| You use the LoadVars class when working with data in the URL string format. This class enables you to load variable data from a text file, or to send and load variable data to and from a server-side script. Note Although variable data contained in a text file can be loaded into Flash, Flash cannot save data to a text file directly; you must use a server-side script to do that.
Creating a LoadVars instance in Flash is simple. Look at the following example: var container:LoadVars = new LoadVars();
This creates a new LoadVars instance named container. To load variables from a URL into a LoadVars instance, use the load() method: container.load("http://www.myDomain.com/myFile.txt");
Note You can get the total number of bytes loaded so far or the total bytes that will be loaded by using the getBytesLoaded() and getBytesTotal() methods of the LoadVars class.
When data has been loaded into a LoadVars instance, you can access it by referencing the name of the particular instance that contains the data you want, followed by the variable name of that piece of data. For example, if you were to load the following string into an instance named myData: name=Jobe&age=28&wife=Kelly
these variable values could be referenced as follows: myData.name myData.age myData.wife
For example: userAge = myData.age;
Here, userAge would have a value of 28. In the same manner, a variable value in a LoadVars instance can be set from within a script in Flash like this: myData.age = 45;
Therefore, a variable value inside a LoadVars instance can be set not only by loading external data into the object but also by setting the value internally (using a script inside the movie). Note When loading variables into a LoadVars instance, Flash will overwrite existing variable values in the object or append new variable values.
If you want to send the variables in a LoadVars instance to a server-side script for processing, use the send() method. That syntax is as follows: myLoadVarsObject.send("http://www.mydomain.com/process.asp");
No response is sent back to Flash when you use this method, so you would use it only to send variable data to the server for processing. The sendAndLoad() method allows you to specify a LoadVars instance whose contents you want to send and the LoadVars instance in which you want the response to load: myLoadVarsObject.sendAndLoad("http://mydomain.com/process.asp", ¬ receivingLoadVarsObject);
In this case, the variables in myLoadVarsObject are sent to the specified URL for processing. The server sends data back to Flash, and that data is loaded into receivingLoadVarsObject. At that point, you can work with the receivingLoadVarsObject to extract the data that the server sent back. If you want to send variables in a LoadVars instance and have that same instance receive the data that the server sends back, simply use the load() method described in the following exercise. Using the toString() method of the LoadVars class, you can create a URL-formatted string that represents the variables/values contained in the object. 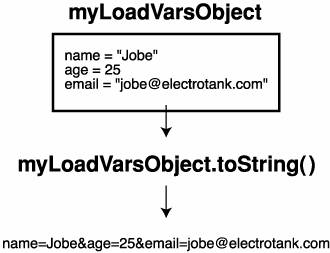 The LoadVars class has two properties: contentType and loaded. The contentType property can be changed before sending out variables, simply giving you the mime type specified in the HTTP header of the loaded document. The loaded property returns true if data has finished loading into the object, false if it has not, and undefined if a load() method has not yet been invoked. There is only one event available to the LoadVars class: onLoad. Use this event to call a function when data has finished loading into the instance. Each time data is loaded into the instance, this event is fired again. To load variables from a specified URL into a LoadVars instance and then call a function when loading is complete, you must do the following: 1. | Define a function.
| 2. | Create a new LoadVars instance using the new LoadVars constructor.
| 3. | Specify the function to be called when the loading has completed.
| 4. | Invoke the load() method of the LoadVars instance.
|
For example: function myFunction(){ trace("Data is loaded"); } var container:LoadVars = new LoadVars(); container.onLoad = myFunction; container.load("http://www.somedomain.com/myFile.asp");
In this example, myFunction() is called when a string of data from the specified URL has been completely loaded into the container LoadVars instance. In the following exercise, you'll create a simple polling system using a LoadVars instance. This instance will send data to and load data from an ASP page in the URL string format. The ASP page contains a server-side script that enables it to read and write to a Microsoft Access database. When variable data is sent to the ASP page, the page interprets the data and updates the values in the database accordingly. When a LoadVars instance requests that data be loaded into it from the ASP page, the page is set up so that it gets the data from the various fields in the database, encodes that data into the URL string format, and sends that data to the LoadVars instance. You will find this scripted page (Poll.asp) and the accompanying database (Poll.mdb) in the Lesson13/Assets folder on your CD-ROM. To complete this lesson successfully, you will need access to a Windows server running IIS so that the server-side script on the ASP page can be executed. Before you begin this exercise, upload Poll.asp and Poll.mdb to a Windows server and make a note of their location (URL). Note The database that you are uploading to the server will be written to by the Poll.asp script. To allow this to occur, you must set the permissions on the database to allow it to be written to. Please contact your web host or your server administrator for help doing this.
1. | Open poll1.fla in the Lesson 13/Start folder.
We already created the layers, frames, frame labels, and movie clips you'll need so that you can focus on the ActionScript.
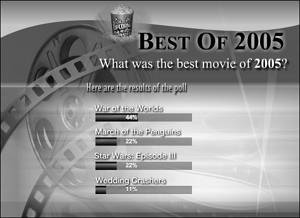
With the Timeline at Frame 1, you'll notice the text, "What was the best movie of 2005?" Below this text is some space and a Submit button. You will place four Radio Button components in the empty space between these two elements. These radio buttons will represent the selection method for your choice of the best movie of 2005. When a user presses the Submit button, the movie will execute a script, sending data to the server (based on which radio button is selected) and at the same time move the playhead to Frame 3, Waiting, in which it will wait for a response from the server. When a response is received (data is loaded into a LoadVars instance), the movie will move to the frame labeled Display. This frame will contain a script used to interpret the response from the server (data will be extracted from the LoadVars instance). The data will be used to determine the percentage of the total number of votes that each of the four movies has received. Each movie's overall percentage value will then be displayed in a text field as well as graphically by using simple bar graphs.
 | 2. | Move the playhead to Frame 1, and select the frame in the layer called Text and Buttons.
You will add four instances of the Radio Button component to this layer (beneath the question but above the Submit button).
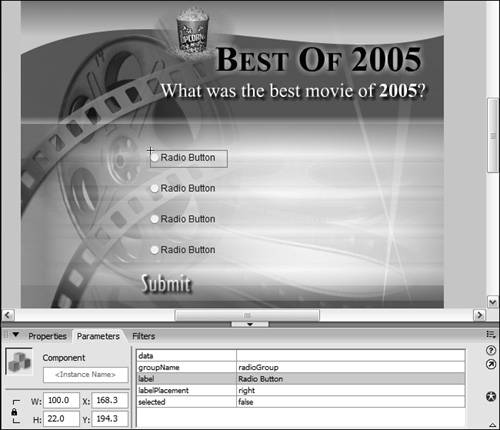
| 3. | Open the Components panel. Locate the Radio Button component and drag four instances of it onto the Stage. Align these four components in a vertical column under the question on the screen.
You have just added four Radio Button components to the Stage. If you select one of them and look at the Property inspector, you'll see a list of the component's properties/parameters, all of which are editable.
Note Although the Property inspector lists what you see as parameters, from an ActionScript standpoint they represent properties of the component. Because this is an ActionScript book, we identify them as properties. The first property, data, should be blank. The data property associates a data value with the selected radio button instance. When the radio button instance is selected by the user as the movie plays, this value can be used by a script to perform a task based on that value.
The next property shown on the Property inspector is groupName. As you learned in Lesson 10, "UI Components," radio button instances are designed to work in groups, allowing only a single radio button within a group to be selected at any time. This property setting enables you to assign the instance to a particular radio button group. You'll use the radioGroup default value for this property; therefore, the four radio button instances we dragged onto the Stage belong to the radioGroup group.
The label property represents the text displayed next to the radio button instance.
Next is the labelPlacement property. You can click the value of this property to display a drop-down list of label placement options. Each option specifies where the label text should be placed relative to the button itself. The default setting is right, which means that the text is shown to the right of the button.
The final property in the Property inspector is selected. This is a Boolean value that determines whether a radio button should start off with a dot, indicating that the button is selected. By default, all radio button instances start with a selected value of false, meaning that the button is not selected. If you want one of your radio buttons to start off selected, you would change the value here to TRue.
 | 4. | Select the top radio button and change its label property to War of the Worlds. Change the label properties of the next three radio buttons to March of the Penguins, Star Wars: Episode III, and Wedding Crashers, respectively.
As you change the label names of the radio buttons (from top to bottom on the screen), you should see the text updated in the component itself.
Note If the text in the component isn't updated, choose Control > Enable Live Preview. You may need to resize a couple of instances horizontally to avoid truncating the appearance of the label text.
| 5. | Change the data property of the four radio buttons to 1, 2, 3, and 4, from top to bottom.
When the movie is published and a radio button is selected, its data property value is set as the data value of the radioGroup. You retrieve this data value for use at any time by accessing the selectedData property of the RadioButtonGroup class. For example, if a radio button with a data property value of 3 were selected, and this radio button were part of a group of radio buttons with a group name of radioGroup, the following syntax would assign a value of 3 to myValue:
var myValue:Number = radioGroup.selectedData;
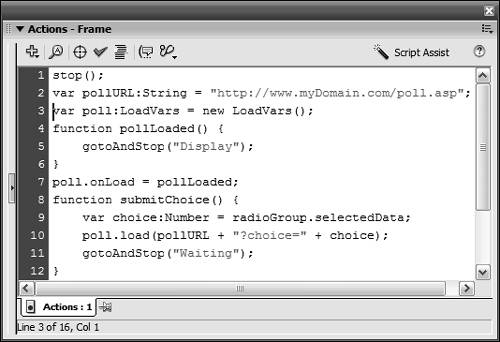
| 6. | With the Actions panel open, select Frame 1 in the Actions layer and add stop();.
This stop() action prevents the movie from playing past Frame 1 until you instruct it to do so.
| 7. | With Frame 1 still selected, add the following line of script:
var pollURL:String = "http://www.myDomain.com/poll.asp";
This creates a variable named pollURL and assigns it a value that represents the location (URL) of the Poll.asp page you uploaded to your server at the beginning of this exercise. (The URL shown should be replaced with the actual location where Poll.asp resides on your server.)
| 8. | Add the following line of script:
var poll:LoadVars = new LoadVars();
This creates a new LoadVars instance. With this instance, we can load data from a remote location and make use of the convenient methods and properties described earlier in this lesson.
| 9. | Define the pollLoaded() function by adding the following script at the end of the current script:
function pollLoaded() { gotoAndStop("Display"); }
This function is used to move the playhead to the frame labeled Display. (The next step explains when this function gets called.)
| 10. | To associate the function we just defined with the onLoad event of the poll LoadVars instance, add the following line of ActionScript:
poll.onLoad = pollLoaded;
This script says that when the last byte of data is completely loaded into the poll LoadVars instance, the pollLoaded() function will be called; therefore, when the data has finished loading, the Timeline will move to the frame labeled Display, as set up in Step 9. In a moment, we'll add a script at the Display label that will use the loaded data to display the results in several bar graphs.
| 11. | Add the following function definition just below the last line of script:
function submitChoice() { var choice:Number = radioGroup.selectedData; poll.load(pollURL + "?choice=" + choice); gotoAndStop("Waiting"); }
 This function, which is used to submit the user's choice for best movie of 2005, is called when the Submit button is clicked. This function, which is used to submit the user's choice for best movie of 2005, is called when the Submit button is clicked.
The first line of the function definition creates a local variable named choice. This variable is assigned the current data value of the radioGroup group of radio buttons by accessing the selectedData property of the RadioButtonGroup class. If the user selected the second radio button, choice would have a value of 2.
The next line of ActionScript invokes the load() method of the poll LoadVars instance. Using an expression, the URL of the Poll.asp page is specified (pollURL), and the variable choice is added to the end of the string to send this to the server using the GET method of transferring variable data. If the user clicked the third radio button, this argument would look something like this:
"http://www.mydomain.com/poll.asp?choice=3"
Remember, everything after the question mark in the argument is a variable. In this case, we're sending a vote (choice=3) to the Poll.asp page. That page will then update the values in the database based on this vote and load the results into the poll LoadVars instance. Those results are used in the actions described in Step 14.
 The final line of script in this function tells Flash to go to the frame labeled Waiting. The movie will stay on this frame until the data is loaded back into Flash from the server. At that point, the pollLoaded() function will be called (as described in Step 10), moving the Timeline to the frame labeled Display. The final line of script in this function tells Flash to go to the frame labeled Waiting. The movie will stay on this frame until the data is loaded back into Flash from the server. At that point, the pollLoaded() function will be called (as described in Step 10), moving the Timeline to the frame labeled Display.
| 12. | Add the following onRelease event handler for the Submit button at the end of Frame 1:
submit_btn.onRelease = function() { submitChoice(); };
The submitChoice() function defined in Step 11 is executed when the Submit button is clicked.
| 13. | Move the playhead to the frame labeled Display.
On this frame are four movie clip instances with horizontal barsone bar graph for each movie on which the user is voting. All are instances of the same movie clip: Their instance names are barGraph1_mc, barGraph2_mc, barGraph3_mc, and barGraph4_mc. Notice that all these instance names include numbers. These numbers are used to associate one bar graph movie clip for each movie in the poll. Each of these instances also includes two text fields topPercent_txt and bottomPercent_txtthat are used to display a textual representation of the percent. Both of these text fields display the same text; bottomPercent_txt is simply there to provide a slight shadow effect behind topPercent_txt. This movie clip also contains a horizontal bar with an instance name of bar_mc. It will be scaled horizontally based on the percentage value.
| 14. | Select the frame in the Actions layer and add the following loop:
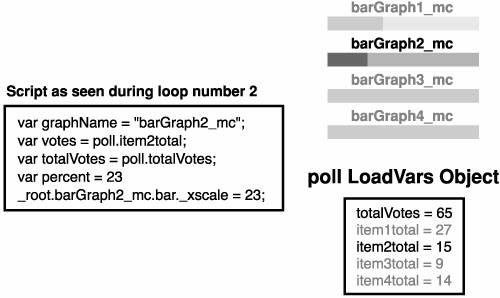
for (var i:Number = 1; i <= 4; ++i) { var graphName:String = "barGraph" + i + "_mc"; var votes:Number = poll["item" + i + "total"]; var totalVotes:Number = poll.totalVotes; var percent:Number = Math.round((votes / totalVotes) * 100); this[graphName].bar_mc._xscale = percent; }
 When the playhead has made it to this frame label (Display), the user has submitted his or her choice and the server has accepted it, added it to the current results, and loaded the resulting data into the poll LoadVars instance. Remember that in Steps 9 and 10 we scripted our movie so that it would move to this frame label only after the resulting data from the server had been loaded completely into the poll LoadVars instance. The script on this frame will now use that data. The variables loaded from the remote script into the LoadVars instance are named totalVotes, item1total, item2total, item3total, and item4total. Obviously, totalVotes has a numeric value representing the total number of all votes submitted, and will be used to figure percentage values. The other variables hold the number of individual votes that each of the movies received. Because these variables have been loaded into the poll LoadVars instance, you can access their values by using the following syntax: When the playhead has made it to this frame label (Display), the user has submitted his or her choice and the server has accepted it, added it to the current results, and loaded the resulting data into the poll LoadVars instance. Remember that in Steps 9 and 10 we scripted our movie so that it would move to this frame label only after the resulting data from the server had been loaded completely into the poll LoadVars instance. The script on this frame will now use that data. The variables loaded from the remote script into the LoadVars instance are named totalVotes, item1total, item2total, item3total, and item4total. Obviously, totalVotes has a numeric value representing the total number of all votes submitted, and will be used to figure percentage values. The other variables hold the number of individual votes that each of the movies received. Because these variables have been loaded into the poll LoadVars instance, you can access their values by using the following syntax:
poll.totalVotes poll.item1total poll.item2total poll.item3total poll.item4total
The loop calculates the percentage of votes received by each movie and scales the bar in the appropriate movie clip instance based on that number. The first line of script in the loop defines the variable graphName. Because the value of this variable is based on the concatenation of the string "barGraph" with the current value of i and the string "_mc", it's actually a reference to the name of the movie clip instance that will be used during the current loop (barGraph1_mc, barGraph2_mc, and so on). Again, using the value of i, the next action in the loop sets a variable called votes equal to the total number of votes for the current item (poll.item1total, poll.item2total, and so on). A variable called totalVotes is then assigned a value that represents the total number of votes cast for all of the movies. Next, the percent variable is calculated by dividing the current item's number of votes by the total votes and multiplying by 100. This is rounded using the Math.round() method of the Math class. Finally, the bar_mc clip in the current movie clip (as referenced by the current value of graphName) is scaled to match the percent value. This loop will repeat these actions four times, scaling each of the bar graphs in the process.
 Note For more information about loops, see Lesson 4, "Arrays and Loops." | 15. | Add the following two lines of ActionScript at the end of the loop but within the loop:
this[graphName].topPercent_txt.text = percent + "%"; this[graphName].bottomPercent_txt.text = percent + "%";
The text to be displayed in the topPercent_txt and bottomPercent_txt text fields, above the scaled bar_mc movie clip instance, is set using the value of the percent variable and concatenating "%" at the end.
| 16. | Choose Control > Test Movie to test your work. Select a movie radio button and click the Submit button.
When you click the Submit button, your choice is sent to the Poll.asp page, which updates the database and returns the results of the poll to the poll LoadVars instance. Your movie then moves to the frame labeled Display and shows you the results.
| 17. | Close the test movie and save your work as poll2.fla.
You have just completed a basic application that uses the LoadVars class to talk to external scripts. You can now use this knowledge to build more complex and useful applications.
|
|