Animating the Face
Over the years, many methods have been used to animate the face. Early on in computer graphics, people tugged and pulled the vertices of the faceframe by agonizing frameto make it move. Later on, people deformed the face directly through the use of bones, clusters, and lattices. All of these methods have their place, but they all have a number of weaknesses, the most important of which is a lack of control over the subtle details of the shape of the face.
Over time, most people learned that the best way to control these subtle details is in a modeling program. The only method that takes advantage of a modeling program is called morphing. In most productions, morphing has become the de facto standard method for animating faces. We covered the basics of modeling morph targets for animation in Chapter 3 and a face rigged with these targets is a great place to start.
Those who are learning facial animation should not start with dialogue animation, but with the simple act of conveying emotion. You don't need to have a character speak for it to be expressive. There are plenty of examples of characters who express themselves quite well without dialogue.
Creating Facial Expressions
Facial expressions convey a lot of emotion, and it's very important to understand these expressions and the way the face communicates emotion. When building an expression, always ask yourself what the character is feeling at the moment; this will help guide you to create the correct face.
Basic Expressions
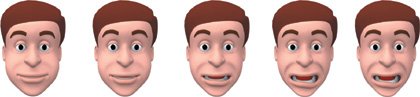
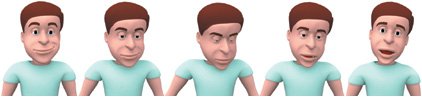
The face can make an infinite number of expressions; luckily, most of them fall into some broad categories: anger, disgust, fear, joy, sadness, surprise. We'll detail these categories here, but you must recognize that they are only the extremesprimary colors among the many possible hues of expression. You could never animate with these six expressions alone, but understanding these basic "faces" can take you a long way toward understanding the underlying mechanics of facial expression.
Anger: The eyes are open, but the brows are down. The mouth is usually open, with the lips tensed and teeth bared. The jaw may be lowered.

Disgust: The whole face is tightened, with the eyes narrowed and the center brow lowered slightly. The mouth is closed and the upper lip pulled into a sneer.

Fear: The mouth is wide open and pulled back at the lower corners. The jaw is dropped, and the eyes are wide, with the brows raised.

Joy: The mouth is pulled upward into a smile, exposing the upper teeth and forcing the cheeks up. The brows are usually relaxed.

Sadness: The mouth is pulled down at the lower corners and may expose the lower teeth. The eyes squint and, when crying, may be closed. The brow is raised only in the middle.

Surprise: The eyes are wide open, and the brows are raised but not furrowed. The mouth is relaxed, and the jaw is slack.

The Upper Face
The upper part of the face is the most important part of an expression. If you want to change the meaning of an expression, look here, to the eyes and brows. The position of the brow probably conveys more information about emotion than any other part of the face. When the brows are lowered, it usually indicates a dark emotion, like anger. When the brows are raised, the face opens up. The eyes can also affect the meaning of an expressionlooking away from a person can indicate shyness, for example.
Symmetry
When you're animating the face, it's always best to introduce asymmetry into the poses to make things look more natural. As with body posing, the dreaded "twins" can creep into facial animation, making your character's face look stale and boring. Still, you need to be careful not to make things too asymmetrical or it will change the meaning of the expression.
When the face pose becomes extremely asymmetrical, the expressions become less clear. If a character flashes a crooked smile, for example, it usually means he's not sincere. If one eyebrow is raised, it can indicate curiosity or insight. (Of course, if your character needs to express such emotions, this knowledge can work to your advantage.)
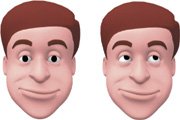
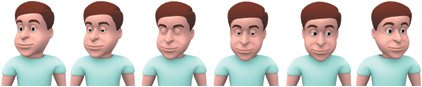
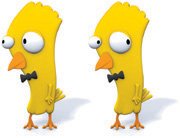
Changing the brow changes emotion. With his brows raised, the character looks happy.

With the same mouth but lowered brows, he looks evil.

A simple change in the eyes can also affect expression.
Complex Expressions
The palette of human emotions contains many subtle hues, and most expressions are not as distinct as the ones we've looked at up to now. Facial expressions are often asymmetrical, and they frequently combine various attributes of the basic expressions. A smiling mouth with lowered brows might indicate evil, for example.
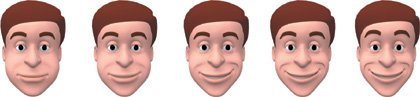
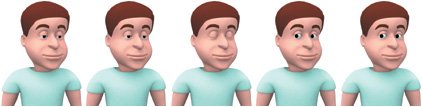
This face is symmetrical.

When creating these expressions, remember the basics you learned from the fundamental expressions. Since the eyes are the most important in conveying emotion, start with them. As with the hips when posing the body, if you get the eyes right, the rest of the pose falls into place. If you ever get confused as to what the expression should be, make the face you want in front of a mirror and try to have the character mimic your own expression.
Lowering one side of the smile a bit introduces asymmetry and makes the face more natural.

Lower it too much, however, and the meaning of the expression changes.

Many complex expressions can be made out of the basic facial expressions.

Animating Facial Expressions
Understanding the basic expressions is a good start, but eventually you'll want to make the face move. All of the basic principles of animation that you learned while animating the body, like anticipation, overlap, and follow through, still apply.
One big reason morphing is used in facial animation is that it gives you the ability to overlap the actions of the face. Like motion in the body, facial actions do not happen all at once. A character may need to smile as he's talking, for instance, or change the position of his brows.
You may want to let one side of the face lead the other. If a character smiles, the left side of the face may begin the smile a frame or two ahead of the right. Also, as in head turns, the eyes tend to take the lead in facial animation. If the mood changes, the change usually begins with the expression of the eyes.
In this smile, the left side leads the right.
In this look of surprise, the upper face leads the lower.
The audience needs to be watching the face when it undergoes a significant change of expression. In these situations, pose the character so that its face is clearly visible to the audience, and keep the character in that pose while the expression changes. If the body moves too much, its motion will overwhelm the action of the face, and if the head moves too much, the audience cannot see the face at all.
Animating the Head
As you begin animating the face, you will also need to study the head and how it moves. A perfectly animated face on a perfectly still head looks horrible. Head motions are necessary to accent and emphasize the facial animation. If a character is talking, his head will nod or bob to accent certain lines of dialogue. If a character is curious, he may cock his head to one side. If the character is disapproving, the head may shake as if to say "no." If a character turns his head, it usually suggests a shift of attention or focus.
Remember the basic principles of animation: If a character turns his head to the right, he will anticipate it with a slight turn to the left. The character may also overshoot the turn slightly and then settle in.
An animated face on a perfectly still head is lifeless.
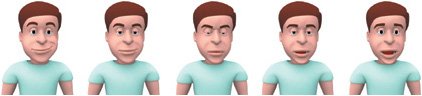
Head and body motions are needed to bring your character to life.
Animating the Eyes
Since the eyes are the most important part of the face, the direction in which the eyes point is also important. Be sure to have your character's eyes firmly fixed on the subject at handif your character is talking to someone but the eyes are looking off into the distance, your character will appear to be staring into space and not paying attention. Of course, this can be used as an effect, but typically you want your characters to be looking at the people they're talking to. Another little tidbit on human interaction is that even when a person moves his head slightlyto accentuate a part of speech, for examplethe eyes tend to remain fixed on their target.
Blinks and Head Turns
During a head turn, most people tend to blink. Adding a blink into your character's head turns will make him seem more alive. Characters also tend to look in the direction of the head turn, so it's best to lead the turn with the eyes: if the head is turning left, the eyes will look left before the head turns.
Blinks and Eye Direction
One problem that often crops up is a character with a lazy eye that seems to float rather than locking onto a specific target. Some of these problems stem from poor eye direction, while others can be fixed with a simple blink. When people change the direction of their gaze, it is almost always accompanied by a blink. If your character looks from left to right, add a blink as the eyes change direction. The blink will help the eyes look less "floaty" and will also draw attention to the change in focus.
There are times when a character's eyes need to travel without blinking. One good example is when a character is reading, when the eyes go from left to right without a blink. Like the head, the eyes move along arcs, dipping slightly in the middle of a turn.
The eyes usually point in the direction of the head turn, and a blink in the middle adds some life.
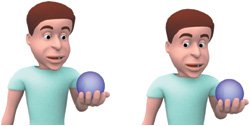
With no blink, this change in eye direction appears floaty.

Adding a blink gives it more purpose and eliminates the float.
Eye Direction and Thought
There is a whole area of research that maps people's thoughts to the directions in which their eyes move. While this is just a theory, psychologists, among others, use this information to find visual cues as to how people think. Try remembering what you had for breakfast without moving your eyes. It's hard, right? Each thought that goes through a person's head triggers an unconscious motion in the eyes, and these motions can actually be mapped and used to the animator's advantage. While the exact motion of the character's eyes will depend on a wide range of stimuli, these rules of thumb can help guide you when animating a character's eyes.
The level of the eye also plays a role in the thought process. Eyes looking up indicate visual thoughts. A character looking up and to the left is remembering an image. Looking up and to the right means he is constructing an image.
The middle levels are associated with sound. Eyes looking directly left mean that a character is remembering something that was said. Looking right would mean he is constructing a new sentence.
The lower levels deal with emotion. Eyes looking diagonally down to the left indicate an internal dialogue, such as when difficult emotions are held inside. Emotions are expressed externally when a person looks diagonally down to the right.

Typically, eye motion to the left means the character is remembering something. Eye motion to the right means the character is constructing something new. This may mean he's thinking out a problem, or it could also mean that he is fabricating a lie or that the character is simply confused or guessing.
Making Eye Contact
The most important aspect of animating the eyes is keeping eye contact focused on the object of interest. If the character's eyes appear to be looking elsewhere, the character looks distracted or spaced out.
Eye contact is a tricky thing, however. The next time you're in a conversation, try to notice how often you make eye contact. Usually, it is only a fraction of the time. In fact, if someone stares at you constantly while talking, it appears abnormal.
Breaking eye contact is as important as making it. If a character becomes embarrassed or evasive, it tends to look away. Confident people usually make frequent eye contact when talking to others. On a related note, nervous and surprised people can be wide-eyed, whereas untrustworthy and defensive people often squint and dart their eyes from left to right.
Psychologists have discovered that infants are very sensitive to eye direction, so some of this awareness may be hard-wired into our brains. Among social species, eye direction indicates where another individual is looking and what that individual's future actions might be.
Eye direction is important. The audience will tend to look at whatever the character is looking at.
Eyelids
Eyelids are most commonly used for blinking. Characters should blink every once in a while just so that they look alive. Blinks can also be used to great effect to draw attention to the character's face, such as in a change of eye direction.
When animating the eyelids, the first instinct is to keep the lids fully open so that the character seems alert. If you keep the lids 100 percent open, however, you can't open them wider, such as when the character is shocked or surprised. It is better to keep the "normal" lid of the character somewhere around 80 percent open instead. This keeps the character alert, but in a relaxed way. Plus, it gives you some flexibility for opening the eyes wider.
The lids should usually be kept slightly relaxed so that they can open wider.

Warm personalities open the eyes wider, which can also be a sign of intelligence or attentive listening. These open communicators make use of "smiling eyes"; in the most extreme cases, a smiling cheek will lift so high that it affects the lower outline of the eye, pushing it up into a crescent or smiling eye. In contrast, an angry person may stare with squinted eyes for an uncomfortable length of time. It has also been discovered that people close their eyes briefly before giving a false answer.
Pupils
Dilation of the pupils is one area that is often overlooked when animating a character. In a realistic scene, pupil dilation from moment to moment is usually very subtle, but it can go a long way to indicate mood. Think of the scene in Jurassic Park where the T. rex looks in the window of the car and the pupil contracts when the flashlight beam hits it. The motion of the eye itself is what kept the character from appearing to be a giant puppet. This is an extreme example, and the size of the pupil usually remains fairly constant within a scene, changing between scenes as the character's mood and environment change.
Typically, the bigger the pupil, the more innocent and childlike a character seems. A character with small pupils seems to have "beady" eyes and appears to be less trustworthy. The quality of light in the scene also affects the pupils. More light results in smaller pupils; less light results in bigger pupils. If a character is dying of thirst in a sun-parched desert, make sure his pupils match the situation.
Chapter One. Basics of Character Design
- Chapter One. Basics of Character Design
- Approaching Design as an Artist
- Design Styles
- Designing a Character
- Finalizing Your Design
Chapter Two. Modeling Characters
Chapter Three. Rigging Characters
- Chapter Three. Rigging Characters
- Hierarchies and Character Animation
- Facial Rigging
- Mesh Deformation
- Refining Rigs
- Conclusion
Chapter Four. Basics of Animation
- Chapter Four. Basics of Animation
- Understanding Motion
- Animation Interfaces
- The Language of Movement
- Secondary Action
- Conclusion
Chapter Five. Creating Strong Poses
- Chapter Five. Creating Strong Poses
- Posing the Body Naturally
- Creating Appealing Poses
- Animating with Poses
- Conclusion
Chapter Six. Walking and Locomotion
- Chapter Six. Walking and Locomotion
- The Mechanics of Walking
- Animating Walks
- Beyond Walking
- Adding Personality to a Walk
- Transitions
- Conclusion
Chapter Seven. Facial and Dialogue Animation
Chapter Eight. Animal Motion
Chapter Nine. Acting
- Chapter Nine. Acting
- Acting Vs. Animating
- Acting and Story
- Acting Technique
- Acting and the Body
- Other Techniques
- Conclusion
Chapter Ten. Directing and Filmmaking
EAN: 2147483647
Pages: 84
- ERP Systems Impact on Organizations
- Challenging the Unpredictable: Changeable Order Management Systems
- Enterprise Application Integration: New Solutions for a Solved Problem or a Challenging Research Field?
- Distributed Data Warehouse for Geo-spatial Services
- Development of Interactive Web Sites to Enhance Police/Community Relations
