How Terminal Server Printing Works
Now that you understand how printing works in standard Windows environments, let's see how printing can be configured in Terminal Server environments. Before we get too far into the details of Terminal Server printing, we need to "redefine" some standard printing terms for the Terminal Server environment.
Even with the infinite number of printing scenarios available in the real world, there are only two major types of printing scenarios available with Terminal Server. All Terminal Server printing is a variation on one of the following two themes:
-
Server Printers. Server printers in Terminal Server environments are printers in which the Terminal Server has direct access to the print queue. This can include standard network printers that are accessible via a \\servername\printername share. It can also include printers where the print queue is located locally on a Terminal Server itself, even including printers that are directly connected to the Terminal Server. Think of server printers as printers that are "installed" on the server.
-
Client Printers These are printers that are available to a user's client device before an RDP session is launched. This can include printers that are physically attached to a client device or printers that are logically mapped through the network. Think of these as printers that are "installed" on the RDP client.
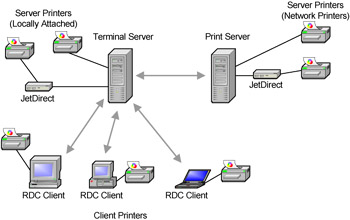
Figure 8.2: The various types of Terminal Server printers
It's important that you understand the differences between server and client printers in Terminal Server environments. Each type has advantages and disadvantages and is used or configured differently. For these reasons, we'll look at server printers and client printers separately in this chapter, beginning now with server printers.
Server Printers
A "server printer" is any printer that is installed on a Terminal Server. In technical terms, this means that the server has direct access to the print queue. This print queue can be Windows or NetWare, client or server based. Basically, any printer that can be accessed via a \\computername\printername share is a server printer.
A server printer can also be a printer that has a print queue directly on a Terminal Server. This could be a printer that is physically connected to a local LPT or USB port of a server or an IP printer that has a print queue locally on a Terminal Server.
In Terminal Server environments, server printers work just like "regular" printers in traditional environments. Figure 8.3 outlines this process.
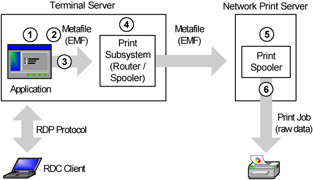
Figure 8.3: Server Printers in a Terminal Server environment
-
The user prints from his application running on the Terminal Server.
-
The GDI creates the EMF file on the Terminal Server.
-
The GDI sends the EMF file to the printer subsystem.
-
The print router on the Terminal Server sends the EMF file to the network print server.
-
The network print server receives the EMF file and transfers it to its print spooler. The spooler renders the print job in preparation for printing.
-
The print job is transferred to a printer port where a print monitor service transfers it to the physical printer.
In most environments, users' network printers are already being mapped via logon scripts or they're configured as part of a user's roaming profile. In these cases, you don't really have to do anything special to make them available via Terminal Server sessions. Users can even set up their own network printers if they have the permissions to connect to them.
In general, you'll notice that if the print servers are on the same network as the Terminal Servers, then printing performance is excellent. In fact, printing in this type of environment is no different than printing in any network environment. This is most often seen when the users, Terminal Servers, and printers are all located in the same building.
Unfortunately, this server printer performance is not as good in remote environments where the users and printer are located on one side of a WAN and the Terminal Server is located in another. In such cases, (as shown in Figure 8.4) the voluminous print jobs have to reach the print server over the WAN link which is also shared with all the RDP session traffic.
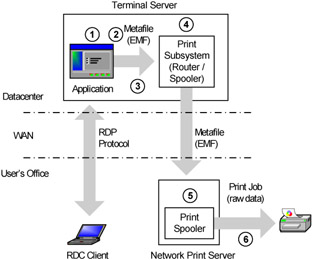
Figure 8.4: Server printers are not efficient when the Terminal Servers are remote
Advantages of Using Server Printers
-
Decent performance when the Terminal Server and print server are on the same LAN.
-
Reliable.
-
Users receive the same printers no matter where they log in
Disadvantages of Using Server Printers
-
If "fat" clients are used, you'll need to set up the printer for the user on the client and the Terminal Server.
-
Users must browse the network for printers that are not preconfigured.
-
Printers must be manually configured by user or group.
-
To get good performance, the print server and the printer must be located on the same LAN as the Terminal Server.
-
Users receive the same printers no matter where they log in.
Client Printers
In Terminal Server environments, any printer that's available on a user's client device is known as a "client printer." Client printers can be printers that are physically attached to the client device (perhaps via a USB or LPT port) or they can be network printers that were mapped before the user's RDP session started. Either way, Terminal Server 2003 can automatically make client printers available on the server via a user's RDP session. This lets users print to printers that they are familiar with.
Both the RDP ActiveX control (web client) and the full RDC client support printing to client printers. Some third party RDP client software is available for other operating systems, but their printing capabilities are pretty varied. (These clients are discussed in full in Chapter 10.) For the sake of this chapter we will focus only on the RDP clients from Microsoft.
How Client Printers Work
Before we can look at how client printers are configured, it's important to understand how client printers are used by Terminal Server.
When a user connects to a Terminal Server, his local RDP client software automatically makes the printers he has installed locally available to him from within his server session. It does this by dynamically creating printers that print to special printer ports (also dynamically created) that point back to the client device. These printers will have a name like "Printer name (from Client name)in Session #." (For example, "Lexmark Optra E312 (from LAPTOP42) in session 14.") Furthermore, these printers are configured on special ports with names like "TS001" and "TS002" (as seen from the "Ports" tab of the printer's property page. Each printer is created with permissions that allow only that user to print to it.
Technically, power users and administrators can print to any printer, so they'll see all the printers from all users on the server. Regular users, however, will only see their own printers. When a user needs to print a document from within a Terminal Server application, he invokes the print job as usual. From within his session, he'll see his client device's printers listed within the application's printing interface. To the user, these printers look like regular printers. The user has no idea that these printers are actually mapped back to his local printers through the RDP protocol.
When the user prints to one of his client printers, the process outlined in Figure 8.5 (next page) takes place.
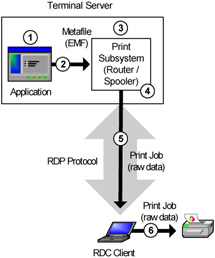
Figure 8.5: Printing to a client printer attached locally to a client device
-
The user prints from his application running on the Terminal Server.
-
The GDI creates the EMF file on the Terminal Server.
-
The EMF file is sent to the print spooler (via the print router) on the Terminal Server.
-
If the print drivers for the client printer are load on the Terminal Server, the Terminal Server's print spooler renders the print job. If the proper drivers are not loaded on the Terminal Server, the user's print job cannot be completed.
-
The print job is sent from the Terminal Server to the client device via a printing virtual channel as part of the RDP protocol.
-
The client device receives the print job. Because the server had the print drivers loaded for the client's printer, the print job is rendered specifically for the client's printer, and the client device's local printer subsystem can immediately process the job and send it to the printer.
Upon looking at the client printing process in Figure 8.5, you can probably see that there is the potential for a severe performance problem. The raw print job is usually quite large, and it can take a long time to transmit to the client's printer, especially if the user is connected via a dial-up line. Additionally, the performance of the RDP session can be degraded because bandwidth is being consumed by the print job that is being sent to the client.
Now consider what happens when printing to a client network printer. (Remember that a client network printer is a network printer that was mapped from the user's client workstation before their session with the Terminal Server was started.)
Conceptually, this process is similar to printing to a locally-attached client printer. However, since this is a network printer, the client must take the additional step of sending the print job to the network print server once it's received from the Terminal Server. Figure 8.6 outlines this process.
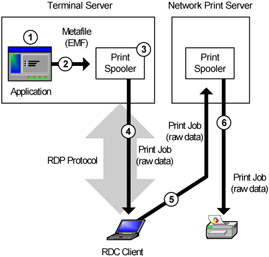
Figure 8.6: Terminal Server printing to a client network printer
-
The user prints from his application running on the Terminal Server.
-
The GDI creates the EMF file on the Terminal Server.
-
Since the printer is a client-mapped printer, the print job is rendered on the Terminal Server.
-
The Terminal Server sends the print job to the mapped port through the printing virtual channel of the RDP protocol.
-
The client device receives the print job and forwards it to the network print server.
-
The print server receives the print job and sends it to the printer.
At first glance you might wonder why Terminal Server is not smart enough to print directly to the network print server. It would seem that doing so would alleviate the need for the EMF file to travel down from the server to the client and back. Unfortunately, in reality, this is not feasible. For example, there can be situations where the print server from Figure 8.6 is only available to the client device and not to the Terminal Server., or maybe there's a firewall on the network that only allows RDP traffic on port 3389 through.
Regardless of the specifics of a situation, the folks at Microsoft who designed Windows knew that they couldn't guarantee that Terminal Server had access to the print server. Therefore, they had to take the lowest common denominator and send the print jobs down to the client, even if that meant that in some cases the client turned around and sent the print jobs right back up to the server.
Of course an easy way to combat this potential inefficiency would be to simply map the network printer from within the user's Terminal Server session, thereby allowing the server to send the print job directly to the network print server. Sound familiar? It should, because this would be the exact description of a server printer as outlined back in Figure 8.3.
Another way to combat this inefficiency would be to use a third-party printing product, as discussed later in this chapter.
In addition to the performance issues, there's one more potential downside to using client printers. As you saw in Figures 8.5 and 8.6, a user's print job is initiated on the Terminal Server when client printer mappings are used. Because of this, the server needs to have the necessary drivers installed for the client's printer so that it can create the print job. After all, it's the server that will be creating print jobs from user sessions, not the client device.
If you're lucking enough to have an environment in which your users have only a few different types of printers, then this might not be a problem. However, if you have hundreds of users with hundreds of different printers, installing and configuring printer drivers on your Terminal Servers can be a nightmare. We'll study the use and management of printer drivers on Terminal Servers a bit later in this chapter.
Another downside to using client printers in Terminal Server environments is that in order for a user to be able to use a printer, it must (by definition) be installed and configured locally on their client device. If your users have a lot of printers already configured on their workstations, then this might be okay. However, this could also be the exact opposite of what you're trying to do by using Terminal Server. Most likely, you want to move away from having to configure things on individual users' workstations. If a user installs, deletes, or otherwise modifies their local workstation printers (not your problem), it will affect how they print from their Terminal Server session (definitely your problem).
Advantages of Printing with Mapped Client Printers
-
Seamless connection of printers.
-
Users see printers that they are familiar with.
-
All supported local printers are available.
-
Quick setup for existing client printers.
Disadvantages of Printing with Mapped Client Printers
-
Poor print performance.
-
Bandwidth intensive.
-
Print jobs must be rendered on the server, which is processor-intensive.
-
Printer drivers must be installed on the Terminal Server.
-
Printers must be installed and configured on local clients.
-
Users can update, modify, or delete their local printers, directly impacting the client printer mappings.
Enabling Client Printer Support
By definition, client printers are already set up and configured on the client devices, so there is nothing else that you need to do there. All client printer mapping configuration is done on your Terminal Servers. From a high level, allowing users to print to their client printers involves two steps:
-
Install the printer drivers on your Terminal Servers.
-
Configure your servers to use client printers.
Step 1. Install Printer Drivers
Since client printers will only work when the printer drivers are installed on the Terminal Server, the first thing you need to do when using client printers is make sure that the proper drivers are installed on your server. In the real world, there are many issues associated with the installation and management of printer drivers on Terminal Servers. We'll look at the specific details in the "Managing Printer Drivers" section of this chapter.
Step 2. Configure the Terminal Server to Connect Client Printers
After the printer drivers are installed, you need to configure your Terminal Server to connect clients' printers when their RDP sessions are started. To do this, you'll have to configure Terminal Server permissions, the RDP connection listener, and the user's domain account properties.
Step 2A: Verify Terminal Server Permissions for Printing
In order for users to be able to print on a Terminal Server, users will need Read, Write, Execute, and List Folder Contents access to the print spooler's directory, %SystemRoot%\System32\Spool. Even though these are not the default settings for Windows Server 2003 "out of the box," these settings have been a Terminal Services best practice since the beginning of Terminal Services.
Step 2B: Verify RDP Listener Configuration for Client Printer Use
With the Terminal Services Configuration tool, you can configure the client printer options for all users that use a particular connection. In the "client settings" tab section of the connection properties, make sure that the "Windows printer mapping" and "LPT port mapping" boxes are not checked in the "Disable the following" section. Obviously, checking either one of these boxes will prevent client printers from being mapped.
Also, if the "Use connection settings from user settings" option is checked, then you will need to verify that the user's account is properly configured for client printer mapping.
Instead of configuring these options as an RDP connection property on each server, you can apply them via a GPO. (See Chapter 6 for more information about GPOs.) These client printer mapping properties can be found within a GPO via the following path:
Computer Configuration\Administrative Templates\Windows Components\ Terminal Services\Client Server Data Redirection
The settings configured here will then apply to any Windows 2003 Terminal Server that is in an OU where this GPO has been applied.
Step 2C: Configure User Account Settings
You can also configure client printer connection settings on a user-by-user basis. In Active Directory environments, the client printer mapping properties are part of the user's AD object (Active Directory Users and Computers | User Object | Environment Tab).
Selecting "Connect Client Printers at Logon" will cause the user's client printer to automatically be created when they log onto a Terminal Server. When the user logs off and all his print jobs have printed, the printer is automatically deleted. If you do not set the "Connect Client Printers at Logon" option, a user will still be able to manually map to his client printer, it just will not be created for him automatically.
Printer Driver Problems when Using Client Printer Mapping
Remember that your Terminal Server must have the proper printer drivers installed for users to be able to print to their client printers since the print jobs are rendered and spooled on the server.
At first glance, this doesn't seem like it would be too much of a problem. However, there can be complications. For example, how does a Terminal Server know if it has the proper driver installed for a user's client printers?
When a user with client printer mapping enabled starts a Terminal Server session, the server checks the driver names of the printers install on the user's client device. It then looks at all the names of the drivers that are installed on the server. If the two names are the same, the server knows that it has the appropriate drivers installed to support that printer and the printer is automatically mapped for that user's session. However, if there's not an exact match, then that printer is skipped and the Terminal Server moves on to the next client printer.
For example, if the Terminal server has a driver installed called "HP OfficeJet 40xi" and the RDP client has a printer installed that uses a driver called "HP OfficeJet 40xi," the server will know that there's a match. However, if the client has a printer that uses a driver called "HP DeskJet 500," then obviously the server knows that there is not a match.
This works fine in when Windows 2000 and Windows XP clients connect to Windows 2000/2003 Terminal Servers. Since all these platforms use the same printer drivers, the names of the drivers are guaranteed to match. However, this leads to an interesting situation if your client devices are running anything prior to Windows 2000, including ME, 98, 95, or NT. The problem arises from the fact that the same printer driver written for two different versions of Windows doesn't necessarily use the exact same printer driver names. For example, the Windows 95/98 version of the driver for a LaserJet 5P printer is named "Hewlett Packard LaserJet 5P," while that printer's Windows 2000/XP/2003 driver is named "HP LaserJet 5P." To humans, these two names are the same, but to Terminal Server, the fact that the client's printer uses a driver that starts with "Hewlett Packard" and the server's driver starts with "HP" means that the server thinks these two names are different. To a Terminal Server, these two names are no more similar than the names "HP LaserJet 5P" and "Tandy LP-1000."
In the situation of a client connecting from Windows 98 with an HP LaserJet 5P printer attached, the server would not map that printer—even if it had the proper drivers installed—since the print drivers' names didn't match.
Workaround Solution: Client to Server Print Driver Mapping
To address this, it's possible for you to correlate the names of printer drivers on your server with the names of printer drivers on your users' clients. For example, you can tell the server that the client print driver "Hewlett Packard LaserJet 5P" is the same as the server print driver "HP LaserJet 5P." Keep in mind that you only need to do this if (1) you are using client printer mappings and (2) your clients are not running Windows 2000 or Windows XP.
In order to enable printer driver mapping, you need to place a file on your Terminal Server that contains the pairs of client and server driver names. In previous versions of Terminal Server, this was done via a mapping file called "wtsuprn.inf" located in the %systemroot%\system32\ folder. However, this file does not exist by default in Windows Server 2003, and Windows does not look for it.
To create a mapping file in Windows 2003, you must add two registry values:
-
Key: HKLM\SYSTEM\CurrentControlSet\
-
Control\Terminal Server\Wds\rdpwd
-
Type: REG_SZ
-
Value: PrinterMappingINFName
-
Data: Name of the .INF file that contains printer driver name mappings. (For example, c:\winnt\inf\printsubs.inf)
-
Key: HKLM\SYSTEM\CurrentControlSet\
-
Control\Terminal Server\Wds\rdpwd
-
Type: REG_SZ
-
Value: PrinterMappingINFSection
-
Data: Name of the section in the .INF file that contains the actual mappings. (For example: Printers)
Once you've finished adding your registry entries you should restart the spooler service or reboot the Terminal Server to allow these changes to take effect. After you add the new registry values, you'll need to create an .INF file that includes the driver names you want to use for client-side to server-side mappings. You file will look something like this:
;PRINTSUBS.INF ;This file contains Mappings for Client driver to Server driver printer connections [Printers] ;"Client Printer Driver Name" = "Server Printer Drive Name" "Hewlett Packard LaserJet 5P" = "HP LaserJet 5P"
You can create this file with Notepad and save it within an .INF filename extension in the %SystemRoot%\System32\ directory. Using this example, you would specify the printsubs.inf file name that you just created in the PrinterMappingINFName registry value and "Printers" in the PrinterMappingINFSection registry value.
The printer driver names you place in this file are case sensitive and space sensitive. Basically, everything between the quotation marks must match the printer name exactly. As with many .INF files, the leading semicolon (;) indicates that the line is a comment and should be ignored. When you use this file, be aware that you can have more than one client printer mapped to a single server print driver.
Creating a printer driver mapping file is more of an art than a science. Fortunately, the some very kind people run a website called www.printingsupport.com. This site has downloadable printer mapping files that you can use in your environment.
Once you get your mapping file created, you'll need to make sure that it exists on every Terminal Server where you want these printer driver mappings to be applied. Keep in mind that this mapping file merely tells the server which of its already installed drivers correlate to client printer drivers. You'll also need to install the actual printer drivers on your Terminal Server when you use this file.
If your .INF mapping file contains any syntax errors (other than a misspelled driver name inside the quotes), you may receive the following messages in the event log:
Event 1110: "Error processing ntprint.inf. If the file on the system is corrupt, you can restore it from the installation media.
This message is misleading since it refers to "ntprint.inf" and not your custom filename. This error usually means that the custom .INF file that the system is processing has errors in it. The most common error is that you will create a custom mapping file with no entries in it. You new .INF file must have at least one mapping in its printer name mapping section and the lines containing your mappings must not start with a semicolon. If the custom .INF file has a blank name-mapping section, you'll receive the Event 1110 errors in the event log.
Finding the Exact Printer Driver Names
In order to be able to map printer drivers between your Terminal Server and clients, you need to know the exact printer driver name for both the server and the client. You can get this information from the printer properties dialog box (Right-click Printer | Properties). On Windows 9x computers, the driver is listed in the "Print using the following driver" box. On Windows 2003 servers the driver box is on the "Advanced" tab. Because the name of the printer driver can vary on the workstation depending on the platform, make sure you have the right driver name for the each client platform that is being used. For example, if you see "HP LaserJet 4000 Series PCL 5/5e," be sure to note all the punctuation, spaces, and case sensitivity.
If you already have the driver installed on your Terminal Server, but you do not have a printer installed where you can check the properties, you can always view the driver name from the list of drivers installed on the server. Just open the Printers applet in control panel and use the "Drivers" tab from the File | Server Proprieties applet. This will show you a complete list of drivers installed on your Terminal Server.
Once the driver names have been added to your mapping file, your users will be able to print to their client printers from Terminal Server sessions. You do not have to reboot your server after you change the mapping file. Simply log the user off and then back on.
Sequencing of Client Printer Driver Mapping
When a user with client printers logs on to a Terminal Server, the server goes through several steps to try to find an appropriate printer driver to use:
-
The list of the client's local printers is enumerated from the registry.
-
The server queries the printer driver string names on the client.
-
The server looks for the client printer driver name in the printer driver mapping .INF file.
-
If no match is found, the server looks for a driver name match in the [Previous Names] section of built-in "ntprint.inf" file.
-
If the server still cannot find any mapping information, it checks to see if the driver is already installed. To do this, it looks at HKLM\System\CurrentControSet\Control\Print\Environments\Windows NT x86\Drivers\ in the registry.
-
If it can't find the printer driver information in the registry, that means that the printer driver is not installed. As a last resort, the server will check to see if the client's printer is one of the hundreds of standard printers that are available with Windows. To do this, it goes back to the built-in ntprint.inf file and looks in the [Manufacturer] section. If a match is found, the server automatically installs the driver by extracting in from the built-in Driver.cab file located in the %systemroot%\Driver Cache\i386 folder on the server.
-
Once any of these steps is successful, the server creates a dynamic printer port that maps back to the real printer on the user's client device. This port is mapped through an RDP virtual channel. Then, the server creates a printer object with the appropriate permissions (and using the appropriate drivers) for the user.
-
If the server is not able to find an appropriate driver using any of the previous methods, then the client's printer is not mapped for the session and an event that states that the printer could not be redirected is written to the event log.
-
The server starts this entire process over again for the next printer on the client's list.
In general, Terminal Server 2003's printer driver installation process works fairly well. There used to be problems with incompatible drivers getting installed and crashing the server, but that hasn't really been a problem since the NT 4 days. (Back then, a lot of regular drivers would blue screen the server if multiple users tried to print at the same time. Ouch!)
Limiting the Number of Drivers Installed
One of the big concerns that many administrators have is the number of printer drivers that are installed on their servers. Since users with all types of printers cause drivers to be installed on the Terminal Server, the server will need to manage a lot of drivers. This can be a problem whenever client printers are used, regardless of the client operating system. (Remember that the mapping file is helpful when using older clients, but even new Windows XP clients still cause printer drivers to get installed on your Terminal Servers.)
In order to prevent too many drivers from getting installed on your server, there are two options that you can implement:
-
Map multiple client printer drivers to a single server driver.
-
Use a third-party "driverless" printing solution (discussed later).
Let's look at how we can use the printer driver mapping .INF file to control the number of drivers that are installed on a Terminal Server. Thinking back to the previous description of this file, you'll remember that it can contain multiple client driver entries for a single server driver. This means that you can use a single printer driver on your server to support dozens (or even hundreds) of different client printer models. For example, it's widely known that many LaserJet drivers will work with other LaserJet printers. You might decide that you want all client printers called HP LaserJet 4, HP LaserJet 4M, HP LaserJet 4 Plus, HP LaserJet 4M Plus, HP LaserJet 4L, and HP LaserJet 4ML to use the same "HP LaserJet 4" driver. This will let you provide a single server driver for six different printer models. To do this, you could configure your .INF mapping file to look like this:
[Printers] ;"Client Printer Driver Name" = "Server Printer Drive Name" "HP LaserJet 4M" = "HP LaserJet 4" "HP LaserJet 4 Plus" = "HP LaserJet 4" "HP LaserJet 4M Plus" = "HP LaserJet 4" "HP LaserJet 4L" = "HP LaserJet 4" "HP LaserJet 4ML" = "HP LaserJet 4"
In fact, HP has a completely "generic" LaserJet driver (called "HP LaserJet") that you could use for every single LaserJet printer, and a generic DeskJet driver (called "HP DeskJet") that you could use for every single DeskJet printer. Adding all these entries to your .INF file would allow you to support hundreds of different types of printers with only two different drivers.
You can also use these "alternate printer mappings" to map a driver from one vendor to support a printer from another vendor. In addition to having fewer drivers to support on your servers, this can also lead to a potential performance gain. This can happen because the spooled print file, which is transmitted down the RDP stream to the RDP client, is created with the printer driver. All printer drivers are not created equal. Some printer drivers are very efficient and create very efficient spool files. This is usually the case with name-brand printers. However, the whole reason that we need to use client printer mapping in the first place is because we, as administrators, do not have control over the printers that our users have connected locally to their clients. They probably didn't buy the name brand printer that we recommended. Instead, they bought the cheapest $25 printer that they could find at Walmart. These printers tend to have very inefficient drivers, which means that they can easily create spooled print files that are several megabytes per page. (To be fair, the people who created these drivers probably never imagined that anyone would actually want to transmit the spooled print files across a slow network.)
To combat this, you can usually find alternate drivers that work for some printers that are much more efficient than the printer's native drivers. You can also use alternate black-and-white drivers for color printers. By definition, black-and-white drivers will produce smaller spool files since they're monochrome instead of full color. Of course, your users will not be able to print in color, but monochrome printing is better than nothing.
All this alternate printer driver mapping leads to one question: Which drivers can successfully be substituted for which printers?
Of course you can find out by trial and error on your own, but most likely you have better ways to spend your time. Fortunately, the Internet is full of free resources like www.printingsupport.com whose sole purpose is to provide printer driver mapping information for Terminal Server administrators.
The only real drawback to using alternate printer driver mapping is that some of the functionality of the original printer driver on the Terminal Server may not work on the printer. These functions are usually minor, like multiple paper tray settings, stapling, or duplexing options.
Advantages of Alternate Printer Driver Mapping
-
Allows users to print to printers whose native drivers are not supported.
-
Controls the total number of printer drivers in your server farm.
-
Allows you to substitute efficient printer drivers for inefficient ones
Disadvantages of Alternate Printer Driver Mapping
-
Some printer functionality could be lost by using alternate drivers.
-
You need to figure out which alternate drivers work for each printer.
-
You must manually map the generic driver to the exact name of every driver it is to replace.
-
If you make this change on one server, it needs to propagate to the other servers.
Improving the Performance of Client Printing
As discussed previously, the architecture behind the use of client printers is fundamentally inefficient since large spooled print jobs must be sent via the RDP stream to the client to be printed. Even though some of the other printing methods (such as server printers) are much more efficient than using client printers, the convenience of client printers is a compelling reason to use them. Because of this, there are some aspects of their performance that can be addressed, including:
-
Reducing the DPI of the printers.
-
Implementing a third party printing solution.
Reducing the Printer DPI Settings
Because the entire spooled print job must be sent to the client when client printer mapping is enabled, users with slow connections may see degraded session performance. This amount of degradation is generally proportional to the size of the print job being sent. Therefore, reducing the size of the print job reduces the impact printing has on the client session. By reducing the DPI of the printer from 600 DPI to 300 DPI, you essentially reduce the print job size by 75%.
Of course an additional benefit of this is that print jobs finish faster since the amount of data being transmitted is smaller. The drawback to this is that jobs that require a high resolution will look "grainy" and this will not be acceptable to some users. For normal text, however, 300 DPI is just fine.
Advantages of changing Printer DPI settings
-
Increases overall RDP session performance while printing, especially over slow connections.
-
Can possibly speed up printing.
Disadvantages of changing Printer DPI settings
-
Documents requiring a high-resolution may look grainy.
EAN: 2147483647
Pages: 126