Section 2.4. XAML Applications and Visual Studio
2.4. XAML Applications and Visual StudioWorking in Visual Studio, you'll be able to select a number of WinFX Applications, and the project files and application manifest will be generated automatically. You can choose to create a WinFX Windows executable, a WinFX WebBrowser application, a WinFX Service Library (which creates a WinFX library comprising the definition and implementation of a WinFX Service), or a WinFX Custom Control Library (for extending WinFX controls). However, you'll still have to edit both the XAML and associated C# or VB.NET codebehind files manually. If you've downloaded and installed the WinFX extensions for Visual Studio 2005, fire up the IDE. Choose Create Project and you'll be presented with a list of options, as illustrated in Figure 2-3. Figure 2-3. WinFX application options in Visual Studio 2005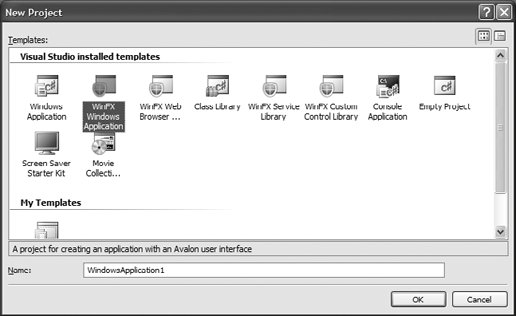 To create an application, choose either WinFX Windows Application or WinFX WebBrowser Application, depending on whether you want to deploy the application as an executable or for use within a web browser. Give the project a name and click OK. Visual Studio automatically generates the default XAML and codebehind files. In Figure 2-4, you can see that it has generated Windows1.xaml (Example 2-5) and Windows1.xaml.cs (Example 2-6). The language of the codebehind file depends on your choice of .NET-supported languages. I have chosen C#, so the generated files will reflect that choice. Figure 2-4. Default files generated by Visual C# 2005 Express Edition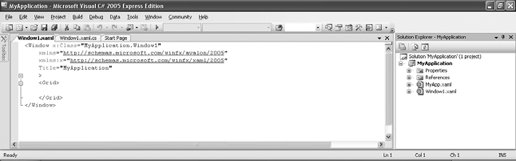
If you look carefully in the SolutionExplorer, you'll note that Visual Studio generates additional XAML and C# files to represent the application. Because you normally won't be working with the application-level files and instead will work on individual pages, Visual Studio will only display the first Window and its codebehind file after generating the appropriate code. You can see the relationship between the two files in Examples 2-3 and 2-4. The StartupUri value for the Application element is Window1.xaml, which is the XAML file that automatically opens for editing after Visual Studio generates the files for the application. Example 2-3. Default C# code generated for the application
Example 2-4. Default XAML code generated for the application
The automatically generated XAML (Example 2-5) and codebehind file (Example 2-6) contain the shell of a XAML definition and include, by default, the root Window element and an instance of the Panel-derived Grid element. Microsoft is encouraging developers to use Grid for base user-interface design, primarily for its flexibility in positioning elements on the page. Example 2-5. Default XAML code generated by Visual Studio 2005
Example 2-6. Default C# code generated by Visual Studio 2005
First, add a Button element with the name MyButton and a Click handler called ChangeMe to Window1.xaml. Your code should look something like Example 2-7 when you have finished. Example 2-7. Adding a Button with a handler to Window1.xaml
Next, open Window1.xaml.cs. Inside the partial class definition for Window1, you'll need to add an event handler for the button you just added to the XAML file. Add the following code: void ChangeMe(object sender, RoutedEventArgs eventArgs) { count++; MyButton.Content = "You have clicked " + count + " times!"; } Don't forget to add the variable count as a member of the class. Your code should look something like Example 2-8 when you have finished. When you reference the Button in Window1.xaml in code, make sure that you use the Name you assigned to the Button in the XAML file (MyButton in this example). There is no need to declare the element again; it already exists in the partial class generated when the XAML file is "compiled." It will be joined with the partial class defined in the codebehind file when the solution is built to form a cohesive class. This is why you can reference elements by the Name with which they are declared in the XAML file within the codebehind file as well. Example 2-8. Adding an event handler to Window1.xaml.cs
After adding elements and the appropriate handlers, logic, etc., you'll build the solution the same way you've always built applications using Visual Studio. Choose Build, then Build Solution (or just hit F6), and wait for the application to compile. You can then test, debug (Figure 2-5), and deploy the application just as you would any other application created using Visual Studio. Save the changes to the files and build the solution, then run the application. The application will appear as an aqua button filling the entire application (Figure 2-5). The text will initially read "This is a test." Click on the button. You'll notice that the handler you implemented (ChangeMe) executed and replaced the text with "You have clicked 5 times!". Figure 2-5. Debugging a XAML application within Visual Studio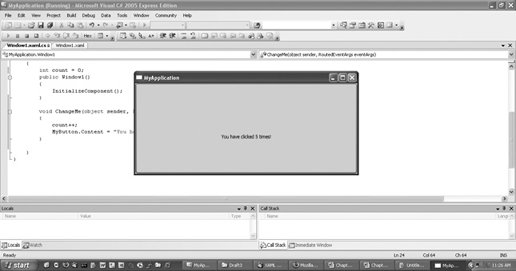 This process should be familiar to .NET developers. The XAML file is akin to the visual representation of a page or Windows application, and the codebehind file is the equivalent of the server-side code necessary to handle events and process requests from users. The difference between developing .NET applications and XAML applications is that at this time, there is no visual mechanism for designing XAML applications. The XAML file is similar to the source view of a .NET page. As mentioned earlier, when using Visual Studio, it is not necessary to generate the project files or understand how the new unified build system operates. The necessary files are all generated automatically for you by Visual Studio. Now that you know how to define and build a basic XAML application, it's time to move on to something a bit more interesting. The next chapter dives into the mechanics of XAML and explains more about the language. |

EAN: 2147483647
Pages: 217