3.3. Advanced Editing In Chapter 1, you learned the essentials of editing, including how to add, delete, and modify records. However, Access has a few finer points that you haven't seen yet. In the following sections, you'll tackle two great conveniences in Accessthe spell checker and AutoCorrectand you'll learn a simple way to insert special characters in your fields. 3.3.1. The Spell Checker The spell checking functionality in Access is almost exactly the same as in other Office applications like Wordit uses the same dictionary, catches the same sorts of errors, and gives you the option to ignore things it doesn't recognize, or add them to the dictionary. The difference is that when you perform a spell check with Access, it examines only the content in text and memo fields. Numbers , dates, and everything else get a pass. Of course, many of your fields are likely to contain text you don't want to spell checklike names , places, or product titles. You have two ways to handle this. You can perform a spell check on a single field, thereby ignoring everything else. Or, you can start a datasheet-wide spell check, but choose to ignore certain fields on the fly. Here's how it works: -
Move to the field where you want to start the spell check . If you want to check the entire datasheet from start to finish, then move to the first field in the first record. If you want to check part of the datasheet, then move to the location where you want to start checking. Keep in mind that when Access reaches the end of your datasheet, it loops around and starts again at the top, continuing until it's reviewed every field in every record. (Of course, you can cancel a spell check at any time.) If you want to check just a single field, then select that field before continuing by clicking the column header. -
Choose Home  Records Spelling (or just press F7) . Records Spelling (or just press F7) . The Check Spelling button looks like a small checkmark with the letters ABC above it. If you're performing a datasheet-wide spell check, then Access examines the current record and moves through the fields from left to right. When it finishes, it moves to the next record and repeats the process. If you've selected a single column, then Access scans only the values in that field, from top to bottom. When the spell check finishes, a dialog box informs you that all your data's been checked. If your table passes the spell check, then this dialog box is the only feedback you receive. On the other hand, if Access discovers any potential spelling errors during its check, then it displays a Spelling window (as shown in Figure 3-15), showing the offending word and a list of suggestions. 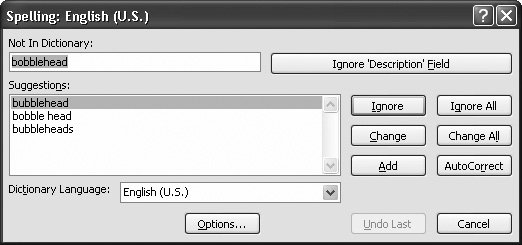 | Figure 3-15. When Access encounters a word it thinks is misspelled, it highlights the word. Unlike Microsoft Word, Access doesn't let you edit your file while the Spelling window's active. You have to either click one of the options on the Spelling windowfor example, clicking Change to replace the misspelled word with the first suggested spellingor cancel the spell check. | |
The Spelling window offers a wide range of choices. If the spell checker's complaining about a word that really is misspelled, you have three options: -
Fix it once . Click one of the words in the list of suggestions, and then click Change to replace your text with the proper spelling. You can also double-click the word in the list of suggestions, which has the same effect. -
Fix it everywhere . Click one of the words in the list of suggestions, and then click Change All to replace your text with the proper spelling. If Access finds the same mistake elsewhere in your datasheet during the spell check, then it automatically repeats the change, without bothering to alert you about the problem. -
Fix it forever . Click one of the words in the list of suggestions, and then click AutoCorrect. Access makes the change for this field, and for any other similarly mistaken words. In addition, it adds the information for the change to the AutoCorrect list (described in Section 3.3.3). If you type the same unrecognized word into another record (or even another table), Access automatically corrects your entry. This option's useful if you've discovered a mistake that you make frequently. On the other hand, if the spell checker's complaining about a word that you don't want to change, you have a few more possibilities available, by clicking the following options: -
Ignore skips this problem and keeps checking. If Access finds the same mystery word elsewhere in your spreadsheet, then it prompts you again for a correction. -
Ignore All skips this problem and keeps checking. If Access finds the same mystery word elsewhere in your spreadsheet, then it ignores the word. You might use Ignore All to force Access to disregard something you don't want to correct, like a person's name . -
Ignore Field ignores any errors in that field for the remainder of the spell check. This way's handy to filter out fields that contain a lot of names, places, or titles, so you don't waste your time reviewing bogus spell checker suggestions. -
Add adds the word to the custom spell check dictionary. This step's a great one to take if you plan to keep using the word in this datasheet and many more. (A company name makes a great addition to the custom dictionary.) Not only does Access ignore any occurrences of this word, but if it finds a similar but slightly different word in a field, it provides the custom word in its list of suggestions, letting you quickly clear up minor typos. -
Cancel stops the operation altogether. You can then correct the field, and resume the spell check later.
Note: Every Office application on your computer shares the same custom dictionary. If you add a word in Access and then perform a spell check in Word, the same word's allowed. This convenience is timesaving, as long as you don't go overboard adding words that don't really belong.
3.3.1.1. Spell checking options You can control how the spell checker works by setting a few straightforward options. To set these options (or just take a look at them), choose Office button Access Options to show the Access Options window. Then, choose Proofing in the list on the left (Figure 3-16). You can also find the same page of options if you click the Spelling windows Options button while a spell check's underway. 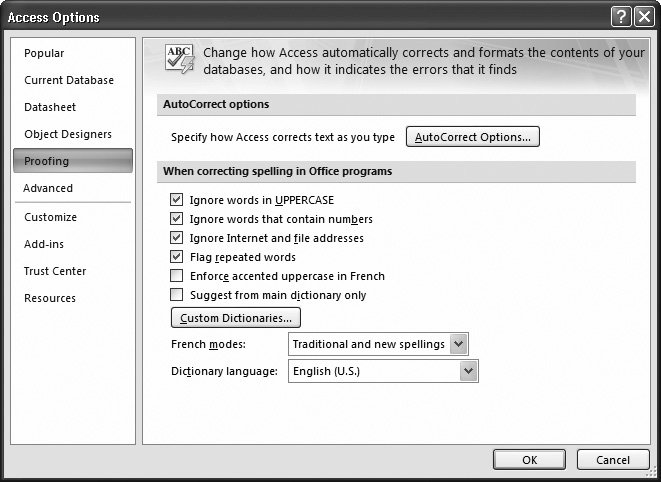 | Figure 3-16. The spell checker options let you specify the language and a few other miscellaneous settings. All spell check settings are language-specific; the last box in the window indicates the language you're currently using. | |
Here are the most common spelling options: -
Ignore words in UPPERCASE . If you choose this option, then Access doesn't bother to check any word in all capitals (which is helpful when your text contains lots of acronyms). -
Ignore words that contain numbers . If you choose this option, then Access doesn't check words that contain numeric characters, like Sales43 or H3ll0. If you don't choose this option, Access checks these entries and flags them as errors, unless you've specifically added them to the custom dictionary. -
Ignore Internet and file addresses . If you choose this option, then Access ignores words that appear to be file paths (like c:\Documents and Settings) or Web site addresses (like http://FreeSweatSocks.com). -
Flag repeated words . This search finds errors where you inadvertently repeat the same word twice, like like this this. -
Enforce accented uppercase in French . Forces French words to take the accents they should have, even for capital letters (where they look a little weird). English speakers don't need to worry about this setting. -
Suggest from main dictionary only . If you choose this option, then the spell checker doesn't use words in the custom dictionary as suggestions if it finds an unrecognized word. However, it still accepts a word that matches one of the entries in the custom dictionary. You can also choose the file that Access uses to store custom wordsthe unrecognized words that you add to the dictionary while a spell check's underway. To do so, click the Custom Dictionaries button, which shows the Custom Dictionaries dialog box (Figure 3-17). 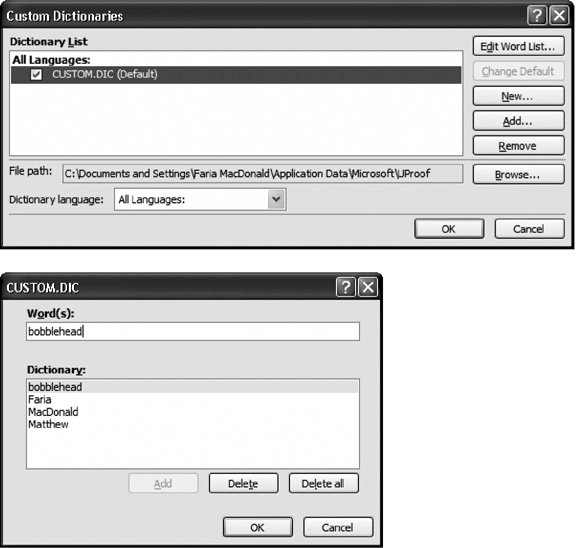 | Figure 3-17. Top: Using the Custom Dictionaries dialog box, you can delete the current custom dictionary, add new ones, or edit the word list by hand.
Bottom: If you click Edit Word List, then you see all the words in your custom.dic file. You can add new ones or remove entries that no longer apply. | |
Note: Custom dictionaries are stored in an account-specific section of your hard drive. For example, if you're logged in under the user account Dan_Quayle, you'll probably find the custom dictionary in the folder C:\Documents and Settings\Dan_Quayle\Application Data\Microsoft\UProof. One side effect of this system's that custom dictionaries aren't shared between two people who use different accounts on the same computer (unless you manually add the other user 's dictionary in the Custom Dictionaries dialog box).
3.3.2. AutoCorrect As you type text in a field, AutoCorrect cleans up behind you, correcting things like miscapitalized letters and common misspellings. AutoCorrect is such a subtle feature that you might not even realize it's monitoring your every move. To get a taste of its magic, look for behaviors like these: -
If you type HEllo, then AutoCorrect changes it to Hello. -
If you type friday, then AutoCorrect changes it to Friday. -
If you start a sentence with a lowercase letter, then AutoCorrect uppercases it. -
If you scramble the letters of a common word (for example, typing thsi instead of this , or teh instead of the ), then AutoCorrect replaces the word with the proper spelling. -
If you accidentally hit Caps Lock, and then type jOHN sMITH when you really wanted to type John Smith, then Access not only fixes the mistake, it also switches off Caps Lock. For the most part, AutoCorrect's harmless and even occasionally useful, as it can spare you from delivering minor typos in a major report. But if you need to type irregularly capitalized words, or if you have a garden-variety desire to rebel against standard English, you can turn off some or all of the AutoCorrect actions. To set AutoCorrect options, choose Office button Access Options to show the Access Options window. Then, choose Proofing in the list on the left. In the page of settings on the right side, click the "AutoCorrection settings button. Most of the settings are self-explanatory, and you can turn them off by unchecking them. Figure 3-18 explains the "Replace text as you type" option, which is not just for errors. 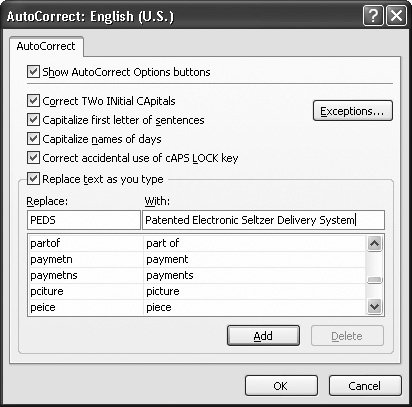 | Figure 3-18. Under "Replace text as you type" is a long list of symbols and commonly misspelled words (the column on the left) that Access automatically replaces with something else (the column on the right). But what if you want the copyright symbol to appear as a C in parentheses? You can remove individual corrections (select one, and then click Delete), or you can change the replacement text. And you can add your own rules. You may want to be able to type "PESDS" and have Access insert "Patented Electronic Seltzer Delivery System". Simply type in the "Replace" and "With" text as shown here, and then click Add. | |
Tip: For really advanced AutoCorrect settings, you can use the Exceptions button to define cases where Access doesn't use AutoCorrect. When you click this button, the AutoCorrect Exceptions dialog box appears with a list of exceptions. This list includes abbreviations that include the period but shouldn't be capitalized (like pp .) and words where mixed capitalization's allowed (like WordPerfect).
3.3.3. Special Characters Text content isn't just about letters, numbers, and punctuation. You also have special symbols that you can't type directly on your keyboard. One example's the copyright symbol ( ), which you can insert into a field by entering the text (C), and letting AutoCorrect do its work. Other symbols, like the Greek theta (), aren't as readily available. To use a symbol like this, you'll need the help of the Character Map utility. The Character Map is an often-overlooked tool that lets you see all the characters that a font provides. It's great for digging out the odd accented and other non-English characters.
Note: Other Office applications, like Word and Excel, provide far more special characters for you to use. They support all sorts of fonts, including the nifty Wingdings font that's included with Windows and packed with icons. However, Access has a more rigorous way or working. It accepts only plain- vanilla characters that are supported in any font. Databases store unformatted information, and, as a consequence, text fields don't include font and formatting details. The only exception's the seldom-used rich text feature for memo fields (Section 2.3.2.1).
Here's how you can use the Character Map to add a special character: -
Click the Windows Start button, and then choose Run . The Character Map utility's a part of Windows, not Access. As a result, you need to launch it outside of Access. -
In the Run dialog box, type charmap , and then click OK . The Character Map window appears (Figure 3-19). -
In the Font list, select the Calibri font . There's no point using an exotic font, because Access doesn't support it. However, you can find the supported special characters using any common font, including Arial, Times, and Tahoma. Calibri's the standard font that Access uses to display information in the datasheet, unless you've customized it (as described in Section 3.1.2). -
Scroll through the list of characters until you find the one you want . If you need a letter character from another language, look hardyou'll almost certainly find it. If you want something a little more exotic but can't find it, you're probably out of luck. You'll need to use ordinary text instead. -
Double-click the character . It appears in the "Characters to copy" box at the bottom of the Character Map window. You can repeat steps 4 and 5 as many times as you need to copy several characters in a row. 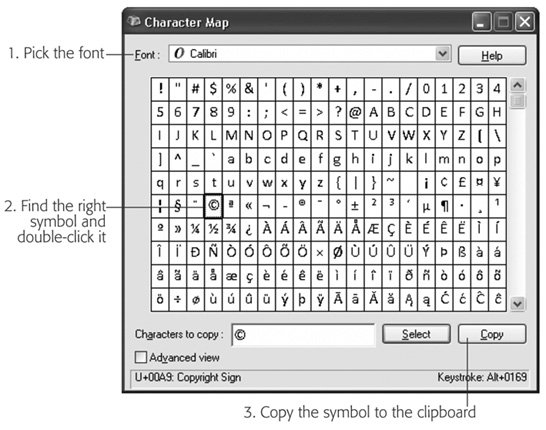 | Figure 3-19. In this example, the copyright symbol's being copied with the help of Character Map. | | -
Click Copy . Windows copies the symbols in "Characters to copy" to the clipboard. -
Switch back to the Access window . If you aren't in the right fieldthe place where you want to insert the copied textmove there now. If you want to place the symbol between existing characters, then make sure you move the cursor to the right place inside the field. -
Press Ctrl+V to paste the symbol . |