Security and Cryptography
Overview
Security is a broad field that encompasses everything from scrambling data with encryption to locking the server room door. To write secure code, it's essential to conduct risk analysis and threat assessment studies, make use of industrial-strength security standards such as Secure Sockets Layer (SSL) and Kerberos, and have everything reviewed by a security expert. There are several excellent books that can help you come to terms with essential security concepts. You can refer to Bruce Schneier's Applied Cryptography, Second Edition (John Wiley & Sons, 1995) for an introduction to cryptographic concepts; Microsoft's own Writing Secure Code, Second Edition (Microsoft Press, 2003) for an introduction to a wide range of security concepts; and Eric Lippert's Visual Basic .NET Code Security Handbook (Wrox Press, 2002) for a comprehensive overview of the code access security infrastructure that's built into the .NET Framework.
Remember, writing code that deals with some aspect of security is fairly easy. Writing secure code is a much more subtle and complex issue.
This chapter considers common tasks in several areas of security programming. Recipes 18.1 to 18.5 consider the Windows security system, and how you can retrieve information about the current user, check group membership, get lists of users and groups, and even log on to a different account programmatically. Recipes 18.6 to 18.18 deal with cryptography, and they form the bulk of this chapter. In these recipes, you'll learn how to use symmetric and asymmetric encryption to hide data, how to use hash codes and digital signatures to prevent data tampering, how to securely store a password in a database, and how to generate cryptographically secure random numbers. For most of these recipes, you'll need to import the System.Security.Cryptography and System.IO namespaces. Finally, recipes 18.19 and 18.20 consider how to display assembly evidence and limit assembly permissions using code access security.
Retrieve Information About the Current Windows User
Problem
You need to retrieve information about the current user's Windows account.
Solution
Use the WindowsIdentity.GetCurrent method to retrieve a WindowsIdentity object representing the current user.
Discussion
The WindowsIdentity class in the System.Security.Principal namespace represents basic information about a Windows user account. You can use the shared GetCurrent method to retrieve a WindowsIdentity object that represents the account under which your code is executing.
The following code example uses GetCurrent to retrieve a WindowsIdentity, and then displays all the available information. To use this example as written, you must import the System.Security.Principal namespace.
Public Module WindowsSecurityTest

 Public Sub Main()
 ' Retrieve the identity of the current user.
 Dim Identity As WindowsIdentity
 Identity = WindowsIdentity.GetCurrent()

 ' Display some information about the identity.
 Console.WriteLine("Authenticated: " & Identity.IsAuthenticated)
 Console.WriteLine("Anonymous: " & Identity.IsAnonymous)
 Console.WriteLine("Guest: " & Identity.IsGuest)
 Console.WriteLine("System: " & Identity.IsSystem)
 Console.WriteLine("Authentication: " & Identity.AuthenticationType)
 Console.WriteLine("User Name: " & Identity.Name)
 Console.WriteLine("Token: " & Identity.Token.ToString())

 Console.ReadLine()
 End Sub

End Module
The WindowsIdentity.Name property takes the format ComputerNameUserName or DomainNameUserName. WindowsIdentity.Token is a memory reference to the account token (technically, an IntPtr instance). Here's an example of the sample output that will be displayed in the Console window:
Authenticated: True
Anonymous: False
Guest: False
System: False
Authentication: NTLM
User Name: FARIAMATMatthew
Token: 280
On its own, the WindowsIdentity class doesn't allow you to test the roles that a user belongs to. For this task, you need a WindowsPrincipal object, as described in recipe 18.2.
Use Windows Role Based Security
Problem
You want to determine application privileges based on group membership.
Solution
Create a WindowsPrincipal object from the current WindowsIdentity, and call the IsInRole method.
Discussion
The Windows operating system allows you to place users in groups and give these groups different permissions for accessing resources such as files and the registry. In addition, you can create application-specific groups (such as SalesManagers, Contractors, and so on), examine these in your code, and then configure the behavior of your application accordingly. To configure groups and group members, select Computer Management from the Control Panel. Figure 18-1 shows the Computer Management console with some common groups.
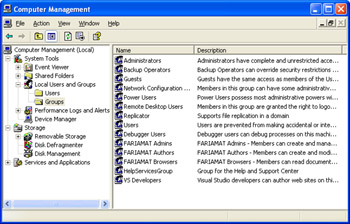
Figure 18-1: Managing users and groups.
To access group membership information in your code, you must use the WindowsPrincipal class. The WindowsPrincipal class contains two members: an Identity property that returns the associated WindowsIdentity and an IsInRole method that allows you to determine whether the account is in a specific group.
You can retrieve a WindowsPrincipal object in two ways. The first way is to retrieve it from the current thread by using the Thread.CurrentPrincipal shared property. For this technique to work, you must first call the AppDomain.SetPrincipalPolicy method. This method instructs Windows to associate the current principal (which encapsulates the current user identity) with the application thread. Here's the code you'll need:
' Associate the authentication information for the current user with
' the current thread.
AppDomain.CurrentDomain.SetPrincipalPolicy(PrincipalPolicy.WindowsPrincipal)

' Retrieve the current principal.
Dim Principal As WindowsPrincipal
Principal = CType(Thread.CurrentPrincipal, WindowsPrincipal)
Another option is to create a WindowsPrincipal object manually and pass the associated WindowsIdentity object in the constructor:
' Retrieve the identity of the current user.
Dim Identity As WindowsIdentity
Identity = WindowsIdentity.GetCurrent()

' Create the corresponding principal.
Dim Principal As New WindowsPrincipal(Identity)
Once you have the WindowsPrincipal, you can call IsInRole to determine group membership. There are three overloaded versions of the IsInRole method, allowing you to specify a numeric role ID, a role name, or a value from the WindowsBuiltInRoles enumeration. If you use a string, you must use the format ComputerNameRoleName or DomainNameRoleName. If you're using a built-in role, you can use the WindowsBuiltInRoles enumeration or the syntax BuiltInRoleName. Built-in roles include
- Account Operators
- Administrators
- Backup Operators
- Guests
- Power Users
- Print Operators
- Replicators
- System Operators
- Users
The following example demonstrates a simple Console application that tests group membership. To use this example, you must import the System.Security.Principal namespace.
Public Module WindowsSecurityTest

 Public Sub Main()
 ' Retrieve the identity of the current user.
 Dim Identity As WindowsIdentity
 Identity = WindowsIdentity.GetCurrent()
 Console.WriteLine("User Name: " & Identity.Name)

 ' Create the corresponding principal.
 Dim Principal As New WindowsPrincipal(Identity)

 ' Testing for a custom role you have defined.
 ' If this group doesn't exist no error will be raised.
 ' IsInRole will simply return False.
 Console.WriteLine("Member of Managers: " & _
 Principal.IsInRole("Managers"))

 ' Testing for a built-in role.
 Console.WriteLine("Member of Administrators: " & _
 Principal.IsInRole("BUILTINAdministrators"))

 ' Using the WindowsBuiltInRole enumeration.
 Console.WriteLine("Member of Administrators: " & _
 Principal.IsInRole(WindowsBuiltInRole.Administrator))

 Console.ReadLine()
 End Sub

End Module
Retrieve a List of All Windows Accounts or Groups
Problem
You need to retrieve a list of all users on the current computer or on a network domain.
Solution
Perform a query using the Win32_UserAccount or Win32_Group Windows Management Instrumentation (WMI) class.
Discussion
The Microsoft .NET Framework doesn't include any classes that allow you to retrieve a list of Windows accounts. However, there's no need to delve into the intricacies of the Win32 API—instead, you can access this information by performing a simple WMI query.
To use the WMI objects, you must import the System.Management namespace and add a reference to the System.Management.dll assembly. You can then retrieve a list of users by domain, by computer name, or by using a combination of other criteria. Each user account exposes the same properties you can view in the Computer Management console, including user account name, full name, password expiry settings, unique identifier, and so on. You can also retrieve a list of groups, each of which has a name and a description.
The following Console application retrieves all the users and groups for a computer or domain you specify.
Public Module WindowsSecurityTest

 Public Sub Main()
 Console.Write("Enter a domain or computer name: ")
 Dim Domain As String = Console.ReadLine()
 Console.WriteLine()

 ' Retrieve the user list.
 Dim UserQuery As String = "SELECT * FROM Win32_UserAccount " & _
 "WHERE Domain='" & Domain & "'"
 Dim Query As New ManagementObjectSearcher(UserQuery)

 Console.WriteLine(New String("*"c, 60))
 Console.WriteLine(" USERS")
 Console.WriteLine(New String("*"c, 60))
 Dim User As ManagementObject
 For Each User In Query.Get()
 Console.WriteLine("User name: " & User("Name").ToString())
 Console.WriteLine("Full name: " & User("FullName").ToString())
 Console.WriteLine("SID: " & User("SID").ToString())
 Console.WriteLine()
 Next

 ' Retrieve the group list.
 Console.WriteLine()
 Dim GroupQuery As String = "SELECT * FROM Win32_Group WHERE " & _
 "Domain='" & Domain & "'"
 Query = New ManagementObjectSearcher(GroupQuery)

 Console.WriteLine(New String("*"c, 60))
 Console.WriteLine(" GROUPS")
 Console.WriteLine(New String("*"c, 60))
 Dim Group As ManagementObject
 For Each Group In Query.Get()
 Console.WriteLine("Group name: " & Group("Name").ToString())
 Console.WriteLine("Group description: " & _
 Group("Description").ToString())
 Console.WriteLine("SID: " & Group("SID").ToString())
 Console.WriteLine()
 Next

 Console.ReadLine()
 End Sub

End Module
A sample run of this program produces the following (shortened) output:
Enter a domain or computer name: fariamat

************************************************************
 USERS
************************************************************
User name: ACTUser
Full name: Application Center Test Account
SID: S-1-5-21-507921405-1383384898-1708537768-1018

User name: Administrator
Full name: Administrator
SID: S-1-5-21-507921405-1383384898-1708537768-500

User name: ASPNET
Full name: aspnet_wp account
SID: S-1-5-21-507921405-1383384898-1708537768-1011
. . .

************************************************************
 GROUPS
************************************************************
Group name: Administrators
Group description: Administrators have complete and unrestricted access to the
computer/domain
SID: S-1-5-32-544

Group name: Guests
Group description: Guests have the same access as members of the Users group
by default, except for the Guest account which is further restricted
SID: S-1-5-32-546
Log In to Another Account Programmatically
Problem
You want part of your code to execute under a different user account than that of the current user.
Solution
Log in to the new account with the unmanaged LogonUser function, and use the WindowsIdentity.Impersonate method.
Discussion
By default, your code executes under the Windows identity of the current user. That means that your code has the ability to perform any action the user can and it will be prevented if it attempts any action that's forbidden to the user. In some cases, however, you might want to allow your code to execute with different permissions than the current user account. For example, you might create an application that runs permanently on a shared kiosk in an organization. Before a user can perform certain operations (such as reading a file), you'll want the application to temporarily assume that user's identity so that the appropriate file rights and restrictions are applied. Or you might want to create an application that can run under an "administrator" and a "user" mode. In either case, you'll want your application to temporarily assume another Windows identity—a process called impersonation.
To use impersonation in a .NET application, you need to take five steps:
- Log on with the new account using the unmanaged LogonUser function from the Windows API (the advapi32.dll file). This function returns a memory reference to the user's security token.
- Duplicate the token using the unmanaged DuplicateToken function (also defined in the advapi32.dll file).
- Use the token to create a new WindowsIdentity object by passing the token to the constructor.
- Call the WindowsIdentity.Impersonate method to assume the new identity. This method returns a WindowsImpersonationContext object.
- At this point, you can execute code statements under the new account. To stop impersonating the user, call the Undo method of the WindowsImpersonationContext object.
The following Console application demonstrates these steps. To use the code as written, you must import the System.Security.Principal namespace.
Public Module WindowsSecurityTest

 ' This API function gets the security token for a user.
 Private Declare Auto Function LogonUser Lib "advapi32.dll" _
 (ByVal lpszUsername As String, ByVal lpszDomain As String, _
 ByVal lpszPassword As String, ByVal dwLogonType As Integer, _
 ByVal dwLogonProvider As Integer, ByRef phToken As IntPtr) As Integer

 Private Enum Logon
 Interactive = 2
 NetworkCleartext = 8
 End Enum

 Private Enum Provider
 [Default] = 0
 WindowsNT35 = 1
 WindowsNT40 = 2
 Windows2000 = 3
 End Enum

 ' This API function duplicates a security token so you can use it.
 Private Declare Auto Function DuplicateToken Lib "advapi32.dll" _
 (ByVal ExistingTokenHandle As IntPtr, _
 ByVal ImpersonationLevel As Integer, _
 ByRef DuplicateTokenHandle As IntPtr) As Integer

 Public Sub Main()
 Console.WriteLine("*** Current User ***")
 DisplayIdentityInfo()

 ' Get the login information from the user.
 Console.WriteLine("Enter the information for the user " & _
 "you want to impersonate.")
 Dim UserName, Domain, Password As String
 Console.Write("Domain: ")
 Domain = Console.ReadLine()
 Console.Write("User Name: ")
 UserName = Console.ReadLine()
 Console.Write("Password: ")
 Password = Console.ReadLine()

 ' Log the new identity in.
 Dim NewIdentity As WindowsIdentity
 NewIdentity = GetWindowsIdentity(UserName, Domain, Password)
 Console.WriteLine()

 If NewIdentity Is Nothing Then
 Console.WriteLine("Invalid credentials.")
 Else
 ' Impersonate the new identity.
 Dim NewContext As WindowsImpersonationContext
 NewContext = NewIdentity.Impersonate()

 Console.WriteLine("*** Starting Impersonation ***")
 DisplayIdentityInfo()

 ' Revert to the original identity.
 NewContext.Undo()

 Console.WriteLine("*** Ending Impersonation ***")
 DisplayIdentityInfo()
 End If

 Console.ReadLine()
 End Sub

 ' This function displays information about the current user.
 Private Sub DisplayIdentityInfo()
 Dim Identity As WindowsIdentity = WindowsIdentity.GetCurrent()
 Console.WriteLine("This application is executing as " & Identity.Name)
 Console.WriteLine()
 End Sub

 ' This function uses the Win32 API functions to return a WindowsIdentity
 ' object for a given user.
 Private Function GetWindowsIdentity(ByVal UserName As String, _
 ByVal Domain As String, ByVal Password As String) As WindowsIdentity
 Dim SecurityToken, TokenDuplicate As IntPtr

 If LogonUser(UserName, Domain, Password, _
 Logon.Interactive, Provider.Default, SecurityToken) > 0 Then
 DuplicateToken(SecurityToken, 2, TokenDuplicate)
 Return New WindowsIdentity(TokenDuplicate)
 Else
 ' Invalid user information.
 Return Nothing
 End If
 End Function

End Module
Here's the output of a sample test run:
*** Current User ***
This application is executing as FARIAMATMatthew

Enter the information for the user you want to impersonate.
Domain: fariamat
User Name: test
Password: test

*** Starting Impersonation ***
This application is executing as FARIAMAT	est

*** Ending Impersonation ***
This application is executing as FARIAMATMatthew
| Note |
Windows XP imposes some restrictions on the use of blank passwords to prevent network-based attacks. As a result of these restrictions, you won't be able to use the LogonUser function to impersonate an account with a blank password. |
Impersonate the IIS User with ASP NET
Problem
You want to impersonate the Internet Information Services (IIS) authenticated user in your Web page or Web service code.
Solution
Retrieve a WindowsIdentity object that represents the authenticated user from the built-in User object. You can use this identity to perform impersonation with the WindowsIdentity.Impersonate method.
Discussion
In an ASP.NET application, all code runs under a special worker or local system account that has the necessary privileges for running Web page and Web service code. In some situations, however, it might be useful to run part of the application logic under a user-specific account. For example, if you have a file-lookup service, you might want to use Windows access control lists (ACLs) to determine whether a given user can retrieve a specific file. Without impersonation, you have to write all the security code yourself, and your service can be tricked into accessing a file it shouldn't if the code contains an error. If you use impersonation, however, you don't have to write any security code. If the code attempts to access a disallowed file, an exception will be thrown automatically when the operating system refuses access.
You can use the technique shown in recipe 18.4 to perform impersonation. However, this approach is less ideal if you need to retrieve the authentication credentials (such as a username and password) from a remote user. A better approach is to use IIS to perform the authentication automatically using the most secure standard that's supported in your environment. You can then use the IIS-authenticated identity to perform impersonation.
To use IIS authentication, you must disable anonymous access for the corresponding virtual directory. Start IIS Manager (by selecting Internet Information Services from the Administrative Tools section of the Control Panel), right-click on a virtual directory, and select Properties. Then choose the Directory Security tab, and click Edit in the Anonymous Access And Authentication Control section. You can then enable the appropriate authentication method, as shown in Figure 18-2.
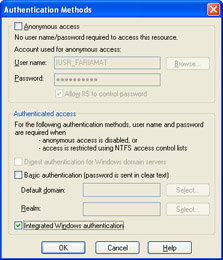
Figure 18-2: IIS virtual directory authentication settings.
Once you've taken these steps, users will be required to authenticate themselves. In a Web page, the browser will perform the authentication automatically, either by retrieving the current user information (for Windows Integrated authentication) or by displaying a login dialog to the user. In a Web service, the client application must supply the credentials programmatically (as demonstrated in recipe 16.6). However, your Web page or Web service code will still run under the local ASP.NET account. To change this behavior, you need to add code that retrieves the IIS-authenticated identity and impersonates it.
Here's a code snippet that uses impersonation with the IIS user identity:
If Not User.GetType() Is WindowsPrincipal
 ' User was not authenticated with Windows authentication.
 Throw New SecurityException( _
 "Windows authentication was not performed.")

Else
 ' Retrieve the identity object.
 Dim Identity As WindowsIdentity
 Identity = CType(User.Identity, WindowsIdentity)

 ' Impersonate the identity.
 Dim ImpersonateContext As WindowsImpersonationContext
 ImpersonateContext = Identity.Impersonate()

 ' (Perform tasks under the impersonated account.)

 ' Revert to the original ID.
 ImpersonateContext.Undo()
End If
| Note |
You can also enable impersonation with a configuration file setting. However, this approach is much less flexible because it ensures that all your Web page or Web service code runs under the IIS account. In this case, you must make sure that the account has the additional permissions required for executing ASP.NET applications. For example, the account will require read/write access to the Temporary ASP.NET Files directory, where the compiled ASP.NET files are stored. |
Use SSL Encryption with ASP NET
Problem
You want to ensure that communication between the server and a remote client is encrypted to ensure privacy.
Solution
Install a server certificate, and configure the virtual directory to require SSL.
Discussion
Secure Sockets Layer (SSL) technology is used to encrypt communication between a client and a Web server. You can use SSL automatically with a Web service or Web site—all you need to do is configure IIS accordingly.
Before a Web server can support SSL connections, it must have an X.509 digital certificate. This certificate indicates that the server identity is registered with a valid certificate authority (CA). You can generate your own certificate for testing (using Certificate Server from Windows 2000 Server or Windows 2003 Server). When creating a public application, however, you'll probably want to use a genuine certificate authority such as VeriSign. (See, for example, http://www.verisign.com.)
| Note |
Certificates are used to establish trust. They indicate that a certificate authority vouches for the server's identity. The client makes the decision, "I will trust this server because the CA vouches that it is Amazon.com," not "I trust this server because it claims to be Amazon.com." To support this model, every computer is preconfigured with a list of trusted certificate authorities. You can modify this list using a tool such as certmgr.exe, which is installed with the .NET Framework. Certificates also contain a small set of identifying information, including the holder's name, organization, and address; the holder's public key; validation dates; and a unique serial number. |
One of the easiest ways to purchase a certificate is to create and e-mail a certificate request to the appropriate certificate authority. IIS Manager allows you to create a certificate request automatically by following these steps:
- Expand the Web Sites group, right-click on your Web site (often called Default Web Site), and choose Properties.
- In the Directory Security tab, click the Server Certificate button. This starts the IIS Certificate Wizard, which requests some basic organization information and generates a request file.
- Complete all steps of the wizard. Figure 18-3 shows one step, in which you must choose the Web site name and key length. The longer the bit length, the stronger the key.

Figure 18-3: The IIS Certificate Wizard. - E-mail the generated request file (which is automatically encrypted using the CA's public key) to the CA.
- You'll receive a certificate that you can install in IIS to complete the request, along with additional step-by-step instructions from the CA.
- Once the certificate is installed, you can force individual virtual directories to use secure communication. Simply right-click on a virtual directory, and select Properties. Then choose the Directory Security tab, and click Edit in the Secure Communications section.
Note You can read much more information about certificate requests and how to use certificates with IIS in the online IIS help (http://localhost/iisHelp).
Symmetrically Encrypt a File
Problem
You want to use symmetric encryption to prevent a malicious user from viewing the contents of a file.
Solution
Wrap the FileStream with a CryptoStream that encrypts data as it's being written to disk (or decrypts it as it's being read).
Discussion
Symmetric encryption renders data indecipherable using a secret value. To decrypt the data, you need the same secret value (or key) that was used to encrypt the data. For that reason, symmetric encryption is often described as shared secret encryption.
Several classes provide symmetric encryption services in the System.Security.Cryptography namespace. These classes all derive from the base System.Security.SymmetricAlgorithm class, and they work almost identically. The difference is that each class implements a different encryption algorithm. Table 18-1 lists all of your choices and indicates the supported key sizes (in bits). As a general rule, the larger the key size, the stronger the encryption scheme is against a brute force attack. In addition, symmetric encryption algorithms use a random initialization vector (IV), which ensures that the encrypted ciphertext will vary even when encrypting the same source data.
|
Algorithm |
Implementation Class |
Valid Key Sizes |
Default Key Size |
|---|---|---|---|
|
DES |
DESCryptoServiceProvider |
64 |
64 |
|
TripleDES |
TripleDESCryptoServiceProvider |
128, 192 |
192 |
|
RC2 |
RC2CryptServiceProvider |
40–128 (in 8-bit increments) |
128 |
|
Rijndael |
RijndaelManaged |
128, 192, 256 |
256 |
The RijndaelManaged class is implemented entirely in managed code, and it supports a range of strong key sizes. For that reason, it's commonly used for symmetric encryption.
The easiest way to use a symmetric encryption class is in conjunction with CryptoStream. CryptoStream is a stream object that can wrap any other stream, including those that represent files, network connections, memory buffers, and so on. CryptoStream uses the symmetric algorithm class to perform encryption or decryption. For example, you can wrap a CryptoStream over a FileStream to seamlessly encrypt data as it's being written or decrypt it as it's being read.
The following Windows application (shown in Figure 18-4) demonstrates encryption and decryption with a file.
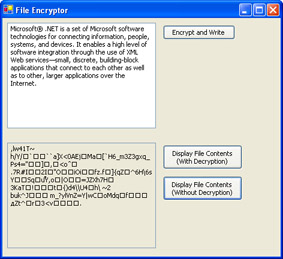
Figure 18-4: Encrypting and decrypting a file.
When the application is first started, a new RijndaelManaged object is created. This object encapsulates the key data and the IV. The key data is saved to a file for future reference.
Private Rijndael As New RijndaelManaged()

Private Sub Form_Load(ByVal sender As System.Object, _
 ByVal e As System.EventArgs) Handles MyBase.Load

 ' Check for file with key data.
 If File.Exists("key.bin") Then
 ' There is a key file. Read the key data.
 Dim fs As New FileStream("key.bin", FileMode.Open)
 Dim Key() As Byte
 ReDim Key(Rijndael.Key.Length - 1)
 fs.Read(Key, 0, Key.Length)
 Rijndael.Key = Key
 fs.Close()
 Else
 ' There is no key file. Use the randomly generated key,
 ' and write it to a file for future use.
 Dim fs As New FileStream("key.bin", FileMode.CreateNew)
 fs.Write(Rijndael.Key, 0, Rijndael.Key.Length)
 fs.Close()
 End If

End Sub
The encryption opens a file and wraps it with a CryptoStream. The CryptoStream uses an encryptor that's created from the RijndaelManaged object using the CreateEncryptor method. A StreamWriter wraps the CryptoStream, providing an easy way to convert the string data in the text box to a series of bytes. The IV is also written directly to the file without performing any encryption.
Private Sub cmdEncrypt_Click(ByVal sender As System.Object, _
 ByVal e As System.EventArgs) Handles cmdEncrypt.Click

 ' Create the transform for Rijndael encryption.
 Dim Transform As ICryptoTransform = Rijndael.CreateEncryptor()

 ' Open a file for writing.
 Dim fs As New FileStream("testfile.bin", FileMode.Create)

 ' Write the random initialization vector without encryption.
 ' This helps strengthen the encryption against certain
 ' types of attacks, because each file will be encrypted
 ' slightly differently.
 fs.Write(Rijndael.IV, 0, Rijndael.IV.Length)

 ' Create a cryptographic stream in write mode.
 ' This stream will encode binary data just before it reaches
 ' the file stream and is written to disk.
 Dim cs As New CryptoStream(fs, Transform, CryptoStreamMode.Write)

 ' Create a text writer.
 ' This text writer will convert our text into binary data.
 Dim w As New StreamWriter(cs)
 w.Write(txtSource.Text)
 w.Flush()

 ' The CryptoStream encrypts data one block at a time.
 ' At the end of your operation, you must pad the final
 ' partial block with zeros, and then write it to the file.
 cs.FlushFinalBlock()

 ' Close the file.
 w.Close()

End Sub
To view the encrypted contents of the file, your code simply needs to open the file, skip over the IV, and convert the remaining information to a string (which will appear as meaningless gibberish):
Private Sub cmdDisplay_Click(ByVal sender As System.Object, _
 ByVal e As System.EventArgs) Handles cmdDisplay.Click

 ' Open a file for reading.
 Dim fs As New FileStream("testfile.bin", FileMode.Open)

 ' Skip over the IV.
 fs.Seek(Rijndael.IV.Length, SeekOrigin.Begin)

 ' Create a text reader. This will convert the
 ' data from a series of bytes into a string.
 ' Note that no decryption is performed.
 Dim r As New StreamReader(fs)
 txtFileContents.Text = r.ReadToEnd()
 r.Close()

End Sub
Finally the decryption process mirrors the encryption process. The only difference is that the CryptoStream now uses a decryptor (which is created from the same RijndaelManaged object), and the CryptoStream operates in read mode, not write mode.
Private Sub cmdDecrypt_Click(ByVal sender As System.Object, _
 ByVal e As System.EventArgs) Handles cmdDecrypt.Click

 ' Open a file for reading.
 Dim fs As New FileStream("testfile.bin", FileMode.Open)

 ' Retrieve the IV that was used (in conjunction with the secret key)
 ' to encrypt this file.
 Dim IV As Byte()
 ReDim IV(Rijndael.IV.Length - 1)
 fs.Read(IV, 0, IV.Length)
 Rijndael.IV = IV

 ' Create the transform for Rijndael decryption.
 Dim Transform As ICryptoTransform = Rijndael.CreateDecryptor()

 ' Create a cryptographic stream in read mode.
 ' This stream will decode binary data just after
 ' it is read from the file.
 Dim cs As New CryptoStream(fs, Transform, CryptoStreamMode.Read)

 ' Create a text reader. This will convert the decrypted
 ' data from a series of bytes into a string.
 Dim r As New StreamReader(cs)
 txtFileContents.Text = r.ReadToEnd()
 r.Close()

End Sub
To decrypt a block of data, you must use the same secret key that was used to encrypt it. In the preceding example, this key is generated automatically when the RijndaelManaged class is created the first time the program is started, and the byte sequence is saved to another file. The key is read from this file for subsequent tests. This is suitable for a demonstration, but it's impractical in a professional application. In a real-world scenario, you would house the key in a secure location (like a piece of hardware or a protected database). Remember, most attackers defeat encryption not by attempting a brute force attack but because they somehow obtain the secret key.
The key weakness of symmetric encryption is that both the writer and the reader of the document must share the same secret value. You can't transmit this value in any obvious way (for example, over a network connection) because a malicious user can intercept it. In scenarios in which no shared secret is available, you might be able to use asymmetric encryption instead. (See recipe 18.10.)
| Note |
If you don't want to generate a random key, you can derive this information from a string password. To do this securely, you need to use the PasswordDeriveBytes class and the technique presented in recipe 18.9. |
Symmetrically Encrypt Any Data
Problem
You need to symmetrically encrypt data that isn't stream-based, such as a series of variables.
Solution
Write these variables to a MemoryStream, and wrap this with a CryptoStream.
Discussion
All symmetric encryption is stream-based. If you need to convert data that's stored in ordinary variables such as integers and strings, you must write this data to an in-memory stream.
The following Console application demonstrates this approach.
Public Module EncryptionTest

 Public Sub Main()
 ' Declare the data.
 Dim Name As String = "Joe Tester"
 Dim Age As Integer = 28

 ' Create the in-memory stream.
 Dim ms As New System.IO.MemoryStream()

 ' Create the cryptographic object.
 Dim Rijndael As New RijndaelManaged()

 ' Write and encrypt the data using a CryptoStream
 ' and BinaryWriter.
 Dim cs As New CryptoStream(ms, Rijndael.CreateEncryptor(), _
 CryptoStreamMode.Write)
 Dim w As New System.IO.BinaryWriter(cs)
 w.Write(Name)
 w.Write(Age)

 ' Pad the final block with zeroes and encrypt it.
 cs.FlushFinalBlock()

 ' Move to the start of the stream.
 ms.Position = 0

 ' Decrypt the data using a CryptoStream and BinaryReader.
 cs = New CryptoStream(ms, Rijndael.CreateDecryptor, _
 CryptoStreamMode.Read)
 Dim r As New System.IO.BinaryReader(cs)
 Console.WriteLine(r.ReadString()) ' Displays "Joe Tester".
 Console.WriteLine(r.ReadInt32) ' Displays 28.

 Console.ReadLine()
 End Sub

End Module
You can also perform encryption on an entire object by serializing the object to an encrypted memory stream. Simply use the technique outlined in recipe 4.10, but instead of using a MemoryStream object, serialize the object to a CryptoStream that wraps a MemoryStream. This approach is shown in recipe 18-12.
Derive a Key from a Password
Problem
You want to change a string into a series of bytes suitable for use with symmetric encryption.
Solution
Use the CryptDeriveKey method of the PasswordDeriveBytes class.
Discussion
You can convert a string to a series of bytes using the techniques described in Chapter 1 and Chapter 2. However, this approach is insufficient for cryptography. For example, most passwords are relatively short and use a limited set of characters (alphabetic characters and numerals). This dramatically reduces the number and strength of the keys that you can generate.
You can, however, use a string value to seed a cryptographically strong random number generator, which can then generate a cryptographically strong sequence of bytes that you can use as a key. The .NET Framework allows you to perform this operation with the PasswordDeriveBytes class. When you create a PasswordDeriveBytes object, you supply the password and a salt value to the constructor.
| Note |
The salt is a random series of bytes. It's combined with the password when generating the key. If you use a nonzero salt value, you can protect against dictionary attacks, where attackers derive a key for every word in the dictionary and try to use this list of pregenerated keys to decrypt your data. The trick is that attackers generate their key lists by assuming that there is no salt. When you use a salt value, the attacker needs to discover it and then regenerate the full key list. If you use different salt values for different data documents, the attacker will need to generate a different key list for each document, which dramatically reduces the effectiveness of the dictionary attack. Although salt helps protect your data against these automated attacks, it can also make your application logic a little more complicated. The problem is that if you use a nonzero salt value, you need to record it so you can use it when regenerating the key for decryption. |
To create a key, you call the PasswordDeriveBytes.CryptDeriveKey method to create the key, specifying the type of encryption and hashing algorithms to use when creating the key sequence. The most important piece of information is the third parameter, which indicates the size of the desired key:
' Create a key that is 128 bits long.
Dim Key() As Byte = PDB.CryptDeriveKey("RC2", "SHA", 128, Salt)
The following Console application demonstrates how to create a sample key.
Public Module PasswordToKey

 Public Sub Main()
 ' Get a password.
 Console.Write("Enter a password: ")
 Dim Password As String = Console.ReadLine()

 ' In this example, we use a blank salt value.
 Dim Salt(7) As Byte

 ' To use random value for the salt (which is recommended for
 ' maximum protection), uncomment the following lines.
 ' Dim Random As New RNGCryptoServiceProvider()
 ' Random.GetBytes(Salt)

 Dim Rijndael As New RijndaelManaged()

 ' Use the password to create a key.
 Dim PDB As New PasswordDeriveBytes(Password, Salt)
 Dim Key() As Byte
 Key = PDB.CryptDeriveKey("RC2", "SHA", 128, Salt)

 ' Display the key bytes.
 Console.WriteLine(BitConverter.ToString(Key))

 ' Apply the key to a symmetric encryption object.
 Rijndael.Key = Key

 Console.ReadLine()
 End Sub

End Module
You can combine this technique with the examples in recipe 18.8 or 18.7 to encrypt data or a file using an ordinary password. However, to ensure the best security, you should use a password that for an attacker is difficult to guess. Ideally, this password will include mixed case, be at least eight characters, and include numeric and special characters.
Asymmetrically Encrypt Data
Problem
You need to encrypt data in situations in which there is no shared secret key.
Solution
Use asymmetric encryption with the RSACryptoServiceProvider class.
Discussion
Asymmetric encryption allows you to exchange encrypted data between two parties without requiring a shared secret value. Asymmetric encryption introduces the concept of key pairs. The basic concept is that every user has both a private and a public key. Information encrypted with the public key can be decrypted only with the private key. The public key is made available to the whole world and can be transmitted freely over unsecured connections such as the Internet. The private key is carefully guarded. Thus, any user can make use of another user's public key to encrypt a message. The only person that can decrypt such a message is the intended recipient, who holds the matching private key.
To asymmetrically encrypt data in .NET, you use the RSACryptoServiceProvider class, which supports key sizes from 384 to 16,384 bits (in 8-bit increments). The default key size is 1024 bits. As a general rule of thumb, the larger the key size, the stronger the encryption. However, asymmetric key sizes don't correlate directly to symmetric key sizes. In fact, it's estimated that a 1024-bit RSA key is roughly equivalent to a 75-bit symmetric key.
The following example uses two Console applications to demonstrate this concept. These applications communicate using .NET Remoting (and assume that you've imported the System.Runtime.Remoting namespace in addition to the System.Security.Cryptography namespace). The configuration files used are similar to those in recipe 17.1, with one difference. The remote object needs to be configured as a singleton, so that it stays alive in between client requests. This ensures that it retains the same random symmetric key for the duration of the test.
 mode = "Singleton"
 type="RemoteObjects.RemoteObject, RemoteObjects"
 objectUri="RemoteObject" />
Following is the code for the remote object. The remote object provides two methods: one for transmitting the public portion of the key to the client (GetPublicKey), and one for receiving encrypted data (ReceiveSecretData). The data is displayed in the Console window of the component host as soon as it is received.
Public Class RemoteObject
 Inherits MarshalByRefObject

 ' Create a key pair.
 Private Key As New RSACryptoServiceProvider()

 Public Function GetPublicKey() As String
 ' Export only the public portion of the key.
 Return Key.ToXmlString(False)
 ' (To export both parts, you would supply True.
 ' You could use that approach to save a key pair
 ' in some secure location for later use.)
 End Function

 Public Sub ReceiveSecretData(ByVal data() As Byte)
 ' Decrypt the received data.
 Dim DecryptedData As String
 DecryptedData = System.Text.Encoding.UTF8.GetString( _
 Key.Decrypt(data, False))
 Console.WriteLine("RECEIVED: " & DecryptedData)
 End Sub

End Class
The client begins by requesting the remote object's public key. The client then enters a loop, requesting information from the current user. Every time the user types in text, the client uses the key to encrypt the data and then sends it to the remote object. Here's the complete code used for the client:
Public Module Startup

 Public Sub Main()
 ' Create the proxy that references the remote object.
 RemotingConfiguration.Configure("SimpleClient.exe.config")
 Dim RemoteObj As New RemoteObjects.RemoteObject()

 ' Construct a key object using the public portion of the key.
 ' The client will be able to encrypt, but not decrypt information.
 Dim Key As New RSACryptoServiceProvider()
 Key.FromXmlString(RemoteObj.GetPublicKey())

 Console.WriteLine("Press Enter to exit, or type some text to send.")
 Console.Write("> ")
 Dim Text As String = Console.ReadLine()
 Do Until Text = ""
 ' Encrypt the text.
 Dim EncryptedData As Byte()
 EncryptedData = Key.Encrypt( _
 System.Text.Encoding.UTF8.GetBytes(Text), False)

 ' Send the data to the server.
 RemoteObj.ReceiveSecretData(EncryptedData)
 Console.WriteLine("Sent encrypted data.")
 Console.WriteLine()
 Console.WriteLine("Press Enter to exit, " & _
 "or type some text to send.")
 Console.Write("> ")
 Text = Console.ReadLine()
 Loop
 End Sub

End Module
Asymmetric encryption is not nearly as convenient as symmetric encryption. It doesn't use the same stream-based model, and it forces you to encrypt data in small blocks. If you try to encrypt data that's larger than a single block without first subdividing it, an error will occur. To resolve this problem, you can combine asymmetric encryption with judicious use of symmetric encryption, as described in recipe 18.11.
| Note |
On its own, asymmetric encryption is not enough to secure communication in a distributed system. The problem is that there is no easy way to validate the identity of other users. For example, John might believe he's talking to Lucy but actually be communicating with the malicious user Sam. He'll send an encrypted message to Sam, but because the message is encrypted using Sam's public key, the malicious user will be able to decipher it easily. To avoid this type of problem, it's recommended that you use a prebuilt security infrastructure for mission-critical applications, such as SSL. SSL incorporates digital certificates, which are used to establish identity. |
Combine Asymmetric and Symmetric Encryption
Problem
You want to use symmetric encryption (perhaps because you need to encrypt a large amount of data, or performance is very important), but there is no shared secret that you can use.
Solution
Create a random symmetric key, and use this key to encrypt your data symmetrically. Then encrypt the random key asymmetrically.
Discussion
Asymmetric encryption is typically 1000 times slower than symmetric encryption, and the encrypted data it creates is several times larger. You can avoid these limitations by generating a random symmetric key, and using it to encrypt the bulk of your data. The trick is to encrypt the random key using asymmetric encryption with the recipient's public key, and then add it to the encrypted document. The recipient can retrieve the encrypted symmetric key, decrypt it using his or her private key, and then use it to decrypt the remainder of the document. This technique is commonly used; two examples are SSL (which negotiates a symmetric session key for each interaction) and the Windows Encrypting File System (which generates a random symmetric key for each file it encrypts).
The following example rewrites the code from recipe 18.7 to use this technique.
Public Class FileEncryptor
 Inherits System.Windows.Forms.Form

 Private RSA As New RSACryptoServiceProvider()

 Private Sub Form_Load(ByVal sender As System.Object, _
 ByVal e As System.EventArgs) Handles MyBase.Load
 ' Check for file with key data.
 ' This file will contain the full public and private key pair.
 If File.Exists("key.bin") Then
 Dim fs As New FileStream("key.bin", FileMode.Open)
 Dim r As New StreamReader(fs)
 RSA.FromXmlString(r.ReadToEnd())
 fs.Close()
 Else
 Dim fs As New FileStream("key.bin", FileMode.CreateNew)
 Dim w As New StreamWriter(fs)
 w.Write(RSA.ToXmlString(True))
 w.Flush()
 fs.Close()
 End If
 End Sub

 Private Sub cmdEncrypt_Click(ByVal sender As System.Object, _
 ByVal e As System.EventArgs) Handles cmdEncrypt.Click
 ' Open a file for writing.
 Dim fs As New FileStream("testfile.bin", FileMode.Create)

 ' Create a new (random) symmetric key.
 Dim Rijndael As New RijndaelManaged()

 ' Encrypt the symmetric key and IV using the RSA public key.
 Dim EncryptedKey() As Byte = RSA.Encrypt(Rijndael.Key, False)
 Dim EncryptedIV() As Byte = RSA.Encrypt(Rijndael.IV, False)

 ' Write the asymmetrically encrypted key and IV to the file.
 fs.Write(EncryptedKey, 0, EncryptedKey.Length)
 fs.Write(EncryptedIV, 0, EncryptedIV.Length)

 ' Write the remainder of the file using symmetric encryption.
 Dim Transform As ICryptoTransform = Rijndael.CreateEncryptor()
 Dim cs As New CryptoStream(fs, Transform, CryptoStreamMode.Write)
 Dim w As New StreamWriter(cs)
 w.Write(txtSource.Text)
 w.Flush()

 cs.FlushFinalBlock()
 w.Close()
 End Sub

 Private Sub cmdDecrypt_Click(ByVal sender As System.Object, _
 ByVal e As System.EventArgs) Handles cmdDecrypt.Click
 ' Open a file for reading.
 Dim fs As New FileStream("testfile.bin", FileMode.Open)

 ' The key size is measured in bits. 8 bits = 1 byte.
 ' The amount of bytes in an encrypted block of data is always
 ' the same as the key size.
 Dim EncryptedBlockSize As Integer = CType(RSA.KeySize / 8, Integer)

 ' Retrieve the encrypted key and IV.
 Dim Rijndael As New RijndaelManaged()
 Dim EncryptedKey(EncryptedBlockSize - 1) As Byte
 Dim EncryptedIV(EncryptedBlockSize - 1) As Byte
 fs.Read(EncryptedKey, 0, EncryptedKey.Length)
 fs.Read(EncryptedIV, 0, EncryptedIV.Length)
 Rijndael.KeySize = EncryptedBlockSize
 Rijndael.Key = RSA.Decrypt(EncryptedKey, False)
 Rijndael.IV = RSA.Decrypt(EncryptedIV, False)

 ' Use the symmetric key to read the remainder of the file.
 Dim Transform As ICryptoTransform = Rijndael.CreateDecryptor()
 Dim cs As New CryptoStream(fs, Transform, CryptoStreamMode.Read)
 Dim r As New StreamReader(cs)
 txtFileContents.Text = r.ReadToEnd()
 r.Close()
 End Sub

End Class
Encrypt an Object
Problem
You want to use encryption on an entire object, not just individual pieces of data.
Solution
Use .NET serialization to convert the object to a stream of bytes, and encrypt the serialized data.
Discussion
Recipes 4.9, 4.11, and 4.12 demonstrated different ways to serialize an object to a stream of bytes. You can use this technique in conjunction with symmetric or asymmetric encryption to encrypt the contents of a serializable object. If you're using asymmetric encryption, you'll need to convert the object to an array of bytes and then encrypt these bytes one block at a time. If you're using symmetric encryption, you can serialize and encrypt the data in one operation by using a CryptoStream.
For example, consider the serializable Person class shown here:
 _
Public Class Person

 Private _FirstName As String
 Private _LastName As String

 Public Property FirstName() As String
 Get
 Return _FirstName
 End Get
 Set(ByVal Value As String)
 _FirstName = Value
 End Set
 End Property

 Public Property LastName() As String
 Get
 Return _LastName
 End Get
 Set(ByVal Value As String)
 _LastName = Value
 End Set
 End Property

 Public Sub New(ByVal firstName As String, ByVal lastName As String)
 Me.FirstName = firstName
 Me.LastName = lastName
 End Sub

End Class
The following Console application shows how to encrypt and decrypt a Person object. It begins by creating three objects: a Person, a BinaryFormatter that can serialize the Person, and a MemoryStream where the serialized data will be placed. It then wraps the destination MemoryStream with a CryptoStream. The code serializes the data to the CryptoStream instead of using the MemoryStream directly. This way, the data will be encrypted just before it's placed into the MemoryStream.
Public Module EncryptObject

 Public Sub Main()
 Dim Person As New Person("Henrick", "Digali")

 ' Construct a formatter.
 Dim Formatter As New BinaryFormatter()

 ' Create the cryptographic object.
 Dim Rijndael As New RijndaelManaged()

 ' Serialize the object to memory and encrypt it.
 Dim ms As New MemoryStream()
 Dim cs As New CryptoStream(ms, Rijndael.CreateEncryptor(), _
 CryptoStreamMode.Write)
 Formatter.Serialize(cs, Person)
 cs.FlushFinalBlock()

 ' Display the encrypted data.
 ms.Position = 0
 Dim r As New StreamReader(ms)
 Console.Write("Encrypted Data: ")
 Console.WriteLine(r.ReadToEnd())
 Console.WriteLine()

 ' Decrypt and deserialize the object.
 ms.Position = 0
 cs = New CryptoStream(ms, Rijndael.CreateDecryptor, _
 CryptoStreamMode.Read)
 Person = CType(Formatter.Deserialize(cs), Person)
 Console.Write("Decrypted Data: ")
 Console.WriteLine(Person.FirstName & " " & Person.LastName)

 Console.ReadLine()
 End Sub

End Module
In order to use this code as written, you need to import the System.Runtime.Serialization.Formatters.Binary and System.IO namespaces, in addition to the System.Security.Cryptography namespace.
Here's an example of the output this test produces:
Encrypted Data: 5d|-J)nlZL^!"?ZYMAi}P?4*?R$yYjga*Bii3ZMgn-
Decrypted Data: Henrick Digali
If you are creating a custom class, you might want to create dedicated methods in the class for serialization and deserialization. For example, if you are creating a Person class, you might add a shared Person.Decrypt method that accepts a stream of encrypted data, decrypts it, and returns the deserialized Person object. Similarly, you might add a Person.Encrypt method that returns the serialized and encrypted data for the current Person as a stream or byte array. This approach can make it easier to keep encryption code out of your application logic.
Verify That Data Hasn t Changed
Problem
You want to ensure that a file or combination of data files cannot be undetectably altered.
Solution
Use a HashAlgorithm class to create a hash code based on the data, and store this hash code to use for future comparisons.
Discussion
Encryption prevents malicious users from reading your data, but it doesn't stop them from tampering with it. Instead, you need a way to validate data and detect whether it has been altered. This is the role played by hash codes.
A hash code algorithm generates a small (typically about 20-byte) binary fingerprint for any data that can be represented as a sequence of bytes. Hash codes are cryptographically secure, which means that it's extremely difficult for a malicious user to create a document that will generate a given hash code. It's also impossible for an attacker to determine any information about the original data by looking at the hash code. And while it is possible for different data to generate the same hash codes, it's statistically unlikely. In fact, even a minor change (for example, modifying a single bit in the source data) has a 50 percent chance of independently changing each bit in the hash code.
Table 18-2 lists the hash code algorithms provided in the System.Security.Cryptography namespace. They all inherit from the base HashAlgorithm class and provide a ComputeHash method that takes a byte array of a stream and returns a byte array with the hash data. Like encryption algorithms, the smaller the hash size, the less protection a hash code algorithm provides (and the easier it is for an attacker to find another set of data that generates an identical hash code).
|
Algorithm |
Default Implementation Class |
Hash Size (in Bits) |
|---|---|---|
|
MD5 |
MD5CryptoServiceProvider |
128 |
|
SHA-1 |
SHA1CryptoServiceProvider |
160 |
|
SHA-256 |
SHA256Managed |
256 |
|
SHA-384 |
SHA384Managed |
384 |
|
SHA-512 |
SHA512Managed |
512 |
The following code demonstrates a simple Console application that computes and compares the hash codes of a test file, both before and after a simple change. The code includes a helper function that tests byte arrays for equality by iterating through all the values.
Public Module HashTest

 Public Sub Main()
 ' Create a new file.
 Dim fs As New FileStream("testfile.bin", FileMode.Create)

 ' Write some data.
 Dim w As New StreamWriter(fs)
 w.WriteLine("This is the first line.")
 w.WriteLine("This is the second line.")
 w.Flush()

 ' Calculate a 512 bit (64 byte) hash for the file.
 Dim SHA As New SHA512Managed()
 fs.Position = 0
 Dim HashA() As Byte = SHA.ComputeHash(fs)

 ' Display the hash.
 Console.WriteLine(BitConverter.ToString(HashA))
 Console.WriteLine()

 ' Add another value to the file and calculate the hash.
 w.Write("!")
 w.Flush()
 fs.Position = 0
 Dim HashB() As Byte = SHA.ComputeHash(fs)
 fs.Close()

 ' Display the hash.
 Console.WriteLine(BitConverter.ToString(HashB))
 Console.WriteLine()

 ' Compare the hashes.
 If CompareByteArray(HashA, HashB) Then
 Console.WriteLine("Hash codes match.")
 Else
 Console.WriteLine("No match.")
 End If

 Console.ReadLine()
 End Sub

 Private Function CompareByteArray(ByVal BytesA() As Byte, _
 ByVal BytesB() As Byte) As Boolean
 If Not BytesA.Length = BytesB.Length Then Return False

 Dim i As Integer
 For i = 0 To BytesA.Length - 1
 If Not BytesA(i) = BytesB(i) Then Return False
 Next
 Return True
 End Function

End Module
To ensure data integrity, you should store the hash code in a secure location (such as a protected database). Otherwise, an attacker will be able to tamper with the document and simply generate a new hash code that can be used to replace the original hash code. If you need to store the hash code in an unsecured location or with the data itself, you should create a tamper-proof hash code, as explained in recipe 18.14.
Create a Tamper Proof Hash Code
Problem
You want to create a hash code that can't be replaced by a malicious user.
Solution
Combine hashing with encryption, either by using a keyed hash code or a digital signature.
Discussion
Hash codes have one obvious limitation: unless you store the hash code in a secure location, there is nothing to stop an attacker from tampering with your data and generating a new hash code that matches the altered data. In this scenario, it would be impossible to detect that any change has taken place. This is a common problem in distributed applications, which use hash codes to validate messages that are sent over a network.
The solution is to create a hash code that an attacker won't be able to re-create. For example, you can encrypt the hash code using a secret key that the attacker won't know. This is called a keyed hash algorithm. The .NET Framework includes two keyed hash algorithms (shown in Table 18-3), both of which derive from the base KeyedHashAlgorithm class in the System.Security.Cryptography namespace. The prime difference between these classes and the ordinary hash algorithm classes is that they provide a Key property in which you store the secret key (sequence of bytes) that will be used to generate the hash.
|
Algorithm |
Default Implementation Class |
Hash Size (Bits) |
Key Size |
|---|---|---|---|
|
HMAC-SHA1 |
HMACSHA1 |
160 |
64 (recommended) |
|
MAC-3DES-CBC |
MACTripleDES |
64 |
8, 16, or 24 |
The following code snippet computes a keyed hash for the same data using two different key values. Note that the resulting hash codes will not be the same.
' Create a new file.
Dim fs As New FileStream("testfile.bin", FileMode.Create)

' Write some data.
Dim w As New StreamWriter(fs)
w.WriteLine("This is the first line.")
w.WriteLine("This is the second line.")
w.Flush()

' Calculate a keyed hash for the file.
Dim HMACSHA As New HMACSHA1()
fs.Position = 0
Dim HashA() As Byte = HMACSHA.ComputeHash(fs)

' Display the hash.
Console.WriteLine(BitConverter.ToString(HashA))
Console.WriteLine()

' Calculate a keyed hash with the same algorithm and same
' data, but using a different key.
fs.Position = 0
HMACSHA = New HMACSHA1()
Dim HashB() As Byte = HMACSHA.ComputeHash(fs)

' Display the hash.
Console.WriteLine(BitConverter.ToString(HashB))
Console.WriteLine()

fs.Close()

' Compare the hashes.
If CompareByteArray(HashA, HashB) Then
 Console.WriteLine("Hash codes match.")
Else
 Console.WriteLine("No match.")
End If
Another choice is to encrypt a hash algorithm using a private key from an asymmetric key pair. This ensures that any other user will be able to validate the hash code (using the corresponding public key) but no other user will be able generate a new hash code because no other user has the private key. This type of hash code is called a digital signature, and it can be generated using the RSACryptoServiceProvider or DSACryptoServiceProvider asymmetric algorithm class. When using theses classes, you don't need to call a ComputeHash method and compare the byte arrays manually. Instead, you use the SignData and VerifyData methods with a stream or array of bytes, as shown in the following code snippet.
' Create two signature objects.
Dim DsaKeyPair As New DSACryptoServiceProvider()
Dim DsaPublicKeyOnly As New DSACryptoServiceProvider()

' Copy the public key from DsaKeyPair to DsaPublicKeyOnly.
DsaPublicKeyOnly.FromXmlString(DsaKeyPair.ToXmlString(False))
' You need the full key pair to sign the data, because the
' private key is used. However, to verify the data, you only
' require the public key. This example uses DsaKeyPair to
' sign the data, and DsaPublicKeyOnly to verify it.

' Create some data.
Dim Data As String = "This is some tamper-proof data."
Dim DataBytes() As Byte = System.Text.Encoding.UTF8.GetBytes(Data)

' Create a signed hash for the data.
Dim Signature() As Byte = DsaKeyPair.SignData(DataBytes)

' Verify the data.
If DsaPublicKeyOnly.VerifyData(DataBytes, Signature) Then
 Console.WriteLine("Signature authenticated.")
Else
 Console.WriteLine("Invalid signature.")
End If
| Note |
If you want to ensure data integrity and confidentiality, you'll need to combine encryption and hashing. Typically, it will be easiest to encrypt the data and then calculate the hash (so that the hash can be verified without requiring that the recipient decrypt the data first). |
Create an XML Digital Signature
Problem
You need to sign part of an XML document according the XML Signatures standard.
Solution
Use the classes in the System.Security.Cryptography.Xml namespace.
Discussion
You can apply the hashing and signing techniques in recipe 18.12 and 18.13 to encrypt XML content in a file or a byte array, just as you would create a hash for any other type of data. However, this approach introduces several limitations:
- There's no easy way to create a hash code and then make the resulting document (XML source and hash code) into a valid XML document.
- Minor differences in XML documents (such as the addition of white space) will change the hash code, even though they have no effect on how the XML data is parsed. This can be a particular problem if you need to create a hash code on one system and validate it using an application written in another programming language or using different XML tools.
- There's no easy way to sign just part of an XML document (or sign different parts with signatures from different users).
The solution to all of these problems has been provided by the XML Signatures W3C recommendation, which is described at http://www.w3.org/TR/xmldsig-core. XML Signatures defines a standard way of signing XML documents and a canonical representation of XML, so that identical documents will always generate identical signatures. However, the XML Signatures standard uses the same signing algorithms as any other type of data.
The .NET Framework provides an XML Signatures implementation with the types in the System.Security.Cryptography.Xml namespace. To access these types, you need to add a reference to the System.Security.dll assembly.
XML signatures can be of three types:
- Detached signatures.The signature is stored as a separate XML fragment that uses a Uniform Resource Identifier (URI) to refer to the signed document.
- Enveloping signatures.The signature wraps the XML document.
- Enveloped signatures.The signature is inserted into the original XML document that contains the information it is signing.
You can create all of these signature types in .NET. The following example presents a Windows application that creates and verifies enveloped signatures. The original XML document is shown here:
 1
 Toaster Oven
 400.99
The signed XML is shown in Figure 18-5. This document includes the original XML data and a signature with the signature value and information about the algorithm that was used to create the signature as well as the public key needed to validate it.
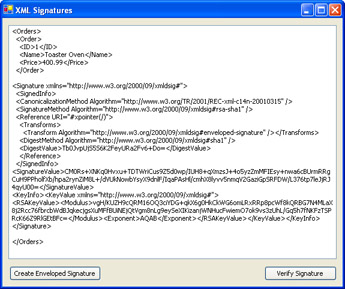
Figure 18-5: Creating enveloped XML signatures.
The code for signing and verifying the signature takes place in two button event handlers. The form code is shown here:
Public Class SignXml
 Inherits System.Windows.Forms.Form

 ' (Form code omitted.)

 Private Sub cmdEnveloped_Click(ByVal sender As System.Object, _
 ByVal e As System.EventArgs) Handles cmdEnveloped.Click
 ' Load the XML data that you want to sign.
 Dim Doc As New XmlDocument()
 Doc.Load("doc.xml")

 ' Create XML signature.
 Dim SignedXml As New SignedXml(Doc)

 ' Sign the data in the entire document.
 ' You could tailor this XPath expression to point to a single element.
 Dim Reference As New Reference()
 Reference.Uri = "#xpointer(/)"
 SignedXml.AddReference(Reference)

 ' Use a transform required for enveloped signatures.
 Reference.AddTransform(New XmlDsigEnvelopedSignatureTransform())

 ' Use the RSA algorithm to create the signature.
 Dim Rsa As New RSACryptoServiceProvider()

 ' Add the key details to the signature.
 SignedXml.SigningKey = Rsa
 Dim KeyInfo As New KeyInfo()
 KeyInfo.AddClause(New RSAKeyValue(Rsa))
 SignedXml.KeyInfo = KeyInfo

 ' Calculate the signature.
 SignedXml.ComputeSignature()

 ' Get the XML representation of the signature.
 Dim XmlSignature As XmlElement = SignedXml.GetXml()

 ' Insert the XML signature into the document.
 Dim Node As XmlNode = Doc.ImportNode(XmlSignature, True)
 Dim Root As XmlNode = Doc.DocumentElement
 Root.InsertAfter(Node, Root.FirstChild)

 ' Save the XML document with the enveloped signature.
 Doc.Save("SignedDoc.xml")

 ' Display the full document with signature.
 txtXml.Text = Doc.OuterXml
 End Sub

 Private Sub cmdVerify_Click(ByVal sender As System.Object, _
 ByVal e As System.EventArgs) Handles cmdVerify.Click
 ' Load the signed XML document.
 Dim Doc As New XmlDocument()
 Doc.Load("SignedDoc.xml")

 ' Create a SignedXml object for verification.
 Dim SignedXml As New SignedXml(Doc)

 ' Find the first signature.
 Dim Node As XmlNode = Doc.GetElementsByTagName("Signature", _
 "http://www.w3.org/2000/09/xmldsig#")(0)
 SignedXml.LoadXml(Node)

 ' Verify the signature.
 If SignedXml.CheckSignature() Then
 MessageBox.Show("Signature authenticated.")
 Else
 MessageBox.Show("Invalid signature.")
 End If
 End Sub

End Class
Store a Salted Password Hash in a Database
Problem
You want to store password information in a database, but you want to make sure the passwords aren't clearly visible.
Solution
Instead of storing a plain text password, store a salted hash of the password in the database as a binary field. This password hash is still suitable for authentication, but much more difficult for an attacker to reverse engineer.
Discussion
Many applications authenticate users by comparing a supplied username and password with information stored in a back-end database. Often, the password information is stored in the database as plain text, which raises a serious security risk. If a malicious user can gain access to the database server, even for only a few minutes, the attacker will be able to retrieve a comprehensive unencrypted password list. This password list can form the basis for other attacks in the future—it might even be used to attack user accounts on another system.
A better approach is to limit the damage of a security breach by storing encrypted password information in the database. In fact, in an ideal scenario, you won't store the password at all—instead, you'll store a salted hash that has been generated from the password. Because it's a hash, the attacker won't be able to reverse engineer the information to determine the original password. If an attack occurs, you simply need to force all users to submit new passwords. The stolen password hashes will then become worthless.
The password hash approach is a common one—for example, it's used to safeguard user accounts in UNIX. For maximum security, all password hashes should also be salted, which means the hash should incorporate a short random series of bytes (the "salt"). In a table of passwords, each password would have a different salt value. This reduces the ability of attackers to use automated brute force attacks such as a dictionary attack. Because each password hash has a different salt value, each password hash must be attacked separately.
To use salted password hashes in this recipe, we'll use the following steps:
- Convert the password to a byte array, and calculate a hash for the password.
- Generate a random salt, and add it to the password hash. Hash the resulting byte array a second time.
- Add the random salt to the new hash, and store the final result in a binary field in a database.
Figure 18-6 diagrams this process of creating a new salted password hash.
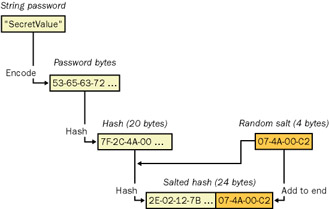
Figure 18-6: Creating a salted password hash.
To authenticate a user with a password hash, you need to follow these steps:
- Look up the corresponding user record, and retrieve the salted password hash from the database.
- Extract the salt from the salted hash.
- Use the salt value to calculate the salted password hash with the user-supplied password.
- Verify that this salted hash matches the value in the database.
The HashHelper class shown below encapsulates these two tasks. The CreateDBPassword method is used to generate a salted hash, which you can store in the database. The ComparePasswords method is used to compare the salted password hash in the database to a user-supplied password.
Public Class HashHelper

 Private Const SaltLength As Integer = 4

 ' This function returns a salted password hash,
 ' which is suitable for storage in the database.
 ' It uses a randomly generated salt value.
 Public Function CreateDBPassword(ByVal password As String) As Byte()
 ' Create the unsalted password hash.
 Dim UnsaltedPassword() As Byte = CreatePasswordHash(password)

 ' Generate a random salt value.
 Dim SaltValue(SaltLength - 1) As Byte
 Dim Rng As New RNGCryptoServiceProvider()
 Rng.GetBytes(SaltValue)

 ' Create the salted hash.
 Return CreateSaltedPassword(SaltValue, UnsaltedPassword)
 End Function

 ' This function returns a password hash
 ' that hasn't been salted.
 Private Function CreatePasswordHash(ByVal password As String) As Byte()
 Dim Sha1 As New SHA1Managed()
 Return Sha1.ComputeHash(System.Text.Encoding.UTF8.GetBytes(password))
 End Function

 ' This function accepts the password hash, and
 ' salts it with the given salt value.
 Private Function CreateSaltedPassword(ByVal saltValue As Byte(), _
 ByVal unsaltedPassword() As Byte) As Byte()
 ' Add the salt to the hash.
 Dim RawSalted(unsaltedPassword.Length + saltValue.Length - 1) As Byte
 unsaltedPassword.CopyTo(RawSalted, 0)
 saltValue.CopyTo(RawSalted, unsaltedPassword.Length)

 ' Create the salted hash.
 Dim Sha1 As New SHA1Managed()
 Dim SaltedPassword() As Byte = Sha1.ComputeHash(RawSalted)

 ' Add the salt value to the salted hash.
 Dim DbPassword(SaltedPassword.Length + saltValue.Length - 1) As Byte
 SaltedPassword.CopyTo(DbPassword, 0)
 saltValue.CopyTo(DbPassword, SaltedPassword.Length)

 Return DbPassword
 End Function

 ' This function compares a hashed password against the
 ' hashed and salted password from the database.
 ' It returns true if authentication succeeds.
 Public Function ComparePasswords(ByVal storedPassword() As Byte, _
 ByVal suppliedPassword As String) As Boolean
 ' Extract the salt value from the salted hash.
 Dim SaltValue(SaltLength - 1) As Byte
 Dim SaltOffset As Integer = storedPassword.Length - SaltLength
 Dim i As Integer
 For i = 0 To SaltLength - 1
 SaltValue(i) = storedPassword(SaltOffset + i)
 Next

 ' Convert the password supplied by the user
 ' to a salted password, using the salt value
 ' from the database record.
 Dim HashedPassword As Byte() = CreatePasswordHash(suppliedPassword)
 Dim SaltedPassword As Byte() = CreateSaltedPassword(SaltValue, _
 HashedPassword)

 ' Compare the two salted hashes.
 ' If they are the same, authentication has succeeded.
 Return CompareByteArray(storedPassword, SaltedPassword)
 End Function

 ' This helper function compares two byte arrays, and returns
 ' true if they contain the same series of bytes.
 Private Function CompareByteArray(ByVal arrayA() As Byte, _
 ByVal arrayB() As Byte) As Boolean
 ' Make sure the arrays are the same size.
 If arrayA.Length <> arrayB.Length Then Return False

 ' Compare each byte in the two arrays.
 Dim i As Integer
 For i = 0 To arrayA.Length - 1
 If Not arrayA(i).Equals(arrayB(i)) Then Return False
 Next

 ' Both tests succeeded. The arrays match.
 Return True
 End Function

End Class
The following example shows a simple Console client that tests the HashHelper class. It generates a salted and hashed password value using CreateDBPassword, and then uses ComparePasswords to validate against it.
Public Module Startup

 Public Sub Main()
 Dim HashHelper As New HashHelper()

 Console.WriteLine("Enter the password you want to hash and salt.")
 Console.WriteLine("This password will be used for authentication.")

 Console.Write("Enter the new password: ")
 Dim Password As String = Console.ReadLine()

 ' Hash and salt the password.
 Dim SaltedPasswordHash As Byte()
 SaltedPasswordHash = HashHelper.CreateDBPassword(Password)

 Console.WriteLine()
 Console.WriteLine("Now you can perform authentication.")

 Dim Success As Boolean
 Console.Write("Enter the password (or press Enter to exit): ")
 Password = Console.ReadLine()
 Do Until Password = ""
 ' Try to authenticate with this password.
 Success = HashHelper.ComparePasswords( _
 SaltedPasswordHash, Password)

 If Success Then
 Console.WriteLine("Authentication succeeded.")
 Else
 Console.WriteLine("Authentication failed.")
 End If
 Console.WriteLine()

 Console.Write("Enter the password (or press Enter to exit):")
 Password = Console.ReadLine()
 Loop
 End Sub

End Module
In this example, the salted password hash is stored only in memory, and each time you run the test program you need to create it. To store the password hash in a database, you simply need to create a binary field of sufficient length. In this example, that field would be 24 bytes, because the hash is 20 bytes in size and the appended salt is 4 bytes long. Figure 18-7 shows the database table you might want to create. In addition, you would probably want to create stored procedures that handle the work of adding and retrieving user records. (You can refer to recipes that deal with stored procedures and ADO.NET code in Chapter 14.)
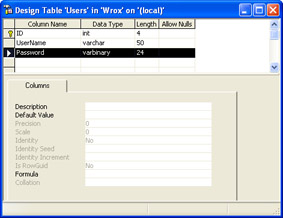
Figure 18-7: A database table for password hashes.
Generate a Secure Random Number
Problem
You want to generate a random number that can't be reverse-engineered (or predicted) by a malicious user.
Solution
Use the RNGCryptoServiceProvider class in the System.Security.Cryptography namespace instead of the System.Random class.
Discussion
Computers are designed to be deterministic. As a result, they aren't often a good source of random numbers. The numbers you generate with the System.Random class are statistically random, which means that they follow a random distribution and are suitable for modeling, simulations, computer games, and so on. However, these generators aren't suitable for cryptographic purposes. With knowledge of the algorithm, a malicious user can look at the random numbers you generate, determine how the seed value is calculated (typically it's drawn from the system clock), and then be able to predict future "random" values. In fact, pseudorandom numbers have been the basis of several infamous attacks, including one that exploited a time-dependent random number generator in an early version of Netscape Navigator, which compromised the key used for SSL connections. (See http://www.cs.berkeley.edu/~daw/papers/ddj-netscape.html for a complete description of this vulnerability.)
The solution is to use a cryptographically strong random number. These numbers are seeded using multiple values, including system and user data such as the process ID and the thread ID, the system clock, the system time, the system counter, the number of free disk clusters, the latency between mouse or keyboard actions, and the hashed user environment block. This value is then used in conjunction with a cryptographic algorithm to create a stream of truly unpredictable random data.
The following Console application demonstrates this technique to create a series of random numbers.
Public Module RandomGenerator

 Public Sub Main()
 Dim RandomByte(0) As Byte
 Dim Random As New RNGCryptoServiceProvider()
 Dim Input As String

 Do
 ' Fill the byte array with random bytes. In this case,
 ' the byte array holds only a single byte.
 Random.GetBytes(RandomByte)

 ' Display the random byte value.
 Console.WriteLine(RandomByte(0).ToString())

 ' Convert the random byte into a decimal from 1 to 10.
 Console.WriteLine(Int(RandomByte(0) / 256 * 10) + 1)

 Console.WriteLine("Type 'exit' to stop " & _
 "or press Enter to continue.")
 Input = Console.ReadLine()
 Loop While Input <> "exit"
 End Sub

End Module
It takes approximately ten times longer to create a cryptographically secure random number. That means it might not be suitable if you need to rapidly generate millions of random numbers.
Generate a Secure Random GUID
Problem
You want to create a cryptographically secure, random globally unique identifier (GUID).
Solution
Use the RNGCryptoServiceProvider class to create 16 random bytes, and then use these to create a new GUID by passing them to the Guid constructor.
Discussion
The random GUIDs you create with the Guid.NewGuid method are not known to be cryptographically secure. Thus, it's theoretically possible for a user to predict a GUID value that you generate for another user or task and use this to exploit weaknesses in your system. To prevent this possibility, you can create a cryptographically secure GUID using the RNGCryptoServiceProvider class. Here's the code you need:
Public Module RandomGuidGenerator

 Public Sub Main()
 ' A GUID is essentially a 16-byte (or 128-bit) number.
 ' So we must create a byte array with 16 byte elements.
 Dim RandomBytes(15) As Byte

 ' Fill the byte array with random bytes.
 Dim Random As New RNGCryptoServiceProvider()
 Random.GetBytes(RandomBytes)

 ' Create the GUID using these bytes.
 Dim MyGuid As New Guid(randomBytes)
 Console.WriteLine(MyGuid.ToString())

 Console.ReadLine()
 End Sub

End Module
Determine the Evidence Associated with an Assembly
Problem
You want to determine the evidence that the .NET security infrastructure uses to determine the permissions of a piece of code.
Solution
Create a System.Reflection.Assembly object, and walk through all the items in the Evidence collection.
Discussion
It's often useful to be able to read the evidence that .NET attaches to an assembly. This is particularly important when debugging code access security settings with a distributed application that uses reflection to load assemblies from the Internet. (See recipe 9-7 for a specific example.)
You can retrieve the evidence for any assembly through the Assembly.Evidence property. This property returns a System.Security.Policy.Evidence object. You can walk through the items of evidence, and display the associated XML, by calling Evidence.GetHostEnumerator.
The following Console application displays the evidence for the current executing assembly.
Public Module ShowAssemblyEvidence

 Public Sub Main()
 ' Retrieve an object representing the current code assembly.
 Dim Asm As System.Reflection.Assembly
 Asm = System.Reflection.Assembly.GetExecutingAssembly()

 ' Get an enumerator that allows us to walk through the
 ' host evidence.
 Dim Enumerator As IEnumerator
 Enumerator = Asm.Evidence.GetHostEnumerator()

 Do While Enumerator.MoveNext()
 ' Show the current piece of evidence.
 Console.WriteLine(Enumerator.Current.ToString())
 Console.WriteLine()
 Loop

 Console.ReadLine()
 End Sub

End Module
Following is an example of the typical output this code produces (in a slightly abbreviated form). The evidence includes the zone from which the code was loaded, the corresponding URL, and a hash of the assembly file.
 MyComputer


 file://C:/Code/Chapter 18/Recipe 18-18/bin/Recipe 18-18.exe


 4D5A9000030000000400000...
Programmatically Restrict Code Permissions
Problem
You want to dynamically load an assembly using reflection but prevent it from having the same permissions as your application.
Solution
Create a custom piece of evidence, and attach it to the dynamically loaded assembly. Give assemblies with this evidence lowered permissions.
Discussion
The .NET Framework uses code access security to give assemblies different permissions, depending on several factors. In some cases, you might want to lower these permissions for certain assemblies. For example, you might create an extensible application with a plug-in framework that allows extra functionality to be added by supplying a new assembly. Your code can instantiate the classes in this assembly through .NET reflection, and, presuming these classes implement some known interface, your code can use them to perform a task at runtime. To ensure that this extensibility model isn't exploited to introduce malicious code, you can reduce the permission set granted to dynamically loaded code, perhaps giving it only the permission to execute and return values, not the permission to write files, read the registry, or present the user interface.
The first step is to create an evidence class that you'll attach to dynamically loaded assemblies. This class doesn't actually contain any code.
 _
Public NotInheritable Class SandboxEvidence
End Class
The next step is to create an IMembershipCondition class that allows the .NET Framework to test whether SandboxEvidence is present in a given assembly. This class implements a Check method that scans a collection of evidence and returns True if it finds an instance of SandboxEvidence. Because this membership condition is never stored, it isn't necessary to implement all the methods—you can simply throw a NotImplementedException from those methods that aren't needed.
 _
Public NotInheritable Class SandboxMembershipCondition
 Implements IMembershipCondition

 Public Function Check(ByVal ev As Evidence) As Boolean _
 Implements IMembershipCondition.Check

 Dim Evidence As Object
 For Each Evidence In ev
 If TypeOf Evidence Is SandboxEvidence Then
 Return True
 End If
 Next
 Return False

 End Function

 Public Function Copy() As IMembershipCondition _
 Implements IMembershipCondition.Copy
 Return New SandboxMembershipCondition()
 End Function

 Public Overloads Overrides Function Equals(ByVal obj As Object) _
 As Boolean Implements IMembershipCondition.Equals
 Return (obj Is Me)
 End Function

 Public Overloads Overrides Function ToString() As String _
 Implements IMembershipCondition.ToString
 Return "SandboxMembershipCondition"
 End Function

 Public Sub FromXml(ByVal e As SecurityElement) _
 Implements ISecurityEncodable.FromXml
 Throw New NotImplementedException()
 End Sub

 Public Function ToXml() As SecurityElement _
 Implements ISecurityEncodable.ToXml
 Throw New NotImplementedException()
 End Function

 Public Sub FromXml(ByVal e As SecurityElement, _
 ByVal Level As PolicyLevel) Implements ISecurityPolicyEncodable.FromXml
 Throw New NotImplementedException()
 End Sub

 Public Function ToXml(ByVal Level As PolicyLevel) As SecurityElement _
 Implements ISecurityPolicyEncodable.ToXml
 Throw New NotImplementedException()
 End Function

End Class
You can now sandbox dynamically loaded assemblies as demonstrated in the following Console application. You simply need to choose the permissions that should be granted to the assemblies and set the security policy.
Public Module SandboxTest

 Public Sub Main()
 ' Define permissions for dynamically loaded assemblies.
 ' In this case, we grant Execute permission only.
 Dim SandBoxPerms As New NamedPermissionSet("Sandbox", _
 PermissionState.None)
 SandBoxPerms.AddPermission( _
 New SecurityPermission(SecurityPermissionFlag.Execution))

 ' Create a security policy that uses this permission set.
 Dim Policy As PolicyLevel = PolicyLevel.CreateAppDomainLevel()
 Policy.AddNamedPermissionSet(SandBoxPerms)

 ' Code is matched to a permission set based on its code group.
 ' Code groups are determined based on membership conditions.
 Dim SandboxCondition As New SandboxMembershipCondition()
 Dim AllCondition As New AllMembershipCondition()
 Dim All, None As NamedPermissionSet
 None = Policy.GetNamedPermissionSet("Nothing")
 All = Policy.GetNamedPermissionSet("Everything")
 Dim RootCodeGroup As New FirstMatchCodeGroup(AllCondition, _
 New PolicyStatement(None))
 Dim SandboxCodeGroup As New UnionCodeGroup(SandboxCondition, _
 New PolicyStatement(SandBoxPerms))
 Dim AllCodeGroup As New UnionCodeGroup(AllCondition, _
 New PolicyStatement(All))
 RootCodeGroup.AddChild(SandboxCodeGroup)
 RootCodeGroup.AddChild(AllCodeGroup)
 Policy.RootCodeGroup = RootCodeGroup

 ' Set this policy into action for the current application.
 AppDomain.CurrentDomain.SetAppDomainPolicy(Policy)

 ' You can now dynamically load an assembly, and
 ' supply the evidence that will force it to be sandboxed.
 Dim Evidence As New Evidence()
 Evidence.AddHost(New SandboxEvidence())

 Dim Asm As System.Reflection.Assembly
 Asm = System.Reflection.Assembly.LoadFrom("myfile.dll", Evidence)
 Dim MyClass As IMyInterface
 MyClass = CType(Asm.CreateInstance("ClassName"), IMyInterface)

 ' (Now MyClass only has Execute permissions.)

 Console.ReadLine()
 End Sub

End Class
You can test this example using the downloadable code for this recipe. It dynamically loads two classes, each of which provides a single method. One class performs numerical calculations, while the other tries to create a file. The method in the first class can always be executed successfully. However, if you try to use the second class after applying the restricted permission set, a SecurityException will be thrown.
| Note |
This dynamic sandbox approach is used in the .NET learning game Terrarium, which can be downloaded from http://www.gotdotnet.com. You can read an interview about how Terrarium implements dynamically loaded assemblies (with C# code samples) at http://msdn.microsoft.com/theshow/episode021/TranscriptText.asp. |
Introduction
- Strings and Regular Expressions
- Numbers, Dates, and Other Data Types
- Arrays and Collections
- Objects, Interfaces, and Patterns
- Files and Directories
- XML
- Multithreading
- Network Programming
- Reflection
- Windows Programming
- Windows Controls
- Printing and Drawing with GDI+
- Windows Services
- ADO.NET
- ASP.NET Web Applications
- Web Services
- Remoting and Enterprise Services
- Security and Cryptography
- Useful COM Interop
EAN: 2147483647
Pages: 376
