Section 8.2. Image Links and Image Maps
It's worth pointing out that you can also turn images into links. The trick is to put an <img> tag inside an <a> tag, like this:
<a href="LinkedPage.htm"><img src="MyPic.gif"></a>
Pictures that are linked in this way get a thick blue border that indicates they're clickable. Usually, you'll turn this clunky looking border off using the style sheet border properties (Section 6.5.1) or by adding a border attribute and setting it to 0 (which is the old-fashioned approach). Either way, when a visitor hovers his mouse over a linked picture, the mouse pointer changes to a hand.
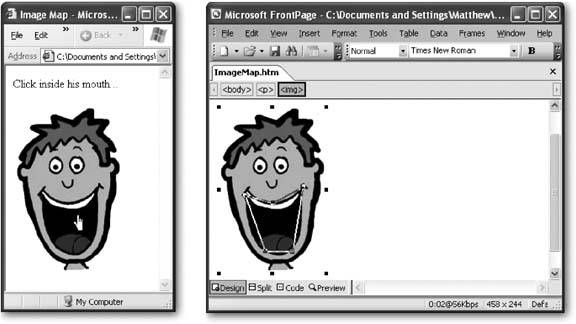
In some cases, you might want to create distinct clickable regions inside a picture. For example, consider Figure 8-4.
|
To add a hotspot to a picture, you need to start by creating an image map using the <map> tag. This part's easyall you need to do is choose a unique name for your image map so you can use it later on:
<map name="FaceMap"> </map>
Inside the <map> tag, between the start and end tags, you need to define each hotspot. You can add as many hotspots as you want, although they shouldn't overlap. (If they do, the one that's defined first takes precedence.)
To define each hotspot, you add an <area> tag. The area tag identifies three important details: the target page you'll get to if the link is clicked (the href attribute), the shape of the hotspot (the shape attribute), and the exact dimensions (the cords attribute). Here's an example:
<area href="MyPage.htm" shape="rect" coords="5,5,95,195">
This hotspot defines a rectangular region. When clicked, it takes the surfer to MyPage.htm .
Three types of shapes are supported for the shape attribute, each of which corresponds to a different value for the shape attribute. You can use circles ( circle ), rectangles ( rect ), and multi-edged shapes ( polygon ). Once you've chosen your shape, you need to supply the coordinates, which are a bit trickier to interpret. In order to understand hotspot coordinates, you need to first understand how browsers measure pictures (see Figure 8-5).
|

You need to enter the coordinates as a list of numbers separated by commas. For a circle, list the coordinates in this order: center point (x-coordinate), center point (y-coordinate), radius. For any other shape, supply the corners in order as a series of x-y coordinates, like this: x1, y1, x2, y2, and so on. For a polygon, you supply every point. For a rectangle, you only need two pointsthe top-left corner, and the bottom left corner.
That means the rectangle described earlier is defined by these two points: (5,5) at the top-left and (95, 195) at the bottom right. The more complex polygon that represents the mouth region in Figure 8-4 is defined like this:
<area href="MyPage.htm" shape="polygon" coords="38, 122, 76, 132, 116, 110, 102, 198, 65, 197">
In other words, this shape is created by drawing lines between these five points: (38, 122), (76, 132), (116,110), (102, 198), and (65, 197)
Tip: Getting coordinates correct is tricky. Many Web editors, like FrontPage and Dreamweaver, have built-in hotspot editors that let you create an image map by dragging shapes over your picture, which is a lot easier than trying to guess the correct values. To use this tool in Dreamweaver, select a picture, and look for the three hotspot icons (circle, square and polygon) in the Properties panel. In FrontPage, you use similar icons in the Picture toolbar. If the Picture toolbar isn't visible, right-click the picture and then select Show Pictures Toolbar.
Once you've perfected all your hotspots, there's one step left. You need to apply the hotspot to an image by adding the usemap attribute to your <img> tag. The usemap attribute matches the name of the map, but starts with the hash (#) character, which indicates that the image map is defined on the current page:
<img src="mouth.gif" usemap="#FaceMap">
Here's the complete HTML for the mouth hotspot example:
<html> <head> <title>Image Map</title> <style> img { border-style: none; } </style> </head> <body> <p>Click inside his mouth</p> <p> <map name="FaceMap"> <area href="http://edcp.org/factsheets/handfoot.html" shape="polygon" coords="38, 122, 76, 132, 116, 110, 102, 198, 65, 197"> </map> <img src="mouth.gif" usemap="#FaceMap"> </p> </body> </html> The hotspots you create are invisible (unless you've drawn lines on your picture to indicate where they are). However, when visitors hover over a hotspot the mouse pointer changes to a hand. Clicking on a hotspot has the same effect as clicking an ordinary <a> linksurfers get transported immediately to the new page.
Note: It's tempting to use image maps to start creating your own navigation systems. However, sophisticated Web sites go many steps further with menus and buttons that become highlighted when the mouse moves over them. To implement this nifty trick you need the JavaScript know-how you'll learn in Chapters 14 and 15.
EAN: N/A
Pages: 135
- Structures, Processes and Relational Mechanisms for IT Governance
- Measuring and Managing E-Business Initiatives Through the Balanced Scorecard
- A View on Knowledge Management: Utilizing a Balanced Scorecard Methodology for Analyzing Knowledge Metrics
- Managing IT Functions
- Governance Structures for IT in the Health Care Industry