Hack 30. Use Filters to Control Message Delivery
|
Use BlackBerry's built-in filtering capabilities to filter messages or classify certain ones as Level 1 messages. Imagine you have just sent your manager an urgent request and you know he'll be replying sometime soon. You would like to be notified the instant he replies to your message, given the importance of the issue. You could stare at your BlackBerry, waiting patiently for those transmission arrows to appear in the top-right portion of your screen, indicating a message is on its way. But you've got other work to do! You can use a filter in conjunction with your device profiles to automatically notify you when his reply arrives, so you can get on with your life. Using this hack will let you avoid constantly checking your device for new messages an action that brings down the "spouse approval factor" for the BlackBerry. 2.10.1. Set Up Custom FiltersIf you're a BlackBerry Enterprise Server user or you use the BlackBerry Desktop Redirector, you can customize the filters that are applied to your messages in Desktop Manager. Double-click on the Redirector Settings icon and go to the Filters tab. Click on the New button to configure a new filter. This brings up the Add Filter dialog box, as shown in Figure 2-23. BlackBerry Web Client users can configure new filters on the BWC web site by clicking the Filters link at the top of the page, as shown in Figure 2-24. Enter a descriptive name in the Filter Name field. Use the conditions in the "When a new message has the following conditions:" section to narrow down the messages that you'd like to tie to a particular action. These actions will be "ANDed" together in other words, the filter action will apply only when all the conditions are satisfied. Figure 2-23. Adding a filter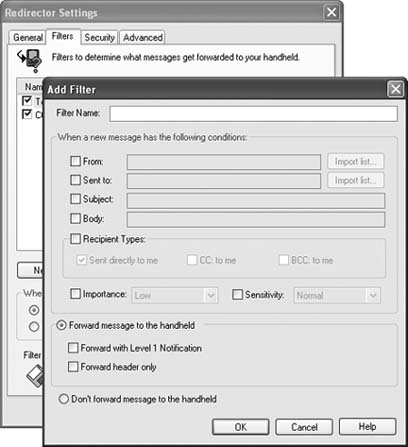 Figure 2-24. The Add Filter screen for BWC users When using the From or Sent to fields to specify conditions, you can manually type a standard email address in the field or use the Import list button to pick the email addresses from your corporate Global Address List or your Outlook Contacts folder. To specify your manager's email for this example alert, type it in the From field.
Use the Recipient Types field to isolate messages that are sent to you in a certain way. Use the Sent directly to me option to require that your email address be specifically specified on the To line before the action is taken. This is useful for isolating messages that are sent directly to you from messages that arrive via a distribution list. In this example, you are probably more likely to want to have your device alert you when a message is sent directly to you. 2.10.2. Set the Action for the FilterIf the criteria you've specified in the conditions section are met, then you can choose how the messages are handled. To have your device categorize them differently for alerting, use the Forward with Level 1 Notification option. This allows you to instruct your device to alert you in a specific way for these types of messages. If you don't have an unlimited data plan, you may want to make use of the Forward Header Only or the Don't Forward Message to the Handheld options. The Forward Header Only option sends only the header fields to your device at first. Once you open a message that's been sent this way, you will see the To, Sent, From, and Subject fields of the message, but the body of the message will not appear. Instead, you'll see the text More Available in the body along with the number of bytes in the body. Click the trackwheel once to bring up the menu and choose More or More All to retrieve the body of the message.
2.10.3. Use Your Device Profiles to Set Up AlertingOn your device, you can set up special alerting when messages that you've categorized as Level 1 are sent to your inbox. From the Home screen on your device, choose Options, and then choose Profiles. To edit a profile, use the trackwheel to bring up the menu and choose Edit, as shown in Figure 2-25. Figure 2-25. Editing your profiles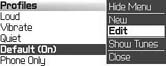 Use the trackwheel to select Level 1 messages and press Enter to edit the alerting associated with these messages. Notice there are two sections, shown in Figure 2-26: one for when the device is in the holster and another for when the device is out of the holster. There is a small magnet in the holster that the device uses to detect whether it's in the holster. Having separate alerts for in and out of holster is convenient for specifying an audible alert when your device is out of its holster and perhaps sitting on your desk or counter. Figure 2-26. Customizing alerts for Level 1 messages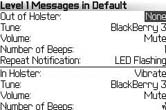 These options should be self-explanatory for the most part, except perhaps the Repeat Notification option. This option lets you specify what the device does if you've received a message and then not read it yet. Perhaps you've laid your device down to exercise or sleep (surely you don't wear your BlackBerry doing either of these!) and you return. Using the Repeat Notification option will let you be alerted when an important message hasn't been attended to.
|


EAN: 2147483647
Pages: 164
- Chapter II Information Search on the Internet: A Causal Model
- Chapter V Consumer Complaint Behavior in the Online Environment
- Chapter VII Objective and Perceived Complexity and Their Impacts on Internet Communication
- Chapter IX Extrinsic Plus Intrinsic Human Factors Influencing the Web Usage
- Chapter XVIII Web Systems Design, Litigation, and Online Consumer Behavior