Lesson 9: Managing Disk Quotas
While it may sound like a fine idea to allow users to have all the storage space they desire, this practice can start increasing the total cost of ownership (TCO) of your computer systems. In large distributed environments in particular it may become important to manage the amount of disk storage users can utilize.
When you must manage storage growth in distributed environments, you use disk quotas. Disk quotas allow you to allocate disk space usage based on the files and folders that users own. You can set disk quotas, quota thresholds, and quota limits for all users and for individual users. You can also monitor the amount of hard disk space that users have and the amount that they have left against their quota.
After this lesson, you will be able to
- Configure and manage disk quotas
Estimated lesson time: 20 minutes
Understanding Windows 2000 Disk Quota Management
Windows 2000 disk quotas track and control disk usage on a per-user, per-volume basis. Windows 2000 tracks disk quotas for each volume, even if the volumes are on the same hard disk. Because quotas are tracked on a per-user basis, every user's disk space is tracked regardless of the folder in which the user stores files. Table 2.10 describes the characteristics of Windows 2000 Professional disk quotas.
Table 2.10 Disk Quota Characteristics and Descriptions
| Characteristic | Description |
|---|---|
| Disk usage is based on file and folder ownership | Windows 2000 Professional calculates disk space . usage based on the files and folders that users own. When a user copies or saves a new file to an NTFS volume or takes ownership of a file on an NTFS volume, Windows 2000 charges the disk space for the file against the user's quota limit. |
| Disk quotas do not use compression. | Windows 2000 Professional ignores compression when it calculates hard disk space usage. Usage totals are based on uncompressed file sizes, regardless of how much hard disk space is actually used. This is done partially because file compression produces different degrees of compression for different types of files. Different uncompressed file types that are the same size might end up to be different sizes when they are compressed |
| Free space for applications is based on quota limit. | When you enable disk quotas, the free space that Windows 2000 Professional reports to applications for the volume is the amount of space remaining within the user's disk quota limit |
NOTE
Disk quotas can be applied only to Windows 2000 NTFS volumes.
You use disk quotas to monitor and control hard disk space usage. System administrators can do the following:
- Set a disk quota limit to specify the amount of disk space for each user.
- Set a disk quota warning to specify when Windows 2000 should log an event, indicating that the user is nearing his or her limit.
- Enforce disk quota limits and deny users access if they exceed their limit, or allow them continued access.
- Log an event when a user exceeds a specified disk space threshold. The threshold could be when users exceed their quota limit, or when they exceed their warning level.
After you enable disk quotas for a volume, Windows 2000 collects disk usage data for all users who own files and folders on the volume. This allows you to monitor volume usage on a per-user basis. By default, only members of the Administrators group can view and change quota settings. However, you can allow users to view quota settings.
Setting Disk Quotas
You can enable disk quotas and enforce disk quota warnings and limits for all users or for individual users.
If you want to enable disk quotas, open the Properties dialog box for a disk, click the Quota tab, and configure the options that are described in Table 2.11 and displayed in Figure 2.16.
Table 2.11 Quota Tab Options
| Option | Description |
|---|---|
| Enable Quota Management | Select this check box to enable disk quota management. |
| Deny Disk Space To Users Exceeding Quota Limit | Select this check box so that when users exceed their hard disk space allocation, they receive an "out of disk space" message and cannot write to the volume. |
| Do Not Limit Disk Usage | Click this option when you don't want to limit the amount of hard disk space for users. |
| Limit Disk Space To | Configure the amount of disk space that users can have. |
| Set Warning Level To | Configure the amount of disk space that users can fill before Windows 2000 logs an event indicating that a user is nearing his or her limit. |
| Quota Entries | Click this button to open the Quota Entries For dialog box, where you can add a new entry, delete an entry, and view the per-user quota information. |
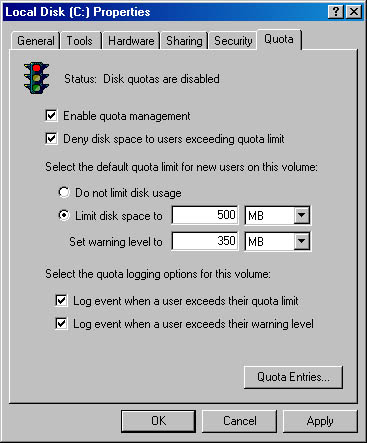
Figure 2.16 The Quota tab of the Properties dialog box for a disk
You can enforce identical quota limits for all users as follows:
- In the Limit Disk Space To box and the Set Warning Level To box, enter the values for the limit and warning level that you want to set.
- Select the Deny Disk Space To Users Exceeding Quota Limit check box.
Windows 2000 will monitor usage and will not allow users to create files or folders on the volume when they exceed the limit.
Determining the Status of Disk Quotas
You can determine the status of disk quotas in the Properties dialog box for a disk by checking the traffic light icon and by reading the status message to its right (see Figure 2.16).
- A red traffic light indicates that disk quotas are disabled.
- A yellow traffic light indicates that Windows 2000 is rebuilding disk quota information.
- A green traffic light indicates that the disk quota system is active.

Figure 2.17 The Quota Entries for Local Disk window
You can enforce different quota limits for one or more specific users, as follows:
- Open the Properties dialog box for a disk, click the Quota tab, and then click the Quota Entries button.
- In the Quota Entries For window, shown in Figure 2.17, double-click the user account for which you want to set a disk quota limit, or create an entry (in which you will establish a disk quota for a particular user) by clicking New Quota Entry on the Quota menu.
- Configure the disk space limit and the warning level for the user. Do the same for other users according to the individual warning levels you want to assign to them.
Monitoring Disk Quotas
You use the Quota Entries For window to monitor usage for all users who have copied, saved, or taken ownership of files and folders on the volume. Windows 2000 will scan the volume and monitor the amount of disk space that each user occupies. Use the Quota Entries For window to view the following:
- The amount of hard disk space that each user occupies
- Users who are over their quota-warning threshold, which is signified by a yellow triangle
- Users who are over their quota limit, which is signified by a red circle
- The warning threshold and the disk quota limit for each user
Determining Best Uses of Disk Quotas
The following are general guidelines for using disk quotas:
- If you enable disk quota settings on the volume where Windows 2000 is installed and your user account has a disk quota limit, log on as Administrator to install additional Windows 2000 components and applications. This way, Windows 2000 won't count the disk space that you use to install applications against the disk quota allowance for your user account.
- You can monitor hard disk usage and generate hard disk usage information without preventing users from saving data. To do so, clear the Deny Disk Space To Users Exceeding Quota Limit check box when you enable disk quotas.
- Set more restrictive default limits for all user accounts, and then modify the limits to allow more disk space to users who work with large files.
- If computers running Windows 2000 Professional are shared by more than one user, set disk quota limits on computer volumes so that disk space is shared by all users who share the computer.
- Generally, you should set disk quotas on shared volumes to limit storage for users. Set disk quotas on public folders and network servers to ensure that users share hard disk space appropriately. When storage resources are scarce, you might want to set disk quotas on all shared hard disk space.
- Delete disk quota entries for a user who no longer stores files on a volume. You can delete quota entries for a user account only after all files that the user owns have been removed from the volume or another user has taken ownership of the files.
- Before you can delete a quota entry for a user account, you or the user must remove all files that the user owns from the volume, or another user must take ownership of the files.

Practice: Enabling and Disabling Disk Quotas
In this practice, you configure default quota management settings to limit the amount of data that users can store on drive C (their hard disk drive). Next, you configure a custom quota setting for a user account. You increase the amount of data the user can store on drive C to 20 MB with a warning level set to 16. Finally, you turn off quota management for drive C.
NOTE
If you didn't install Windows 2000 Professional on drive C, substitute the NTFS partition on which you did install Windows 2000 Professional whenever drive C is referred to in this practice.
Exercise 1: Configuring Quota Management Settings
In this exercise, you configure the quota management settings for drive C to limit the data that users can store on the volume. You can then configure custom quota settings for a user account.
To configure default quota management settings
- Log on as Administrator and create a user account, User5. Assign the password of password to the account, and clear the User Must Change Password At Next Logon check box.
- In Windows Explorer, right-click drive C, and then click Properties.
Windows 2000 displays the Local Disk (C:) Properties dialog box with the General tab active.
- Click the Quota tab.
Notice that disk quotas are disabled by default.
- On the Quota tab, click the Enable Quota Management check box.
What is the default disk space limit for new users?
- Select Deny Disk Space To Users Exceeding Quota Limit.
- Click Limit Disk Space To.
- Type 10 in the Limit Disk Space To box and then type 6 in the Set Warning Level To box.
Notice the default unit size is KB.
- Change the unit sizes to MB, and then click Apply.
Windows 2000 displays the Disk Quota message box, warning you that the volume will be rescanned to update disk usage statistics if you enable quotas.
- Click OK to enable disk quotas.
To configure quota management settings for a user
- On the Quota tab of the Local Disk (C:) Properties dialog box, click the Quota Entries button.
Windows 2000 displays the Quota Entries For Local Disk (C:) window.
Are any user accounts listed? Why or why not?
Answer
- On the Quota menu, click New Quota Entry.
Windows 2000 displays the Select Users dialog box.
- In the Look In box, select PRO1.
NOTE
If you didn't name your computer PRO1 or if your computer is part of a domain, select the appropriate computer or domain name. - At the top of the dialog box, under Name, select User5, and then click Add.
The user name appears in the Name list at the bottom of the dialog box.
- Click OK.
Windows 2000 displays the Add New Quota Entry dialog box.
What are the default settings for the user you just set a quota limit for?
Answer
- Increase the amount of data that User5 can store on drive C: by changing the Limit Disk Space To option to 20 MB and the Set Warning Level To option to 16 MB.
- Click OK to return to the Quota Entries window.
- Close the Quota Entries window.
- Click OK to close the Local Disk (C:) Properties dialog box.
- Log off.
To test quota management settings
- Log on as User5 with a password of password.
- Start Windows Explorer and create a User5 folder on drive C.
- Insert into your CD-ROM drive the CD-ROM you used to install Windows 2000 Professional.
- If a dialog box appears as a result of inserting the CD-ROM, close it.
- Copy the i386 folder from your CD-ROM to the User5 folder.
Windows 2000 Professional begins copying files from the i386 folder on the CD-ROM to a new i386 folder in the User5 folder on drive C. After copying several files, however, Windows 2000 displays the Error Copying File Or Folder dialog box, indicating that there isn't enough room on the disk.
Why did you get this error message?
Answer
- Click OK to close the dialog box.
- Right-click the User5 folder and then click Properties.
Notice that the Size On Disk value is slightly less than your quota limit of 20 MB.
- Close all open windows and log off.
Exercise 2: Disabling Quota Management
In this exercise, you disable quota management settings for drive C.
- Log on as Administrator and start Windows Explorer.
- Delete the User5 folder.
- Right-click drive C, and then click Properties.
Windows 2000 displays the Local Disk (C:) Properties dialog box with the General tab active.
- Click the Quota tab.
- On the Quota tab, clear the Enable Quota Management check box.
Notice that all quota settings for drive C are no longer available.
- Click Apply.
Windows 2000 displays the Disk Quota message box, warning you that if you disable quotas, the volume will be rescanned if you enable them later.
- Click OK to close the Disk Quota message box.
- Click OK to close the Local Disk (C:) Properties dialog box.
- Close all applications.
Lesson Summary
In this lesson, you learned that you use disk quotas to allocate disk space usage. You can set disk quotas, quota thresholds, and quota limits for all users and for individual users. You can also monitor the amount of hard disk space that users have and the amount that they have left against their quota. You also learned that Windows 2000 ignores compression when it calculates hard disk space usage and that you can apply disk quotas only to Windows 2000 NTFS volumes.
Windows 2000 disk quotas track and control disk usage on a per-user, per-volume basis. Windows 2000 tracks disk quotas for each volume, even if the volumes are on the same hard disk. Because quotas are tracked on a per-user basis, every user's disk space is tracked regardless of the folder in which the user stores files.
EAN: N/A
Pages: 244