Lesson 2: Recovering from a Disaster
Reliability and availability are in part affected by your system's ability to recover from a disaster. Disaster recovery allows you to restore a computer so that you can log on and access system resources after a computer disaster has occurred. This lesson provides information on repairing a Windows 2000 installation, restoring data, and recovering a RAID-5 or mirrored volume.
After this lesson, you will be able to
- Use Safe mode, the Recovery Console, and the Emergency Repair Disk (ERD) to repair a Windows 2000 installation
- Restore data that has been backed up
- Recover a RAID-5 or RAID-1 volume
Estimated lesson time: 60 minutes
Repairing the Windows 2000 Installation
Windows 2000 has several features that allow you to repair a system that does not start or load Windows 2000. These features are useful if some of your system files become corrupted or are accidentally erased, or if you have installed software or device drivers that cause your system to not work properly. Windows 2000 includes three methods that allow you to repair a system: Safe mode, the Recovery Console, and the Emergency Repair Disk (ERD).
NOTE
You can also reinstall Windows 2000 over a damaged Windows 2000 system or install Windows 2000 into a separate folder. This may be time consuming, but it is useful if the emergency repair process does not solve your problem. If you reinstall Windows 2000, you might lose changes that have been made to your system, such as service pack upgrades.
Safe mode
Safe mode lets you start your system with a minimal set of device drivers and services. For example, if newly installed device drivers or software are preventing your computer from starting, you might be able to start you computer in Safe mode and then remove the software or device drivers from your system. Safe mode does not work in all circumstances, especially if your system files are corrupted or missing or your hard disk is damaged or has failed.
In Safe mode, Windows 2000 uses default settings (Video Graphics Adapter [VGA] monitor, Microsoft mouse driver, and the minimum device drivers required to start Windows). If a symptom does not reappear when you start in Safe mode, you can eliminate the default settings and minimum device drivers as possible causes of the problem.
You can choose one of the following options when you start Safe mode:
- Safe Mode. This option starts Windows 2000 and uses only basic files and drivers (mouse, except serial mice; monitor; keyboard; mass storage; base video; default system services; and no network connections). If your computer does not start successfully by using Safe mode, you might need to use the ERD to repair your system.
- Safe Mode With Networking. This option starts Windows 2000 with only basic files and drivers, plus network connections.
- Safe Mode With Command Prompt. This option starts Windows 2000 with only basic files and drivers. After a user logs on, the command prompt is displayed instead of the Windows desktop, Start menu, and Taskbar.
- Enable Boot Logging. This option starts Windows 2000 while logging all the installed drivers and services that were loaded (or not loaded) by the system to a file. This file is called ntbtlog.txt and is located in the %systemroot% directory. Safe mode, Safe mode with Networking, and Safe mode with Command Prompt add to the boot log a list of all the drivers and services that are loaded. The boot log is useful in determining the exact cause of system startup problems.
- Enable VGA Mode. This option starts Windows 2000 with the basic VGA driver. This mode is useful when you have installed a new driver for your video card that is causing Windows 2000 to not start properly. The basic video driver is always used when you start Windows 2000 in Safe mode (either Safe mode, Safe mode with Networking, or Safe mode with Command Prompt).
- Last Known Good Configuration. This option starts Windows 2000 with the registry information that Windows saved at the last shutdown. Use this option only in cases of incorrect configuration. Last Known Good Configuration does not solve problems caused by corrupted, incompatible, or missing drivers or files. Also, any changes made since the last successful startup will be lost.
- Directory Service Restore Mode. This option is used to restore the SYSVOL directory and Active Directory service on a domain controller. It is available only on domain controllers.
- Debugging Mode. This option starts Windows 2000 while sending debug information through a serial cable to another computer. This is an important mode for software developers.
If you are using or have used Remote Install Services to install Windows 2000 on your computer, you might see additional options related to restoring or recovering your system through Remote Install Services.
To start Windows 2000 in Safe mode, restart your computer. Press F8 when you see the message Please Select The Operating System To Start. Use the arrow keys to highlight the appropriate Safe mode option, and then press Enter.
Safe mode helps you diagnose problems. If a symptom does not reappear when you start in Safe mode, you can eliminate the default settings and minimum device drivers as possible causes. If a newly added device or a changed driver is causing problems, you can use Safe mode to remove the device or reverse the change.
Recovery Console
The Recovery Console is a text-mode command interpreter that is separate from the Windows 2000 command prompt and allows the system administrator to gain access to the hard disk of a computer running Windows 2000, regardless of the file system (NTFS or FAT) used, for basic troubleshooting and system maintenance. Since starting Windows 2000 is not a prerequisite for using the Recovery Console, it can help you recover when your Windows 2000-based computer does not start properly or at all.
The Recovery Console allows you to obtain limited access to NTFS, FAT16, and FAT32 volumes without starting the graphical interface. The Recovery Console allows administrators and Microsoft Product Support Services technicians to start and stop services and repair the system in a very precise manner. It can also be used to repair the master boot record and boot sector and to format volumes. The Recovery Console prevents unauthorized access to volumes by requiring the user to enter the system administrator password.
Starting the Recovery Console
To start the Recovery Console, start the computer from the Windows 2000 installation CD-ROM or the Windows 2000 Setup floppy disks. If you do not have Setup floppy disks and your computer cannot start from the Windows 2000 installation CD-ROM, use another computer and the Makeboot.exe or Makebt32.exe utility to create the Setup floppy disks.
If the Recovery Console was installed on the local hard disk, it can also be accessed from the Windows 2000 startup menu. However, if the master boot record or the system volume boot sector has been damaged, you need to start the computer by using either the Windows 2000 Setup floppy disks or the Windows 2000 installation CD-ROM to access the Recovery Console.
To add the Recovery Console to existing installations of Windows 2000, on the Start menu, click Run, and then type <cdrom>:\I386\Winnt32.exe /cmdcons where <cdrom> is the drive letter of the CD-ROM drive.
The installation of the Recovery Console requires approximately 7 MB of disk space on the system partition.
IMPORTANT
You cannot preinstall the Recovery Console on a computer that contains a mirrored volume. First break the mirror, and then install the Recovery Console. After the Recovery Console is installed, you can reestablish the mirrored volume.
If the Recovery Console is not installed, run Windows 2000 Setup. Press Enter at the Setup Notification screen. Press R to repair a Windows 2000 installation, and then press C to use the Recovery Console.
Certain installations and configurations can affect how you use the Recovery Console:
- If there is more than one installation of Windows 2000 or Windows NT 4.0 or earlier, they are shown in the Recovery Console Startup menu.
- Mirrored volumes appear twice in the Recovery Console Startup menu, but each entry has the same drive letter, so they are actually the same drive.
- Changes made with the Recovery Console to mirrored volumes are mirrored.
To access the disk by using the Recovery Console, press the number key representing the Windows 2000 installation that you want to repair, and then press Enter. The Recovery Console prompts you for the administrator password. If you press Enter without typing a number, the Recovery Console exits and restarts the computer.
NOTE
To use the Recovery Console, you must know the password for the local Administrator account. If you do not have the correct password, Recovery Console does not allow access to the computer. If an incorrect password is entered three times, the Recovery Console quits and restarts the computer. However, you can use either the Group Policy snap-in or the Security Configuration And Analysis snap-in to enable automatic administrative logon. This setting is contained in the Security Options node, and the value name is Recovery Console: Allow automatic administrative logon.
Once the password has been validated, you have full access to the Recovery Console but limited access to the hard disk. You can access the following partitions and folders on your computer:
- %systemroot% and subfolders of the Windows 2000 installation in which you are currently logged on
- The root of all partitions, including %systemdrive%, the CD-ROM, and floppy drive with some restrictions (Floppy drive restrictions are outlined later in this lesson.)
NOTE
With the set command enabled, you can copy files to removable media, disable the file copy prompt, use wild cards with the Copy command, and access all paths on the system. The Set command is an optional Recovery Console command that can be enabled by using either the Group Policy snap-in or the Security Configuration And Analysis snap-in.
The Recovery Console prevents access to other folders such as Program Files or Documents And Settings, as well as to folders containing other installations of Windows 2000. However, you can use the logon command to access an alternate installation. Alternatively, you can gain access to other installation folders by restarting the Recovery Console, choosing the number representing that installation, and then entering the administrator password for that installation.
You cannot copy a file from the local hard disk to a floppy disk, but you can copy a file from a floppy disk or a CD-ROM to any hard disk, and from a hard disk to another hard disk. However, with the set command enabled, you can copy files to a floppy disk. The Recovery Console displays an Access Is Denied error message when it detects invalid commands.
IMPORTANT
The set command makes use of Recovery Console environment variables to enable disk write access to floppy disks as well as to enable other options. To enable the user to modify the restricted default Recovery Console environment variables, a policy setting must be made.
The Recovery Console buffers previously entered commands and makes them available to the user with the up and down arrow keys. To edit a previously entered command, use Backspace to move the cursor to the point of the edit and retype the remainder of the command. At any point, you can quit the Recovery Console and restart the computer by typing exit at the command prompt.
Note that the Recovery Console might not map disk volumes with the same drive letters they have in Windows 2000. If you are having trouble copying files from one location to another, use the Map command from the Recovery Console to make sure that the drive mappings for both the source and the target locations are correct.
TIP
You can use the Help command to list the commands supported by the Recovery Console. In addition, the /? switch works with every Recovery Console command to display a Help screen that includes a description of the command, its syntax, a definition of its parameters, and other useful information.
Emergency Repair Disk
If your system does not start and using Safe mode or the Recovery Console has not helped, you can try using the ERD. Backup includes a wizard to help you create an ERD. If a system failure occurs, first start the system by using the Windows 2000 installation CD-ROM or the Windows 2000 Setup floppy disks, which can be created by running Makeboot.exe or Makebt32.exe from the Bootdisk folder of the Windows 2000 installation CD-ROM. In Text mode, type r to enter recovery options and type r again to enter Emergency Repair. Then use the ERD to restore core system files. Note that you cannot repair all disk problems by using the ERD.
Make sure to create an ERD when your computer is functioning well so that you are prepared if you need to repair system files. You can use the ERD to fix problems that might be preventing you from starting your computer. This includes problems with your registry, system files, partition boot sector, and startup environment. However, the ERD does not back up data or programs and is not a replacement for regular system backups.
The Windows 2000 ERD, unlike the ERD used with Windows NT, does not contain a copy of the registry files. The backup registry files are in the folder %systemroot%\Repair as they are in Windows NT. However, these files are from the original installation of Windows 2000. In the event of a problem, they can be used to return your computer to a usable state.
When you back up system state data, a copy of your registry files is placed in the folder %systemroot%\Repair\Regback. If your registry files become corrupted or are accidentally erased, use the files in this folder to repair your registry without performing a full restore of the system state data. This method is recommended for advanced users only and can also be accomplished by using the Recovery Console commands.
Creating the Emergency Repair Disk
When the ERD is created, the files described in Table 25.3 are copied from %systemroot%\Repair to a floppy disk.
Table 25.3 Files copied to ERD floppy disk
| File Name | Contents |
|---|---|
| Autoexec.nt | A copy of %systemroot%\System32\Autoexec.nt, which is used to initialize the MS-DOS environment. |
| Config.nt | A copy of %systemroot%\System32\Config.nt, which is used to initialize the MS-DOS environment. |
| Setup.log | A log of which files were installed and of Cyclic Redundancy Check (CRC) information for use during the emergency repair process. This file has the read-only, system, and hidden attributes, and it is not visible unless you have configured My Computer to show all files or used the dir /a, dir /as or dir /ah command-line commands. |
Create the ERD after Windows 2000 is installed. Re-create the ERD after each service pack, system date, or updated driver is installed. Be sure to make a copy of your current ERD and store it in a secure location, perhaps off site.
Emergency Repair Process
If you have prepared an ERD, you can use it to help repair system files after starting the computer by using either the Windows 2000 installation CD-ROM or the Windows 2000 Setup floppy disks. However, the Windows 2000 installation CD-ROM is required for replacing any damaged files.
The ERD must include current configuration information. Make sure that you have an ERD for each installation of Windows 2000 on your computer, and never use an ERD from another computer.
When you start the emergency repair process, you will be asked to choose one of the following options:
- Manual Repair. To choose from a list of repair options, press M. It is recommended that only advanced users or administrators choose this option. You can use it to repair system files, boot sector problems, and startup environment problems.
- Fast Repair. To perform all repair options, press F. This is the easier option to use and does not require user input. If you choose this option, the emergency recovery process attempts to repair problems related to system files, the boot sector on your system disk, and your startup environment (if your computer has more than one operating system installed). This option also checks and repairs the registry files by loading and unloading each registry key. If a key is not successfully checked, it is automatically copied from the repair directory to the folder %systemroot%\System32\Config.
If you select Manual Repair, the registry files are not checked. If you select Fast Repair and the folder %systemroot%\Repair is accessible, the registry files are checked. If the folder %systemroot%\Repair is inaccessible (for example, due to file system corruption), the registry files are not checked.
Manual Repair allows you to select from the following three options:
- Inspect Startup Environment. Inspect Startup Environment verifies that the Windows 2000 files in the system partition are correct. If any of the files needed to start Windows 2000 are missing or corrupted, Repair replaces them from the Windows 2000 installation CD-ROM. These include Ntldr and Ntdetect.com. If Boot.ini is missing, it is re-created.
- Verify Windows 2000 System Files. Verify Windows 2000 System Files uses a checksum to verify that each installed file is good and matches the file that was installed from the Windows 2000 installation CD-ROM. If the recovery process determines that a file on the disk does not match what was installed, it displays a message that identifies the file and asks if you want to replace it. The emergency repair process also verifies that startup files, such as Ntldr and Ntoskrnl.exe, are present and valid.
- Inspect Boot Sector. Inspect Boot Sector verifies that the boot sector on the system partition still references Ntldr. The Emergency Repair Process can only replace the boot sector for the system partition on the first hard disk. The Emergency Repair Process can also repair the boot sector for the system partition on the startup disk.
NOTE
If the boot sector is infected with a virus, boot the computer using an antivirus boot diskette. Instruct the antivirus program to inspect and cure the boot sector. An antivirus program for inspecting the boot sector is included on the Windows 2000 Server Installation CD-ROM in the \3RDPARTY\CA_ANTIV folder. This program might not be included on the Windows 2000 Server installation CD-ROM included with this training kit.
If the Emergency Repair Process Does Not Fix Your System
If you have performed the emergency repair process and the computer still does not operate normally, you can perform an in-place upgrade over the existing installation. This is a last resort before reinstalling the operating system. However, note that the time required to perform an upgrade is similar to the time it takes to reinstall the operating system.
NOTE
If you perform an in-place upgrade of your Windows 2000 existing installation, you might lose some customized settings of your system files.
Restoring Data
Restoring corrupt or lost data is critical for all corporations and is the goal of all backup jobs. To ensure that you can successfully restore data, you should follow certain guidelines, such as keeping thorough documentation on all of your backup jobs. In addition, you must select the backup sets, files, and folders to restore. You can also specify additional settings based on your restore requirements. Windows Backup provides a Restore wizard to help you restore data, or you can restore data without using the wizard.
Preparing to Restore Data
When critical data is lost, you need to restore the data quickly. Use the following guidelines to prepare for restoring data:
- Base your restore strategy on the backup type you used for the backup. If time is critical when you are restoring data, your restore strategy must ensure that the backup types you choose for backups expedite the restore process. For example, use normal and differential backups so that you need to restore only the last normal backup and the last differential backup.
- Perform a trial restore periodically to verify that Windows Backup is backing up your files correctly. A trial restore can uncover hardware problems that do not show up with backup file verifications. Restore the data to an alternate location, and then compare the restored data to the data on the original hard disk.
- Keep documentation for each backup job. Create and print a detailed Backup log for each backup job. A detailed backup log contains a record of all files and folders that were backed up. By using the Backup log, you can quickly locate which piece of media contains the files you need to restore without having to load the catalogs. A catalog is an index of the files and folders from a backup job that Windows 2000 automatically creates and stores with the backup job on the computer running Windows Backup.
- Keep a record of multiple backup jobs in a calendar format that shows the days on which you perform the backup jobs. For each job, note the backup type and identify the storage used, such as a tape number or removable disk name. Then, if you need to restore data, you can easily review several weeks' worth of backup jobs to select which type to use.
Selecting Backup Sets, Files, and Folders to Restore
The first step in restoring data is to select the data to restore. You can select individual files and folders, an entire backup job, or a backup set. A backup set is a collection of files or folders from one volume that you back up during a backup job. If you back up two volumes on a hard disk during a backup job, the job has two backup sets. You can select the data to restore in the catalog.
To restore data, use the Restore wizard, which you access through Windows Backup. After you run the wizard, the initial settings for the restore process are displayed in the Completing The Restore Wizard screen. At this time, you can perform one of the following actions:
- Finish the restore process by clicking the Finish button. If you choose to finish the restore job, the Restore wizard requests verification for the source of the restore media and then performs the restore. During the restore process, the Restore wizard displays status information about the restore.
- Specify advanced restore options by clicking the Advanced button.
Specifying Advanced Restore Settings
The advanced settings in the Restore wizard vary, depending on the types of backup media from which you are restoring. After you have finished the Restore wizard, Windows Backup does the following:
- Prompts you to verify your selection of the source media to use to restore data. After the verification, Windows Backup starts the restore process.
- Displays status information about the restore process. As with a backup process, you can choose to view the report (restore log) of the restore. It contains information about the restore, such as the number of files that have been restored and the duration of the restore process.
Table 25.4 describes the advanced restore options.
Table 25.4 Advanced Restore Options
| Option | Description |
|---|---|
| Restore Files To | The target location for the data you are restoring. You can choose from the following options: Original Location. Replaces corrupted or lost data. Alternate Location. Restores an older version of a file or does a practice restore. Single Folder. Consolidates the files from a tree structure into a single folder. For example, use this option if you want copies of specific files but do not want to restore the hierarchical structure of the files. If you select either an alternate location or a single folder, you must provide the path. |
| When Restoring A File That Is Already On My Computer | You can choose from the following options: Do Not Replace The File On My Disk (Recommended). Prevents accidental overwriting of existing data. This option is the default. Replace The File On My Disk Only If The File On Disk Is Older Than The Backup Copy. Verifies that the most recent copy exists on the computer. Always Replace The File On My Computer. Windows Backup does not provide a confirmation message if it encounters a duplicate file name during the restore operation. |
| Advanced Restore Options | The options for whether or not to restore security or special system files. You can choose from the following options: Restore Security. Applies the original permissions to files you are restoring to an NTFS volume. Security settings include access permissions, audit entries, and ownership. This option is available only if you have backed up data from an NTFS volume and are restoring to an NTFS volume. Restore Removable Storage Database. Restores the configuration database for Removable Storage Management (RSM) devices and the media pool settings. The database is located in %systemroot%\system32\remotestorage. Restore Junction Points, And Restore File And Folder Data Under Junction Points To The Original Location. Restores junction points on your hard disk as well as the data the junction points refer to. If you have any mounted drives and you want to restore the data that mounted drives point to, you should select this check box. If you do not select this check box, the junction point is restored but the data your junction point refers to might not be accessible. |

Practice: Restoring Data
In this practice, you delete the Inetpub folder and then run a restore routine to restore the Inetpub folder. Complete this practice on Server01.
NOTE
Before you start this exercise, you need to use the Backup wizard (see Lesson 2, "Backing Up Data," of Chapter 6, "Monitoring and Optimizing System Performance," if you need to review backup procedures) and backup the system state (the Active Directory store, Boot files, Registry settings, COM+ Class Registration database, Sysvol folder and Certificate services database) to a file called backup1.bkf.
Exercise 1: Deleting Critical Data
In this exercise, you intentionally delete Boot.ini on Server01. Typically, deleting critical files is an accident or a result of hardware failure.
- Double-click My Computer, and then double-click Local Disk (C:).
The Local Disk (C:) window appears.
- Maximize the window.
- Click the Tools menu, and then click Folder Options.
The Folder Options dialog box appears.
- Click the View tab.
- Clear the Hide Protected Operating System Files (Recommended) check box.
A Warning message box appears stating that you are about to show critical hidden and system files.
- Click Yes.
The Folder Options dialog box appears.
- Click OK.
More files appear in the Local Disk (C:) window.
- Click once on boot.ini.
- Click the File menu, and then click Delete.
A Confirm File Delete message box appears asking if you are sure you want to delete this critical file.
- Click Yes.
The boot.ini file is now gone. While you could recover it from the Recycle Bin, you will use the restore program in the next exercise to recover the file that was backed up before you began this exercise..
- Keep the Local Disk (C:) window maximized; it will be used in the next exercise.
Exercise 2: Restoring Critical Data
In this exercise, you recover boot.ini on Server01from a backup set.
- In the Local Disk (C:) window, double-click Backup1.bkf.
The Backup - [Untitled] dialog box appears.
- Click the Restore Wizard button.
The Welcome To The Restore Wizard screen appears.
- Click Next.
The What To Restore screen appears, prompting you to select the backup media from which you wish to restore files.
Notice that the only media from which you can restore is a file and the backup files are listed according to the media label specified.
- Under the What To Restore box, expand the first backup job you created when you began Exercise 1..
Notice that drive C appears as the first folder in the backup file. Windows Backup creates a separate backup set for each volume backed up. All folders and files backed up from a single volume appear under the drive letter for the volume.
- Expand drive C.
The Backup File Name dialog box appears with C:\ Backup1.bkf in the Catalog Backup File text box.
If c:\Backup2.bkf appears, change the name to C:\Backup1.bkf.
- Click OK.
- When you are returned to the What To Restore screen, click on C:.
Boot.ini appears in the Name column.
- In the Name column, click the Boot.ini check box and then click Next.
The Completing The Restore Wizard screen appears, prompting you to start the restore operation and use the default restore settings.
- Click the Advanced button.
The Where To Restore screen appears, prompting you for a target location to restore files.
- Click the drop-down list box to review the restore location options.
- Verify that Original location is selected, and click Next.
- The How To Restore screen appears, prompting you to specify how to process duplicate files during the restore job.
- Verify that the Do Not Replace The File On My Disk (Recommended) radio button is selected, and then click Next.
- The Advanced Restore Options screen appears, prompting you to select security options for the restore job.
- Verify that the Restore Security check box is selected, clear the Restore Junction Points, Not The Folders And File Data They Reference check box, and then click Next.
The Completing The Restore Wizard screen appears, displaying a summary of the restore options you selected.
- Click Finish to begin the restore process.
Windows Backup displays the Enter Backup File Name dialog box, prompting you to supply or verify the name of the backup file that contains the folders and files to be restored.
- Verify that C:\ Backup1.bkf appears in the Restore From Backup File text box, and then click OK.
The Selection Information dialog box appears.
The Restore Progress dialog box appears, providing the status of the restore operation, statistics on estimated and actual amount of data being processed, the time that has elapsed, and the estimated time that remains for the restore operation.
- When the Restore Progress dialog box indicates that the restore is complete, click the Report button.
Notepad starts and displays the report. Notice that the details about the restore operation are appended to the Backup log. This provides a centralized location from which to view all status information for this backup and restore operation.
- Examine the report, and then close Notepad.
- In the Restore Progress dialog box, click Close.
Backup [Untitled] dialog box appears with the Welcome tab active.
- Close the Backup [Untitled] dialog box.
The Local Disk (C:) window appears.
- Notice that boot.ini has been restored.
- Close the Local Disk (C:) window.
Recovering a Mirrored or RAID-5 Volume
This section provides information about recovering from a mirrored volume failure and repairing a RAID-5 volume.
Recovering from a Mirrored Volume Failure
In a mirrored volume, the computer saves data to each member simultaneously. If one member fails, the functional member continues to operate.
To replace the failed member, you must first "remove" the failed disk from the mirrored volume. Using the Computer Management snap-in, you can isolate the working member as a separate volume. Then you can replace the failed disk with a functional disk.
To re-create the mirrored volume after replacing the failed disk, click the working partition in the Computer Management window, and then click Add Mirror. The computer then presents the option to mirror this partition to the replacement disk.
In Figure 25.4, drive D on disk 0 is mirrored on disk 1. Drive D on disk 1 is the secondary member of the mirrored volume.
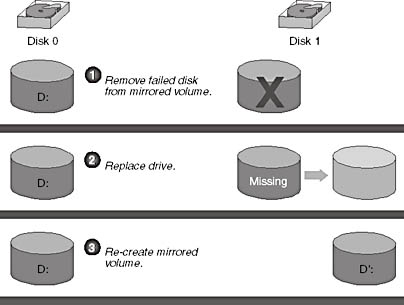
Figure 25.4 Replacing a failed disk in a mirrored volume
In the event of the failgure of the primary member of a mirrored volume, including the boot partition, use a boot disk to start the computer and access the functioning member. The Boot.ini file on the boot disk must include the Advanced RISC Computing (ARC) path pointing to the mirrored partition. It is recommended that you create and test a boot disk immediately after implementing a mirrored volume.
NOTE
Replacing a failed member is not the only reason to remove a mirrored volume. You might also remove one member of a mirrored volume to reclaim the disk space for other purposes.
Repairing a RAID-5 Volume
If a member of a RAID-5 volume fails, the computer continues to operate with access to all data. However, as data is requested, the Windows 2000 Server fault tolerance driver uses the data and parity bits on the remaining members to regenerate the missing data in RAM. During this regeneration, computer performance decreases.
To restore the computer's level of performance, you can replace the failed drive and then repair the RAID-5 volume. The fault tolerance driver reads the parity information from the parity information stripes on the remaining members, and then re-creates the data contained on the missing member. When complete, the fault tolerance driver writes the data to the new member.
Lesson Summary
In this lesson you learned that disaster recovery allows you to restore a computer so that you can log on and access system resources after a computer disaster has occurred. Windows 2000 includes three methods that allow you to repair a system: Safe mode, the Recovery Console, and the ERD. Safe mode lets you start your system with a minimal set of device drivers and services. The Recovery Console is a text-mode command interpreter that is separate from the Windows 2000 command prompt and allows the system administrator to gain access to the hard disk of a computer running Windows 2000. The ERD allows you to restore core system files.
You also learned that in addition to repairing a system, you should be able to restore data. Windows Backup provides a Restore wizard to help you restore data, or you can restore data without using the wizard. Also, if you have set up your system with disk fault tolerance, you can recover from a mirrored volume failure or repair a RAID-5 volume.
EAN: N/A
Pages: 244