Lesson 6: Managing and Monitoring Remote Access
Managing and monitoring a remote access server can be done with several tools. In this lesson, you learn about remote access logging, accounting, Netsh, Network Monitor, and various resource kit utilities.
After this lesson, you will be able to
- Explain remote access logging
- Describe accounting
- Explain Netsh
- Understand Network Monitor's role in remote access
- List several resource kit utilities to monitor remote access
Estimated lesson time: 30 minutes
Logging User Authentication and Accounting Requests
Internet Authentication Service (IAS) can create log files based on the authentication and accounting requests received from the Network Access Servers (NASs) by collecting these packets in a centralized location. Setting up and using such log files to track authentication information—such as each accept, reject, and automatic account lockout—can help simplify administration of your service. You can set up and use logs to track accounting information—such as logon and logoff records—to help maintain records for billing purposes (see Figure 12.16).
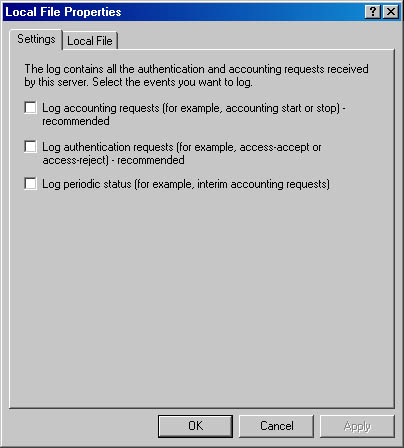
Figure 12.16 Remote Access logging
When you set up logging, you can specify the following:
- The requests to be logged
- The file format for the logs
- The frequency with which new logs are started
- The location where the logs are to be maintained
You can also select the types of requests received by the IAS server that are to be logged.
Accounting requests include the following:
- Accounting-on requests, which are sent by the NAS to indicate that the NAS is online and ready to accept connections
- Accounting-off requests, which are sent by the NAS to indicate that the NAS is going offline
- Accounting-start requests, which are sent by the NAS (after the user is accepted by the IAS server) to indicate the start of a user session
- Accounting-stop requests, which are sent by the NAS to indicate the end of a user session
Authentication requests include the following:
- Authentication requests, which are sent by the NAS on behalf of the connecting user. These entries in the log contain only incoming attributes.
- Authentication accepts and rejects, which are sent by IAS to the NAS to indicate whether the user should be accepted or rejected. These entries contain only outgoing attributes.
- Periodic status, to obtain interim accounting requests sent by some NASs during sessions.
- Accounting-interim requests, which are sent periodically by the NAS during a user session (if the acct-interim-interval attribute is configured in the remote access profile on the IAS server to support periodic requests).
Initially, it is recommended that you select the first two options and refine your logging methods after you determine which data best matches your needs.
When you set up your servers, specify whether new logs are started daily, weekly, monthly, or when the log reaches a specific size. You can also specify that a single log is maintained continually (regardless of file size), but this is not recommended. The file naming convention for logs is determined by the log period you select. Because changing this option can result in overwriting of existing logs, you should copy logs to a separate file before changing the log period. By default, the log files are located in the %systemroot%\System32\LogFiles folder, but you have the option of specifying a different location.
Log File Records
Attributes are recorded in Unicode Translation Format-8 (UTF-8) encoding in a comma-delimited format. The format of the records in a log file depends on the file format.
- In IAS-formatted log files, each record starts with a fixed-format header, which consists of the NAS IP address, user name, record date, record time, service name, and computer name, which is followed by attribute-value pairs.
- In database-import log files, each record contains attribute values in a consistent sequence, starting with the computer name and are followed by the service name, record date, and record time. An NAS may not use all of the attributes specified in the database-import log format, but the comma-delimited location for each of these predefined attributes is maintained, even for attributes that have no value specified in a record.
Accounting
Routing and Remote Access can be configured to log accounting information in the following locations:
- Locally stored log files when configured for Windows accounting. The information logged and where it is stored are configured from the properties of the Remote Access Logging folder in the Routing and Remote Access snap-in.
- At a RADIUS server when configured for RADIUS accounting. If the RADIUS server is an IAS server, the log files are stored on the IAS server. The information logged and where it is stored are configured from the properties of the Remote Access Logging folder in the Internet Authentication Service snap-in.
Configuration of the Routing and Remote Access accounting provider is done from the Security tab from the properties of a remote access router in the Routing and Remote Access snap-in, as shown in Figure 12.17, or by using the Netsh tool.
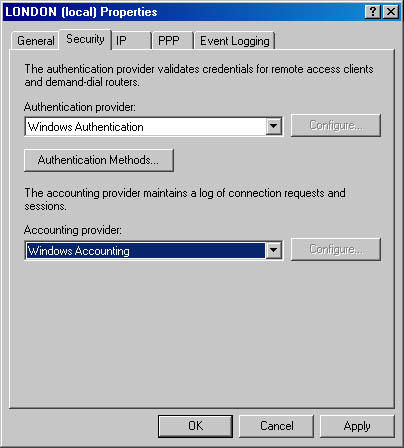
Figure 12.17 Remote Access accounting
Netsh Command-Line Tool
Netsh is a command-line and scripting tool for Windows 2000 networking components for local or remote computers. Netsh is supplied with Windows 2000. Netsh allows you to save a configuration script in a text file for archival purposes or for configuring other servers.
Netsh is a shell that can support multiple Windows 2000 components through the addition of Netsh helper dynamic-link libraries (DLLs). A Netsh helper DLL extends Netsh functionality by providing additional commands to monitor or configure a specific Windows 2000 networking component. Each Netsh helper DLL provides a context (a group of commands for a specific networking component). Within each context, subcontexts can exist. For example, within the routing context, the subcontexts IP and IPX exist to group IP routing and IPX routing commands together.
For Routing and Remote Access, Netsh has the following contexts:
- ras. Use commands in the ras context to configure remote access configuration.
- aaaa. Use commands in the aaaa context to configure the AAAA component used by both Routing and Remote Access and IAS.
- routing. Use commands in the routing context to configure IP and IPX routing.
- interface. Use commands in the interface context to configure demand-dial interfaces.
Network Monitor
Network Monitor enables you to detect and troubleshoot problems on LANs and on WANs, including Routing and Remote Access links. With Network Monitor you can identify network traffic patterns and network problems. For example, you can locate client-to-server connection problems, find a computer that makes a disproportionate number of work requests, capture frames (packets) directly from the network, display and filter the captured frames, and identify unauthorized users on your network.
Resource Kit Utilities
The following are Resource Kit utilities that make the job of managing and monitoring Routing and Remote Access easier.
RASLIST.EXE
The RASLIST.EXE command-line tool displays Routing and Remote Access server announcements from a network. Raslist listens for Routing and Remote Access server announcements on all active network cards in the computer from which it is run. Its output shows which card received the announcement. Raslist is a monitoring tool. It may take a few seconds for the data to begin to appear; data continues to appear until the tool is closed.
RASSRVMON.EXE
By using the RASSRVMON.EXE tool, you can monitor the remote access server activities on your server in greater detail than the standard Windows tools allow. Rassrvmon provides the following monitoring information:
- Server information, such as the time of first call to server, time of most recent call to server, total calls, total bytes passed through server, peak connection count, total connect time, currently connected users, and their connection information.
- Per Port information, which is the time of first call to port, time of most recent call to port, total connections to this port since server started, total bytes passed on this port, total errors on this port, and current port status.
- Summary information, such as statistics kept for each unique user/computer combination since the start of the monitoring, which include total connect time, total bytes transmitted, connection count, average connect time, and total error count.
- Individual connection information, which includes per-connection statistics for each connection: user name/computer name, IP address, connection establishment time, duration, bytes transmitted, error count, and line speed.
To allow for more flexibility, alerts can be set up to run a program of your choice. This gives you the flexibility to send mail, a page, a network popup, or any other action you can automate with an executable file name or a batch script.
RASUSERS.EXE
RASUSERS.EXE lets you list for a domain or a server all user accounts that have been granted permission to dial in to the network via Routing and Remote Access, a feature of Windows 2000 that implements remote access functionality.
TRACEENABLE.EXE
TRACEENABLE.EXE is a graphical user interface-based tool that enables tracing and displays current tracing options. Windows 2000 Routing and Remote Access has an extensive tracing capability that you can use to troubleshoot complex network problems. Tracing records internal component variables, function calls, and interactions. Separate Routing and Remote Access components can be independently enabled to log tracing information to files (file tracing). You must enable the tracing function by changing settings in the Windows 2000 registry using TRACEENABLE.EXE.
Using TraceENABLE.EXE
As each tracing item is selected in the combo box, the values are displayed. Make your changes, and then click Set. This writes your changes to the registry. To get console tracing, you must turn it on for the component and turn it on with the master check box at the top of the Trace Enable window. For example, you would follow these steps to generate a log file for PPP:
- Select PPP from the drop-down list.
- Click Enable File Tracing.
- Click Set.
Tracing is now enabled for this component. In most cases the log file is created in %windir%\tracing.
Lesson Summary
Managing and monitoring a remote access server is done with several tools. In this lesson, you learned about remote access logging, accounting, Netsh, Network Monitor, and various resource kit utilities.
EAN: N/A
Pages: 244