| Because every loop is different, the best way to get a feel for the loop player's controls is to try it out. In this example, we'll take a rhythm guitar loop and turn it into a repeating dance figure. To load a loop 1. | In the transport bar at the bottom of the Sequencer, set your song tempo to 140.
| 2. | Go to the Dr. Rex in your Rack, and click the Browse Loop button.
| 3. | In the loop browser, load the loop Reason Factory Sound Bank /Dr Rex Instrument Loops/Guitar Loops/Ac Guitar Strum 125 bpm/AcGt_Oley_Cm7_125.rx2 (Figure 6.144).
Figure 6.144. Load a slice file of an acoustic-guitar rhythm part. 
Since the loop is recorded at a slower tempo (125 bpm) the slices will be slightly longer than needed, giving us some decay to work with.
| 4. | Click the Preview button.
For a rhythm guitar part, the tempo right now is a bit fast. But we're going to turn it into a dance loop, so this is about right.
|
The amp envelope works by the slice, so it shapes notes the way most amp envelopes do. But since slices usually pass quickly and don't often extend very far beyond an attack, the attack and decay stages have more effect than sustain and release. To set the amp envelope and filter 1. | With the guitar loop loaded in your Dr. Rex and with Preview enabled, set the amp envelope attack to 27. This gives each slice a softer attack.
| 2. | Set the amp decay stage to 60 and the sustain to 0 (Figure 6.145). This has the effect of tightening up the loop by creating space between the slices.
Figure 6.145. Set the amp envelope. 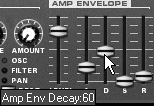
| 3. | Turn on the Filter section, and set the Res fader to 50.
| 4. | Set the filter frequency to 0 (Figure 6.146). This temporarily shuts off all sound, but don't worrywe're going to open the filter using the filter envelope.
Figure 6.146. Set the filter (don't worry that you don't hear anything). 
| 5. | Set the filter envelope Amount fader to 112, the attack to 12, the decay to 56, the sustain to 30, and the release to 0 (Figure 6.147). These settings turn the soft, sparse guitar part into a dance guitar line.
Figure 6.147. Set the filter envelope. 
|
Unlike with other samples, you can adjust individual portions of a slice file. This gives you a great deal of creative freedom without even having to write a note! Now let's try adjusting the slices. To adjust the slice settings 1. | With the AcGt_Oley_Cm7_125bpm loop still previewing, turn the Slice knob to 6. This determines the slice of the loop that you'll alter.
| 2. | Hold down Ctrl (Win) / Cmd (Mac) to get the fine adjustment mode, and turn the Pitch knob to 7 (Figure 6.148). This raises the pitch of Slice 6 a perfect fifth.
Figure 6.148. Transpose the pitch of a single slice. 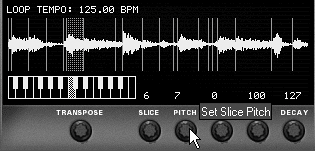
| 3. | Now turn the Pan knob to 13 (Figure 6.149). This separates the adjusted slice from the others in the stereo field. It also fixes Slice 6's panning position for when we apply the LFO to panning in the next exercise.
Figure 6.149. Setting the pan for an individual slice overrides LFO panning. 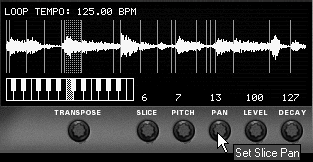
|
Now we'll set up a nice panning rotation that will highlight this sound and emphasize the slice we altered in the last exercise. To modulate panning using the LFO 1. | With the AcGt_Oley_Cm7_125bpm loop still previewing, set the LFO destination to Pan (Figure 6.150).
Figure 6.150. Set the LFO to modulate panning. 
| 2. | With Sync enabled, set the LFO rate to 4/4 and the Amount to 127. This causes all the other slices in the loop to rotate between the left and right stereo fields, with only Slice 7 remaining fixed.
| 3. | Set the Wavef. switch to triangle so that the sound pans smoothly from side to side (Figure 6.151).
Figure 6.151. Use the triangle LFO waveform for a smooth modulation curve. 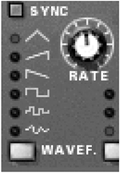
The upward sawtooth waveform will pan smoothly from left to right and then jump hard left.
The downward sawtooth will pan smoothly from right to left and then jump hard right.
The square waveform will ping-pong from left to right (try increasing the Rate knob to 1/8 or 3/8 for standard ping-pong pan).
The square noise setting will randomly jump panning positions at the selected rate.
The soft noise waveform will randomly pan from one position to the next, smoothly, at the selected rate.
|
 Tip Tip
The Mod wheel in Dr. Rex can add some drama. Let's set it for a more muted sound, which can be used to fade the loop into a song. To fade with the Mod wheel 1. | Set the Mod wheel's F.Freq knob to 26, the F.Res knob to 18, and the F.Decay knob to 45 (Figure 6.152).
Figure 6.152. Set up the Mod wheel for a muted version of the sound. 
| 2. | Move the Mod wheel to 127. This causes the filter to close, the resonance to increase, and the synthetic-sounding filter envelope effect to decrease.
| 3. | Now slowly move the Mod wheel back to 0 while previewing the loop, to hear the effect.
Slowly fading from a muted to a bright sound is a common dance music technique.
Finally, we'll add a beat loop to our dance guitar.
|
To load a beat loop 1. | Create a second Dr. Rex player.
| 2. | Load the Reason Factory Sound Bank /Dr Rex Drum Loops/House/Hse46_ Houseback_130_Griffin.rx2 loop.
| 3. | Click Preview.
|
|