Mapping Multiple Key Zones


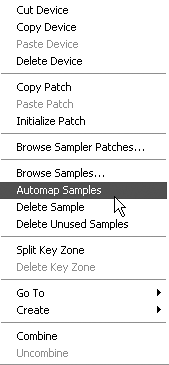
To get all the samples to correspond to the same pitch scale, you'll next need to set key zones. Using Reason's Automap feature is the easiest way to do this.

To map zones automatically

1.

Select and load multiple samples, as you did in the preceding section.

2.

Select Edit > Automap Samples (Figure 6.27). This assigns one key zone for each sample in memory.

Figure 6.27. The Automap command sets key zones for all samples in memory.


3.

Check that Reason has interpreted root keys correctly, by clicking key zones and looking for the shaded root key on the keyboard map at midpoint below the zone (Figure 6.28).

Figure 6.28. A correctly set root key sits centered below its key zone.


Tips

  • When a sample is missing root-key information, Reason will create key zones, but the root key is set to C3 by default (Figure 6.29).

    Figure 6.29. Automapped samples with no root key information get the default root key of C3.


  • Use Automap any time you're reasonably sure your samples contain root-key information (for example, if you're using samples from the Factory and Orkester sound banks).


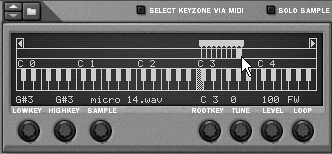
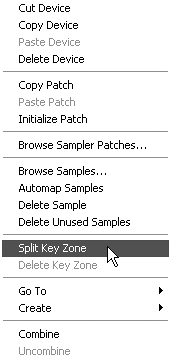
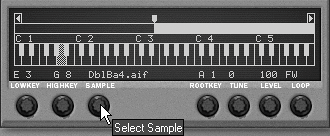
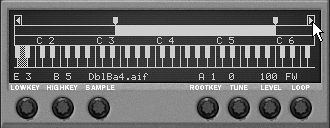
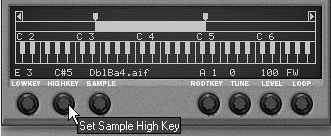
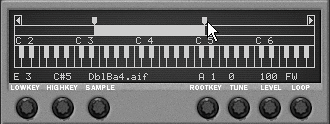
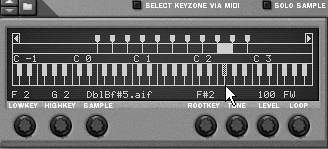
It's important to know how to manually map the keyboard, especially if you think you might want to load "unpedigreed" samples somedayor set up a performance patch with your own mapping scheme.

To map zones manually

1.

With unmapped samples loaded, click a key zone and add a new one by selecting Edit > Split Key Zone (Figure 6.30).

Figure 6.30. Use the Split Key Zone command when manually setting key zones.


2.

Select the new empty zone and drag the Sample knob until the desired sample name is displayed (Figure 6.31).

Figure 6.31. While a new key zone is selected, turn the Sample knob to assign a sample.


The sample is assigned to the new key zone.

3.

With the same zone selected, set the sample's root key using the Rootkey knob.

4.

Repeat steps 1 through 3 for each sample.

5.

Once you have more than two key zones, you can scroll over the keyboard ruler using the scroll arrows (Figure 6.32) in order to see keys not currently displayed.

Figure 6.32. Use the scroll arrows to get to different parts of the keyboard ruler.


6.

If you need to adjust an existing key zone, you can use the Highkey and Lowkey knobs (Figure 6.33), or you can interactively drag the zone marker handles (Figure 6.34).

Figure 6.33. Use the Lowkey and Highkey knobs to adjust key zones...


Figure 6.34. …or use the handles to resize interactively.


Tips

  • Dividing the keyboard among various types of samples is handy for performance patches (for example, bass in the lower zone and a lead sound in the upper zone).

  • When creating your own samples, include the root key in the sample name (F#5, C2, and so on) so that you can take your sample library with you to other studios and venues (Figure 6.35).

    Figure 6.35. The Reason Factory and Orkester sound banks include a sample's pitch in its name.


Reason 3 For Windows and Mac
ISBN: 321269179
EAN: N/A
Year: 2003
Pages: 180

flylib.com © 2008-2017.
If you may any questions please contact us: flylib@qtcs.net