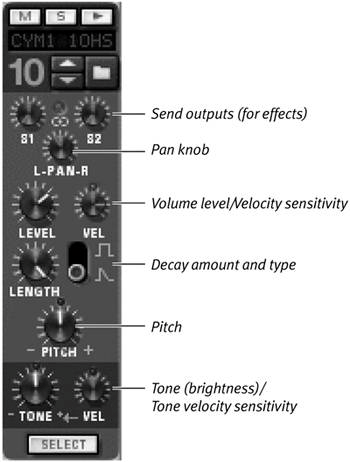
| In this section you'll walk through the process of using the various Redrum channel knobs (Figure 4.31) to adjust everything from volume levels to length and decay. The channel level knobs on the Redrum control the volume of the sound playing on each channel, enabling you to mix the various drum sounds in your beat against each other. Figure 4.31. The Redrum channel controls affect only the sample playing on that channel, and are optimized for different sounds. 
However, when people refer to a song's "mix," they are talking about more than just volume balance. The mix also includes the way different sounds are spread (panned) across the left and right channels, and how well the sounds balance tonally (are equalized) against each other. In short, mixing consists of taking a number of tracks and using every tool at your disposal to make them sound good together. The Redrum does not have the same controls on every channel. Some channels are optimized for toms (notice the pitch sensitivity controls on the bottom of Channels 6 and 7), and others work better for drums that sound brighter when hit hard (notice the tone sensitivity controls on Channels 1, 2, and 10). Mixing Tips for Drums Turn up the Level knob on the kick channel for a heavier bottom. Depending on what your snare sound is like, you may find that turning up the snare channel gives your beat more of a loud rock vibe. Emphasizing the hi-hat can be useful for funk styles, especially if you are using complicated patterns. Cymbal crashes often need to be turned down in the mix because their bright, noisy sound can easily overpower the other drum sounds.
|
To adjust levels 1. | With looping enabled in the Sequencer, click the play button.
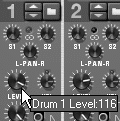
| 2. | In the Rack, choose a Redrum drum channel and drag the Level knob counterclockwise to lower the volume, or clockwise to raise it (Figure 4.32).
Figure 4.32. Turn up the kick drum using Channel 1's Level knob. 
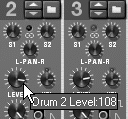
| 3. | Adjust the other channels' Level knobs to get an overall balance (Figure 4.33).
Figure 4.33. Turn up the snare drum using Channel 2's Level knob. 
|
 Tip Tip
Velocity sensitivity Right next to the Level knob in all the channels is the Vel knob, which controls level velocity sensitivity. This knob determines the drum level's sensitivity to note attack. To adjust velocity sensitivity 1. | In the Sequencer, in Edit mode, find a channel with a lot of activity and many different attack strengths, such as the hi-hat.
| 2. | In the Rack, turn the Vel knob clockwise. This makes hard attacks sound louder, and soft attacks softer.
| 3. | Turn the Vel knob counterclockwise to make soft attacks sound louder, and hard attacks sound softer.
|
 Tips Tips
Though not always useful, the "reversible" velocity sensitivity control can add some interesting variety to your beat. You can even disconnect note attack from volume altogether by setting the Vel knob at 12 o'clock.
Panning The Redrum Pan knobs allow you to separate sounds between the right and left speakers. Turning the Pan knob clockwise puts more sound out the right side, and turning the Pan knob counterclockwise puts more sound out the left side. To adjust panning 1. | With the loop playing, select a drum channel and turn the Pan knob counterclockwise.
| 2. | Pick a second drum channel and turn its Pan knob clockwise (Figure 4.34).
Figure 4.34. These channels' Pan knobs are turned hard left and hard right for dramatic separation. 
You should hear the first sound coming out the left speaker, and the second sound coming out the right side.
|
 Tip Tip
If you're concerned with creating an interesting stereo space, you may want to pan some sounds hard left and others hard right to separate them as much as possible. If you're looking for "realism" or "live" sound quality, pan the channels closer together (Figure 4.35). Figure 4.35. When the channels' Pan knobs are turned to similar positions, the listener's ear will perceive the sounds as coming from the same location. 
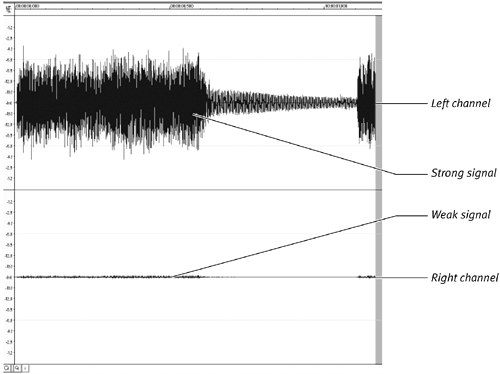
Panning Stereo Samples Reason handles stereo and mono samples differently. With mono samples, Reason passes two copies of the signal through the outputsone to the left and one to the right. This means when the sound is panned center, both left and right sides have equal volume. A stereo sample, on the other hand, already has left and right channels. Reason passes the left channel through the left output, and the right channel through the right output. Panning a stereo sample left and right can cause drop-outs or fade-ins if the stereo sample is already panned heavily to one side. How? If a stereo drum sound is recorded panned hard to the left, the right channel will have very little signal (Figure 4.36). So when you pan that sample hard right, there's almost no sound. Figure 4.36. A stereo file with heavy panning, displayed as a waveform. This sample would produce little or no signal on the right channel, even when panned dead center. 
|
Tone control and accents Channels 1, 2, and 10 are typically used for kick, snare, and cymbals in many preset patches in your sound bank. Conveniently, Reason has tone controls for these channelstone controls can be an even more powerful tool than level volume for creating dramatic accents. The Tone knob sets brightness level, and the adjacent Vel knob sets brightness sensitivity to note attack. To control tone 1. | With your loop playing, boost the Tone knob setting on Channel 1 in the Redrum to brighten the sound.
| 2. | Turn the Vel knob clockwise to make hard attacks sound brighter and soft attacks sound darker.
| 3. | Turn the Vel knob counterclockwise to make soft attacks sound brighter and hard attacks sound darker.
|
The Length knob and articulation Articulation is the musical term describing how slurred or punchy the notes sound, and technically that means the spaces between notes. The Length and Mode controls on the Redrum channel strip directly affect the articulation of notes by altering the length of the drum sounds (Length knob) and the way the notes decay before the next note is played (Mode switch). The Length knob shortens the drum sound by applying a volume cutoff, or gate, to the end (the decay) of the sound. The Redrum has two types of gates for cutting off a note: Mode 1, square mode, cuts off the drum sound instantaneously. Mode 2, ramp mode, fades out. Since every sample is different, these modes will create different results for every sound, so the easiest way to understand length and gate modes is to start tweaking them and listen to the result. To control the length and mode 1. | With the loop playing, choose a drum channel with a lot of activity and click the Solo button on the top of the Redrum channel strip.
| 2. | Drag the Length knob counterclockwise to shorten the drum sound.
| 3. | Reset the Length knob to midrange.
| 4. | Flip the Mode switch to the right of the Length knob, switching it from the lower, triangle icon to the upper, square icon (Figure 4.37).
Figure 4.37. The shape or gate mode switch determines how the Redrum cuts off a drum sound. The gate does not function unless the Length knob is at a short setting. 
| 5. | Listen to how these two ways of cutting off a sound affect the sound's quality.
Mode 1 (square) cuts off sharply, creating more separation between notes. As a result, this setting often sounds louder and more aggressive than mode 2 (ramp), which fades out.
|
|


 Tip
Tip


