| The Redrum Drum Computer is a 10-part drum machine that plays samples. This means it stores a different drum sound on each channel and can play 10 different drum sounds at once. Although its 10 channel strips may resemble the Mixer, the Redrum only puts out sound. In other words, it doesn't receive audio. It sends the audio, one sound from each of its 10 channels. Since a new Redrum is always empty when you first add it to the Rack, you'll need to load it with samples before it can play any sounds. A Redrum patch (.drp file) typically consists of a couple of kick drums, a couple of snare drums, some toms, a couple of hi-hats, and a cymbal or percussion sample. The Reason Factory Sound Bank has scores of patches, so you should be able to find just what you need. To load Redrum sounds 1. | On the front panel of your Redrum Drum Computer, click the Browse Patch button to open the Patch Browser.
| 2. | In the Locations window (upper-right), double-click the Factory Sound Bank (Figure 4.10).
Figure 4.10. Use the Locations window to browse to the Factory Sound Bank. 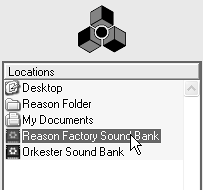
| 3. | Open the Redrum Drum Kits folder.
| 4. | Choose the style of drum kit you want and open that folder. For this example, I chose Rock Kits.
| 5. | Choose a kit and click Open to load it. For this example, I chose Groovemasters Rock Kit 2.
| 6. | Now go to your Rack and look at the Redrum's front panel. Notice that at the top of each drum channel there are samples loaded, with their names displayed in red. Also, you should see a patch name in the Patch field of the Redrum master controls panel (Figure 4.11).
Figure 4.11. The Redrum's patch display should now show a loaded Redrum (.drp) patch. 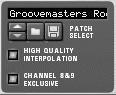
|
You can also browse a list of all .drp files, regardless of what folder they're in. To view all available drum kits 1. | Open the Patch Browser and select Factory Sound Bank in the Locations window.
| 2. | In the browser's Search For field, type drp to search for drum patches.
| 3. | From the Show pull-down menu, select All Instruments (Figure 4.12).
Figure 4.12. In the Search field, enter the type of patch you want to find. 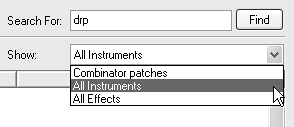
| 4. | Click the Find button, and the browser will list all drum patches in the Factory Sound Bank.
|
Patches vs. Samples Patches are different from samples. What's the difference? Patches contain many different sounds and any accompanying virtual knob settings. For example, a Redrum patch has 10 different drum sounds, one for each of the 10 drum channels of one track. Patches are loaded from the Redrum master controls panel. Samples are audio files (individual sounds) stored on your hard drive. Often they are of very short durationan excerpt of a song or phrase, or even a single note. When you installed Reason, you installed hundreds of samples in your Factory Sound Bank, and you can add even more samples to your collection from third-party sellers. |
Although loading a patch is the quickest way to set up your drum sounds, loading samples individually into the Redrum's channels allows you to create a custom drum set that can be saved as a custom patch. To create a custom drum set 1. | Go to a Redrum channel strip and click the Browse Sample button (Figure 4.13).
Figure 4.13. Click the Browse Sample button on a Redrum channel. 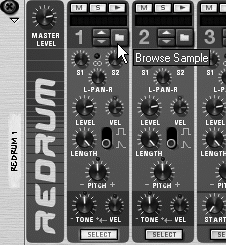
| 2. | In the Locations window of the Sample Browser, double-click the Factory Sound Bank, and open the Redrum Drum Kits folder.
| 3. | Open the folder named xclusive drums-sorted; then open the folder for the type of drum you want to add. For this example, I chose 01_BassDrums (Figure 4.14).
Figure 4.14. Select a drum sample in the Reason Factory Sound Bank from the xclusive drums-sorted folder. 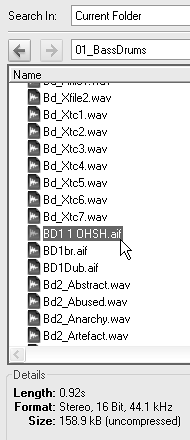
| 4. | Check the Autoplay box in the Sample Browser to audition the drum samples (Figure 4.15), and select the one you want. For this example, I chose the sample BD1 1 OHSH.aif.
Figure 4.15. Audition samples in the sample browser. Check Autoplay to hear each sample as it is selected, or manually trigger the sound using the Play button. 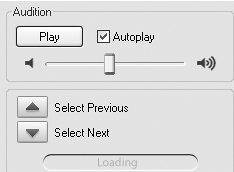
| 5. | Click Open to load the sample. The name of the sample will appear at the top of your Redrum drum channel.
| 6. | Use the up and down arrow buttons under the sample name in the Redrum channel (Figure 4.16) to scroll through the sounds quickly.
Figure 4.16. Click the up or down arrows to swap the currently loaded sound with the preceding or next sound in the directory. 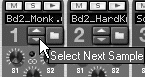
| 7. | Repeat steps 1 through 6, choosing drums for the different channels until you have created the kit you want.
| 8. | Click the Save Patch button (Figure 4.17) in the Redrum master controls and save the Redrum patch to a location where you want to store your future patches.
Figure 4.17. Save a drum patch from the Redrum master controls panel. 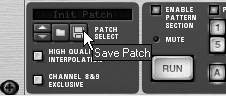
|
 Tips Tips
Set up a file structure on your hard drive that lets you easily find your custom patches and keep them backed up. If you decide later that you want to work with more than 10 drum sounds, no problem. Just create a second Redrum instrument, add it to your Mixer, and load it with additional sounds. A new drum track will be created in your Sequencer, where you can write a second drum track or copy an existing track to layer various sounds over the same part.
|