Section 13.5. A Simple Python File Server


13.5. A Simple Python File Server

Time for something more realistic; let's conclude this chapter by putting some of these socket ideas to work doing something a bit more useful than echoing text back and forth. Example 13-10 implements both the server-side and the client-side logic needed to ship a requested file from server to client machines over a raw socket.

In effect, this script implements a simple file download system. One instance of the script is run on the machine where downloadable files live (the server), and another on the machines you wish to copy files to (the clients). Command-line arguments tell the script which flavor to run and optionally name the server machine and port number over which conversations are to occur. A server instance can respond to any number of client file requests at the port on which it listens, because it serves each in a thread.

Example 13-10. PP3E\Internet\Sockets\getfile.py

 ############################################################################# # implement client and server-side logic to transfer an arbitrary file from # server to client over a socket; uses a simple control-info protocol rather # than separate sockets for control and data (as in ftp), dispatches each # client request to a handler thread, and loops to transfer the entire file # by blocks; see ftplib examples for a higher-level transport scheme; ############################################################################# import sys, os, thread, time from socket import * def now(): return time.ctime(time.time( )) blksz = 1024 defaultHost = 'localhost' defaultPort = 50001 helptext = """ Usage... server=> getfile.py  -mode server            [-port nnn] [-host hhh|localhost] client=> getfile.py [-mode client] -file fff [-port nnn] [-host hhh|localhost] """ def parsecommandline( ):     dict = {}                        # put in dictionary for easy lookup     args = sys.argv[1:]              # skip program name at front of args     while len(args) >= 2:            # example: dict['-mode'] = 'server'         dict[args[0]] = args[1]         args = args[2:]     return dict def client(host, port, filename):     sock = socket(AF_INET, SOCK_STREAM)     sock.connect((host, port))     sock.send(filename + '\n')                 # send remote name with dir     dropdir = os.path.split(filename)[1]       # filename at end of dir path     file = open(dropdir, 'wb')                 # create local file in cwd     while True:         data = sock.recv(blksz)                # get up to 1K at a time         if not data: break                     # till closed on server side         file.write(data)                       # store data in local file     sock.close( )     file.close( )     print 'Client got', filename, 'at', now( ) def serverthread(clientsock):     sockfile = clientsock.makefile('r')          # wrap socket in dup file obj     filename = sockfile.readline( )[:-1]        # get filename up to end-line     try:         file = open(filename, 'rb')         while True:             bytes = file.read(blksz)           # read/send 1K at a time             if not bytes: break                # until file totally sent             sent = clientsock.send(bytes)             assert sent == len(bytes)     except:         print 'Error downloading file on server:', filename     clientsock.close( ) def server(host, port):     serversock = socket(AF_INET, SOCK_STREAM)     # listen on TCP/IP socket     serversock.bind((host, port))                 # serve clients in threads     serversock.listen(5)     while True:         clientsock, clientaddr = serversock.accept( )         print 'Server connected by', clientaddr, 'at', now( )         thread.start_new_thread(serverthread, (clientsock,)) def main(args):     host = args.get('-host', defaultHost)         # use args or defaults     port = int(args.get('-port', defaultPort))    # is a string in argv     if args.get('-mode') == 'server':             # None if no -mode: client         if host == 'localhost': host = ''         # else fails remotely         server(host, port)     elif args.get('-file'):                       # client mode needs -file         client(host, port, args['-file'])     else:         print helptext if _ _name_ _ == '_ _main_ _':     args = parsecommandline( )     main(args) 

This script isn't much different from the examples we saw earlier. Depending on the command-line arguments passed, it invokes one of two functions:

  • The server function farms out each incoming client request to a thread that transfers the requested file's bytes.

  • The client function sends the server a file's name and stores all the bytes it gets back in a local file of the same name.

The most novel feature here is the protocol between client and server: the client starts the conversation by shipping a filename string up to the server, terminated with an end-of-line character, and including the file's directory path in the server. At the server, a spawned thread extracts the requested file's name by reading the client socket, and opens and transfers the requested file back to the client, one chunk of bytes at a time.

13.5.1. Running the File Server and Clients

Since the server uses threads to process clients, we can test both client and server on the same Windows machine. First, let's start a server instance and execute two client instances on the same machine while the server runs:

  [server window, localhost] C:\...\PP3E\Internet\Sockets>python getfile.py -mode server  Server connected by ('127.0.0.1', 1089) at Thu Mar 16 11:54:21 2000 Server connected by ('127.0.0.1', 1090) at Thu Mar 16 11:54:37 2000  [client window, localhost] C:\...\Internet\Sockets>ls  class-server.py   echo.out.txt      testdir           thread-server.py echo-client.py    fork-server.py    testecho.py echo-server.py    getfile.py        testechowait.py C:\...\Internet\Sockets>python getfile.py -file testdir\python15.lib -port 50001  Client got testdir\python15.lib at Thu Mar 16 11:54:21 2000 C:\...\Internet\Sockets>python getfile.py -file testdir\textfile  Client got testdir\textfile at Thu Mar 16 11:54:37 2000 

Clients run in the directory where you want the downloaded file to appearthe client instance code strips the server directory path when making the local file's name. Here the "download" simply copies the requested files up to the local parent directory (the DOS fc command compares file contents):

 C:\...\Internet\Sockets>ls class-server.py   echo.out.txt      python15.lib      testechowait.py echo-client.py    fork-server.py    testdir           textfile echo-server.py    getfile.py        testecho.py       thread-server.py C:\...\Internet\Sockets>fc /B python1.lib testdir\python15.lib Comparing files python15.lib and testdir\python15.lib FC: no differences encountered C:\...\Internet\Sockets>fc /B textfile testdir\textfile Comparing files textfile and testdir\textfile FC: no differences encountered 

As usual, we can run server and clients on different machines as well. Here the script is being used to run a remote server on a Linux machine and a few clients on a local Windows PC (I added line breaks to some of the command lines to make them fit). Notice that client and server machine times are different nowthey are fetched from different machines' clocks and so may be arbitrarily skewed:

  [server Telnet window: first message is the python15.lib request  in client window1] [lutz@starship lutz]$ python getfile.py -mode server  Server connected by ('166.93.216.248', 1185) at Thu Mar 16 16:02:07 2000 Server connected by ('166.93.216.248', 1187) at Thu Mar 16 16:03:24 2000 Server connected by ('166.93.216.248', 1189) at Thu Mar 16 16:03:52 2000 Server connected by ('166.93.216.248', 1191) at Thu Mar 16 16:04:09 2000 Server connected by ('166.93.216.248', 1193) at Thu Mar 16 16:04:38 2000  [client window 1: started first, runs in thread while other client  requests are made in client window 2, and processed by other threads] C:\...\Internet\Sockets>python getfile.py -mode client                               -host starship.python.net                               -port 50001 -file python15.lib  Client got python15.lib at Thu Mar 16 14:07:37 2000 C:\...\Internet\Sockets>fc /B python15.lib testdir\python15.lib  Comparing files python15.lib and testdir\python15.lib FC: no differences encountered  [client window 2: requests made while client window 1 request downloading] C:\...\Internet\Sockets>python getfile.py                               -host starship.python.net -file textfile  Client got textfile at Thu Mar 16 14:02:29 2000 C:\...\Internet\Sockets>python getfile.py                               -host starship.python.net -file textfile  Client got textfile at Thu Mar 16 14:04:11 2000 C:\...\Internet\Sockets>python getfile.py                               -host starship.python.net -file textfile  Client got textfile at Thu Mar 16 14:04:21 2000 C:\...\Internet\Sockets>python getfile.py                               -host starship.python.net -file index.html  Client got index.html at Thu Mar 16 14:06:22 2000 C:\...\Internet\Sockets>fc textfile testdir\textfile  Comparing files textfile and testdir\textfile FC: no differences encountered 

One subtle security point here: the server instance code is happy to send any server-side file whose pathname is sent from a client, as long as the server is run with a username that has read access to the requested file. If you care about keeping some of your server-side files private, you should add logic to suppress downloads of restricted files. I'll leave this as a suggested exercise here, but I will implement such filename checks in a different getfile download tool in Chapter 16.[*]

[*] We'll see three more getfile programs before we leave Internet scripting. The next chapter's getfile.py fetches a file with the higher-level FTP interface instead of using raw socket calls, and its http-getfile scripts fetch files over the HTTP protocol. Later, Example 16-27 presents a server-side getfile.py CGI script that transfers file contents over the HTTP port in response to a request made in a web browser client (files are sent as the output of a CGI script). All four of the download schemes presented in this text ultimately use sockets, but only the version here makes that use explicit.

Making Sockets Look Like Files

For illustration purposes, getfile uses the socket object makefile method to wrap the socket in a file-like object. Once so wrapped, the socket can be read and written using normal file methods; getfile uses the file readline call to read the filename line sent by the client.

This isn't strictly required in this examplewe could have read this line with the socket recv call too. In general, though, the makefile method comes in handy anytime you need to pass a socket to an interface that expects a file.

For example, the Python pickle module's load and dump methods expect an object with a file-like interface (e.g., read and write methods), but they don't require a physical file. Passing a TCP/IP socket wrapped with the makefile call to the pickler allows us to ship serialized Python objects over the Internet, without having to pickle to strings and ship manually across the socket. See Chapter 19 for more details on object serialization interfaces.

More generally, any component that expects a file-like method protocol will gladly accept a socket wrapped with a socket object makefile call. Such interfaces will also accept strings wrapped with the built-in StringIO module, and any other sort of object that supports the same kinds of method calls as built-in file objects. As always in Python, we code to protocolsobject interfacesnot to specific datatypes.


13.5.2. Adding a User-Interface Frontend

You might have noticed that we have been living in the realm of the command line for this entire chapterour socket clients and servers have been started from simple DOS or Linux shells. Nothing is stopping us from adding a nice point-and-click user interface to some of these scripts, though; GUI and network scripting are not mutually exclusive techniques. In fact, they can be arguably sexy when used together well.

For instance, it would be easy to implement a simple Tkinter GUI frontend to the client-side portion of the getfile script we just met. Such a tool, run on the client machine, may simply pop up a window with Entry widgets for typing the desired filename, server, and so on. Once download parameters have been input, the user interface could either import and call the getfile.client function with appropriate option arguments, or build and run the implied getfile.py command line using tools such as os.system, os.fork, tHRead, and so on.

13.5.2.1. Using Frames and command lines

To help make all of this more concrete, let's very quickly explore a few simple scripts that add a Tkinter frontend to the getfile client-side program. All of these examples assume that you are running a server instance of getfile; they merely add a GUI for the client side of the conversation, to fetch a file from the server. The first, in Example 13-11, creates a dialog for inputting server, port, and filename information, and simply constructs the corresponding getfile command line and runs it with os.system.

Example 13-11. PP3E\Internet\Sockets\getfilegui-1.py

 ########################################################## # launch getfile script client from simple Tkinter GUI; # could also use os.fork+exec, os.spawnv (see Launcher); # windows: replace 'python' with 'start' if not on path; ########################################################## import sys, os from Tkinter import * from tkMessageBox import showinfo def onReturnKey( ):     cmdline = ('python getfile.py -mode client -file %s -port %s -host %s' %                       (content['File'].get( ),                        content['Port'].get( ),                        content['Server'].get( )))     os.system(cmdline)     showinfo('getfilegui-1', 'Download complete') box = Frame(Tk( )) box.pack(expand=YES, fill=X) lcol, rcol = Frame(box), Frame(box) lcol.pack(side=LEFT) rcol.pack(side=RIGHT, expand=Y, fill=X) labels = ['Server', 'Port', 'File'] content = {} for label in labels:     Label(lcol, text=label).pack(side=TOP)     entry = Entry(rcol)     entry.pack(side=TOP, expand=YES, fill=X)     content[label] = entry box.master.title('getfilegui-1') box.master.bind('<Return>', (lambda event: onReturnKey( ))) mainloop( ) 

When run, this script creates the input form shown in Figure 13-1. Pressing the Enter key (<Return>) runs a client-side instance of the getfile program; when the generated getfile command line is finished, we get the verification pop up displayed in Figure 13-2.

Figure 13-1. getfilegui-1 in action


Figure 13-2. getfilegui-1 verification pop up


13.5.2.2. Using grids and function calls

The first user-interface script (Example 13-11) uses the pack geometry manager and Frames to lay out the input form, and runs the getfile client as a standalone program. It's just as easy to use the grid manager for layout, and to import and call the client-side logic function instead of running a program. The script in Example 13-12 shows how.

Example 13-12. PP3E\Internet\Sockets\getfilegui-2.py

 ############################################################### # same, but with grids and import+call, not packs and cmdline; # direct function calls are usually faster than running files; ############################################################### import getfile from Tkinter import * from tkMessageBox import showinfo def onSubmit( ):     getfile.client(content['Server'].get( ),                    int(content['Port'].get( )),                    content['File'].get( ))     showinfo('getfilegui-2', 'Download complete') box    = Tk( ) labels = ['Server', 'Port', 'File'] rownum  = 0 content = {} for label in labels:     Label(box, text=label).grid(col=0, row=rownum)     entry = Entry(box)     entry.grid(col=1, row=rownum, sticky=E+W)     content[label] = entry     rownum += 1 box.columnconfigure(0, weight=0)   # make expandable box.columnconfigure(1, weight=1) Button(text='Submit', command=onSubmit).grid(row=rownum, column=0, columnspan=2) box.title('getfilegui-2') box.bind('<Return>', (lambda event: onSubmit( ))) mainloop( ) 

This version makes a similar window (Figure 13-3), but adds a button at the bottom that does the same thing as an Enter key pressit runs the getfile client procedure. Generally speaking, importing and calling functions (as done here) is faster than running command lines, especially if done more than once. The getfile script is set up to work either wayas program or function library.

Figure 13-3. getfilegui-2 in action


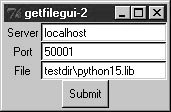
13.5.2.3. Using a reusable form-layout class

If you're like me, though, writing all the GUI form layout code in those two scripts can seem a bit tedious, whether you use packing or grids. In fact, it became so tedious to me that I decided to write a general-purpose form-layout class, shown in Example 13-13, which handles most of the GUI layout grunt work.

Example 13-13. PP3E\Internet\Sockets\form.py

 ############################################################ # a reusable form class, used by getfilegui (and others) ############################################################ from Tkinter import * entrysize = 40 class Form:                                              # add non-modal form box     def _ _init_ _(self, labels, parent=None):          # pass field labels list         box = Frame(parent)         box.pack(expand=YES, fill=X)         rows = Frame(box, bd=2, relief=GROOVE)        # box has rows, button         lcol = Frame(rows)                            # rows has lcol, rcol         rcol = Frame(rows)                            # button or return key,         rows.pack(side=TOP, expand=Y, fill=X)         # runs onSubmit method         lcol.pack(side=LEFT)         rcol.pack(side=RIGHT, expand=Y, fill=X)         self.content = {}         for label in labels:             Label(lcol, text=label).pack(side=TOP)             entry = Entry(rcol, width=entrysize)             entry.pack(side=TOP, expand=YES, fill=X)             self.content[label] = entry         Button(box, text='Cancel', command=self.onCancel).pack(side=RIGHT)         Button(box, text='Submit', command=self.onSubmit).pack(side=RIGHT)         box.master.bind('<Return>', (lambda event: self.onSubmit( )))     def onSubmit(self):                                        # override this         for key in self.content.keys( ):                      # user inputs in             print key, '\t=>\t', self.content[key].get( )     # self.content[k]     def onCancel(self):                                       # override if need         Tk().quit( )                                          # default is exit class DynamicForm(Form):     def _ _init_ _(self, labels=None):         labels = raw_input('Enter field names: ').split( )         Form._ _init_ _(self, labels)     def onSubmit(self):         print 'Field values...'         Form.onSubmit(self)         self.onCancel( ) if _ _name_ _ == '_ _main_ _':     import sys     if len(sys.argv) == 1:         Form(['Name', 'Age', 'Job'])     # precoded fields, stay after submit     else:         DynamicForm( )                    # input fields, go away after submit     mainloop( ) 

Running this module standalone triggers its self-test code at the bottom. Without arguments (and when double-clicked in a Windows file explorer), the self-test generates a form with canned input fields captured in Figure 13-4, and displays the fields' values on Enter key presses or Submit button clicks:

 C:\...\PP3E\Internet\Sockets>python form.py Job     =>      Educator, Entertainer Age     =>      38 Name    =>      Bob 

Figure 13-4. Form test, canned fields


With a command-line argument, the form class module's self-test code prompts for an arbitrary set of field names for the form; fields can be constructed as dynamically as we like. Figure 13-5 shows the input form constructed in response to the following console interaction. Field names could be accepted on the command line too, but raw_input works just as well for simple tests like this. In this mode, the GUI goes away after the first submit, because DynamicForm.onSubmit says so.

Figure 13-5. Form test, dynamic fields


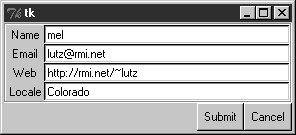
 C:\...\PP3E\Internet\Sockets>python form.py - Enter field names: Name Email Web Locale Field values... Email   =>      lutz@rmi.net Locale  =>      Colorado Web     =>      http://rmi.net/~lutz Name    =>      mel 

And last but not least, Example 13-14 shows the getfile user interface again, this time constructed with the reusable form layout class. We need to fill in only the form labels list, and provide an onSubmit callback method of our own. All of the work needed to construct the form comes "for free," from the imported and widely reusable Form superclass.

Example 13-14. PP3E\Internet\Sockets\getfilegui.py

 ################################################################# # launch getfile client with a reusable GUI form class; # os.chdir to target local dir if input (getfile stores in cwd); # to do: use threads, show download status and getfile prints; ################################################################# from form import Form from Tkinter import Tk, mainloop from tkMessageBox import showinfo import getfile, os class GetfileForm(Form):     def _ _init_ _(self, oneshot=0):         root = Tk( )         root.title('getfilegui')         labels = ['Server Name', 'Port Number', 'File Name', 'Local Dir?']         Form._ _init_ _(self, labels, root)         self.oneshot = oneshot     def onSubmit(self):         Form.onSubmit(self)         localdir   = self.content['Local Dir?'].get( )         portnumber = self.content['Port Number'].get( )         servername = self.content['Server Name'].get( )         filename   = self.content['File Name'].get( )         if localdir:             os.chdir(localdir)         portnumber = int(portnumber)         getfile.client(servername, portnumber, filename)         showinfo('getfilegui', 'Download complete')         if self.oneshot: Tk().quit( )  # else stay in last localdir if _ _name_ _ == '_ _main_ _':     GetfileForm( )     mainloop( ) 

The form layout class imported here can be used by any program that needs to input form-like data; when used in this script, we get a user interface like that shown in Figure 13-6 under Windows (and similar on other platforms).

Figure 13-6. getfilegui in action


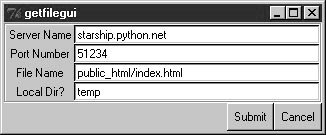
Pressing this form's Submit button or the Enter key makes the getfilegui script call the imported getfile.client client-side function as before. This time, though, we also first change to the local directory typed into the form so that the fetched file is stored there (getfile stores in the current working directory, whatever that may be when it is called). As usual, we can use this interface to connect to servers running locally on the same machine, or remotely. Here is some of the interaction we get for each mode:

  [talking to a local server] C:\...\PP3E\Internet\Sockets>python getfilegui.py  Port Number     =>      50001 Local Dir?      =>      temp Server Name     =>      localhost File Name       =>      testdir\python15.lib Client got testdir\python15.lib at Tue Aug 15 22:32:34 2000  [talking to a remote server] [lutz@starship lutz]$ /usr/bin/python getfile.py -mode server -port 51234  Server connected by ('38.28.130.229', 1111) at Tue Aug 15 21:48:13 2000 C:\...\PP3E\Internet\Sockets>python getfilegui.py  Port Number     =>      51234 Local Dir?      =>      temp Server Name     =>      starship.python.net File Name       =>      public_html/index.html Client got public_html/index.html at Tue Aug 15 22:42:06 2000 

One caveat worth pointing out here: the GUI is essentially dead while the download is in progress (even screen redraws aren't handledtry covering and uncovering the window and you'll see what I mean). We could make this better by running the download in a thread, but since we'll see how to do that in the next chapter when we explore the FTP protocol, you should consider this problem a preview.

In closing, a few final notes: first, I should point out that the scripts in this chapter use Tkinter techniques we've seen before and won't go into here in the interest of space; be sure to see the GUI chapters in this book for implementation hints.

Keep in mind, too, that these interfaces just add a GUI on top of the existing script to reuse its code; any command-line tool can be easily GUI-ified in this way to make it more appealing and user friendly. In Chapter 15, for example, we'll meet a more useful client-side Tkinter user interface for reading and sending email over sockets (PyMailGUI), which largely just adds a GUI to mail-processing tools. Generally speaking, GUIs can often be added as almost an afterthought to a program. Although the degree of user-interface and core logic separation varies per program, keeping the two distinct makes it easier to focus on each.

And finally, now that I've shown you how to build user interfaces on top of this chapter's getfile, I should also say that they aren't really as useful as they might seem. In particular, getfile clients can talk only to machines that are running a getfile server. In the next chapter, we'll discover another way to download filesFTPwhich also runs on sockets but provides a higher-level interface and is available as a standard service on many machines on the Net. We don't generally need to start up a custom server to transfer files over FTP, the way we do with getfile. In fact, the user-interface scripts in this chapter could be easily changed to fetch the desired file with Python's FTP tools, instead of the getfile module. But instead of spilling all the beans here, I'll just say, "Read on."

Using Serial Ports on Windows

Sockets, the main subject of this chapter, are the programmer's interface to network connections in Python scripts. As we've seen, they let us write scripts that converse with computers arbitrarily located on a network, and they form the backbone of the Internet and the Web.

If you're looking for a lower-level way to communicate with devices in general, though, you may also be interested in the topic of Python's serial port interfaces. This isn't quite related to Internet scripting and it applies only on Windows machines, but it's similar enough in spirit and is discussed often enough on the Net to merit a quick look here.

Serial ports are known as COM ports on Windows (not to be confused with the COM object model) and are identified as COM1, COM2, and so on. By using interfaces to these ports, scripts may engage in low-level communication with things like mice, modems, and a wide variety of serial devices. Serial port interfaces are also used to communicate with devices connected over infrared ports (e.g., hand-held computers and remote modems). There are often other higher-level ways to access such devices (e.g., the PyRite package for accessing Palm Pilot databases, or RAS for using modems), but serial port interfaces let scripts tap into raw data streams and implement device protocols of their own.

At this writing, there are at least three ways to send and receive data over serial ports in Python scriptsa public domain C extension package known as pySerial (which works on both Windows and Linux), the proprietary MSComm COM server object interface by Microsoft, and the low-level CreateFile file API call exported by the Python Windows extensions package, available via links at http://www.python.org. In addition, there are Python packages for interfacing with USB serial ports; search the Web for pointers.

Unfortunately, there is not enough space to cover any of these in detail in this text. For more information, Mark Hammond and Andy Robinson's book, Python Programming on Win32 (O'Reilly), includes an entire section dedicated to serial port communication topics. Also be sure to use the search tools at Python's web site for up-to-date details on this front.


Programming Python
Programming Python
ISBN: 0596009259
EAN: 2147483647
Year: 2004
Pages: 270
Authors: Mark Lutz

flylib.com © 2008-2017.
If you may any questions please contact us: flylib@qtcs.net