Section 10.6. Grids
10.6. GridsSo far, we've been arranging widgets in displays by calling their pack methodsan interface to the packer geometry manager in Tkinter. This section introduces grid, the most commonly used alternative to the packer. As we learned earlier, Tkinter geometry managers work by arranging child widgets within a parent container widget (parents are typically Frames or top-level windows). When we ask a widget to pack or grid itself, we're really asking its parent to place it among its siblings. With pack, we provide constraints and let the geometry manager lay out widgets appropriately. With grid, we arrange widgets in rows and columns in their parent, as though the parent container widget was a table. Gridding is an entirely distinct geometry management system in Tkinter. In fact, at this writing, pack and grid are mutually exclusive for widgets that have the same parentwithin a given parent container, we can either pack widgets or grid them, but we cannot do both. That makes sense, if you realize that geometry managers do their jobs as parents, and a widget can be arranged by only one geometry manager. At least within one container, though, that means you must pick either grid or pack and stick with it. So why grid, then? In general, grid is handy for laying out form-like displays; arranging input fields in row/column fashion can be at least as easy as laying out the display with nested frames. As we'll see, though, grid doesn't offer substantial code or complexity savings compared to equivalent packer solutions in practice, especially when things like resizability are added to the GUI picture. In other words, the choice between the two layout schemes is largely one of style, not technology. 10.6.1. Grid BasicsLet's start off with the basics; Example 10-18 lays out a table of Labels and Entry fieldswidgets we've already met. Here, though, they are arrayed on a grid. Example 10-18. PP3E\Gui\Tour\Grid\grid1.py
When run, this script creates the window shown in Figure 10-27, pictured with data typed into a few of the input fields. Once again, this book won't do justice to the colors displayed on the right, so you'll have to stretch your imagination a little (or run this script on a computer of your own). Figure 10-27. The grid geometry manager in pseudoliving color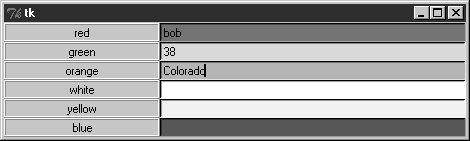 This is a classic input form layout: labels on the left describe data to type into entry fields on the right. Just for fun, this script displays color names on the left and the entry field of the corresponding color on the right. It achieves its nice table-like layout with the following two lines: Label(...).grid(row=r, column=0) Entry(...).grid(row=r, column=1) From the perspective of the container window, the label is gridded to columns in the current row number (a counter that starts at 0), and the entry is placed in column 1. The upshot is that the grid system lays out all the labels and entries in a two-dimensional table automatically, with evenly sized columns large enough to hold the largest item in each column. 10.6.2. grid Versus packTime for some compare-and-contrast: Example 10-19 implements the same sort of colorized input form with both grid and pack, to make it easy to see the differences between the two approaches. Example 10-19. PP3E\Gui\Tour\Grid\grid2.py
The basic label and entry widgets are created the same way by these two functions, but they are arranged in very different ways:
The difference in the amount of code required for each scheme is roughly a wash: the pack scheme must create a Frame per row, but the grid scheme must keep track of the current row number. Running the script makes the windows in Figure 10-28. Figure 10-28. Equivalent grid and pack windows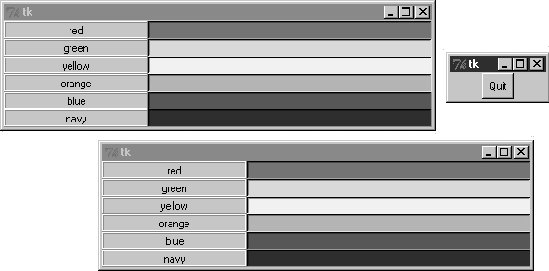 10.6.3. Combining grid and packNotice that the prior script passes a brand-new Toplevel to each form constructor function so that the grid and pack versions wind up in distinct top-level windows. Because the two geometry managers are mutually exclusive within a given parent, we have to be careful not to mix them carelessly. For instance, Example 10-20 is able to put both the packed and the gridded widgets on the same window, but only by isolating each in its own Frame container widget. Example 10-20. PP3E\Gui\Tour\Grid\grid2-same.py
We get a composite window when this runs with two forms that look identical (Figure 10-29), but the two nested frames are actually controlled by completely different geometry managers. Figure 10-29. grid and pack in the same window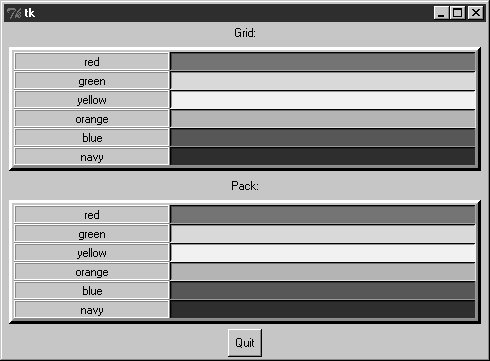 On the other hand, the sort of code in Example 10-21 fails badly, because it attempts to use pack and grid within the same parentonly one geometry manager can be used on any one parent. Example 10-21. PP3E\Gui\Tour\Grid\grid2-fails.py
This script passes the same parent (the top-level window) to each function in an effort to make both forms appear in one window. It also utterly hangs the Python process on my machine, without ever showing any windows at all (on Windows 98, I had to resort to Ctrl-Alt-Delete to kill it). Geometry manager combinations can be subtle until you get the hang of this; to make this example work, for instance, we simply need to isolate the grid box in a parent container all its own to keep it away from the packing going on in the root window: root = Tk( ) frm = Frame(root) frm.pack( ) # this works gridbox(frm) # gridbox must have its own parent in which to grid packbox(root) Button(root, text='Quit', command=root.quit).pack( ) mainloop( ) Again, today you must either pack or grid within one parent, but not both. It's possible that this restriction may be lifted in the future, but it seems unlikely given the disparity in the two window manager schemes; try your Python to be sure. 10.6.4. Making Gridded Widgets ExpandableAnd now, some practical bits: the grids we've seen so far are fixed in size; they do not grow when the enclosing window is resized by a user. Example 10-22 implements an unreasonably patriotic input form with both grid and pack again, but adds the configuration steps needed to make all widgets in both windows expand along with their window on a resize. Example 10-22. PP3E\Gui\Tour\Grid\grid3.py
When run, this script makes the scene in Figure 10-30. It builds distinct pack and grid windows again, with entry fields on the right colored red, white, and blue (or for readers not working along on a computer: gray, white, and an arguably darker gray). Figure 10-30. grid and pack windows before resizing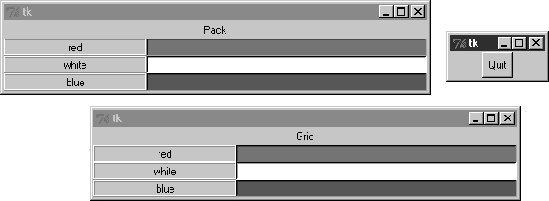 This time, though, resizing both windows with mouse drags makes all their embedded labels and entry fields expand along with the parent window, as we see in Figure 10-31. Figure 10-31. grid and pack windows resized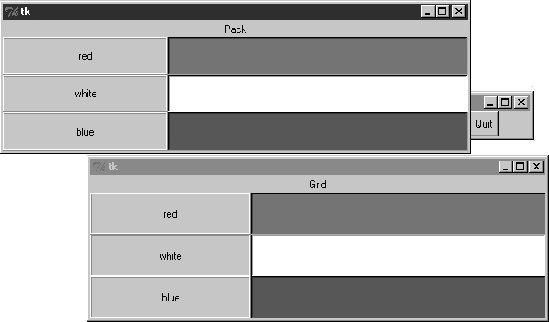 10.6.4.1. Resizing in gridsNow that I've shown you what these windows do, I need to explain how they do it. We learned earlier how to make widgets expand with pack: we use expand and fill options to increase space allocations and stretch into them. To make expansion work for widgets arranged by grid, we need to use different protocols. Rows and columns must be marked with a weight to make them expandable, and widgets must also be made sticky so that they are stretched within their allocated grid cell:
Different combinations of row and column weights and sticky settings generate different resize effects. For instance, deleting the columnconfig lines in the grid3 script makes the display expand vertically but not horizontally. Try changing some of these settings yourself to see the sorts of effects they produce. 10.6.4.2. Spanning columns and rowsThere is one other big difference in how the grid3 script configures its windows. Both the grid and the pack windows display a label on the top that spans the entire window. For the packer scheme, we simply make a label attached to the top of the window at large (remember, side defaults to TOP): Label(root, text='Pack').pack( ) Because this label is attached to the window's top before any row frames are, it appears across the entire window top as expected. But laying out such a label takes a bit more work in the rigid world of grids; the first line of the grid implementation function does it like this: Label(root, text='Grid').grid(columnspan=2) To make a widget span across multiple columns, we pass grid a columnspan option with a spanned-column count. Here, it just specifies that the label at the top of the window should stretch over the entire windowacross both the label and the entry columns. To make a widget span across multiple rows, pass a rowspan option instead. The regular layouts of grids can be either an asset or a liability, depending on how regular your user interface will be; these two span settings let you specify exceptions to the rule when needed. So which geometry manager comes out on top here? When resizing is factored in, as in this script, gridding actually becomes slightly more complex (in fact, gridding requires three extra lines of code here). On the other hand, grid is nice for simple forms, and your grids and packs may vary. 10.6.5. Laying Out Larger Tables with gridSo far, we've been building two-column arrays of labels and input fields. That's typical of input forms, but the Tkinter grid manager is capable of configuring much grander matrixes. For instance, Example 10-23 builds a five-row by four-column array of labels, where each label simply displays its row and column number (row.col). When run, the window in Figure 10-32 appears on-screen. Figure 10-32. A 5 x 4 array of coordinate labels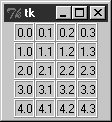 Example 10-23. PP3E\Gui\Tour\Grid\grid4.py
If you think this is starting to look like it might be a way to program spreadsheets, you may be on to something. Example 10-24 takes this idea a bit further and adds a button that prints the table's current input field values to the stdout stream (usually, to the console window). Example 10-24. PP3E\Gui\Tour\Grid\grid5.py
When run, this script creates the window in Figure 10-33 and saves away all the grid's entry field widgets in a two-dimensional list of lists. When its Fetch button is pressed, the script steps through the saved list of lists of entry widgets, to fetch and display all the current values in the grid. Here is the output of two Fetch pressesone before I made input field changes, and one after: C:\...\PP3E\Gui\Tour\Grid>python grid5.py 0.0 0.1 0.2 0.3 1.0 1.1 1.2 1.3 2.0 2.1 2.2 2.3 3.0 3.1 3.2 3.3 4.0 4.1 4.2 4.3 0.0 0.1 0.2 42 1.0 1.1 1.2 43 2.0 2.1 2.2 44 3.0 3.1 3.2 45 4.0 4.1 4.2 46 Figure 10-33. A larger grid of input fields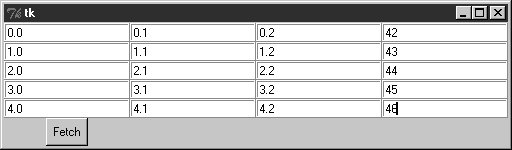 Now that we know how to build and step through arrays of input fields, let's add a few more useful buttons. Example 10-25 adds another row to display column sums and adds buttons to clear all fields to zero and calculate column sums. Example 10-25. PP3E\Gui\Tour\Grid\grid5b.py
Figure 10-34 shows this script at work summing up four columns of numbers; to get a different size table, change the numrow and numcol variables at the top of the script. Figure 10-34. Adding column sums And finally, Example 10-26 is one last extension that is coded as a class for reusability, and adds a button to load the table from a datafile. Datafiles are assumed to be coded as one line per row, with whitespace (spaces or tabs) between each column within a row line. Loading a file of data automatically resizes the table GUI to accommodate the number of columns in the table. Example 10-26. PP3E\Gui\Tour\Grid\grid5c.py
Notice that this module's SumGrid class is careful not to either grid or pack itself. In order to be attachable to containers where other widgets are being gridded or packed, it leaves its own geometry management ambiguous and requires callers to pack or grid its instances. It's OK for containers to pick either scheme for their own children because they effectively seal off the pack-or-grid choice. But attachable component classes that aim to be reused under both geometry managers cannot manage themselves because they cannot predict their parent's policy. This is a fairly long example that doesn't say much else about gridding or widgets in general, so I'll leave most of it as suggested reading and just show what it does. Figure 10-35 shows the initial window created by this script after changing the last column and requesting a sum. Figure 10-35. Adding datafile loads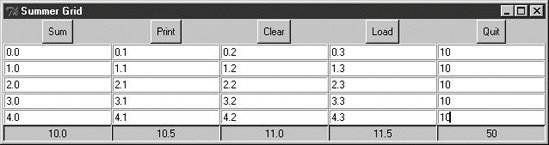 By default, the class makes the 5 x 5 grid here, but we can pass in other dimensions to both the class constructor and the script's command line. When you press the Load button, you get the standard file selection dialog we met earlier on this tour (Figure 10-36). Figure 10-36. Opening a datafile for SumGrid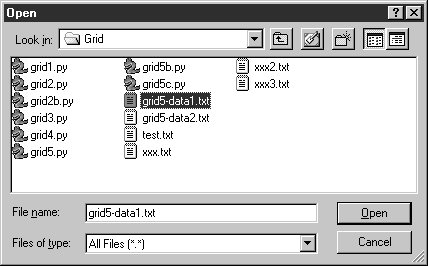 The datafile grid-data1.txt contains seven rows and six columns of data: C:\...\PP3E\Gui\Tour\Grid>type grid5-data1.txt 1 2 3 4 5 6 1 2 3 4 5 6 1 2 3 4 5 6 1 2 3 4 5 6 1 2 3 4 5 6 1 2 3 4 5 6 1 2 3 4 5 6 Loading this into our GUI makes the dimensions of the grid change accordinglythe class simply reruns its widget construction logic after erasing all the old entry widgets with the grid_forget method.[*] Figure 10-37 captures the scene after a file load.
Figure 10-37. Datafile loaded, displayed, and summed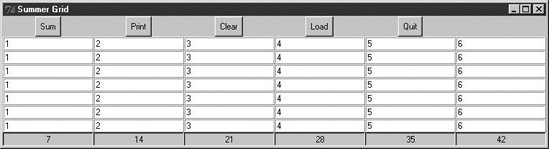 The grid5-data2.txt datafile has the same dimensions but contains expressions in two of its columns, not just simple numbers. Because this script converts input field values with the Python eval built-in function, any Python syntax will work in this table's fields, as long as it can be parsed and evaluated within the scope of the onSum method: C:\...\PP3E\Gui\Tour\Grid>type grid5-data2.txt 1 2 3 2*2 5 6 1 3-1 3 2<<1 5 6 1 5%3 3 pow(2,2) 5 6 1 2 3 2**2 5 6 1 2 3 [4,3][0] 5 6 1 {'a':2}['a'] 3 len('abcd') 5 6 1 abs(-2) 3 eval('2+2') 5 6 Summing these fields runs the Python code they contain, as seen in Figure 10-38. This can be a powerful feature; imagine a full-blown spreadsheet grid, for instancefield values could be Python code "snippets" that compute values on the fly, call functions in modules, and even download current stock quotes over the Internet with tools we'll meet in the next part of this book. Figure 10-38. Python expressions in the data and table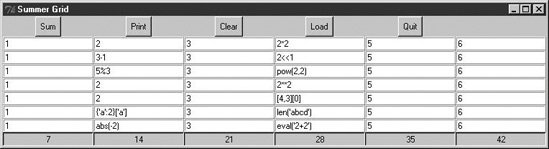 It's also a potentially dangerous toola field might just contain an expression that erases your hard drive! If you're not sure what expressions may do, either don't use eval (convert with more limited built-in functions like int and float instead) or see Chapter 18 for details on the Python rexec restricted-execution mode module. Of course, this still is nowhere near a true spreadsheet program; further mutations toward that goal are left as exercises. I should also point out that there is more to gridding than we have time to present fully here. For instance, by creating subframes that have grids of their own, we can build up more sophisticated layouts in much the same way as nested frames arranged with the packer. For now, let's move on to one last widget survey topic. |
- Context Management of ERP Processes in Virtual Communities
- Data Mining for Business Process Reengineering
- Intrinsic and Contextual Data Quality: The Effect of Media and Personal Involvement
- Healthcare Information: From Administrative to Practice Databases
- Relevance and Micro-Relevance for the Professional as Determinants of IT-Diffusion and IT-Use in Healthcare