| All digital cameras soften their images as part of their internal processing when they calculate color values. Fortunately, this softening is nothing that can't be corrected with some simple postproduction sharpening. All cameras are able to perform this sharpening internally, and most offer controls for specifying how much sharpening to apply. If you shoot RAW images, however, no sharpening will be applied to your image by the camera. What's more, even after your camera applies sharpening to non-RAW images, you might still need to add more if your camera's sharpening settings are not very aggressive. Many JPEG photographers deactivate their camera's in-camera sharpening (or set it as low as possible) so that they can take more control of the sharpening in postproduction. Many cameras also produce noise, especially if you're shooting at high ISO settings. Aperture provides sharpening and noise-reduction filters for handling both of these problems. In this exercise, we'll take a look at how to use these tools effectively. Applying Sharpening One of the risks of sharpening an image is that the process of sharpening will often increase the noise in your image. At the same time, noise reduction can result in a softening of your image. Therefore, you'll usually want to apply sharpening and noise-reduction adjustments at the same time, to try to achieve a balance between the two effects. Sharpening in Aperture is very simple. 1. | Select the image Sharpening Fodder in the Browser.
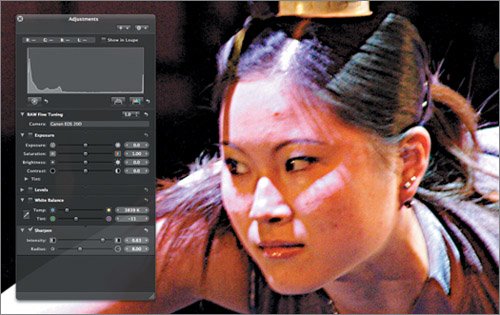
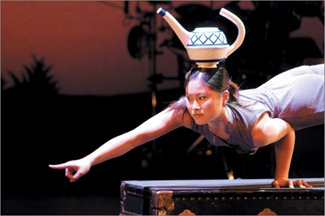 Like many of the other images in this shoot, this image is soft due to the shooting conditions (low light and, therefore, slow shutter speed). Fortunately, these images will most likely be printed at smaller sizes with a coarse line screenin newspapers and on postcard mailersso the softness won't be as visible. Nevertheless, this picture needs to be sharpened.
| 2. | Press F to switch to Full Screen mode. Press H to open the Adjustments HUD if it's not already open.
| 3. | Position your mouse over the woman's face and then press Z. This will zoom the image to 100 percent while keeping the zoom centered around the current pointer position, ensuring that the woman's face remains visible.
| | | 4. | In the Adjustments HUD, choose Sharpen from the Add Adjustments pop-up menu (or press Control-S). A Sharpen controls group is added to the Adjustments HUD.
 Aperture's Sharpen adjustment works just like the Unsharp Mask filter that you might have in your image-editing program. It looks for areas of high contrast in your imagesince a high-contrast area is usually an edgeand then it darkens the pixels along the dark side of the edge and lightens the pixels along the light side of the edge. This makes the edge look more contrasty, and therefore sharper.
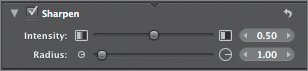
The Intensity slider lets you specify how much of this lightening and darkening you want applied to an edge, while the Radius slider lets you control how thick the brightened and darkened areas will be.
Usually, you'll keep the radius fairly small and perform the bulk of your adjustments using the Intensity slider.
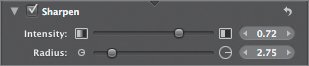
| 5. | Drag the Radius slider to the right until you see some sharpening, at around 2.75. Next increase the Intensity. We found good results around 0.72.
 | | | 6. | Click to deselect the Sharpen checkbox to return the image to its unsharpened state. By selecting and deselecting the checkbox, you can see the improvement in sharpness.
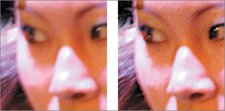 Note that it is possible to oversharpen an image. Too much sharpening will result in too much lightening and darkening along your edges, producing an image peppered with strange tiny halos and blotchy, posterized areas.
 |
Applying Noise Reduction It doesn't really matter whether you apply noise reduction before or after sharpening. Thanks to Aperture's nondestructive editing, you can continue to tweak these adjustments after you've applied them to get them properly balanced. Because of the low-light, high-ISO shooting conditions, the circus images we've been working with have a lot of noise. 1. | If you're not already there, zoom to 100 percent. As with sharpening, it's best to work at 100 percent when applying noise reduction.
| | | 2. | In the Adjustments HUD choose Noise Reduction from the Add Adjustments pop-up menu. A Noise Reduction controls group is added to the Adjustments HUD.
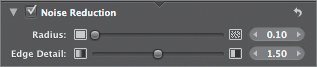 The Radius slider lets you select the size of the noise that you want to reduce.
The Edge Detail slider gives you some control over the softening of your image, by telling Aperture how much edge detail to preserve. Again, high-contrast areas are usually edges, so if you don't apply as much noise reduction to those areas, there's a good chance that your image will suffer less from softening.
There's no right or wrong to applying noise reduction. Try it for yourself:
| 3. | Adjust the Radius and Edge Detail sliders, and see what effect you like best.
| 4. | Now set the Radius slider to 0.72 and the Edge Detail slider to 2.75.
| 5. | Select and deselect the Noise Reduction checkbox. You should notice a slight reduction of noise. However, the image is still very noisy overall.
Given that the image is also a little soft, you're probably better off minimizing noise reduction on this image.
|
Note Digital cameras produce two kinds of noise, luminance noise and chrominance noise. Luminance noise appears in your images as speckled patterns: from one pixel to the next, there will be a sudden change in brightness, or luminance. Chrominance noise appears as brightly colored pixels or splotches of pixels.
|