| When encoding numerous source files or encoding to multiple bit rates and formats from a single source file, you can save time by using a process called batch encoding. Now that you've fine-tuned your settings, batch encoding tools speed the process by allowing the creation of encoding templates. This makes it possible to avoid re-entering the same parameters every time you encode. Programs that do batch encoding also often include extra audio optimization features. For example, you could take a single uncompressed digital audio file and enter all your encoding information, press OK, and walk away. Returning several hours (or maybe a day) later, you'd find all of your on-demand MP3, Windows Media, RealMedia, and QuickTime files encoded in several bit rates, ready to be uploaded to your streaming or Web server. Batch encoding many files can be time consuming, but encoding those files individually will take even longer. You could set your computer to encode everything overnight thereby freeing you to work on other tasks (or even sleep!). The time it takes to batch encode depends on your computer's processing speed, the size of the source song files, the way the files are being encoded (to what settings, formats, and so on) and, of course, the number of files you are authoring. Using Cleaner 5 Cleaner is a multimedia encoding and authoring software program. It encodes to QuickTime, RealMedia, MP3, and Windows Media formats and includes many other features. You can author rich-media elements (interactivity, URL flips, links to sites, chapter lists, caption tracks, and so on) in your streams (depending on each format's capabilities). Cleaner also has customizable optimization filters and audio fades for the encoding process and allows you to either save files locally or upload them to a streaming server or hosting service. You can create HTML codes within Cleaner, too. Helpfully, Cleaner comes with a series of useable encoding presets. You can modify an existing preset or create and save your own presets from scratch. Presets can also be shared with other Cleaner users via e-mail. NOTE Cleaner 5.1 for both Macintosh and Windows supports Windows Media v7, RealSystem 8, and the most recent QuickTime (and QDesign codecs). Cleaner also provides full support for video.
Some formats' media attributes (beyond author, title and copyright) aren't fully supported by Cleaner. Most notably, ID3 tags for MP3 on-demand files aren't supported at all. If necessary, you can always go back and edit these attributes using the format-specific application or, in some cases, override them with your metafile settings (see Chapter 7, "Serving Your Audio"). NOTE Another simple option for adding ID3 tags to your MP3 files is using an ID3 tag editor that supports batch encoding. Look in the list of additional tools in the Appendix, " Tools and Resources."
In the following Step-by-Step tutorial, you'll create seven on-demand files in four formats optimized for both 56K dial-up modems and 384K DSL broadband. That equals two files apiece (one low bit rate and one high) from QuickTime, Windows Media, and MP3. You only need to author one RealMedia file because you'll be using the SureStream technology (see Chapter 3, "Using RealMedia"). You'll also set the encoding parameters for each of the seven files. STEP-BY-STEP: Using Cleaner to Batch Encode -
Launch Cleaner 5.1 on your Macintosh or Windows computer. Add your source WAV or AIFF files by choosing File, Add File to Batch. FezGuys' Tip  Because you're going to add your source files seven times, it'll be faster to drag and drop your files. Locate your AIFF or WAV source file. Drag your source file into the Batch Window seven times (one for each encoded file you want to create). You now have your source file named seven times in the Batch encoding window (see Figure 12.2). Figure 12.2. Drag your source file seven times to Cleaner's Batch window, one for each desired encoded output file. 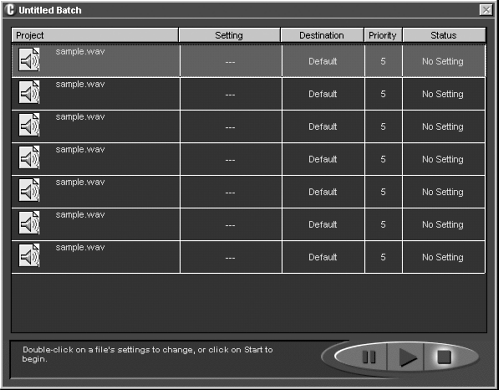 |
-
To choose the encoding setting for the first batch entry, click on the batch entry and select Windows, Advanced Settings (Windows: Ctrl+T, Macintosh:  +T). An Advanced Settings dialog box opens with a left-hand column of available presets and a right-hand column of setting parameters. +T). An Advanced Settings dialog box opens with a left-hand column of available presets and a right-hand column of setting parameters. -
To choose the encoding setting for the single RealMedia SureStream file, click on the arrow to expand the RealSystem Streaming submenu and then choose RealAudio Streaming. From the available choices, select RealAudio SureStream (music). The right side of the screen updates (see Figure 12.3). Figure 12.3. To encode to a RealMedia SureStream file, select RealSystem Streaming, RealAudio Streaming, and then RealAudio SureStream (music) in Cleaner 5's Advanced Settings dialog box. 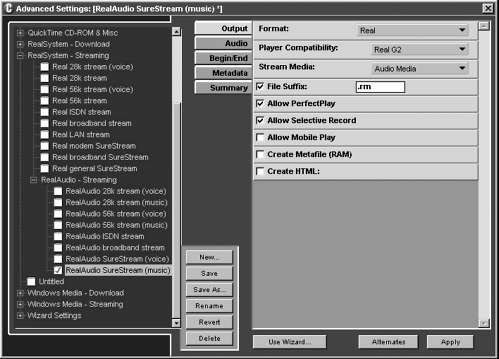 NOTE Advanced users can play with the many settings, but leaving the default settings is perfectly okay. As you get more comfortable with the software, you'll begin to experiment. -
Click Apply and choose the next batch entry. -
The next two batch entries are encoded into Windows Media files (to be streamed in real-time through a Windows Media server). Set the encoding parameters to first author a 32Kbps stream for 56K dial-up modems and then author a 128Kbps stream for 384Kbps DSL broadband users. -
To author the 32Kbps stream, click on the arrow to expand the Windows Media Streaming sublevel. Choose Windows Media Audio Streaming and then choose WMA 56K Streaming. Check the box, and the right side of the screen updates these settings (see Figure 12.4). Figure 12.4. To encode to a Windows Media file for 56Kbps modem users, select Windows Media Streaming, Windows Media Audio Streaming, and then WMA 56K Streaming in Cleaner 5's Advanced Settings dialog box. 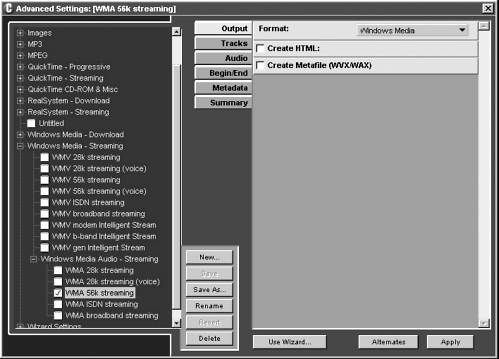 -
Click Apply and move on to encode the next batch entry for Windows Media for 384Kbps DSL users. -
To author the 384Kbps stream, click on the arrow to expand the Windows Media Streaming sublevel, choose Windows Media Audio Streaming, and then choose WMA Broadband Streaming. Check the box, and the right side of the screen updates these settings. -
Click Apply and choose the next batch entry. -
The next two batch entries will be encoded into QuickTime files (to be streamed in real-time through a QuickTime Streaming Server or Darwin Streaming Server). Set the encoding parameters to first author a 32Kbps stream for 56Kbps dial-up modems and then a 128Kbps stream for 384Kbps DSL broadband users. FezGuys' Tip  If you happen to already have a RealServer installed, you can serve QuickTime files through it. Simply upload your QuickTime files to the content directory of your RealServer and link to them with the appropriate rtsp:// location. |
-
To author the 32Kbps stream, click on the arrow to expand the QuickTime Streaming sublevel. Choose QuickTime Audio Streaming, and then choose QT 56K Audio Stream. The right side of the screen updates (see Figure 12.5). Figure 12.5. To encode to a QuickTime file for 56Kbps modem users, select QuickTime Streaming, QuickTime Audio Streaming, and then QT 56K Audio Stream in Cleaner 5's Advanced Settings dialog box. 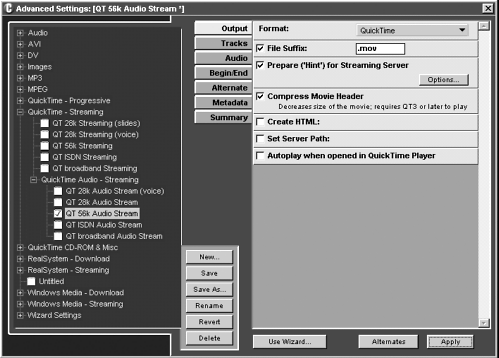 -
Optimize the file for the efficient QuickTime Hinting protocol by clicking on the Output button of the Advanced Settings window, checking the box for Prepare ('Hint') for Streaming Server, and clicking Options within that area. A Hint Exporter Settings window pops up. -
Check Optimize Hints for Server and click OK to return to the Advanced Settings window. -
Leave all other QT 56K Audio Stream settings at their default values. -
Click Apply and move on to encode the next batch entry for QuickTime for 384Kbps DSL users. -
To author the stream for 384Kbps DSL users, click on the arrow to expand the QuickTime Streaming sublevel, choose QuickTime Audio Streaming, and then choose QT Broadband Audio Stream. -
Optimize this file for the Hinting protocols as you did for your 56K setting. -
Click Apply and choose the next batch entry. -
The next two batch entries will be encoded into MP3 files. Set the encoding parameters to first author a 32Kbps stream for 56Kbps dial-up modems and then a 192Kbps stream for 384Kbps DSL broadband users. NOTE The Cleaner default settings for MP3 encoding don't suit the particular needs of this tutorial. Instead, you're going to create your own settings templates to save and keep for later re-use. As mentioned earlier, you can create and save custom settings templates for any format. -
Create a new MP3 setting for 56Kbps streaming by modifying an existing template and saving it as a new one. Select MP3 Streaming Modem VBR and click Save As. -
Within the Save Settings As pop-up dialog box, enter MP3 56K standard. -
Save the new setting in the MP3 folder by choosing MP3 in the Save Settings in Which Folder dialog box and clicking OK (see Figure 12.6). Figure 12.6. Save your new MP3 56K standard Cleaner 5 setting template. 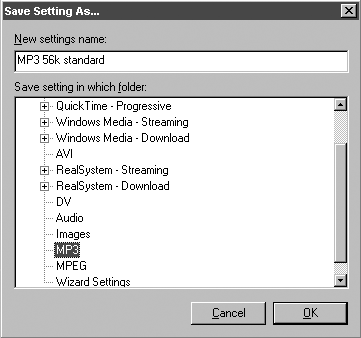 -
Make sure that MP3 56K standard on the left side is checked. -
On the right side, click on the Audio tab and change the data rate from 40 to 32. -
Uncheck Variable Bit Rate. -
Set the sample rate to 22.050kHz. -
Click the Save button to save the changes you've made to this preset. -
Click Apply to accept the setting and choose the next batch entry. -
Create a new MP3 setting for a 384Kbps streaming file by modifying the existing MP3 standard 128K template and clicking Save As. -
Within the Save Settings As pop-up dialog box, enter MP3 192K standard. -
Save the new setting in the MP3 folder by choosing MP3 in the Save Settings in Which Folder dialog box and clicking OK. -
Make sure that MP3 192K standard on the left side is checked. -
On the right side, click on the Audio tab and change the data rate from 128 to 192. -
Click the Save button to save the changes you've made to this preset. -
Click Apply to accept the setting. -
To enter the metadata for each file, first double-click on the Audio icon to the left of the filename in the Batch window. This opens a Project: yourfilename window in which you can play your source audio file and also view and edit your encoding settings. Click on the Edit button in Settings Modifiers & Metadata. This opens a Settings Modifier window. -
Click on the Metadata tab and fill out the appropriate information. -
Click Apply. -
Repeat this process for each of your files as desired. -
Go to Batch, Set Default Destination, and set the folder into which you'd like your encoded files to be placed. NOTE Advanced users can set individual files' custom destinations by double-clicking on the Destination box and entering the desired setting. This is usually done when you need to explicitly include special information (such as the format or bit rate) in the name of a file. -
Select Edit, Preferences and a new window will pop up. -
In the Streaming Server Paths section, enter your default streaming server URL paths for each file. NOTE Streaming Server Paths are used when Cleaner 5 is instructed to automatically create metafiles. Regardless of whether you are creating metafiles, Cleaner 5 requires you to set these values. Otherwise, you're prompted for them at the start of the encoding process. If you want to enable the creation of metafiles, open the Advanced Settings window and check the Create Metafile option in the Output tab of your preferred setting template. Cleaner only supports automatic metafile creation for the RealMedia and Windows Media formats. -
Still in the Preferences pop-up window, check the Append Setting to Filename box. This doesn't make for a pretty filename, but it does make it clear which format and bit rate the file is. NOTE If you don't select the Append Setting to Filename preference when you encode a single source file into multiple templates within the same format, Cleaner 5 adds a unique number to the encoded file's name (such as "sample0001.mov") for each additional template. If you are only encoding each source file to a single bit rate per format, you can safely leave the Append Setting to Filename preference unset. Doing so results in default names where the suffix of the source file is replaced with the corresponding format-specific suffix (such as QuickTime's .mov or RealMedia's .rm). Another solution to filename confusion that comes from creating multiple encoded files from the same source is to use a custom destination for each encoded file. To set a custom destination, double-click on the Destination column for the file you want to alter. In the pop-up window, select your desired folder, check the Custom Filename box, and enter your desired filename. Make sure you include the appropriate file suffix (.mov, .rm, .wma, .mp3, and so forth). NOTE In Cleaner version 5.1 on Windows, there's a problem with Custom Filenames when encoding to a QuickTime file during the flattening process. If you need this feature, contact Discreet and check for an update that fixes the problem. -
If you're happy with all your settings, start the encoding process by pressing the Play arrow at the bottom right of the Batch window or going to Batch, Encode (Windows: Ctrl+E, Macintosh:  +E). +E). -
During the encoding process, Cleaner 5 displays the status of each file that is being encoded in the Batch window. Cleaner 5 pops up a dialog box telling what time the file completed. It chimes once at the end of the batch encode process. Cleaner 5 acts differently on Macintosh and Windows during the encoding process. On a Macintosh computer, Cleaner 5 uses all the CPU available and only operates when the mouse is not moved. If you move the mouse, encoding pauses. This allows you to perform other tasks on your Macintosh during encoding but suspends the encoding process until you stop using the mouse. On a Windows computer, Cleaner 5 merely slows down if you're using other applications. Let Cleaner 5 do its thing unmolested. You now have a directory full of files encoded in multiple formats and bit rates ready to upload to the server(s) of your choice and link into your Web site. |


