| In this section, you'll use software tools to upload your on-demand files and move them to the correct local folder on your streaming server. If you're using the same computer for both authoring and serving your streams, the process is only a quick copy from one folder to another. If you're authoring and streaming from different computers, you'll need to use a file transfer protocol (FTP) program to move your on-demand files. An FTP program moves files from one location to another across any kind of network. Using FTP programs requires plugging in the host name or IP address of your streaming server as well as your username and password. NOTE Skip this section if you're authoring live streams. An FTP program is unnecessary because the entire configuration for sending your stream to the server is handled as part of your authoring software.
Using CuteFTP (Windows) CuteFTP is a simple and commonly used Windows-based FTP program. If you dig around online, you can also find many freeware FTP programs. Spending a few dollars gets you a better product as well as someone you can yell at if there are problems. Download and install the 30-day free evaluation copy of CuteFTP v4.2.5 for Windows (compatible with 98, ME, and 2000) from www.cuteftp.com. After the 30-day evaluation period ends, CuteFTP will cost $39.95. STEP-BY-STEP: Using CuteFTP to Upload On-Demand Files via FTP  -
Launch CuteFTP on your Windows authoring computer. CuteFTP, by default and on first launch, brings up a Site Manager (see Figure 7.1). If the Site Manager window doesn't appear, go to File, Site Manager (F4). Figure 7.1. Set the appropriate Site settings when adding a new site within CuteFTP's Site Manager. 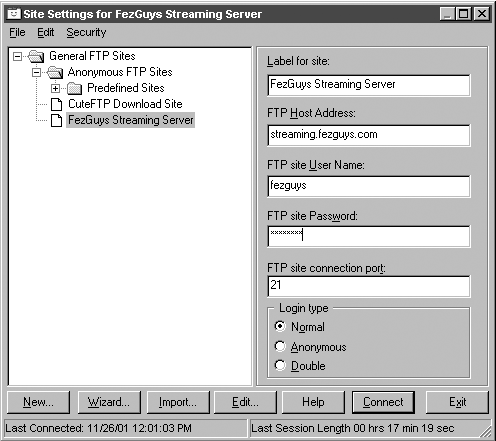 -
Click the New button to create a new site entry for your streaming server. By creating a new site, you won't have to constantly re-enter your streaming server's information each time that you upload new on-demand files. -
In Label for Site, give your new site entry a name. (In this case, FezGuys Streaming Server was chosen.) -
For FTP Host Address, enter your host name or IP address. (In this case, streaming.fezguys.com was chosen.) -
For FTP Site User Name, enter your username. (In this case, fezguys was chosen.) -
Fill in your username password for FTP Site Password. -
Leave the default value of 21 for FTP Site Connection Port. -
From the three choices of Login type (Normal, Anonymous or Double), leave the default of Normal. -
Click Connect and CuteFTP will connect your authoring computer to your server computer. -
After connecting, you'll get a login message pop-up window. Click OK to continue. This places you back in the main window. You're now logged in and ready to transfer your on-demand files to your server. -
Within the main CuteFTP window are four panes: -
Log Window (at top) This pane shows the commands you've sent to your server and your server's responses, indicates completed transfers, and can be useful if there are errors. Unless a problem exists, you can usually ignore the contents of this window. -
Local Window (at center left) This pane is where you select the local copies of your on-demand files for uploading. -
Remote Window (at center right) This pane shows the files and directories that are contained on your connected server. -
Queue Window (at bottom) This pane shows the files that you're currently transferring to the server or the files you want to transfer later. Locate the directory containing your local files in the left center Local Window. -
Verify that the directory into which you're logged (in the right center Remote Window) on your streaming server is correct. You can change to a different remote directory in CuteFTP by selecting Commands, Directory, Change Directory (Ctrl+D) or create a new one with Commands, Directory, Make New Directory (Ctrl+M). -
Drag your files and directories from the Local Window and drop them into the correct server directory in the Remote Window (see Figure 7.2). Figure 7.2. Drag your files from CuteFTP's local window to the remote window to begin the upload process. 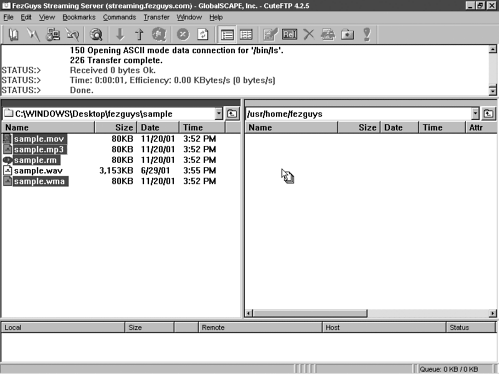 -
Have a cup (or two) of tea while your files upload. The files will appear in the bottom Queue Window until the transfer is complete (see Figure 7.3). Figure 7.3. CuteFTP's Queue window shows the status of files that are being uploaded.  NOTE Depending on the size of the file and the speed of your connection, it can take anywhere from a few seconds to several hours to upload your files. It doesn't matter how long it takes to get to your server as long as the file streams efficiently to your users after it's there. If you're working with more than one format, you'll either upload your files to a different streaming server for each format or to different directories on the same server. The specifics will vary based on how and where you host your on-demand streams. After the transfer is complete, the uploaded files in your selected directory on your streaming server will be displayed in the Remote window. Using Fetch (Macintosh) Download Fetch v4 from www.fetchsoftworks.com and install it on your Macintosh computer. The demo is free for 15 days and then requires a single $25 payment for lifetime use. If you're running Macintosh OS X, you must use version 4 (unless you have OS 9 also installed to run in Classic mode). Pre-OS X Macintosh operating systems can run version 3 or 4. Although Fetch Softworks pushes version 4, it also provides a link to the free and fully functional download of version 3 on the site. This book uses version 4 under OS X. STEP-BY-STEP: Using Fetch to Upload On-Demand Files Via FTP  -
Launch Fetch on your Macintosh computer. A New Connection window opens. In the window, click Cancel because you'll most likely be uploading on-demand files to your streaming server more than once. You'll instead create a new shortcut that remembers your server settings, making it easy to connect each time you launch Fetch. -
Select Customize, New Shortcut, which brings up a Shortcut Editor window where you choose your parameters (see Figure 7.4). Figure 7.4. Configure your shortcut in Fetch's Shortcut Editor window. 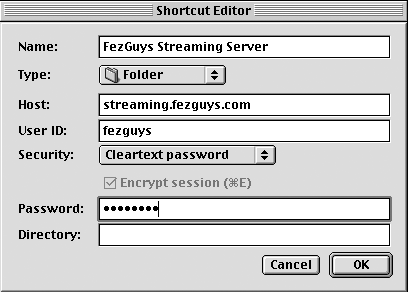 -
Name Choose a name for your shortcut or leave as the default value. (In this case, FezGuys Streaming Server was chosen.) -
Host Enter your host name or IP address. (In this case, streaming.fezguys.com was chosen.) -
User ID Enter the name you want to use to identify yourself. (In this case, fezguys was chosen.) -
Security Leave the default setting of Cleartext Password. Advanced users might want to choose a more secure way to connect. -
Password Enter your password to the User ID entered in step 3. -
Directory If necessary, enter a specific directory to upload your files onto the server. -
Click OK to make your new shortcut available in the Fetch Shortcuts menu. -
Go to File, Open Shortcut and select your new shortcut to open a new window connected to your streaming server. This window displays your remote files and folders. Figure 7.5. Select your new Fetch shortcut to connect to your streaming server. 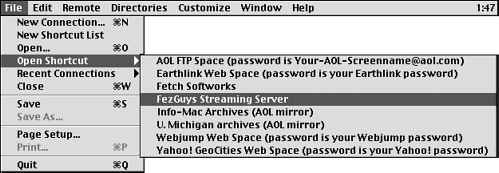 -
Click on the Put files button, select the files you want to put on the server, and click Open. -
From the Format pull-down menu (default set to Automatic), select Raw Data. This ensures that your on-demand files arrive to the server in the correct format, not mistakenly transferred as text documents. -
Click OK in the Put File dialog box to begin the transfer (see Figure 7.6). Figure 7.6. Fetch displays the status of the files being transferred from a local folder to a streaming server computer. 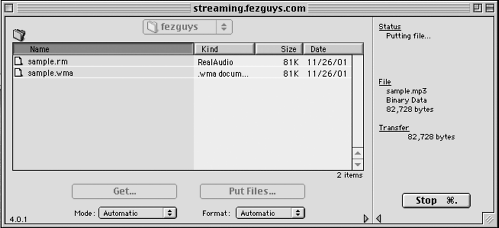 NOTE Depending on the size of the file and the speed of your connection, it could take anywhere from a few seconds to several hours to upload your files. It doesn't matter how long it takes to get to your server as long as the file streams efficiently to your users after it's there. If you're working with more than one format, you'll either upload your files to a different streaming server for each format or to different directories on the same server. The specifics will vary based on how and where you host your on-demand streams. After the transfer is complete, the uploaded files in your selected directory on your streaming server will be displayed in the main Fetch window. |