| In this section, you'll create a live MP3 stream on your authoring computer. That is, source audio enters your computer uncompressed and exits as an encoded live stream. The server forwards the live stream, in turn, to your listeners on the Internet. Make sure your audio source is plugged into your computer's audio input. Use the same audio input level guidelines that you used to create a digital file (see Chapter 2). Your source audio quality is crucial here. This is because no further opportunities (such as waveform editors) are typically available to optimize the signal between encoding and outputting that audio as a live stream. Make sure your signal is as clean as possible and that your level is set accurately not so low that it can't be heard and not so loud that it will distort; both scenarios prevent the encoder from doing a good job. You might want to place some audio hardware (such as a compressor) in your signal path to smooth the signal and increase the encoder's efficiency. (See Chapter 11, "Advanced Audio Optimization.") This may seem a little like putting the cart before the horse but now is a good time to mention that, when sending a live stream to the Internet, your authoring computer's software needs to connect to a computer that is running the SHOUTcast server. Therefore, an important early step is to either lease or borrow space on someone else's SHOUTcast server, or have already configured your own (see "Creating a Server" at the end of this chapter). You'll also need a reliable Internet connection between the encoding authoring computer and the server computer. In addition, you'll need a valid username and password ready to plug in as you configure Winamp to create a live stream. If you're running your own SHOUTcast server, you already have that information handy; otherwise, make sure you've received it from your server provider. Prior to beginning the live stream, it's strongly recommended that you have, if possible, yet another computer available to do a listening test. (That totals three computers: an authoring computer to encode the live stream from the source audio, a server computer to send the encoded live stream out to the Internet, and a test computer on another connection to make sure it all works!) Short of calling your friends on the phone (which also works), this is the best way to make sure your live stream sounds okay and is actually making it out to the Internet intact. The most realistic test is having your listening test computer on a completely different Internet connection from your live encoder computer. In addition, if you're encoding and streaming for modem users, make sure you test your live stream with a modem connection (not broadband or DSL) to get a realistic experience. NOTE Although it's possible to use the same computer to simultaneously author from and run your streaming server, doing so is not recommended for handling more than a dozen listeners.
Using Winamp's SHOUTcast Plug-In You'll use the popular Winamp MP3 player software enabled with the SHOUTcast DSP plug-in to create a live MP3 stream from your Windows computer. This plug-in adds live broadcasting capabilities for Winamp to send to a SHOUTcast server. If you don't already have Winamp installed, you can get the free download from www.winamp.com (any version above 2.65). If you don't already have the free SHOUTcast plug-in, you'll need to download and install it from www.shoutcast.com/download. From the main page, click on Be A DJ. This page also includes detailed download and installation instructions. NOTE Version 1.8.2 (which these examples use) of the SHOUTcast DSP plug-in for Winamp varies greatly from previous versions. If you have an older version, you should upgrade to this or the most recent version.
Allow all defaults during the installation of both Winamp and the SHOUTcast plug-in. You'll need the SHOUTcast server configuration settings (server name or IP address, port number, and password) for the server to which you'll be sending your live stream. If you're running your own server, you'll need to have the SHOUTcast server software already installed and configured and know what the settings are (see the next section, "Creating a Server"). If you're sending to someone else's SHOUTcast server, you'll need to get these configuration settings from the server administrator. Alright, enough talk, let's get on with creating a live MP3 stream! STEP-BY-STEP: Using Winamp and the SHOUTcast Plug-In to Author a Live MP3 Stream (Windows) -
Launch Winamp on your Windows computer and press Ctrl+P to bring up the Preferences menu. -
Select DSP/Effect from the Plug-ins section of the left column and then click on Nullsoft SHOUTcast Source DSP v1.8.2 (or whichever version you have) from the right column (see Figure 6.10). Figure 6.10. Choose DSP/Effect from the Plug-ins section of Winamp's Preferences window and select Nullsoft SHOUTcast Source DSP.  -
A new pop-up window appears labeled SHOUTcast Source. Click Close on the Preferences window (and click the title bar of the SHOUTcast main window to bring it back to the front, if necessary). The SHOUTcast source configuration has four tabs. Main Encoding stream summary information Output Server settings Encoder Encoding codec settings Input Source audio input settings -
Make sure your audio source input is connected to the computer and that the signal is coming through to test your levels. -
Select the Input tab of the SHOUTcast source configuration. -
For Input Configuration, set your input device to Soundcard Input (see Figure 6.11). Figure 6.11. In the Input tab of Winamp's SHOUTcast plug-in preferences, select Soundcard Input for Input Configuration. 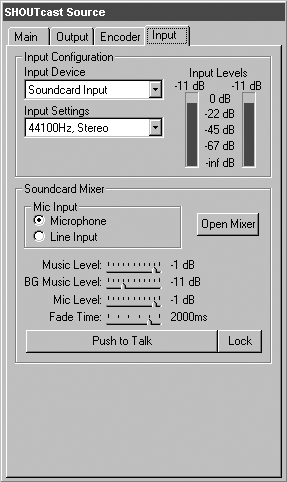 NOTE Don't use Winamp's default recommended setting as this default is for creating a live stream from existing on-demand files. Instead, you are using an external audio input in this Step-by-Step. The Soundcard Input setting also allows you to use advanced features such as voice-overs and cross fading regardless of your audio source. Additional information is included in the DSP SHOUTcast plug-in dsp_sc_readme.txt file (part of the installation). -
Click the Open Mixer button in the sound card section of the Input tab. This opens the standard Windows Volume and Recording panels. Because you'll be using the Record Control window to set your input level (see Figure 6.12), feel free to close the Volume Control panel. Figure 6.12. Select your audio input in the standard Windows Record Control window and adjust your levels. 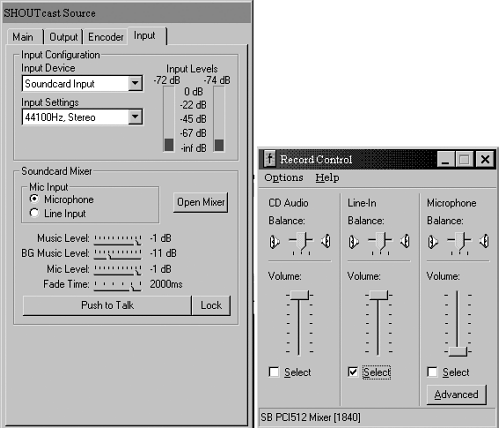 -
Select the appropriate audio input (typically Line, meaning that an external device is plugged into the Line Input of your sound card). -
Start your source audio and adjust your input levels so that they don't read higher than 4db in the SHOUTcast input meter. -
Stop your source audio and (if necessary) reposition to the start point. -
For Input Settings, select your sample rate and number of channels (mono or stereo). Because you can also set the sample rate and number of channels when choosing your bit rate, select 44100Hz, Stereo here. -
Select the Encoder tab of the SHOUTcast source configuration. -
Select Encoder 1 from the encoder options list. -
For Encoder Type, select MP3 Encoder. -
For Encoder Settings, select 32Kbps, 22.050kHz, Mono (see Figure 6.13) Figure 6.13. Configure the bit rate, sample rate, and number of channels settings for your first Winamp SHOUTcast encoder. 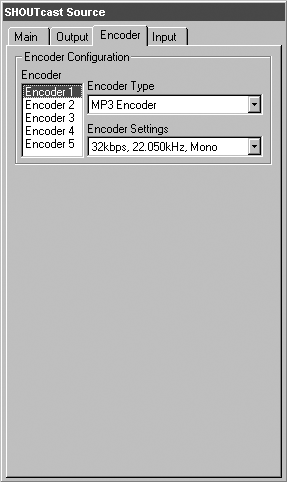 -
Click on the Output tab of the SHOUTcast Source configuration (see Figure 6.14). This is where you link the encoding settings that you just created to an output stream to send to your SHOUTcast server. Figure 6.14. Set your SHOUTcast server configuration in Winamp's SHOUTcast output settings window. 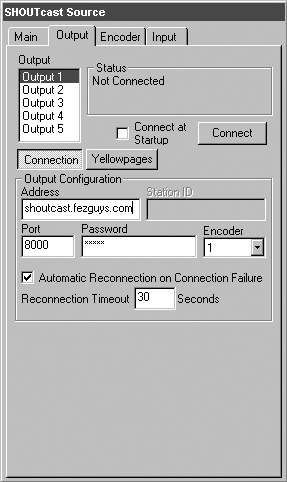 -
Select Output 1 on the output options list. The status should read Not Connected. -
Leave the Connect at Startup option unchecked because in this Step-by-Step tutorial, you are only authoring a one-time live stream. NOTE Selecting the Connect At Startup option causes your authoring computer to attempt to connect to this server (Output 1) upon launching Winamp. If you're providing an ongoing live stream, you might want to check this and also configure Winamp to run when your computer boots. This way your stream is always running. -
Make sure the Connection button (next to the Yellow Pages button, not to be confused with the Connect button that is higher up) is selected, as it should be by default. -
Enter the settings for the server to which you will be broadcasting (server name, port number, and password). -
Choose Encoder 1 from the pull-down list to select the template you configured earlier. -
Check the Automatic Reconnection on Connection Failure box. -
Click the Yellow Pages button to bring up your program's directory listing preferences. -
If you want to have your live stream included in public listings of available programming, select Make This Server Public and fill out the appropriate information (description, URL, genre, and so on). NOTE Checking Make This Server Public makes your program listing appear in the iTunes player and program listings on SHOUTcast.com and Winamp radio. It takes up to 15 minutes after you begin streaming for this information to update in these directories. If your live stream is not intended for the masses, make sure to leave the Yellow Pages button unchecked. -
When you feel ready, start your source audio and click the Connect button to connect your stream to the server. -
Click Main to see a continuous display of information on server connection status and to see input levels. As your stream progresses, keep an eye on the input levels and, if necessary, adjust accordingly (see Figure 6.15). Figure 6.15. Monitor your broadcast and audio levels from the SHOUTcast plug-in's Main window. 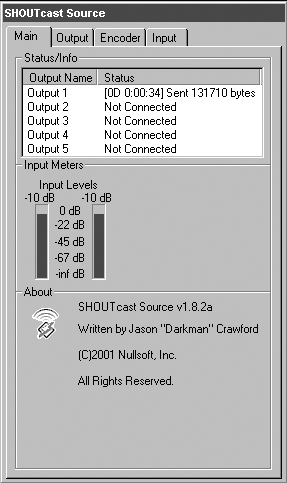 -
Test your stream (see Figure 6.16) through the SHOUTcast administration Web page. Preferably from a separate computer on a separate Internet connection, open your Web browser and go to http://servername:port (where servername is the SHOUTcast server to which you're sending your stream and port is the port on which the server is running). Click on the Listen link. Figure 6.16. Test your live MP3 stream with your MP3 player. 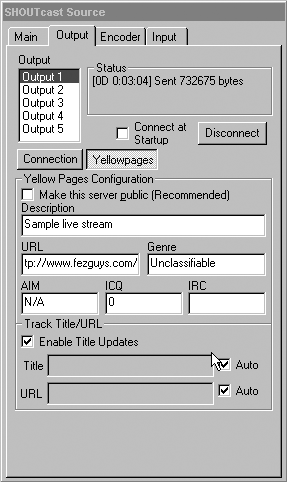 NOTE MP3 doesn't have a technology (like RealMedia's SureStream) that can author multiple streams for multiple bit rates simultaneously. Authoring another, higher quality stream (for instance, 384K DSL broadband users) requires encoding your source audio as another separate stream to another separate encoder. The good news is that the SHOUTcast plug-in for Winamp makes it possible to do this from the same authoring/encoding computer. -
To configure a second stream for DSL users, do the following: -
Click on the Encoder tab and select Encoder 2. -
Set Encoder Type to MP3 Encoder. -
For Encoder Settings, select 192Kbps, 44.100kHz, Stereo. -
Click back to the Output tab. -
Select Output 2 and point it to your new high bit rate file by choosing 2 for Encoder. -
Enter the server name, port number, and password for your second SHOUTcast server. -
Click Connect. You are now sending a high bit rate live stream. NOTE You can configure up to five different live streams from one encoder, although doing so puts a heavier CPU requirement and additional bandwidth on your authoring computer. Watch the authoring computer's efficiency when encoding and, if necessary, drop the number of streams.
You are now broadcasting your live MP3 stream to the Internet. Create your metafiles and link to them from your Web site (see Chapter 7). |