| NOTE  | The new Macintosh version of Sorenson Broadcaster (v2.0) with QT 5 and Macintosh OS X 10.0 support was not available at the time of this writing. The people who manufacture Sorenson Broadcaster say that the v2.0 user interface will look a little different, and there will be some new features. The Windows tutorial in the next Step-by-Step should help with the authoring process of the new Macintosh version (aside from the inherent differences of the disparate operating systems). Macintosh OS 9 users can author a live QuickTime stream with Sorenson Broadcaster v1.1 ($199.00), however it requires the out of date QuickTime 4. Other third-party software offering mixed results are CoolStream at www.evological.com and Channel Storm Live Channel at www.channelstorm.com. |
In this section, you'll create a live QuickTime stream on your authoring computer. That is, source audio enters your computer uncompressed and exits as an encoded live stream. The QuickTime streaming server then forwards the live stream, in turn, to your listeners on the Internet. Make sure your audio source is plugged into your computer's audio input. Use the same audio input level guidelines you used to create a digital file (see Chapter 2). Your source audio quality is crucial here. This is because no opportunities (such as waveform editors) are typically available to optimize the signal between encoding and outputting that audio as a live stream. Make sure your signal is as clean as possible and that your level is set accurately not so low that it can't be heard and not so loud that it will distort; both scenarios prevent the encoder from doing a good job. You might want to place some audio hardware (such as a compressor) in your signal path to smooth the signal and increase the encoder's efficiency (see Chapter 11). Prior to beginning the live stream, it's strongly recommended that you have, if possible, another test computer available to do a listening test. Short of calling your friends on the phone (which also works), this is the best way to make sure your live stream sounds okay and is actually making it out to the Internet intact. The most realistic test is having your listening test computer on a completely different Internet connection from your live encoder computer. In addition, if you're encoding and streaming for modem users, test your live stream with a modem connection (not broadband or DSL) to get a realistic experience. NOTE Although it's possible to use the same computer to simultaneously author from and run your streaming server, doing so is not recommended for handling more than a dozen listeners.
To create a live QuickTime stream on the Windows operating system for Windows 98, ME, and 2000, Sorenson Broadcaster v1.5 will be used. Sorenson Broadcaster includes a version of the QDesign codec specifically for live streaming that offers a maximum data rate of only 16Kbps. To get higher data rate compression, you have to buy the QDesign commercial codec (www.qdesign.com) or get it with a multimedia software bundle, of which Sorenson Broadcaster is a portion. The Sorenson Broadcaster is also included with a Power Bundle for QuickTime 5 and a Professional Suite for QuickTime 5. These two higher-priced bundles that are available from www.sorenson.com include extra support for video and enhanced production tools. STEP-BY-STEP: Using Sorenson Broadcaster to Author a Live QuickTime Stream  -
Launch Sorenson Broadcaster v1.5.1 on your Windows computer. An untitled Sorenson Broadcaster window appears (see Figure 5.8). Make sure that your source audio is connected to your authoring computer. Figure 5.8. The Sorenson Broadcaster main window. 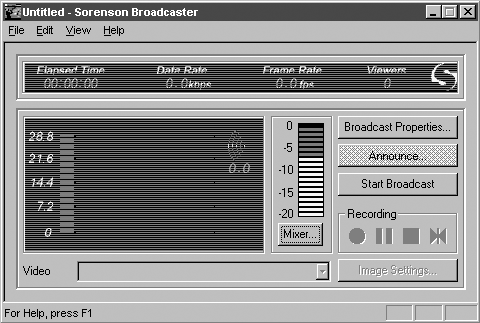 -
Click on the Broadcast Properties button. This takes you to a Sources pane. You have the option of choosing from preset preferences or creating your own. Because a suitable present isn't available for an audio-only 56K live stream, you will configure your settings manually. You can save these settings using File, Save As. -
Leave Video unchecked. (Note: The Sources pane defaults to this setting if no video is plugged in). The first option in the Audio section is the pull-down menu for your Input Audio Device. The default selection should be allowed. (The OS sets this during the install process.) If you're not certain, choose an option that uses the term Wave Recording or Wave Input. To the right of the Input Audio Device menu, allow the default Device Config setting. See Figure 5.9 for a summary of the Sources pane settings. Figure 5.9. Leave the Video option unchecked, make sure the Audio option is checked, and verify the Input Audio Device setting in Sorenson Broadcaster's Sources pane of the Broadcast Properties window. 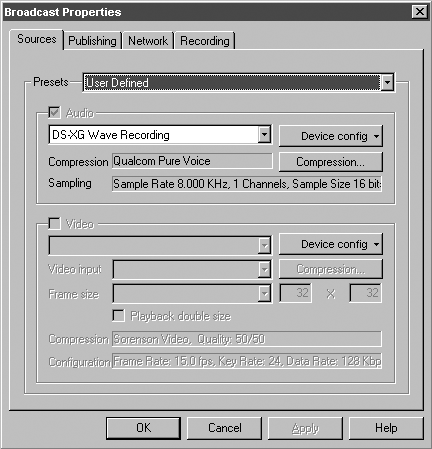 -
Click on the Compression tab, which pops up an Audio Configuration window. For Compressor, choose QDesign Music 2 (see Figure 5.10). Figure 5.10. Select QDesign Music 2 in Sorenson Broadcaster's Audio Configuration window. 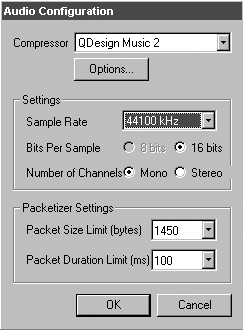 -
Click the Options button, which brings up the QDesign Music Encoder settings window. -
In the QDesign Music Encoder settings window, choose the 32 kbits/s bit rate setting (see Figure 5.11). This setting is for 56K dial-up modem users. If you are authoring a live stream for broadband DSL users, select 128 kbits/s. Figure 5.11. Select 32 kbits/s bit rate and Quality optimization in Sorenson Broadcaster's QDesign Music 2 Codec options window. 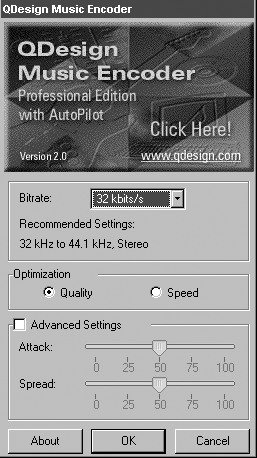 NOTE The QDesign Pro codec only supports bit rate settings up to 128Kbps, which is sufficient. As noted earlier in " Choosing Your Encoding Settings," if you're using the standard QuickTime Pro encoder (without the full version of the QDesign Music Codec), you will only be able to select bit rates up to 48 kbits/s. -
After you select a bit rate, the Recommended Settings text updates the available ranges of sample rates and number of channels (mono or stereo). For your 56K live stream, you will be using mono and a 44.1 kHz sample rate. If you choose Stereo, consider using a 32 kHz sample rate, which provides a little extra space for the encoder to use for the second channel. If you are authoring a live stream for broadband DSL users, choose the 44 kHz sample rate and set the number of channels to Stereo. NOTE The sample rate you choose isn't actually entered in the QDesign Music Encoder settings window. You make your decision based on the information in this window and select it when you return to the Audio Configuration window. -
For file optimization, you have two options: Quality or Speed. Select Quality (see Figure 5.11). Only select Speed if your computer has problems keeping up (typically noticeable through dropouts or especially poor sound). -
The Advanced Settings option enables power users to make specific changes to how the codec encodes your audio. Leave this unchecked for now (see Chapter 12). Click OK. -
In the Audio Configuration window, set your bit size to 16 (unless your source is 8 bit). Set the sample rate and number of channels based on the recommendations of the QDesign Music window. Leave the Packetizer Settings at their default values and click OK. -
Back in the Broadcast Properties window, click the Publishing tab. Enter your appropriate title, author, copyright, program URL, and other information for your stream (see "QuickTime Stream Attributes (and Annotations)"). -
Within the Publishing tab (see Figure 5.12) is an option to provide a graphics image (called Poster Frame) in your listeners' QuickTime player window. Leave this option unchecked. If you would like to go back later and experiment with offering a groovy little graphic, please do. Figure 5.12. Set your QuickTime live stream attributes in Sorenson Broadcaster's Publishing pane of the Broadcast Properties window. 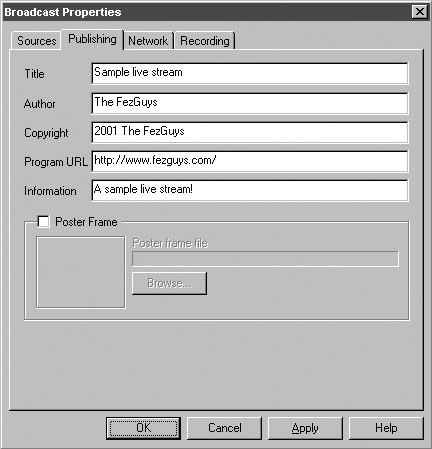 -
Click the Network tab. From the Broadcast Type pull-down menu, select Unicast because you're sending directly to your streaming server (see Figure 5.13). (Users who want to multicast to a local intranet LAN might want to look into the Multicast option.) For Receiver's IP Address, enter the IP address of your QuickTime server. (The IP will be supplied by whomever is in charge of configuring the server. See the section, " Creating a Server " later in this chapter.) Leave the rest of the options on this page as their default settings. Figure 5.13. Select Unicast broadcast type and leave the default values for all other options in Sorenson Broadcaster's Network pane of the Broadcast Properties window. 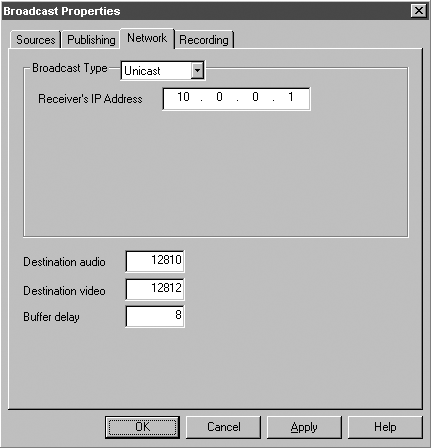 -
If you want to save a local copy of your live broadcast, click the Recording tab and choose the folder to which to save your live streaming file (see Figure 5.14). If desired, check Start Recording When Broadcast Starts to start the Save process as soon as you begin streaming. Regardless of this setting, you can start and stop the archival process while broadcasting using the Record, Pause, and Stop buttons in Sorenson Broadcaster's main window. Click OK to exit the Broadcast Properties window. Figure 5.14. If a local archive of your live stream is desired, enter the archive's filename in Sorenson Broadcaster's Recording pane of the Broadcast Properties window.  FezGuys' Tip  If you choose to archive a local copy of your live broadcast, make sure you have enough disk space available. Long-running programs can quickly consume gigabytes of disk space, and running out of space locally can interrupt your broadcast for all listeners. |
-
In the main Sorenson Broadcaster window is a vertical input level meter with a Mixer button. Click that button to open the standard Windows Recording Control utility. -
Press Play on your input device and make sure the appropriate input (this will most likely be Line Input if you're using an external cassette, CD, and so on) is selected and check your input audio levels (see Figure 5.15). When you're happy with the levels, move the Recording Control window side by side on your authoring computer's screen with the Sorenson Broadcaster Broadcast Properties window to view both simultaneously. Press Stop on your input device and reposition your source audio to the start point. Figure 5.15. Set your input, adjust levels, and place the Recording Control window side by side with Sorenson Broadcaster for easy fine-tuning. 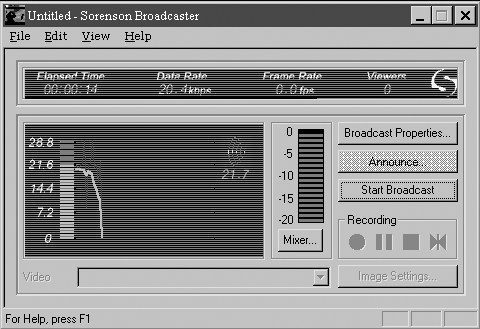 -
You are now ready to stream. Click Start Broadcast button in the main window and start your source audio. You will see elapsed time and data rate information about your broadcast updated in real time. -
You are now streaming! To announce and test your stream, click on the Announce button on the Sorenson Broadcaster main window. This brings up the Save Broadcast Announcement window. -
In the filename field, enter the name of your broadcast. It is recommended that you use a simple, short name with no spaces or odd punctuation, such as "live". A file suffix (.mov or .sdp) is automatically added based on what you choose for the Save as Type option. -
Two options are available for Save as Type: Reference Movie (*.mov) or SDP Text Announcement (*.sdp). Because you're sending your broadcast to a streaming server, choose SDP Text Announcement (*.sdp). If you decide instead to multicast over a LAN or unicast to a single recipient, choose Reference Movie (*.mov). Make your selection and click Save. -
Using FTP, upload your live.sdp file to the Movie Directory folder of your QuickTime streaming server. -
Test your stream by opening the streaming file's URL in a QuickTime player (see Figure 5.16) on another computer (and, if possible, another connection). In the QuickTime player, go to File, Open URL (Macintosh:  +U, Windows: Ctrl+U) and enter rtsp://streamingservername.com/live.sdp. Make sure to include subdirectory names if necessary. +U, Windows: Ctrl+U) and enter rtsp://streamingservername.com/live.sdp. Make sure to include subdirectory names if necessary. Figure 5.16. Test your live stream by playing it back using the QuickTime Player.  You are broadcasting a live stream to the Internet! Do your happy dance! |