Section 12.2. Configuring Permissions
12.2. Configuring PermissionsNow it's time to learn how to configure the various policies, code groups, permissions, and evidences. .NET provides two ways for system administrators to configure code access security policies: the first is to use a command-line utility called caspol.exe; the second is to use the .NET Configuration tool. Both methods are comparable in features and capabilities. You typically use the .NET Configuration tool to configure security and export the security policies to deploy on other machines. You can use caspol.exe during installation to make dynamic changes. This chapter demonstrates the .NET Configuration tool. Please refer to the MSDN Library to learn about the equivalent command-line switches for caspol.exe. The .NET Configuration tool has a folder called Runtime Security Policy, which contains an item for each of the three policies that system administrators can use to mange code access security: Enterprise, Machine, and User. Each policy item has subfolders containing its code groups, permissions sets, and custom policy assemblies (see Figure 12-5). Figure 12-5. Runtime Security Policy configuration using the .NET Configuration tool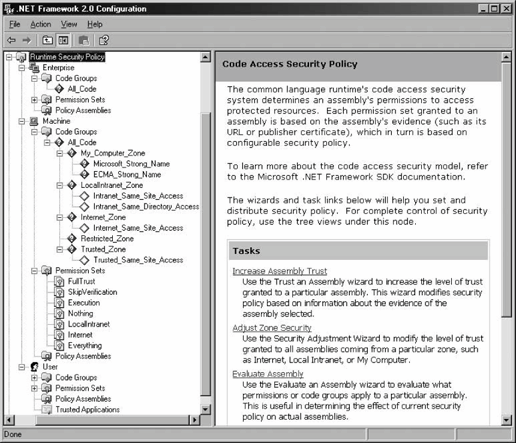 The .NET Configuration tool lets system administrators nest code groups. If the parent code group's evidence is met, .NET will not continue to evaluate child code groups. Only if the parent's evidence is not met will .NET continue to examine child code groups and aggregate their permissions (if their evidence requirements are met). In the Properties page on the General tab of each parent code group, an administrator can specify what to do when the evidence associated with this code group is satisfied. The first instruction, called Exclusive, instructs .NET to include only permissions from this code group in the policy. Multiple code groups can claim to be exclusive. However, if a policy has at least a single exclusive code group, all the code groups must be mutually exclusive, meaning that the evaluated assembly can meet the membership condition of at most one code group. It's considered an error if the assembly meets more than one code group's membership condition when one of the matches is an exclusive group. The added degree of code-group coupling and restriction when using exclusive code groups makes this a setting to avoid. The second instruction is called Level Final. It instructs .NET to stop evaluating lower-level policies. The policy hierarchy is Enterprise, Machine, and User. Setting Level Final at the User policy has no effect (unless app domain-specific policies are employed), while setting it at the Enterprise policy level will render the Machine and User policies meaningless. If it is used at all, Level Final should be used at the Machine policy level only. Each security policy is stored in a dedicated XML-formatted security configuration file, and the .NET Configuration tool is merely a visual tool for editing those files. The Enterprise policy file resides at:
The Machine policy file resides at:
The User policy file resides at:
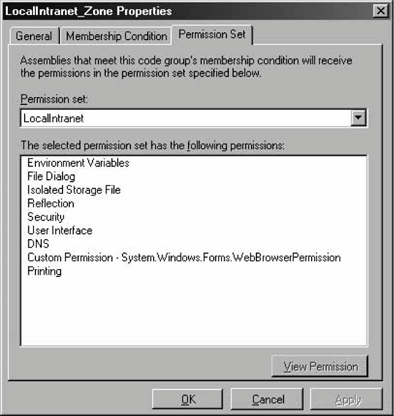
12.2.1. .NET Default ConfigurationAll three policies contain in their Permission Sets folders the same set of named permission sets, although none of the policies uses all its permission sets. The reason why the policies are deployed with all the named sets is so that system administrators can use these predefined sets in their own custom code groups. In addition, system administrators can change the default code groups to use other permission sets (you will see how shortly). The default Microsoft naming convention is to name code groups after the evidence they use. I find this to be a flawed convention, because it is confusing: code groups in different policies often use the same evidence but grant different permissions. Fortunately, this is only a convention, and you can name (or rename) code groups as you like. 12.2.1.1 The Enterprise and User policiesBoth the Enterprise and the User policies contain by default a single code group called All_Code. The All_Code code group (as its name implies) uses the All Code evidence with the FullTrust permission set, which means that by default, as far as the Enterprise and User policies are concerned, all assemblies are unrestricted. As a result, by default, neither the Enterprise nor the User policies have any effect on restricting code access, because their intersection with the third policythe Machine policyyields the Machine policy intact. Administrators can add custom child code groups to both the Enterprise and User policies' All_Code code groups, thus customizing these policies. In that case, make sure to change the default permission grant, because it will mask out any child code groups. 12.2.1.2 The Machine policyThe Machine policy is where the default .NET code access security takes place. The Machine policy has a single root code group called All_Code. All_Code uses the All Code evidence with the Nothing permission set. As a result, by itself it grants nothing, and instead it relies on the following nested code groups to grant permissions:
Table 12-3 summarizes the default permissions granted by the Machine policy (same as the overall default policy).
12.2.2. Custom Permission SetsSystem administrators can apply the predefined named permission sets in the contexts indicated by their names. However, you can't directly modify a named permission setinstead, you must duplicate it and modify the copy. System administrators can define custom permission sets (either from copies of existing sets or from scratch) and compose very granular permissions suitable for their particular needs. The only requirement is that a custom permission set must not have the same name as one of the existing permission sets, because permission sets must be given unique names.
To duplicate a named permission set (or any other custom permission set), go to the Permission Sets folder, select the desired permission set, and then right-click it and select Duplicate from the pop-up context menu. The .NET Configuration tool then creates a new permission set in the policy, named Copy of <original name>. To create a new permission set from scratch, right-click the Permission Sets folder and select New from the context menu. This brings up the Create Permission Set wizard. The first dialog box lets you name the new permission set and provide a description (see Figure 12-8). Figure 12-8. Identifying a new permission set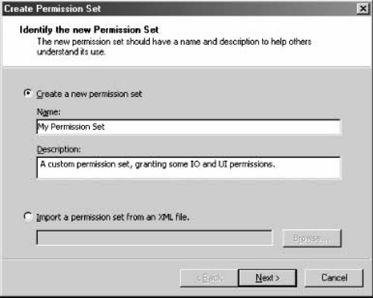 Once you've created a new permission set, its description will be displayed in the right-hand pane of the .NET Configuration tool when that permission set is selected. The first dialog box in the wizard also lets you provide an XML file containing definitions of custom permissions (such as permission not available via the tool itself). In most cases, however, you are likely to simply select permissions from the existing permission types. Click Next to move to the next dialog box in the wizard, which allows you to assign individual permissions to the new permission set (see Figure 12-9). When you add a permission type from the left-hand pane, it brings up a dedicated dialog for that type, allowing you to add individual permissions of that type. For example, suppose the new permission set is required to grant file I/O and user interface (UI) permissions. For file I/O, the permissions required are read permission for the C drive, and full access to C:\ temp. For UI, the permissions required are access to all windows and events, but no access to the clipboard. To configure the file I/O permissions, select File IO in the left hand pane of the dialog, and click Add. This brings up the File IO Permission Settings dialog, shown in Figure 12-10. Figure 12-9. Selecting individual permissions for the permission set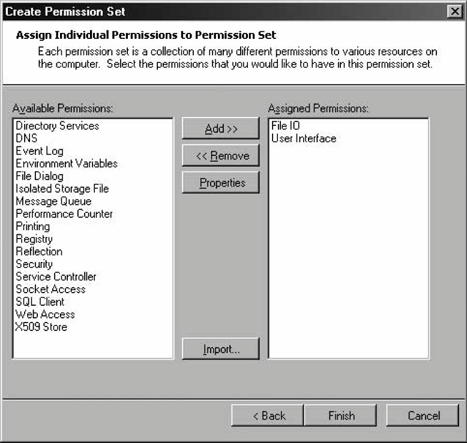 Figure 12-10. Configuring file I/O permissions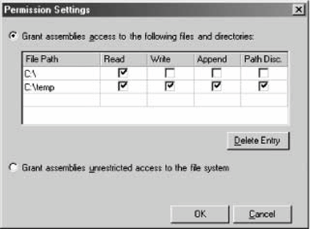 The dialog has a grid in which each line corresponds to a single file I/O permission. You can also grant unrestricted access to the filesystem. Configure the required settings, then click OK to return to the previous dialog. To configure the UI permissions, select User Interface in the left-hand pane and click Add. This brings up the UI Permission Settings dialog, shown in Figure 12-11. Grant access to all windows and events, and deny access to the clipboard. Click OK to return to the previous dialog, then click Finish to complete configuring the new permission set. You can now use this permission set with any code group in the policy.
Figure 12-11. Configuring UI permissions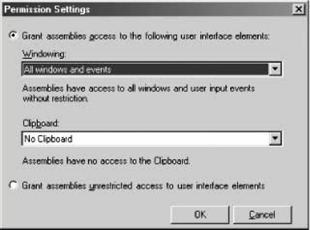 Once you have created a custom permission set (either from scratch or by duplicating an existing permission set), you can change it by selecting Change Permissions from its context menu. This brings up the Create Permission Set dialog shown in Figure 12-9, which lets you modify the permission set.
12.2.3. Custom Code GroupsWith custom code groups, unlike with predefined permission sets, you can change every detail. You can change the permission sets or the evidence required via the code group's Properties page. You can delete any existing code group, and you can duplicate an existing code group (with all its nested code groups), rename it, and modify its composition. With the .NET Configuration tool, you can even drag-and-drop code groups across policies. The .NET Configuration tool also allows you to create new code groups, but only as a child code group of an existing code group. Once created, you can move the new code group anywhere under the policy code group tree by dragging and dropping it to a new location. For example, suppose you want to create a new code group that grants all assemblies signed with your organization's public key the Everything permission set. This can be very handy when different teams use each other's assemblies across the local intranet. The logical place for the new code group is in the Machine policy, as another child code group under the My_Computer_Zone code group, a sibling to the Microsoft_Strong_Name and ECMA_Strong_Name code groups. Note that if your organization is using Enterprise or User policies that are different from the default (of granting all code full trust), you will have to place the new code group in those policies as well, because .NET intersects policies. In the Machine policy, highlight the My_Computer_Zone code group, right-click it, and select New from the context menu. This brings up the Create Code Group wizard. In the first dialog, name the new code group My Applications, provide a short description (see Figure 12-12), and click Next. Figure 12-12. Creating a new code group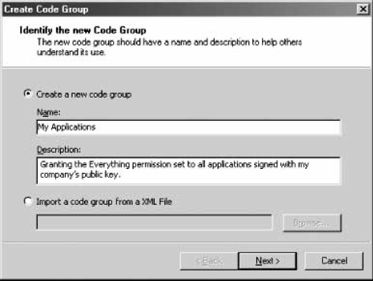 On the "Choose a condition type" dialog, you need to select the evidence type to be used by this code group, and its value. Select Strong Name from the condition type drop-down combo box (see Figure 12-13). The lower part of the dialog will change to reflect the value of the requested strong key. The easiest way to provide the public key value is to import it from an already-signed assembly. Click the Import button to bring up a file-browsing dialog. Browse to a signed assembly (either an EXE or a DLL), and select it. The wizard then reads the public key from the assembly's manifest and populates the "Public key" text box. Figure 12-13. Choosing an evidence type and value for a code group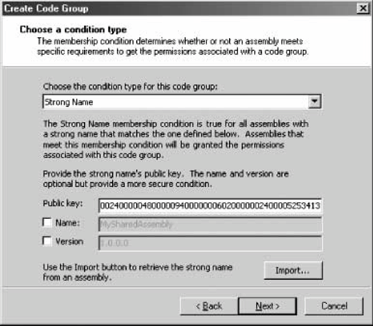 Click Next to proceed to the next dialog, where you need to assign a permission set to the new code group. You can use any existing permission set in the policy (see Figure 12-14), by selecting it from the drop-down combo box. Select Everything, click Next, and click Finish on the next dialog. The new code group is now part of the policy.
12.2.3.1 Non-administrative permissionsMost of the permissions in Table 12-1 can be administered using the .NET Configuration tool. However, there is no easy granular administrative support for the ASP.NET Hosting, Data Protection, Distributed Transactions, Key Container, and Web Browser permissions. The less-than-desirable approach to granting these permissions is to grant the application full trust. This is undesirable because letting an application run with more permissions than it actually requires leaves you susceptible to luring attacks (i.e., when an application is lured into doing something on behalf of a less privileged party). Figure 12-14. Assigning a permission set to a code group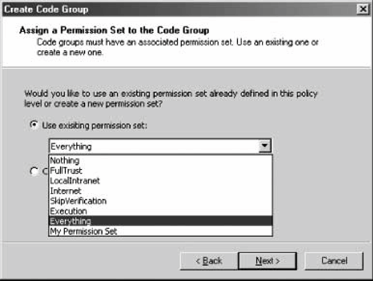 The solution involves adding a custom permission set and a dedicated code group. For example, suppose you have a client application that uses transactions that can be promoted to distributed transactions. In addition, the application needs the following permissions: permission to execute and permission to display a user interface. You can achieve that using two code groups that use the same evidence (such as the application's strong name): the first code group, called MyAppAdmin, grants all the permissions you can grant administratively (execution and user interface), and the second code group, called MyAppCustom, grants the custom permission seta single unrestricted DistributedTransaction permission, in this example. You will need a custom permission set represented by an XML file. For the unrestricted DistributedTransaction permission, create a text file called DistributedTransactionUnrestricted.xml with the following text inside: <PermissionSet version="1"> <IPermission docEmphStrong">DistributedTransactionPermission, System.Transactions, Version=2.0.0.0, Culture=neutral, PublicKeyToken=b77a5c561934e089" version="1" Unrestricted="True"/> </PermissionSet> As you can see, the custom permission set schema is straightforward: it lists the fully qualified name of the permission type, its assembly, and the permission itself (unrestricted, in this example). Next, right-click on the Permission Sets folder in the Machine policy, and select New from the pop-up context menu. Select the "Import a permission set from an XML file" option, browse to the DistributedTransactionUnrestricted.xml file, and click Finish. This will add a new permission set called CustomPermissionSet0 to the Permission Sets folder. Rename it DistributedTransactionUnrestricted. In the Code Groups folder, add a new code group called MyAppCustom that uses the same evidence as MyAppAdmin, but grants the DistributedTransactionUnrestricted permission set. 12.2.4. Administrating Security for ClickOnce ApplicationsWhile ClickOnce applications are completely subject to code access security, you administer such applications in a different manner from that of other kinds of .NET applications. Each ClickOnce application has an application manifest. You associate your ClickOnce application with a certificate using the Signing pane of the project properties. The manifest has a version number and is digitally signed using a publisher certificate. The individual assemblies comprising the ClickOnce application may all come from different vendors, or they may not even have strong names at all. The application manifest lists the assemblies comprising the ClickOnce application, using a hash and a strong name token (if present). You can think of it as an application-level manifest that describes a collection of collectively deployed individual assemblies and their supporting files. The separation of the manifest's digital signature from the assemblies' strong names enables system administrators to trust individual applications rather than the original component vendors. Most importantly, each ClickOnce application manifest lists the security permissions required as a bare minimum for that application to function properly. When the user for the first time clicks the link which downloads the ClickOnce application, the user is then prompted with a Security Warning dialog, asking permission to install the ClickOnce application. The dialog identifies the publisher of the ClickOnce application, using the name in the certificate. If the user approves the installation, the application's files are not just downloaded and installed, but the application is also granted all the permissions listed in its manifest. When executing, the application will be granted only the permissions listed in its manifest. After the first time the user installs the application (and approves the installation in the subsequent Security Warning dialog), the user is not prompted again when clicking the installation link. You can use the .NET Administration tool to see which permissions were granted to a ClickOnce application. The User policy contains a node called Trusted Applications (see Figure 12-5). This node contains a list of all the already installed ClickOnce applications. If you remove an entry from the Trusted Applications list, next time the user tries to install that application, the user will be prompted using the Security Warning dialog, as if the application was never installed. You can view the permissions granted to a particular ClickOnce application: Right-click on the matching entry in the Trusted Applications node and display its properties (see Figure 12-15). Figure 12-15. Permissions granted to a trusted ClickOnce application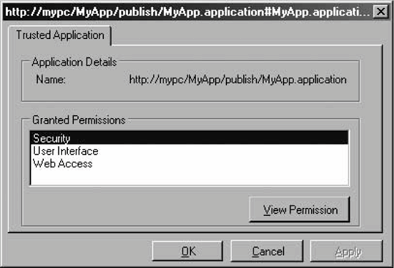
12.2.4.1 ClickOnce versioning and securityEvery version of a ClickOnce application gets its own entry in the Trusted Applications list. Different versions of the same application can request different permissions. When trying to install a new version of a previously installed application, .NET may or may not prompt the user to approve the installation. If the new version of the application contains in its application manifest permissions that are not a subset of a previously installed version, the user is prompted again using the Security Warning dialog. However, if the new version contains the same permissions (or a subset of the permissions demanded by a previously installed version), then the user is not prompted. 12.2.4.2 Trusting ClickOnce application publishersBy default, every time a new ClickOnce application is deployed, even if that application is published by a publisher that the user has already approved other applications from, the user is still going to get the Security Warning dialog prompt. In a dynamic environment, with multiple ClickOnce applications, this approach could get quickly out of hand. To address that, .NET enables trusting not only specific ClickOnce applications but application publishers. Administrators can add a publisher certificate to the Trusted Publishers list on the client machines. When the user launches a ClickOnce application whose application manifest is signed by a trusted publisher, the user will not be prompted, and the application will be granted the permissions specified in the application manifest. If the administrator added the certificate to the Trusted Publishers store at the machine level, it affects all users on that machine. If the administrator added the certificate to the Trusted Publishers store of a particular user, then only that user is not prompted. In addition, .NET makes a distinction between verified certificates and unverified certificates. A verified certificate is any certificate issued by a known authority such as VeriSign or Thawte. Verified certificates are stored in the Trusted Root Certification Authorities certificate container. An unverified certificate is any other certificate, such as the test certificates that you can generate using Visual Studio 2005 in the application's properties Signing pane.
If the publisher certificate used to sign the ClickOnce application is unverified, then the user will be prompted even if the certificate was added to the Trusted Publishers list. To suppress the prompt when using a private, or a third party unverified certificate, simply add that certificate to the Root Certification Authorities certificate container.
12.2.5. Custom Security PoliciesKnowing how to configure both custom permission sets and custom code groups is actually the last step in deploying a custom security policy. The real question is, what is a good security policy? While the exact optimized answer may vary between different applications, vendors, and customers, there are a few general recommendations. First, I believe the default .NET security policy is inadequate. Any users can copy potentially malicious assemblies to their computers, where the default policy will grant them full trust. Furthermore, the rest of the code groups in the default policy all use origin-based evidence, which is inherently only as secure as your resolution service. If someone subverts your resolution service, malicious assemblies coming from malicious sites could be trusted. The default policy uses origin-based evidences because it is better to have some security blanket than none at all, and it does not need to know anything about the content of your assemblies in order to provide for content-based evidence. On the other hand, you are in charge of the content of your assemblies, and you can use content-based evidences (such as the Strong Name evidence). It is also very important to emphasize again that any custom policy you deploy must grant all assemblies signed with the Microsoft or ECMA strong names full trust. Granting full trust to Microsoft assemblies is required because .NET must trust itself in order to run. In fact, the .NET Configuration tool will warn you if the custom policy you configure does not grant Microsoft assemblies full trust. Although it's an undocumented requirement, you must also grant ECMA assemblies full trust in order for your applications and assemblies to work. The .NET Configuration tool will not warn you if you do not, but your applications will not even load. This is probably because the assembly used to verify user types relies on the ECMA strong name, as part of the standardization of extending the CLR type system. In addition, I believe that in a distributed enterprise environment you actually need two security policies: one for the application servers, and one for the client machines. 12.2.5.1 Custom server-side policyA server machine in an enterprise environment is typically dedicated to the set of applications developed by a single team or company. Because of that, you can deploy the following security policy: keep a single root code group that grants nothing to all code. This will force .NET to always evaluate the nested code groups. Add the following three code groups to the policy under the root:
Next, remove all other code groups from the policy, as shown in Figure 12-16. Name the new code group after the authority (e.g., the team or company) that issued the strong name. Remove all entries from the Trust Applications node in the User policy. This server-side policy will enable only your applications to run on the server. If you need to add other applications from other vendors to the server, after careful evaluation of the trustworthiness of the vendors, identify those using a strong name. Figure 12-16. Recommended server-side security policy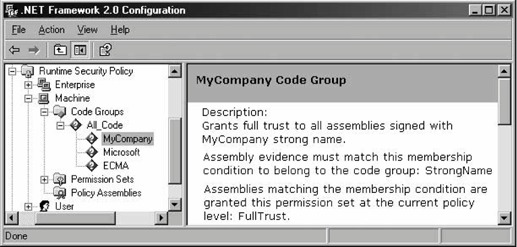 12.2.5.2 Custom client-side policyTypically, a client machine in an enterprise environment is used for a variety of applications from multiple vendors. It is impractical to assume that you could own or lock down those machines solely for the purpose of using your applications. You cannot remove all code groups from the client machine, because that could potentially preclude the execution of other applications. Not only that, but there are no guarantees that the client machines would actually grant your applications permission to execute or call to the server. On a client machine, you can either rely on the ClickOnce deployment mechanism (if your client application is deployed using ClickOnce) or use traditional code groups and permission sets (for conventional client applications). For a traditional client application, I recommend that you deploy a single code group under the root of the policy. Name the new code group after the product it enables. The code group will identify your assemblies using a strong name, and should grant them only the bare permissions required to function. Typically, these are:
It is better to grant your client assemblies only these permissions rather than full trust, because granting your assemblies more permissions than they actually require will make them potentially susceptible to luring attacks, where they are lured into doing things they should not do on behalf of a less-privileged party. Similarly, a ClickOnce application should request the same permissions in its application manifest. 12.2.6. Security Administration UtilitiesThe .NET Configuration tool provides a number of utilities and services to manage security at a level above code groups and policies. In addition, the tool provides ways to reset policies, examine or trust individual assemblies, and deploy security policies. 12.2.6.1 Resetting policiesOne essential feature of the .NET Configuration tool is the ability to reset a policy (or all of them) to the default values. This is instrumental when experimenting with security configuration. To reset an individual policy, simply select Reset from its context menu. You can also undo the last change made by selecting Undo from the policy's context menu. To reset all policies at once to their default configurations, select Reset All from the context menu of the Runtime Security Policy folder.
12.2.6.2 Managing policy filesYou can create new security policy files by selecting New from the context menu of the Runtime Security Policy folder. The New Security Policy dialog lets you specify the level of policy file to createEnterprise, Machine, or Userand a name for the new file. The new file will have as a starting point the default settings for that policy level. You can modify the policy and then assign this new file on the same machine or anywhere else. First, select Open from the context menu of the Runtime Security Policy folder. This brings up the Open Security Policy dialog, which lets you specify which policy level to apply to the configuration file. You can open the default configuration file for that level or assign a specific configuration file (see Figure 12-17). 12.2.6.3 Adjusting securityThe .NET Configuration tool provides a simple, coarse way for system administrators to manage code groups, without bothering with permission sets, evidences, and the like. Selecting Adjust Security from the context menu of the Runtime Security Policy folder brings up the Security Adjustment wizard. The first dialog box lets you decide whether the adjustments should apply to the machine or the current user level only; there is no Enterprise level. The next dialog box presents the five zones (My Computer, Local Intranet, Internet, Trusted Sites, and Untrusted Sites) and a track bar (see Figure 12-18). Adjusting the track-bar position assigns a different permission set to the selected zone. Even though the description of the positions of the track bar to the right don't state so, Figure 12-17. Opening and assigning a new security policy file Figure 12-18. Adjusting zone security using the adjustment wizard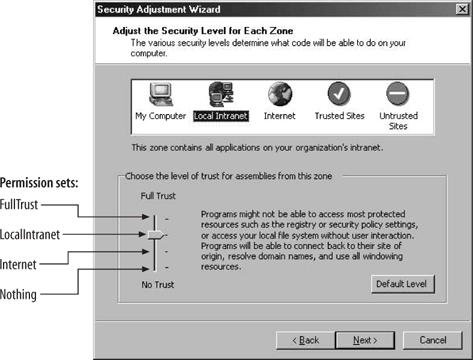 the positions map to the FullTrust, LocalIntranet, Internet, and Nothing permission sets, as shown in Figure 12-18. When you click Next, the last dialog box of the adjustment wizard presents a summary of the new security setting for the five zones. 12.2.6.4 Evaluating an assemblySometimes it isn't easy to find out why a particular assembly isn't granted the expected security permissions. The .NET Configuration tool lets you evaluate an assembly to find out which code group grants permissions to that assembly, and which permissions are granted. Selecting Evaluate Assembly from the context menu of the Runtime Security Policy folder brings up the Evaluate an Assembly wizard. You need to specify the filename and location of the assembly to evaluate, and what to evaluate (see Figure 12-19). Figure 12-19. Selecting an assembly to evaluate and the evaluation information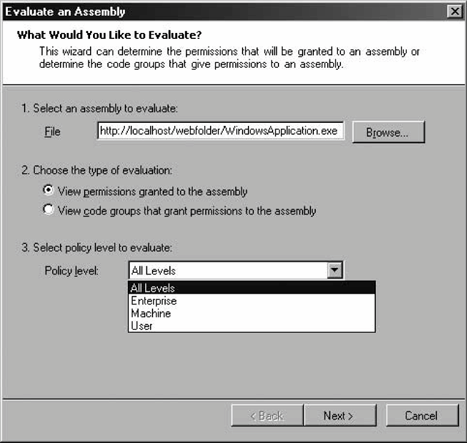 If you need to verify which evidences the assembly meets, you can have the wizard list all the code groups that grant permissions to the assembly. Alternatively, you can have the wizard list the actual permissions granted to see what the assembly ends up with. You also need to select the evaluation level; you can select a specific policy level or all levels. Once you select that information, click Next to see the evaluation report. Depending on your selections in the previous dialog, you are either presented with a hierarchical list of code groups (as in Figure 12-20) or a list of permission sets. If you chose to view the permissions, you can examine each permission type to see the value of individual permissions it grants. Figure 12-20. Code group membership evaluation report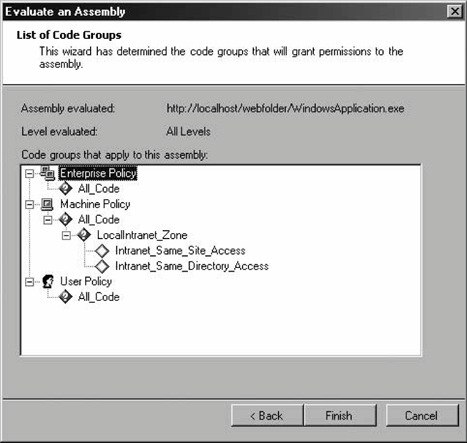 12.2.6.5 Trusting an assemblySometimes, the system administrator may have explicit knowledge that a particular assembly is trustworthy even though it doesn't satisfy enough code groups to operate. In that case, the administrator can simply add a new code group identifying that assembly with a Hash evidence (or a strong name and version) and grant it the desired permission sets. This is especially handy when it comes to making exceptions to a custom server-side policy (such as the one described previously). The .NET Configuration tool supports an automated way to reach the same end result. Select Trust Assembly from the context menu of the Runtime Security Policy folder to bring up the Trust an Assembly wizard. In the first dialog box, you need to decide whether to make the changes apply machine-wide or just to the current user. The next dialog lets you browse to where the assembly in question resides. Once you've provided a path or URL to the assembly, if the assembly does not have a strong name, the wizard presents a track bar that lets you select the minimum level of security permission for the assembly (see Figure 12-21). The different positions of the track bar assign the FullTrust, LocalIntranet, Internet, and Nothing permission sets, as shown in Figure 12-18. The next dialog of the wizard presents a summary of changes made. When you finish the wizard, a new code group is added to the policy specified on the first dialog. The new code group is called Wizard_<N-1>, where N stands for the number of times the wizard has been asked to trust a different assembly (or the same assembly with different evidences). Figure 12-21. Trusting a particular assembly and assigning it an explicit permission set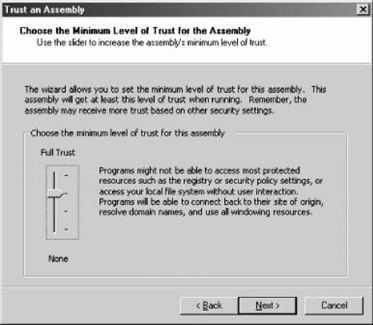 The wizard will also add custom code groups to allow the assembly to call to its site and directory of origin, when applicable. If you don't like the permission set assigned by the wizard, you can change it to another permission set defined in the policy. What evidence the wizard-generated code group uses depends on the assembly. If the assembly does not have a strong name or a certificate, the code group will use the Hash evidence to assign the selected permission set. If the assembly has a strong name or even a certificate, the wizard will present another dialog box asking the user for further guidance on whom to trust (see Figure 12-22). If you choose "This one assembly," the wizard will use the assembly's friendly name, strong name, and version number as evidence. If the assembly has a certificate, you can choose to trust all assemblies from the same publisher. You can also choose to trust all assemblies with the same strong name or strong name and version number. 12.2.6.6 Exporting security policiesOnce the system administrator has finished configuring security on a master machine, you need to replicate that configuration. This chapter has already hinted at a number of manual ways to deploy security configuration by manipulating the actual configuration files. The .NET Configuration tool provides an automated way. Select Create Deployment Package from the context menu of the Runtime Security Figure 12-22. Trusting a strongly named assembly and its publisher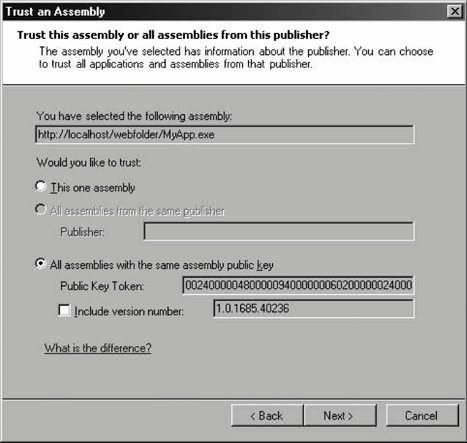 Policy folder to bring up the Deployment Package wizard. In the dialog, you need to select which policy level you wish to export into an MSI file, and specify the MSI file name. You can now incorporate the MSI file into your application's installation files, or send it to other machines. When activated, the exported MSI file overrides the existing policy and installs the exported policy instead.
12.2.7. Security Infrastructure BenefitsThe .NET component-oriented security model provides important benefits to both component vendors and consumers. Component vendors can rely on not being lured to carry out malicious operations, because every caller up the chain must have the required security permissions. Component consumers can rely on the fact that malicious components won't cause harm, because the evidence-based security mechanism grants permissions only to known, trusted components. This is all achieved in a loosely coupled manner: the security policy is managed outside both the client and server code, and they aren't coupled to each other by the details of the security infrastructure. Changes in security policies don't cascade to components, and system administrators have both a great deal of granular control and the freedom to exercise it, because there is nothing in the client or component code pertaining to security. The end user gets a consistent experience, regardless of the operation performed, and no real-time involvement is required to decide whether to trust content coming from a vendor or site. Finally, .NET provides administrators with a centralized place to administer and deploy security policies. |

EAN: 2147483647
Pages: 145