| In addition to the ability to add new jobs, the administrator must also be able to add new projects. The Add Project page allows the creation of a new project and the assigning of a manager, an hours budget, and a method to track the timeline. The hours budget is an estimate of how long the project is expected to take. As the time cards related to the project are submitted, the time reported is subtracted from the hours budget. With these figures, actual time spent on the project can be compared to the initial estimate. The final element on the Add Project page is a list that allows the administrator to establish an estimated timeline for the project. As with the Add Job Code recipe, the Insert Record server behavior is used to implement the server-side logic for this page. Step 1: Implement Add Project Design The Add Project layout is only slightly more complex than the preceding recipe. In addition to three text fields (one each for the project name, manager, and hours budget), a drop-down list with static values displaying the number of weeks for a project is used. Our snippet example creates a list element from 1 to 20 weeks as well as an extra option for 1/2 week. You should, of course, create names and values that reflect your own project timelines. Create a dynamic page for your server model.  In the TimeCards folder, locate the folder for your server model and open the add_project page from there. In the TimeCards folder, locate the folder for your server model and open the add_project page from there.
Insert a table into the content region of your page to hold the needed form elements. From the Snippets panel, drag the Recipes > TimeCards > Wireframes > Add Project - Wireframe snippet into the Content editable region. Insert the form and, within it, a two-column table. The table should include form text fields and labels for a project name, project manager, and hours budget. A select list displaying a number of week options should also be included. Finally, a form button is required to insert the new record. Place your cursor in the row below the words ADD PROJECT and insert the Recipes > TimeCards > Forms > Add Project - Form snippet. Save the file [r6-2].
Figure r6-2. 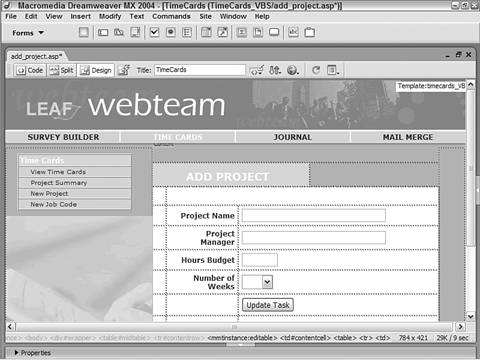
Step 2: Insert Record Add Project Because we're creating a new record, the Insert Record server behavior is the natural choice for our server-side code. To be consistent with the Add Job Code recipe, we'll set the server behavior to redirect the user to the same page the Project Summary page after the insert operation is complete. Note To enhance this recipe, you might create a drop-down list that displays all the managers in your company. To do this, you'll need to add a recordset of the Employee table filtered to shown only the Manager position and attach that recordset to the values and labels of the list.
For ASP From the Server Behaviors panel, choose Add (+) and select Insert Record from the list. In the Insert Record dialog, choose your data source. Choose Recipes from the Connection list. Select the table you want to insert the record into. From the Insert Into Table list, choose Projects. Set the page that you want to appear after the record is inserted. Choose the report_projectsummary.asp file from your server model's folder for the After Inserting, Go To field. Select the form on the current page from which to gather the record values. From the Get Values From list, make sure AddNewProject is selected. In the Form Elements area, match the form elements on the page to the fields in the data source table. Set ProjectName to insert into the ProjectName column as Text type. Set ProjectManager to insert into the ProjectManager column as Text type. Set TaskHours to insert into the ProjectHours column as Numeric type. Set ProjectWeek to insert into the Weeks column as Numeric type.
When you're sure your choices are correct, click OK to close the dialog and add the behavior.
For ColdFusion and PHP From the Server Behaviors panel, choose Add (+) and select Insert Record. In the Insert Record dialog, choose the current form. Select AddNewProject from the Submit Values From list. Select your data source from the list. Choose Recipes from the Data Source list. Enter your username and password, if needed. Select the table in the data source to insert into from the list. Choose Projects (projects in PHP) from the Insert Into Table list. Set the data source fields to their corresponding form elements. Make sure the ProjectID data column is set to be an unused Primary Key. Set ProjectName to the FORM.ProjectName form element and submit as Text type. Set ProjectManager to the FORM.ProjectManager form element and submit as Text type. Set TaskHours to the FORM.ProjectHours form element and submit as Numeric type (Double in PHP). Set Weeks to the FORM.ProjectWeek form element and submit as Numeric type (Double in PHP).
In the After Inserting, Go To field, enter report_projectsummary.cfm or report_projectsummary.php as appropriate and click OK to close the dialog. Save your page.
|