| After a meeting has been scheduled, changes are all but inevitable, and users need a way to update an existing meeting. The Edit Meeting Request page offers a familiar layoutidentical to that of the Meeting Request pagewith similar error-checking routines. This page verifies that no scheduled meeting conflicts with the updated time and place and makes sure that the entered date is valid. Step 1: Implement Edit Meeting Request Design The meeting edit request page uses a series of form text fields (both single-line and text areas) to display the descriptive details of the current record entries and allow them to be edited. The time and place data is handled through drop-down lists that are preset to the record's values. 1. | Create a basic dynamic page, either by hand or derived from a template.
Note ColdFusion and PHP users will need to add an extra hidden form field for the update operation as described in the following steps.  In the ConferenceRoomScheduler folder, locate the folder for your server model and open the edit_meetingrequest page found there. In the ConferenceRoomScheduler folder, locate the folder for your server model and open the edit_meetingrequest page found there.
| 2. | Add a table to the content region of your page to contain the heading and interface elements for the application.
From the Snippets panel, drag the Recipes > ConferenceRoom > Wireframes > Edit Meeting Request - Wireframe snippet into the Content editable region.
| 3. | Within the table, place another HTML table to hold the form and its elements: three text fields (meeting name, owner, and date), one text area for the description, three drop-down lists (start time, duration, and conference room), and a submit button. You'll also need a hidden field, which will be used to combine the date and time entries.
   ASP and ColdFusion users: Place your cursor in the row below the words EDIT MEETING REQUEST and insert the Recipes > ConferenceRoom > Forms > Edit Meeting Request Form snippet [r3-9]. ASP and ColdFusion users: Place your cursor in the row below the words EDIT MEETING REQUEST and insert the Recipes > ConferenceRoom > Forms > Edit Meeting Request Form snippet [r3-9].
r3-9. 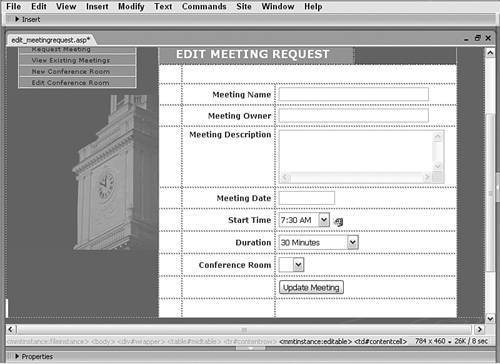
 PHP users: Place your cursor in the row below the words EDIT MEETING REQUEST and insert the Recipes > ConferenceRoom > Forms > Edit Meeting Request Form (PHP) snippet. PHP users: Place your cursor in the row below the words EDIT MEETING REQUEST and insert the Recipes > ConferenceRoom > Forms > Edit Meeting Request Form (PHP) snippet.
| 4. | Make sure the method attribute of the <form> tag is set to POST and save the page.
|
For PHP and ColdFusion Both PHP and ColdFusion require a hidden form element to pass the ConferenceID value properly in the Update Record server behavior used on this page. ColdFusion users will need to add an extra hidden form element to pass the starting date and time. 1. | Add a hidden form field to convey a unique record identifier when updating the record.
From the Forms category of the Insert bar, add a Hidden Field form element to the left of the Update Meeting form button and, in the Property inspector, name the hidden field element ConferenceID.
PHP users can save their page at this point and move on to the next step.
| 2. | If you're using ColdFusion, add a second hidden form element to hold the starting date and time values.
From the Forms category of the Insert bar, add a Hidden Field form element to the left of the form button and, in the Property inspector, name the hidden field element FullDate.
| 3. | Save your page.
|
Step 2: Add Database Components, Part 1 As with the meeting request page, three recordsets are used for this page: Rooms, Conflicts, and Conferences. The three recordsets are similar to those used earlier, but with key differences because we are now working with an existing record. Again, we'll define the simplest recordset first, Rooms. 1. | From the Server Behaviors panel, choose Add (+) and select Recordset (Query).
| 2. | In simple view, enter the name of the recordset.
Enter Rooms in the Name field.
| 3. | Select the data source connection.
Choose Recipes from the Connection (Data Source) list.
| 4. | Choose the table to work with.
Select Rooms (rooms for PHP) from the Table list.
| 5. | Limit your data source columns to only those that are needed.
Choose the Selected Columns option and highlight RoomID and RoomName.
| 6. | Leave the Filter option set to None.
| 7. | Set the Sort option to present an alphabetical listing of the rooms.
Choose RoomName from the Sort list and accept the Ascending order.
| 8. | Verify your choices and click OK when you're done.
|
The Conference recordset found here is quite different from the Inserted recordset in the Meeting Request page. First, rather than working with an ID from a just-entered record, the recordset is filtered on the ID passed from the meeting_details page. In addition, the record's date/time field is formatted into two separate fieldsone that holds just the date and another for the time. These values will be associated with their corresponding lists later. For ASP Due to the complexity of this SQL statement, it is included as a snippet, Recipes > ConferenceRoom > SQL > Conference RS - ASP SQL Statement. Copy the snippet to the clipboard by using the Copy Snippert command from the Snippets panel context menu. 1. | From the Server Behaviors panel, choose Add (+) and select Recordset (Query).
| 2. | Switch to the advanced view of the dialog and enter an appropriate name for the recordset.
Enter Conference in the Name field.
| 3. | Choose the connection for the recordset.
Select Recipes from the Connection list.
| 4. | In the SQL area, enter the following code:
Paste in the copied SQL statement.
[View full width] SELECT *, Format(ConferenceStart,'m/dd/yyyy') AS StartDate, Format(ConferenceStart,'h:nn  ampm') AS StartTime FROM Conferences WHERE ConferenceID = ColParam ampm') AS StartTime FROM Conferences WHERE ConferenceID = ColParam
| 5. | In the Variable area, choose Add (+) and enter ColParam under the Name column.
| 6. | In the Default Value column, enter 1.
| 7. | In the Run-time Value column, enter Request.QueryString("ID") and click OK to close the dialog.
| 8. | Save the page.
|
For ColdFusion Due to the complexity of this SQL statement, it is included as a snippet. To copy the SQL code to the clipboard, first place your cursor in a text string in Design view. Then, right-click (Control-click) the Recipes > ConferenceRoom > SQL > Conference RS - CFML SQL Statement snippet and choose Copy Snippet from the context menu. 1. | From the Server Behaviors panel, choose Add (+) and select Recordset (Query).
| 2. | Switch to the advanced view of the dialog and enter an appropriate name for the recordset.
Enter Conference in the Name field.
| 3. | Choose your data source.
Select Recipes from the Data Source list.
| 4. | Enter a user name and password if necessary.
| 5. | In the SQL area, enter the following code:
Paste in the copied SQL statement.
[View full width] SELECT *, Format(ConferenceStart,'m/dd/yyyy') AS StartDate, Format(ConferenceStart,'h:nn ampm') AS StartTime FROM Conferences WHERE ConferenceID = #URL.ID#
| 6. | In the Page Parameter section, choose Add (+) and, in the Add Parameter dialog, make sure URL.ID is chosen in the Name list.
| 7. | Enter 0 as the Default Value and click OK to close the dialog.
| 8. | Verify your entries in the Recordset dialog and click OK to close that dialog.
| 9. | Save the page.
|
For PHP Integrating the proper MySQL code into Dreamweaver requires several steps. A recordset is first created using custom SQL code, and then an additional date conversion function is added to the top of the page. Later, another function will be incorporated to complete the needed conversions. Due to the complexity of this SQL statement, it is included as a snippet. To copy the SQL code to the clipboard, first place your cursor in a text string in Design view. Then, right-click (Control-click) the Recipes > ConferenceRoom > SQL > Conference RS - PHP SQL Statement snippet and choose Copy Snippet from the context menu. 1. | From the Server Behaviors panel, choose Add (+) and select Recordset (Query).
| 2. | Switch to the advanced view of the dialog and enter an appropriate name for the recordset.
Enter Conference in the Name field.
| 3. | Choose the connection for the recordset.
Select Recipes from the Connection list.
| 4. | In the SQL area, enter the following code:
Paste in the copied SQL statement.
[View full width] SELECT ConferenceID, ConferenceRoom, ConferenceName, ConferenceDescription ,ConferenceDuration,ConferenceBy, UNIX_TIMESTAMP(ConferenceStart) AS ConferenceStart, DATE_FORMAT(ConferenceStart,'DateFormatParam') AS StartDate, DATE_FORMAT(ConferenceStart ,'TimeFormatParam') AS StartTime FROM Conferences WHERE ConferenceID = ColParam
Next we'll need to add three variables: ColParam, DateFormatParam, and TimeParam.
| 5. | In the Variable area, choose Add (+) and enter the following values in the Add Variable dialog:
Name: | ColParam | Default Value: | 1 | Run-time Value: | $_GET['ID'] |
| 6. | Close the Add Variable dialog, and choose Add (+) again to add the second variable with these values:
Name: | DateFormatParam | Default Value: | %c/%d/%Y | Run-time Value: | $dateFormat |
| 7. | Close the Add Variable dialog again, and choose Add (+) one last time to add the third variable with these values:
Name: | TimeFormatParam | Default Value: | %H:%i:00 | Run-time Value: | $timeFormat |
| 8. | Click OK once to close the Add Variable dialog, and again to close Recordset dialog.
|
Before we continue, let's add the first of our support functions for converting the date and time formats properly. 1. | In Code view, place your cursor at the top of the page, after the code that begins <?php require_once.
| 2. | Insert the following code:
From the Snippets panel, insert the Recipes > ConferenceRoom > CustomCode_PHP > Date and Time Formats snippet.
<?php $dateFormat = '%c/%d/%Y'; $timeFormat = '%H:%i:00'; ?>
| 3. | Save the page.
|
Step 3: Add Database Components, Part 2 The final recordset is used to check for a conflicting meeting. Although similar to the Conflicts recordset developed for the Meeting Request page, this recordset employs an additional parameter to filter out the current record being updated. Because the Macromedia Update Record server behavior is being used on the page, we work with the MM_recordId variable. For ASP The SQL statement for this recordset is available to be copied using the previously described techniques at Recipes > ConferenceRoom > SQL > Edit Meeting - ASP Conflicts RS SQL Statement. 1. | From the Server Behaviors panel, choose Add (+) and select Recordset (Query).
| 2. | Switch to the advanced view of the dialog and enter an appropriate name for the recordset.
Enter Conflicts in the Name field.
| 3. | Choose the connection for the recordset.
Select Recipes from the Connection list.
| 4. | In the SQL area, enter the following code:
Press Ctrl-V (Command-V) to paste in the copied snippet.
[View full width] SELECT TOP 1 ConferenceID FROM ConferenceDisplay WHERE RoomID = RoomParam AND ((ConferenceID <> IDParam) AND ((ConferenceStart <= #DateParam# AND ConferenceEnd > #DateParam#) OR (ConferenceStart < DateAdd('n' ,DurationParam*60,#DateParam#) AND ConferenceStart >= #DateParam#)))
| 5. | In the Variable area, choose Add (+) and enter DateParam under the Name column.
| 6. | In the Default Value column, enter 1/1/1975.
| 7. | In the Run-time Value column, enter Request.Form("FullDate").
| 8. | Add another variable by choosing Add (+) and enter DurationParam under the Name column.
| 9. | In the Default Value column, enter 0.
| 10. | In the Run-time Value column, enter Request.Form("Duration").
| 11. | Add one last variable by choosing Add (+) and enter IDParam under the name catalog.
| 12. | In the Default Value column, enter 0.
| 13. | In the Run-time Value column, enter Request.Form("MM_recordId") and click OK to close the dialog.
| 14. | Choose Add (+) to insert one more variable, and enter RoomParam under the Name column.
| 15. | In the Default Value column, enter 0.
| 16. | In the Run-time Value column, enter Request.Form("ConferenceRoom") and click OK to close the dialog.
| 17. | Save the page.
|
For ColdFusion Because the SQL statement for this recordset is quite complex, it is included as a snippet. Although you can't insert a snippet into a Dreamweaver dialog directly, ColdFusion lets you insert it directly within a <cfquery> tag pair. To accomplish this, we'll insert the tag from the Insert bar rather than use the Recordset dialog. To complete this ColdFusion recordset, several <cfparam> tags will also have to be added. 1. | From Code view, position your cursor after the initial <cfparam> tag near the top of the document.
| 2. | From the CFML category of the Insert bar, choose the cfquery object to open the Tag Editor.
| 3. | In the General category of the Tag Editor, name the query appropriately.
Enter Conflicts in the Query Name field.
| 4. | Choose your data source.
Enter Recipes in the Data Source field.
| 5. | Enter a user name and password if necessary, and choose OK to close the dialog.
| 6. | Make sure your cursor is positioned within the <cfquery> tag pair and enter the following code:
From the Snippets panel, insert the Recipes > ConferenceRoom > SQL > Edit Meeting - CFML Conflicts RS SQL Statement snippet.
[View full width] SELECT TOP 1 ConferenceID FROM ConferenceDisplay WHERE RoomID = #FORM.ConferenceRoom# AND (ConferenceID <> #FORM.ConferenceID# AND ( (ConferenceStart <= #CreateODBCDateTime(FORM.FullDate)# AND ConferenceEnd > #CreateODBCDateTime(FORM.FullDate)#) OR (ConferenceStart < DateAdd('n',#FORM.Duration#*60 ,#CreateODBCDateTime(FORM.FullDate)#) AND ConferenceStart >= #CreateODBCDateTime(FORM .FullDate)#)))
The CreateODBCDateTime() functions are used to convert the date values to ODBC drivercompatible versions.
|
To complete this recordset, we need to create a CFParam for each of the four variables used in the SQL statement. There is no need to declare a type for any of these CFParam statements. 1. | From the Bindings panel, choose Add (+) and select CFParam.
| 2. | In the CFParam dialog, enter FORM.FullDate in the Name list.
| 3. | Enter 1/1/1975 as the Default value and click OK to close the dialog.
| 4. | From the Bindings panel, choose Add (+) and select CFParam to add another variable.
| 5. | In the CFParam dialog, enter FORM.Duration in the Name list.
| 6. | Enter 0 as the Default value and click OK to close the dialog.
| 7. | From the Bindings panel, choose Add (+) and select CFParam to add the third variable.
| 8. | In the CFParam dialog, enter FORM.ConferenceID in the Name field.
As you might recall, ConferenceID is the name of the hidden form element inserted earlier.
| 9. | Enter 0 as the Default value and click OK to close the dialog.
| 10. | From the Bindings panel, choose Add (+) and select CFParam to add the final variable.
| 11. | In the CFParam dialog, enter FORM.ConferenceRoom in the Name list.
| 12. | Enter 0 as the Default value and click OK to close the dialog.
| 13. | Save the page.
|
All the CFParam statements and the Conflicts recordset should now be visible in the Bindings panel. For PHP The SQL statement for this recordset is available to be copied using the previously described techniques at Recipes > ConferenceRoom > SQL > Edit Meeting - PHP Conflicts RS SQL Statement. 1. | From the Server Behaviors panel, choose Add (+) and select Recordset (Query).
| 2. | Switch to the advanced view of the dialog and enter an appropriate name for the recordset.
Enter Conflicts in the Name field.
| 3. | Choose the connection for the recordset.
Select Recipes from the Connection list.
| 4. | In the SQL area, enter the following code:
Press Ctrl-V (Command-V) to paste in the copied snippet.
[View full width] SELECT ConferenceID FROM conferences,rooms WHERE conferences.ConferenceRoom = rooms.RoomID AND ConferenceRoom = RoomParam AND ConferenceID != IDParam AND (UNIX_TIMESTAMP(ConferenceStart) = 'DateParam' OR UNIX_TIMESTAMP(ConferenceStart) = UNIX_TIMESTAMP(INTERVAL HOUR('DurationParam')HOUR + INTERVAL MINUTE('DurationParam') MINUTE + FROM_UNIXTIME('DateParam')))
| 5. | In the Variable area, choose Add (+) and enter the following values in the Add Variable dialog:
Name: | DateParam | Default Value: | 157766400 | Run-time Value: | $_POST['FullDate'] |
Again, a Unix time stamp value is used to represent January 1, 1975.
| 6. | Close the Add Variable dialog, and choose Add (+) again to add the second variable with these values:
Name: | DurationParam | Default Value: | 0 | Run-time Value: | $_POST['Duration'] |
| 7. | Close the Add Variable dialog again, and choose Add (+) to add the third variable with these values:
Name: | IDParam | Default Value: | 0 | Run-time Value: | $_POST['ConferenceID'] |
| 8. | Close the Add Variable dialog again, and choose Add (+) one last time to add the fourth variable with these values:
Name: | RoomParam | Default Value: | 0 | Run-time Value: | $_POST['ConferenceRoom'] |
| 9. | After closing the Add Variables dialog, click OK to close the Recordset dialog, and then save the page.
|
Step 4: Data Binding Process Time to put the just-created recordsets to work. The data binding for this page runs the gamut: A number of the form elements can be bound with fields dragged from the Bindings panel; one list element needs to have its values and labels data-bound, while two others pick up their selected values dynamically; and another form element requires JavaScript behaviors to gather the data. Let's start by binding the text and hidden fields to dynamic data. 1. | From the Bindings panel, expand the Conference recordset.
| 2. | Place the data source fields onto the page in their respective areas:
| Drag ConferenceName onto the MeetingName text field. | | | Drag ConferenceBy onto the MeetingOwner text field. | | | Drag ConferenceDescription onto the MeetingDescription text field. | | | Drag StartDate onto the MeetingDate text field. | | | ASP users: Drag ConferenceStart onto the hidden field FullDate. |
| 3. | Save your page.
|
For PHP and ColdFusion The two hidden form fields on PHP and ColdFusion pages require preset values. The first of these fields, FullDate, needs some custom code to work properly, while the second can be chosen easily from the Dynamic Data dialog box. 1. | Insert custom code for the FullDate hidden form field.
Select the hidden form field FullDate next to the Start Time list, and switch to Code view.
Place the cursor inside the input tag, add a space, and insert the following:
From the Snippets panel, insert the Recipes > ConferenceRoom > CustomCode_PHP > Formatted ConferenceStart Column snippet, which includes this code:
| [View full width] value="<?php echo date("n/d/Y H:i:00", $row_Conference['ConferenceStart']); ?>"
|
Select the FullDate hidden form field next to the Start Time list and, in the Property inspector, enter the following code in the Value field:
| [View full width] <cfoutput>#Conference.StartDate# #Conference .StartTime#</cfoutput>
|
| 2. | Choose the hidden field that conveys the conference record ID.
Select the ConferenceID hidden field next to the Update Meeting button.
| 3. | From the Property inspector, click the lightning bolt icon next to the Value field.
| 4. | When the Dynamic Data dialog opens, expand the Conference recordset and select ConferenceID.
| 5. | Click OK to close the dialog and save your page.
|
When you're done with this part of the page, all the visible text elements (and invisible form fields) should have corresponding data source fields [r3-10]. r3-10. 
For All Server Models Now let's bind the appropriate data to the three list elements on the page. First we need to assign dynamic data fields to the selected list value so that the record is accurately reflected when the Edit Meeting Request page loads. 1. | Select the StartTime list and click the Dynamic button on the Property inspector.
| 2. | In the Dynamic List/Menu dialog, click the lightning bolt icon next to the Set Selected Value To field to open the Dynamic Data dialog.
| 3. | In the Dynamic Data dialog, choose StartTime from the Conference recordset, and click OK twice to close the two dialogs.
Now, we'll perform the same operation with the Duration list element.
| 4. | Select the Duration list menu and click the Dynamic button on the Property inspector.
| 5. | In the Dynamic List/Menu dialog, click the lightning bolt icon next to the Set Selected Value To field to open the Dynamic Data dialog.
| 6. | In the Dynamic Data dialog, choose ConferenceDuration from the Conference recordset, and click OK twice to close the two dialogs.
The final list element, Conference Room, is populated dynamically in addition to the selection being assigned dynamically. All these operations are handled in the Dynamic List/Menu dialog.
| 7. | Select the ConferenceRoom list menu and click the Dynamic button on the Property inspector.
| 8. | In the Dynamic List/Menu dialog, choose Rooms from the Options From Recordset list.
| 9. | Set the Values list to RoomID and Labels to RoomName.
| 10. | Click the lightning bolt icon next to the Set Selected Value To field to open the Dynamic Data dialog [r3-11].
r3-11. 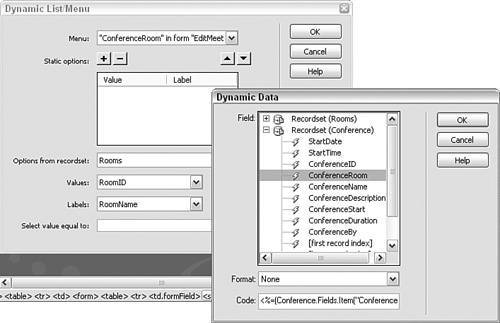
| 11. | In the Dynamic Data dialog, choose ConferenceRoom from the Conference recordset, and click OK twice to close the two dialogs.
|
The final data-binding action for this page requires that a JavaScript behavior be applied to two form elements in order to populate a third. As on the Meeting Request page, the FullDate hidden field is populated by a combination of the values found in the MeetingDate and StartTime elements. 1. | The JavaScript function to be applied is fairly complex and is supplied as a snippet: To copy the SQL code to the clipboard, first place your cursor in a text string in Design view. Then, right-click (Control-click) the Recipes > ConferenceRoom > Client JavaScript > EditMeeting - Populate FullDate Hidden Form Element snippet and choose Copy Snippet from the context menu. The same snippet is used in both behaviors.
| 2. | Select the MeetingDate text field.
| 3. | From the Behaviors panel, choose Add (+) and select Call JavaScript.
| 4. | In the Call JavaScript dialog, enter the following code:
Paste the copied snippet into the JavaScript field.
[View full width] document.EditMeetingRequest.FullDate.value = document.EditMeetingRequest.MeetingDate.value +' '+ document.EditMeetingRequest.StartTime.options document.EditMeetingRequest.StartTime .selectedIndex].value
| 5. | After closing the Call JavaScript dialog, make sure the onBlur event is listed for the behavior in the Behaviors panel.
| 6. | Select the StartTime list form element.
| 7. | From the Behaviors panel, choose Add (+) and select Call JavaScript.
| 8. | In the Call JavaScript dialog, enter the following code:
Paste the copied snippet into the JavaScript field.
[View full width] document.EditMeetingRequest.FullDate.value = document.EditMeetingRequest.MeetingDate.value +' '+ document.EditMeetingRequest.StartTime.options document.EditMeetingRequest.StartTime .selectedIndex].value
| 9. | This time, after closing the Call JavaScript dialog, make sure the onChange event is listed for the behavior in the Behaviors panel.
| 10. | Save your page.
|
Step 5: Update Record for Meeting Request The next step is to add the standard Update Record server behavior. As with the Insert Record server behavior used on the Meeting Request page, two of the form fields are ignored on purpose, and the data is instead sent in a combined fashion through a hidden form element. For ASP 1. | From the Server Behaviors panel, choose Add (+) and then select Update Record.
| 2. | In the Update Record dialog, select the data source connection.
Choose Recipes from the Connection list.
| 3. | Choose the table containing the data you are updating.
From the Table to Update list, choose Conferences.
| 4. | Choose the recordset from which to get data source fields.
From the Select Record From field, choose Conference.
| 5. | Set the Primary Key for the recordset.
From the Unique Key Column list, choose ConferenceID and make sure the Numeric option is selected.
| 6. | Select the file you want to appear when the update is complete.
For the After Updating, Go To field, select the meeting_details.asp page.
| 7. | Choose the form on the page from which to get the values.
From the Get Values From list, choose EditMeetingRequest.
| 8. | In the Form Elements area, set the form elements to their corresponding data source fields.
| Set the MeetingName form element to update the ConferenceName data source field as Text. | | | Set the MeetingOwner form element to update the ConferenceBy data source field as Text. | | | Set the MeetingDescription form element to update the ConferenceDescription data source field as Text. | | | Both the MeetingDate and StartTime form elements are ignored. | | | Set the FullDate form element to update the ConferenceStart data source field as Date MS Access. | | | Set the Duration form element to update the ConferenceDuration data source field as Numeric. | | | Set the ConferenceRoom form element to update the ConferenceRoom data source field as Numeric. |
| 9. | Make sure your entries are correct, and then click OK to close [r3-12].
r3-12. 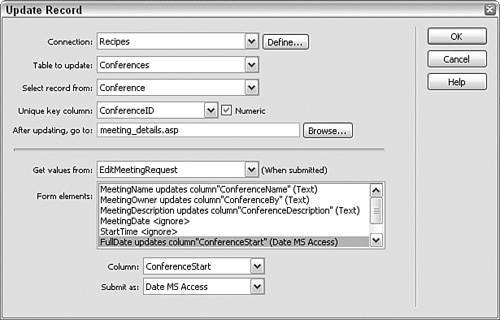
| 10. | Save the page.
|
For ColdFusion and PHP 1. | From the Server Behaviors panel, choose Add (+) and select Update Record.
| 2. | In the Update Record dialog, choose the current form.
Select EditMeetingRequest from the Submit Values From list.
| 3. | Select your data source from the list.
Choose Recipes from the Data Source list.
| 4. | Enter your user name and password, if needed.
| 5. | From the list, select the table in the data source to update.
Choose Conferences (conferences in PHP) from the Insert Into Table list.
| 6. | Set the data source fields to their corresponding form elements.
| Set ConferenceID to the FORM.ConferenceID form element as Numeric type for ColdFusion and Integer type for PHP. | | | Set ConferenceRoom to the FORM.ConferenceRoom form element and submit as Numeric type for ColdFusion and Integer type for PHP. | | | Set ConferenceName to the FORM.MeetingName form element and submit as Text type. | | | Set ConferenceDescription to the FORM.MeetingDescription form element and submit as Text type. | | | Set ConferenceStart to the FORM.FullDate form element and submit as Date MS Access type for ColdFusion and Date type for PHP. | | | Set ConferenceDuration to the FORM.Duration form element and submit as Numeric for ColdFusion and Text for PHP. | | | Set ConferenceBy to the FORM.MeetingOwner form element and submit as Text type. |
In PHP, be sure to submit ConferenceDuration as Text type; the colon in the time value (e.g., 00:30) is not acceptable in MySQL.
| 7. | In the After Inserting, Go To field, enter the path to the file you want displayed after the record is updated.
Choose Browse and select the meeting_details file for your server model, and then, for ColdFusion users only, select the Pass Original Query String option.
|
Step 6: Add Server-Side Date Validation As on the Meeting Request page, we need to ensure that the user enters a date in the proper format. The date validation is handled in the same way with similar routines: one code block to redirect the page with an argument and another to present a message. The redirection code is added first. Note Again, a custom function is needed for those working with ASP-JavaScript and PHP/MySQL.
1. | In Code view, place the cursor on a new line at the top of the page.
ASP users should position the cursor after the <!-- include> statement.
PHP users should position the cursor after the <?php require> statement.
| 2. | Insert the following code (ASP-JS and PHP users only):
From the Snippets panel, open the Recipes > ConferenceRoom > Custom Code folder for your server model and insert the IsADate Function snippet.
| [View full width] <% function isADate(DateString) { var DateRegex = /^(\d{1,2})\/(\d{1,2})\/(\d{4})$/ var theMatch = DateString.match(DateRegex); var validDate = false; if (theMatch) { var DateObj = new Date(DateString); if ((DateObj.getMonth()+1 == parseInt (theMatch[1])) && (DateObj.getDate() == parseInt (theMatch[2])) && (DateObj.getFullYear() == parseInt(theMatch[3]))) validDate = true; } return validDate; } %>
|
| [View full width] <?php function isADate($DateString) { $validDate = false; if (ereg("^[0-9]{1,2}\/[0-9]{1,2}\/[0-9]{4}$" ,$DateString)) { $today = date("Y"); $submittedDate = explode("/",$DateString); $month = $submittedDate[0]; $day = $submittedDate[1]; $year = $submittedDate[2]; if ($year >= $today) { $validDate = (checkdate($month,$day,$year))?true :false; } } return $validDate; } ?>
|
| 3. | Insert the following code:
From the Snippets panel, open the Recipes > ConferenceRoom > Custom Code folder for your server model and insert the Edit Meeting Request - Date Validation snippet.
| [View full width] <% if (cStr(Request.Form("MeetingDate")) <> "") then if not (isDate(Request.Form("MeetingDate"))) then Response.Redirect("edit_meetingrequest.asp?0" width="14" height="9" align="left" src="/books/2/710/1/html/2/images/ccc.gif" /> Request("MM_recordId") & "&badDate=true") end if%>
|
| [View full width] <% if (String(Request.Form ("MeetingDate"))!="undefined" && !isADate(String (Request.Form("MeetingDate")))) Response.Redirect("edit_meetingrequest .asp?MM_recordId")+"&badDate=true"); %>
|
| [View full width] <cfif IsDefined("FORM.MeetingDate") AND NOT IsDate (FORM.MeetingDate)> <cflocation url="edit_meetingrequest.cfm?ID=#FORM .ConferenceID#&badDate=true"> </cfif>
|
| [View full width] <?php if ((isset($_POST['MeetingDate'])) && (!isADate ($_POST['MeetingDate']))) { $url = "edit_meetingrequest.php?0" width="14" height="9" align="left" src="/books/2/710/1/html/2/images/ccc.gif" /> $_POST['ConferenceID'] . "&badDate=true"; header("Location: $url"); } ?>
|
| 4. | Save your page.
|
The next step is to add the error message that will be displayed should the URL variable badDate be present. 1. | In Design view, place your cursor where you want the error message to appear.
Position the cursor in the table row above the Edit Meeting Request text.
| 2. | Insert the following code:
From the Snippets panel, open the Recipes > ConferenceRoom > Custom Code folder for your server model and insert the Date Error - Dynamic Text snippet.
| [View full width] <% if (cStr(Request.QueryString("badDate")) <> "") Then Response.Write("The date you entered was not in the proper format. Dates should be in the format mm/dd/yyyy.%>
|
| [View full width] <%=(String(Request.QueryString("badDate")) != "undefined")? "The date you entered was not in the proper format. Dates should be in the format mm/dd /yyyy.":""%>
|
| [View full width] <cfif isDefined("URL.badDate")>The date you entered was not in the proper format. Dates should be in the format mm/dd/yyyy. </cfif>
|
| [View full width] <?php if (isset($_GET['badDate'])) { echo "The date you entered was not in the proper format. Dates should be in the format mm/dd/yyyy."; } ?>
|
| 3. | Save your page before continuing.
|
Step 7: Hand-Code Edits to Handle Meeting Conflicts Because we're using the Conflicts recordset as we did in the Meeting Request page, the same code manipulation implemented on that page is necessary on this one. To refresh your memory, four phases are involved: Move the Conflicts recordset and its three parameter declarations above the Update Record server behavior code. Add a redirect statement to the end of the Conflicts recordset if a conflict is found. Wrap all Conflicts recordsetassociated code in a conditional statement so that it is executed only if the insert record operation is attempted. Wrap the code that closes the Conflicts recordset in a similar conditional statement; again, this is for ASP and PHP only.
The first operation is to move the Conflicts recordset code blocks. Note You'll remember that in ColdFusion, the SQL parametersthe <cfparam> tagsare inserted at the top of the page automatically and consequently need not be moved.
1. | From the Server Behaviors panel, select the Conflicts recordset.
Selecting the recordset in the Server Behaviors panel highlights a portion of the relevant code.
| 2. | In Code view, select the highlighted recordset and the four SQL parameter code blocks (for DateParam, DurationParam, IDParam, and RoomParam) above the recordset code and cut the entire selection. The code to select is:
| [View full width] <% Dim Conflicts__DateParam Conflicts__DateParam = "1/1/1975" If (Request.Form("FullDate") <> "") Then Conflicts__DateParam = Request.Form("FullDate") End If %> <% Dim Conflicts__DurationParam Conflicts__DurationParam = "0" If (Request.Form("Duration") <> "") Then Conflicts__DurationParam = Request.Form("Duration") End If %> <% Dim Conflicts__IDParam Conflicts__IDParam = "0" If (Request.Form("MM_recordId") <> "") Then Conflicts__IDParam = Request.Form("MM_recordId") End If %> <% Dim Conflicts__RoomParam Conflicts__RoomParam = "0" If (Request.Form("ConferenceRoom") <> "") Then Conflicts__RoomParam = Request.Form("ConferenceRoom") End If %> <% Dim Conflicts Dim Conflicts_numRows Set Conflicts = Server.CreateObject("ADODB.Recordset") Conflicts.ActiveConnection = MM_Recipes_STRING Conflicts.Source = "SELECT TOP 1 ConferenceID FROM ConferenceDisplay WHERE RoomID = " + Replace(Conflicts__RoomParam, "'", "''") + " AND ((ConferenceID <> " + Replace (Conflicts__IDParam, "'", "''") + ") AND ( (ConferenceStart <= #" + Replace (Conflicts__DateParam, "'", "''") + "# AND ConferenceEnd > #" + Replace(Conflicts__DateParam, "'", "''") + "#) OR (ConferenceStart < DateAdd('n' ," + Replace(Conflicts__DurationParam, "'", "''") + "*60,#" + Replace(Conflicts__DateParam, "'", "''") + "#) AND ConferenceStart >= #" + Replace (Conflicts__DateParam, "'", "''") + "#)))" Conflicts.CursorType = 0 Conflicts.CursorLocation = 2 Conflicts.LockType = 1 Conflicts.Open() Conflicts_numRows = 0 %>
|
| 3. | Place the cursor on a new line after the date validation code inserted in the previous step near the top of the page, and paste in the just-cut Conflicts recordset code. ColdFusion users should put their cursor after the <cfparam> tags and paste in the just-cut query.
| 4. | PHP users only: Wrap PHP delimeters around the just-inserted code block.
| Before: | | | <?php
|
| After: | | | ?>
|
|
Note As in the meeting_request page, you'll note that the selection does not include the <?php ?> delimiters because of the way Dreamweaver merges the code for the recordsets. Therefore, after placing this portion of the Conflicts recordset elsewhere on the page, you must add new delimiters to it manually.
The next code block to insert checks the Conflicts recordset and, should a record be found, redirects the user to the meeting_conflict page. This redirection code is placed before the Update Record server behavior code to avoid adding conflicting meetings into the data source. 1. | In Code view, place your cursor after the just-moved Conflicts recordset.
Selecting the recordset in the Server Behaviors panel will highlight it in Code view.
| 2. | Insert the following code:
From the Snippets panel, open the Recipes > ConferenceRoom > CustomCode folder for your server model and insert the Meeting Conflict Redirect snippet.
| [View full width] <% if (NOT Conflicts.EOF) Response.Redirect("meeting_conflict.asp?0" width="14" height="9" align="left" src="/books/2/710/1/html/2/images/ccc.gif" /> Conflicts.Fields("ConferenceID").value) %>
|
| [View full width] <% if (!Conflicts.EOF) Response.Redirect("meeting_conflict .asp?ConferenceID").value); %>
|
| [View full width] <cfif Conflicts.RecordCount NEQ 0> <cflocation url="meeting_conflict.cfm?ID= #Conflicts.ConferenceID#"> </cfif>
|
| [View full width] <?php if ($totalRows_Conflicts > 0) { $url = "meeting_conflict.php?0" width="14" height="9" align="left" src="/books/2/710/1/html/2/images/ccc.gif" />.$row_Conflicts['ConferenceID']; header("Location: $url"); exit(); } ?>
|
|
Next we need to make all the Conflicts recordset code conditional. This is accomplished by wrapping the Conflicts recordset, the parameters, and the redirection code with an if-type statement. After the conditional code has been added, the enclosed code is executed only after the Update Record server behavior has run. Note In ColdFusion, you don't need to select the <cfparam> tags, just the <cfquery> and <cfif> Conflicts code blocks.
1. | In Code view, highlight all the contiguous Conflicts-related code.
| 2. | Wrap the following code around the selection:
From the Snippets panel, open the Recipes > ConferenceRoom > Custom Code folder for your server model and insert the If Statement - Only on Update snippet.
| Before: | | | [View full width] <% If (CStr(Request("MM_update")) = "EditMeetingRequest") Then %>
|
| After: | | | <% end if %>
|
| Before: | | | [View full width] <% if (String(Request("MM_update")) == "EditMeetingRequest") { %>
|
| After: | | | <% } %>
|
| Before: | | | <cfif IsDefined("FORM.MM_UpdateRecord")>
|
| After: | | | </cfif>
|
| Before: | | | <?php if (isset($_POST['MM_update'])) { ?>
|
| After: | | | <?php } ?>
|
|
Our final step involving the Conflicts recordsetand for the pageis to apply the same conditional statement to the code block that explicitly closes the recordset, found at the bottom of the page. This is an ASP- and PHP-only step. For ASP 1. | In Code view, move to the bottom of the page and select the code block that closes the Conflicts recordset. The code will look like this:
| <% Conflicts.Close() Set Conflicts = Nothing %>
|
| <% Conflicts.Close(); %>
|
| 2. | Wrap the following code around the selection:
From the Snippets panel, open the Recipes > ConferenceRoom > Custom Code folder for your server model and insert the If Statement - Only on Update snippet.
| Before: | | | [View full width] <% If (CStr(Request("MM_update")) = "EditMeetingRequest") Then %>
|
| After: | | | <% end if %>
|
| Before: | | | [View full width] <% if (String(Request("MM_update")) == "EditMeetingRequest") { %>
|
| After: | | | <% } %>
|
|
For PHP PHP users first will need to separate three merged code blocks into two, and then make the second one conditional. In addition, two special functions that again are concerned with converting the date and time code must be included: one at the top of the page and another after the Insert Record code. Let's start by making the code conditional. 1. | Using Find and Replace, locate the code block that begins <?php mysql_free_result($Rooms);. The complete code block looks like this and can be found at the bottom of the page:
| <?php mysql_free_result($Rooms); mysql_free_result($Conference); mysql_free_result($Conflicts); ?>
|
| 2. | This code block represents the closing of the three recordsets. Because we want to make one of those recordsets, Conflicts, conditional, you must separate the single block into two, like this:
| <?php mysql_free_result($Rooms); mysql_free_result($Conference); ?> <?php mysql_free_result($Conflicts); ?>
|
| 3. | Select the second of the two blocks.
| 4. | Now wrap conditional code around the second code block; the second code block explicitly references the Conflicts recordset.
From the Snippets panel, insert the Recipes > ConferenceRoom > CustomCode_PHP > If Statement - Only on Update snippet.
| Before: | | | <?php if (isset($_POST['MM_update'])) { ?>
|
| After: | | | <?php } ?>
|
| 5. | Save your page.
|
Now, we can add our two remaining functions. 1. | In Code view, locate the conditional code surrounding the Conflicts recordset and place your cursor above the opening conditional statement, which looks like this:
<?php if (isset($_POST['MM_update'])) { ?>
| 2. | Press Enter (Return) to make a new line, and enter the following code to convert the string entries to date and time format:
From the Snippets panel, insert the Recipes > ConferenceRoom > CustomCode_PHP > Enter Meeting Request - Convert FullDate snippet.
| <?php if (isset($_POST["FullDate"])) { $_POST['FullDate'] = strtotime($_POST['FullDate']); } ?>
|
The final step is to insert a function that performs the opposite function so that the data can be stored properly.
| 3. | Place your cursor below the closing conditional statement surrounding the Conflicts recordset, which looks like this:.
<?php } ?>
| 4. | Press Enter (Return) to make a new line, and enter the following code:
From the Snippets panel, insert the Recipes > ConferenceRoom > CustomCode_PHP > Enter Meeting Request - Reconvert FullDate snippet.
| [View full width] <?php if (($_POST[' <?php if (isset($_POST["FullDate"])) { $_POST['FullDate'] = date("YmdHis" ,$_POST['FullDate']); } ?>
|
| 5. | Save your page.
|
Moving code blocks from place to place can be confusing. After you've completed these steps, double-check your work by making sure your code blocks are in the proper order. To help you, here is a list of the correct sequence of code blocks starting from the top of the page, each with a portion of the first line for verification: Now's the time to save and test your page. At this point in the application development, you should be able to add a new meeting, see the confirmation, opt to modify it, make a change, and see the new record confirmed [r3-13]. r3-13. 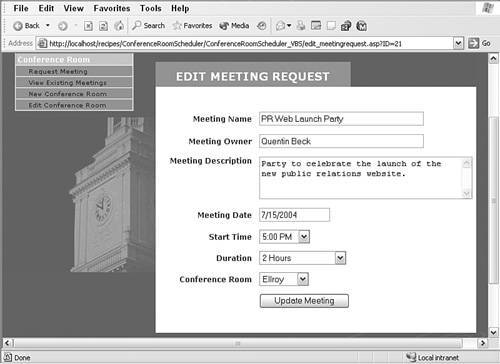
Code Order for PHP Code Block | First Line Excerpt |
|---|
Connection | require_once('../../Connections/Recipes.php') | IsADate | function isADate($DateString) | Date validation | if ((isset($_POST['MeetingDate'])) | Convert FullDate | if (isset($_POST["FullDate"])) | Conditional update opening | if (isset($_POST['MM_update'])) | Recordset parameters | $DateParam_Conflicts = "157766400" | Meeting conflict redirect | if ($totalRows_Conflicts > 0) | Conditional update closing | <?php } ?> | FullDate reconvert | if (isset($_POST["FullDate"])) | Update recordset | function GetSQLValueString($theValue, $theType... |
|