| The administrator's role in this application is limited to two interconnected tasks: creating records for new job openings and new employees. Although both are, at their core, record insertion routines, the implementations have some notable features. The new job page, for example, includes server-side (with a little JavaScript assist) dynamic lists in which a choice in one list alters the options in another. Step 1: Implement New Job Design Let's create our static page first. 1. | Create a basic dynamic page, either by hand or derived from a template.
 In the EmployeeLookup folder, locate the folder for your server model and open the new_job page found there. In the EmployeeLookup folder, locate the folder for your server model and open the new_job page found there.
| 2. | Add a table to the content region of your page to contain the interface elements for the application.
From the Snippets panel, drag the Recipes > EmployeeLookup > Wireframes > New Job - Wireframe snippet into the Content editable region.
| 3. | Within the table, insert the form and necessary form elements for the new job. If you follow our example for this page, you'll need two list elements: one for the departments and one for the manager, in addition to a text field for the job and a submit button.
Place your cursor in the row below the words NEW JOB and insert the Recipes > EmployeeLookup > Forms > Enter Job Information - Form snippet [r2-14].
r2-14. 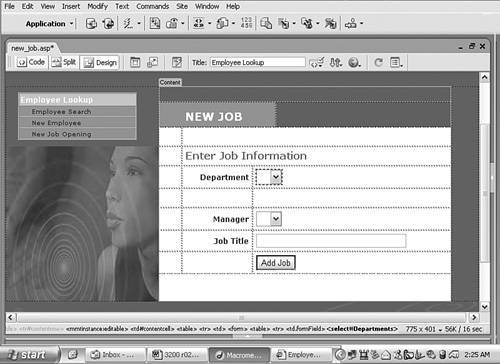
|
Step 2: Add Database Components To populate two lists, two recordsets are required, but the two are interconnected. Because each department has its own managers (each of whom could be responsible for a new job), the list of managers depends on which department is chosen. Although the Department recordset is a simple collection of all the available departments, the Manager recordset is filtered by the Department recordset selection. To accomplish this, the SQL keyword TOP is used; TOP limits the number of records in a recordset to a specified value. For example, the SQL statement SELECT TOP 10 FROM EMPLOYEES WHERE EmployeeLast LIKE 'L%'
would return the first ten records from a recordset of all the employees who have a last name that starts with the letter L. As you'll see, our SQL statement will be limited to the TOP one record returned for a specific departmentthe selection. Because MySQL does not include view support, we'll again use the method of creating the needed data on the fly with later hand-coded functions for the more complex Manager recordset. Let's start by adding the straightforward Department recordset. 1. | From the Bindings panel, choose Add (+) and select Recordset.
| 2. | Make sure the Simple Recordset dialog is displayed, and give the new recordset a meaningful name.
Enter Departments in the Recordset field.
| 3. | Select the connection to your data source.
Choose Recipes from the Connection (Data Source) list.
| 4. | Select the table containing the department details.
Choose Departments (departments in PHP) from the Table list.
| 5. | Keep the Columns option set to All.
| 6. | Leave both the Filter and Sort option set to None and click OK to close the dialog.
|
With the Department recordset ready to go, we can develop the one for the managers. In addition to employing a SELECT TOP clause, the Manager recordset also uses an Access view, which combines data from the Managers and Departments tables. The SQL for the view is as follows: [View full width] SELECT [EmployeeID], [EmployeeFirst] & ' ' & [EmployeeLast] AS ManagerName, [Jobs].[JobDept] FROM Employees INNER JOIN (Jobs INNER JOIN Departments ON [Jobs].[JobDept]=[Departments]  .[DepartmentID]) ON [Employees].[EmployeeJob]=[Jobs].[JobID]; .[DepartmentID]) ON [Employees].[EmployeeJob]=[Jobs].[JobID];
Establishing the recordsets is just the first step in linking the two list elements, but it is a critical one. For ASP 1. | From the Bindings panel, choose Add (+) and select Recordset.
| 2. | In the advanced Recordset dialog, enter an appropriate name for the recordset.
Enter Managers in the Name field.
| 3. | Choose your connection from the drop-down list.
Select Recipes from the Connection list.
| 4. | In the SQL area, enter the following code:
SELECT * FROM ManagersByDepartment WHERE JobDept = IDParam
| 5. | In the Variable area, choose Add (+) and enter IDParam in the Name column.
| 6. | In the Default Value column, enter this:
(SELECT TOP 1 DepartmentID FROM Departments)
| 7. | In the Run-Time Value column, enter Request("DeptID") and click OK to close the dialog and insert the recordset.
|
For ColdFusion 1. | From the Bindings panel, choose Add (+) and select Recordset.
| 2. | In the advanced Recordset dialog, enter an appropriate name for the recordset.
Enter Managers in the Name field.
| 3. | Choose your data source from the drop-down list.
Select Recipes from the Data Source list.
| 4. | If necessary, enter the username and password for the data source in the corresponding fields.
| 5. | In the SQL area, enter the following code:
SELECT * FROM ManagersByDepartment WHERE JobDept = #URL.DeptID#
| 6. | In the Page Parameters section, select Add (+) to display the Add Parameter dialog.
| 7. | In the Add Parameter dialog, enter URL.DeptID in the Name field.
| 8. | In the Default Value fields, enter
(SELECT TOP 1 DepartmentID FROM Departments)
| 9. | Click OK once to close the Add Parameter dialog and again to insert the recordset.
|
For PHP Before you begin this step, you'll need to place your cursor in any text in Design view and then copy the SQL code from the appropriate snippet by right-clicking the Recipes > EmployeeLookup > SQL > Managers RS - PHP SQL Statement snippet and then, from the context menu, choosing Copy Snippet. 1. | From the Bindings panel, choose Add (+) and select Recordset.
| 2. | In the advanced Recordset dialog, enter an appropriate name for the recordset.
Enter Managers in the Name field.
| 3. | Choose your connection from the drop-down list.
Select Recipes from the Connection list.
| 4. | In the SQL area, enter the following code:
Paste the copied snippet into the SQL field by pressing Ctrl-V (Command-V):
| 5. | In the Variable area, choose Add (+) and enter IDParam in the Name field of the Add Parameter dialog.
| 6. | In the Default Value field, enter 1.
| 7. | In the Run-Time Value field, enter $_GET['DeptID'] and click OK once to close the Add Parameter dialog and again to close the Recordset dialog and to insert the recordset.
Now we'll wrap the just-entered recordset with our routines for creating and removing the temporary queries.
| 8. | From the Server Behavior panel, select the Managers recordset.
| 9. | Switch to Code view, and locate the highlighted code.
| 10. | Wrap the following code around the recordset:
From the Snippets panel, insert the Recipes > EmployeeLookup > CustomCode_PHP > Temporary Query - ManagersByDepartment snippet.

| After: | | | [View full width] <?php $query_ManagersByDepartment = "DELETE FROM managersbydepartment "; mysql_query($query_ManagersByDepartment,$Recipes); ?>
|
| 11. | Save the page.
|
Step 3: Data Binding Process In addition to the standard procedure of binding the recordset fields to the form elements, we'll also need to add some JavaScript to cement the connection between the two lists. While the server-side coding is completely capable of filling one list based on the selection of another, you have to rely on client-side scripting to detect a new selection and resubmit the page to the server. But before we insert our JavaScript code, let's bind the data to the form elements. 1. | Select the Departments list element.
| 2. | From the Property inspector, select Dynamic.
| 3. | In the Dynamic List/Menu dialog, select the Departments recordset from the Options From Recordset list.
| 4. | In the Values field, choose DepartmentID.
| 5. | In the Labels field, select DepartmentName.
| 6. | In the Select Value Equal To field, click the lightning bolt icon and, from the Dynamic Data dialog, choose JobDept (DepartmentID in PHP) from the Managers recordset.
| 7. | Click OK once to close the Dynamic Data dialog and then again to close the Dynamic List/Menu dialog.
|
Now that the Department list is completed, let's move on to the Managers list element. 1. | Select the Managers list element.
| 2. | From the Property inspector, select Dynamic.
| 3. | In the Dynamic List/Menu dialog, select the Managers recordset from the Options From Recordset list.
| 4. | In the Values field, choose JobID.
| 5. | In the Labels field, select ManagerName.
| 6. | To avoid presetting the list to any specific value, leave the Select Value Equal To field blank.
| 7. | Click OK to close the Dynamic List/Menu dialog.
| 8. | Save your page.
|
Now it's time to add that JavaScript we've been talking about. We'll tie the execution of the JavaScript code to the onChange event of the Department list. That will ensure that whenever a selection is made, the page will be resubmitted to the server with an argument conveying the selectionwhich in turn triggers the SQL statement in the Managers recordset and repopulates the list. Before you begin this step, you'll need to place your cursor in any text in Design view and then copy the JavaScript code from the appropriate snippet by right-clicking the Recipes > EmployeeLookup > ClientJavaScript > Department Behavior snippet for your server model and then, from the context menu, choosing Copy Snippet. 1. | Select the Department list.
| 2. | From the Behaviors panel, choose Add (+) and select Call JavaScript.
| 3. | Enter the following code in the Call JavaScript dialog:
 
| [View full width] document.location.href = 'new_job.asp?DeptID='+ document.forms[0].Departments.options [document .forms[0].Departments.selectedIndex].value
|

| [View full width] document.location.href = 'new_job.cfm?DeptID='+ document.forms[0].Departments.options [document .forms[0].Departments.selectedIndex].value
|
| [View full width] document.location.href = 'new_job.php?DeptID='+ document.forms[0].Departments.options [document .forms[0].Departments.selectedIndex].value
|
| 4. | Click OK to close the dialog and insert the JavaScript.
| 5. | Make sure that the event in the Behaviors panel is onChange; if necessary, select the down triangle next to the event and choose onChange.
|
Test the dynamic list functionality in the browser. Choosing a new department should generate a new list of managers [r2-15]. r2-15. 
Step 4: Insert RecordNew Job Now we're ready to add the Insert Record server behavior. It's important to keep in mind that both of the list elements in our example will submit their values to the data source as numbers. Why not the text displayed in the lists? Although the lists labels are textual, the underlying values are numeric. It's not unusual for data source schemas to include this dual functionality, which allows greater flexibility and integration with other tables. For ASP 1. | From the Server Behaviors panel, choose Add (+) and select Insert Record.
| 2. | In the Insert Record dialog, select your connection from the list.
Choose Recipes from the Connection list.
| 3. | From the list, select the table in the data source to modify.
Choose Jobs from the Insert Into Table list.
| 4. | In the After Inserting, Go To field, enter the path to the file you want the user to visit after the record has been updated.
Choose Browse and locate the employee_results.asp file.
| 5. | Choose the form to use.
Select InsertJob from the Get Values From list.
| 6. | With the current form selected in the Get Values From list, set the form elements to their corresponding data source fields.
Set the Department form element to the JobDepartment data column and submit as Numeric.
Set the Managers form element to the JobTypeID data column and submit as Text.
Set the JobTitle form element to the JobTitle data column and submit as Text.
| 7. | Verify your choices and click OK to close the dialog.
|
For ColdFusion and PHP 1. | From the Server Behaviors panel, choose Add (+) and select Insert Record.
| 2. | In the Insert Record dialog, choose the current form.
Select InsertJob from the Submit Values From list.
| 3. | Select your data source from the list.
Choose Recipes from the Data Source list.
| 4. | Enter your username and password, if needed.
| 5. | Select the table in the data source to insert into from the list.
Choose Jobs (jobs for PHP) from the Insert Into Table list.
| 6. | Set the data source fields to their corresponding form elements.
| Make sure the JobID data column is set to be an unused Primary Key. | | | Set JobDepartment to the FORM.Departments form element and submit as Numeric (Integer for PHP). | | | Set JobTitle to the FORM.JobTitle form element and submit as Text. | | | Set JobTypeID to the FORM.Managers form element and submit as Numeric (Integer for PHP). | | | PHP users only should set ManagerID to the FORM.Managers form elementand submit as Integer. |
| 7. | In the After Inserting, Go To field, enter the path to the file you want the user to visit after the record has been inserted.
Choose Browse and locate the employee_results file for your server model.
| 8. | Verify your choices and click OK to close the dialog.
| 9. | Don't forget to save the page.
|
Step 5: Error Text: No Job Openings In the workflow of the overall application, the ability to create a new job opening in the data source is critical. If there are no job openings, you logically cannot hire a new employee; an informative error message should alert the user to the problem. In some other recipessuch as those for user authenticationerror messages appeared to point out a problem on the same page. However, in this application we'll insert an error message that occurs only when an error happens on another page. This is accomplished by an If statement, which is triggered if the query string contains a variable named empty. 1. | Place the cursor on the page where you would like the error message to appear.
Put the cursor in the row above the text Enter Job Information.
| 2. | Insert the following code:
From the Snippets panel, open the Recipes > EmployeeLookup > CustomCode folder for your server model and insert the No Job Openings - Display Text snippet.
| [View full width] <%if (cStr(Request("empty"))<>"") then Response .Write("There are no job openings for a new employee. You must add a job before adding an employee.")%>
|
| [View full width] <%=(String(Request("empty"))!="undefined")?"There are no job openings for a new employee. You must add a job before adding an employee.":""%>
|
| [View full width] <cfif IsDefined("URL.empty")><cfoutput>There are no job openings for a new employee. You must add a job before adding an employee.</cfoutput></cfif>
|
| [View full width] <?php echo (isset($_GET['empty']))?"There are no job openings for a new employee. You must add a job before adding an employee.":""; ?>
|
| 3. | Save your page.
|
To see the error message in action, first enter Live Data view. The error message should disappear. Now, in the query string field of the Live Data toolbar, enter empty=true and, if AutoRefresh is enabled, press Enter (Return); otherwise, select Refresh from the Live Data toolbar. The error message should appear. |