| It's generally a good idea to provide feedback on a user's action, whether the action succeeds or fails. The feedback can take many forms: A simple thank-you page is often used. However, the more personalized the feedback, the better. By including information the user submitted on the form, you demonstrate that you actually received the data. In this recipe, you'll see both how to acknowledge receipt of a form submission in a personal manner and how to protect a page from unregistered users. Step 1: Implement the Content Design The first step is to create a page to hold the dynamic content. The Recipes example is rather stark with its title of Protected Page [r1-9], but that's just to keep the concept clear. You are free (and encouraged) to develop your own design. r1-9. 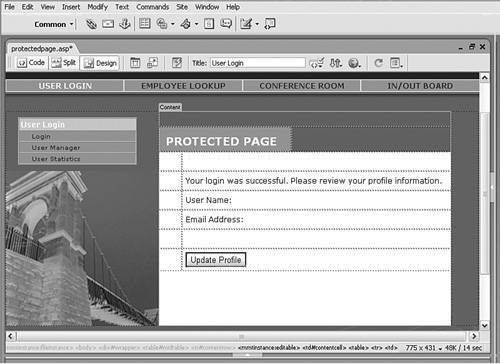
1. | Create a basic dynamic page either by hand or from a template.
 In the UserLogin folder, locate the folder for your server model and open the protectedpage page found there. In the UserLogin folder, locate the folder for your server model and open the protectedpage page found there.
| 2. | Add a table to the content region of your page to contain the interface elements for the application.
From the Snippets panel, drag the Recipes > UserLogin > Wireframes > Protected Page - Wireframe snippet into the Content editable region.
| 3. | Within the table, insert a content table with the necessary text and a form button. No form is necessary for this application.
Place your cursor in the row below the words PROTECTED PAGE in the second cell and insert the Recipes > UserLogin > ContentTables > Protected Page - Content Table snippet.
| 4. | Save your page.
|
Step 2: Add Database Components To demonstrate to the user that he is properly logged in, this application will pull his data into a recordset and then display a few of the fields on the page. We'll target the recordset by using the session variable created on the login page, UserID. 1. | From the Bindings panel, select Add (+) and choose Recordset (Query).
| 2. | The Recordset dialog has two views: simple and advanced. Make sure you are in simple mode [r1-10].
r1-10. 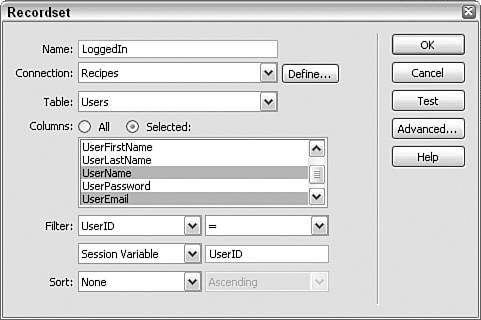
| 3. | In the Name field, enter the label for your recordset.
Enter LoggedIn as the recordset name.
| 4. | From the Connections list, choose the data source connection.
Select Recipes from the Connections list.
| 5. | Choose the appropriate table containing the user's information.
Select Users (users for PHP) from the Table list.
| 6. | Choose the Selected option under Columns and select only the necessary columns for this recordset.
Choose UserID, UserName, and UserEmail by Ctrl-clicking on each column.
It's always a good idea to limit the number of columns to the lowest number of usable items.
| 7. | In the Filter area of the Recordset dialog, set the four Filter list elements like this:
UserID | = (Equals) | Session Variable | MM_UserID |
Effectively, what we are doing is limiting the recordset to the data from just one individualthe one currently logged inrequesting the current page.
| 8. | With just one record, no sorting is necessary. Click OK to confirm your choices and close the dialog.
|
ColdFusion users will remember that setting the cookie was delayed to provide for backward compatibility with ColdFusion 5. We're now ready to include the necessary code. In Code view, place your cursor at the top of the page and insert the following code:  From the Snippets panel, insert Recipes > UserLogin > Custom Code_CF > ProtectedPage - Save Login in Cookie. From the Snippets panel, insert Recipes > UserLogin > Custom Code_CF > ProtectedPage - Save Login in Cookie.
<cfif IsDefined("Session.MM_UserID")> <cfif Session.MM_UserStore NEQ ""> <cfcookie name="UserName" value="#Session.MM_UserName#" expires="30"> </cfif> </cfif>
This code creates the proper cookie, but only if the Save Username checkbox in the login page was selected. We now have all we need to output a personalized response. Step 3: Display Profile Data In this step, we'll insert the dynamic data from the recordset. Although you could use the Dynamic Text server behavior to make this addition, it's more intuitivenot to mention a bit quickerto drag the two fields from the Bindings panel. 1. | From the Bindings panel, expand the recordset, if necessary.
| 2. | Drag the UserName (or corresponding) field onto the page just after the User Name text.
| 3. | Drag the UserEmail (or similar) field onto the page just after the Email Address label [r1-11].
r1-11. 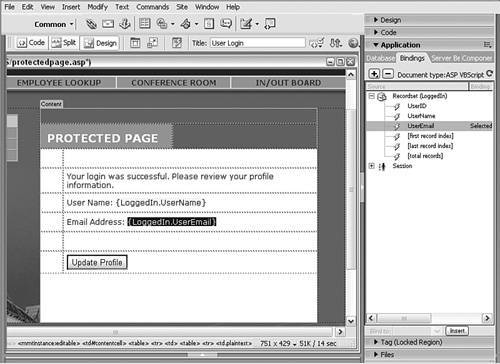
| 4. | Save your page before continuing.
|
You can test your page by entering Live Data view. The first time you preview the page, Dreamweaver will present a dialog asking for an MM_UserID session variable value. Enter 1 or whatever number represents a valid entry in your UserID field. Step 4: Restrict Access to Pages Our registration system is in place, and it's time to protect our page from unauthorized viewing. Dreamweaver supplies a very handy server behavior that does the job nicely: Restrict Access to Page. With this server behavior, you can restrict access based on a matching user name and password, or you can extend the restriction to check access groups. The Recipes application uses the latter approach for maximum flexibility. 1. | From the Server Behaviors panel, choose Add (+) and select User Authentication > Restrict Access to Page.
| 2. | Choose the Restrict Based On Username, Password, and Access Level option.
With the Access Level option chosen, the Select Level(s) area becomes active.
Before we can select which levels to allow, we need to define them.
| 3. | Choose Define to open the Define Access Levels dialog [r1-12].
r1-12. 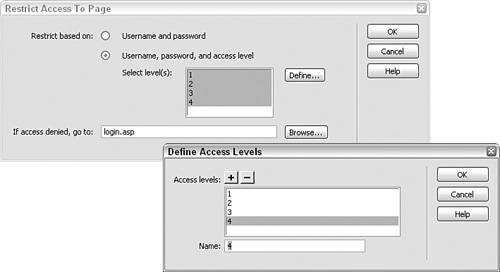
| 4. | Click Add (+) and enter the name of the access level as it appears in your data source.
The Recipes data source indicates levels with a numbering sequence (1 to 4, where 1 is the most restrictive level of access) rather than words. Enter each number on its own line.
| 5. | Repeat step 4 for each level and click OK when you're done to close the Define Access Levels dialog.
| 6. | In the Restrict Access to Page dialog, Shift-select all the access levels to allow all logged-in users to see this page.
Obviously, when this behavior is applied on different pages, different access levels will be selected.
| 7. | In the If Access Is Denied, Go To field, choose your login page for your server model.
| 8. | Click OK to close the dialog box.
|
Once the Restrict Access to Page server behavior is inserted in a page, visitors cannot go to that page without logging in. If they try, the code redirects them to the user login page. The Restrict Access to Page server behavior is very powerful, but it has to be inserted on all pages in the application except for the login and send password pages. Follow the procedure outlined in "Step 4: Restrict Access to Pages" for all other pages. On the administrative recipe pagesedit_user, user_manager, and user_statisticsthe access levels should be set to 1, the administrative level. For ColdFusion We need to add the same cookie object to the protected page for ColdFusion previously added to the login page. This is due to the fact that ColdFusion can't set a cookie and have a server-side redirection on the same page. To handle this unique issue with ColdFusion, you need to put the same cookie code on any page that is protected by the user loginsuch as protected_page. 1. | In Code view, insert your cursor at the top of the page.
| 2. | Insert the following code.
From the Snippets panel, insert the Recipes > UserLogin > CustomCode_CF > Cookie Object Code snippet.
<cflock timeout="20" throwontimeout="No" type="EXCLUSIVE" scope="SESSION"> <cfif IsDefined("Session.MM_UserID")> <cfif Session.MM_UserID NEQ ""> <cfcookie name="UserName" value="#Session.MM_UserName#" expires="30"> <cfelse> <cfcookie name="UserName" value="" expires="0"> </cfif> </cfif> </cflock>
| 3. | Save your page.
|
Step 5: Add Link to Update Profile Button Everyone makes mistakes entering form information sooner or later. Once you press the submit button, the data you entered goes right into the data source, and it's always good to provide a way for the user to amend his entries. In this step, we'll link a button to another page in the application. 1. | Select the Update Profile form button.
| 2. | From the Behaviors panel, choose Add (+) and select the Go To URL behavior.
| 3. | Enter the path to application page for editing user profiles.
Click the Browse button and choose the edit_profile page for your server model.
| 4. | Save the page when you're done.
|
Obviously, you don't have to use a form button and a JavaScript behavior to get the linking functionality; a text or graphic with a standard link would work as well. On the other hand, the form button provides a certain degree of continuity with the other form elements in our application without having to expend resources to develop suitable graphics. |