| In many intranet applications, the first page a user comes to is the login page. If the user is already registered, he enters a user name and password. Clicking the submit button checks the user name and password against the data source and, if a match is found, redirects the user to an application within the intranet. If the user name is not found or the password is incorrect, a message appears on the page telling the user of the problem. The user can then try again, register, or ask that the password be emailed. Note This recipe will not be accessible to Dreamweaver MX users with the PHP server model who do not have the authentication server behaviors installed. The authentication server behaviors were originally available on the Macromedia DevNet Resource Kit (DRK), Volume 2, and later incorporated into Dreamweaver MX 2004.
Our application uses an approach that is somewhat different from Macromedia's standard user login. Rather than sending the user to a different page if the login failswhere he would have to select a link to try againor worse, just bringing him back to the login page with no additional informationour login page provides a message on the same page to allow for an easier retry. Our recipe also adds a UserID session variable to the mix. This session variable is used in later application pages to track the logged-in user. In addition, we've added a cookie to sweeten the recipe. With the cookie in place, the application will optionally fill in the UserName text field to allow for a simplified login. Step 1: Implement User Login Design First let's build the basic page for the user login. You can build this yourself or have a designer construct the page for you, as it includes no server-side code at this point. 1. | Create a basic dynamic page, either by hand or from a template.
 In the UserLogin folder, locate the folder for your server model and open the login page found there. In the UserLogin folder, locate the folder for your server model and open the login page found there.
| 2. | Add a table to the content region of your page to contain the interface elements for the application.
From the Snippets panel, drag the Recipes > UserLogin > Wireframes > User Login - Wireframe snippet into the Content editable region.
| 3. | Within the table, insert the form and necessary form elements for the user login. At a minimum, you'll need a text field to hold the user name and another for the password, a checkbox for optionally remembering the entries, and a submit button.
Place your cursor in the row below the words USER LOGIN in the second cell and insert the Recipes > UserLogin > Forms > User Login - Form snippet [r1-1].
r1-1. 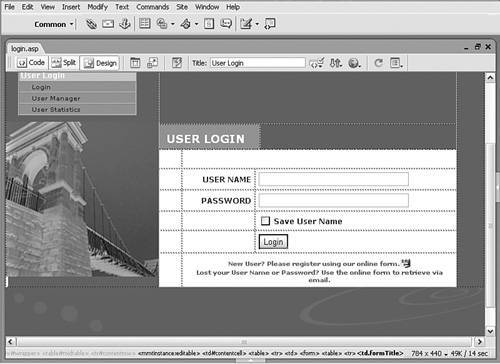
| 4. | Save the page. If you created it from scratch using the template, save it as login with the extension that is appropriate for your platform. For instance, for ASP, save the page as login.asp.
|
Step 2: Apply Server Behavior for User Authentication Our first server-side code action is to set up the basic user authentication routines. Dreamweaver includes a standard server behavior that we will use and adapt in our technique. The Log In User server behavior handles the comparison between the user-entered values and entries in the data source. It also redirects the page in scenarios that are successful (a matching user name and password are found) and failed (either the user name or its password are not found). Note Although Macromedia's standard login page can be stored as a basic HTML page, our login page includes dynamic elements that require server-side code.
Note The following steps use field names from the Recipes database. If you are using your own data source, substitute the equivalent fields.
With the Log In User server behavior, you're offered two degrees of control. The basic option checks only for the user name and password; in this situation, everyone registered in the data source can see every page. The second option offers a greater degree of control in which, in addition to the user name and password, a group field is also checked. To use the more advanced option, everyone who registers must be assigned to a particular group such as Visitor, Employee, Manager, or Administrator. By incorporating group-level access, you can build one interface that integrates features for both the public and the administrators. The application you are about to build utilizes the group option. 1. | From the Server Behaviors panel, choose Add (+) and select User Authentication > Log In User [r1-2].
r1-2. 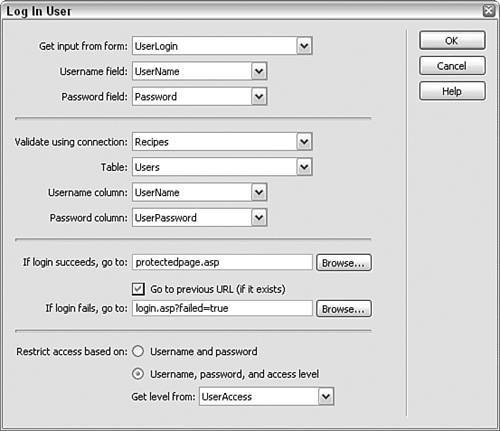
| 2. | Choose the form to work with.
Set the Get Input From Form list to UserLogin.
| 3. | Choose the form field that holds the user name.
Select UserName from the Username Field list.
| 4. | Pick the form field that contains the user's password.
From the Password Field list, choose Password.
Now let's make a data source connection.
| 5. | Select the connection that points to your data source with the user table.
From the Validate Using Connection list, choose Recipes.
| 6. | ColdFusion users only: Enter the user name and password for the data source, if necessary.
| 7. | Select the table from the data source that holds all the user data.
Set the Table list to Users (users for PHP).
Dreamweaver will populate the Username Column and Password Column lists after a table is chosen.
| 8. | Declare which column in the table is used to store the user name.
From the Username Column list, choose UserName.
| 9. | Select the column to hold the password.
From the Password Column list, select UserPassword.
Now we determine how to react depending on whether a login is successful.
| 10. | Enter the name of the page you want displayed with a successful login.
For the If Login Succeeds, Go To field, select Browse and locate the protectedpage file for your server model.
| 11. | If you want the user to continue on to his previously entered URL after a successful login, check the Go to Previous URL (if any) option.
| 12. | Enter the page to display if the login is unsuccessful.
In the If Login Fails, Go To field, click the folder icon and select the login page for your server model. Click Parameters in the Select File dialog and enter failed under the Name column and true under the Value column. Click OK twice to close both the Parameters and the Select File dialogs.
If the login fails, the page submits to itself with an argument identifying the problem. The argument will then be used to trigger a message on the page via additional code added later.
| 13. | Choose whether the access should take the access level into account.
Set the Restrict Access Based On option to UserName, Password, and Access Level.
| 14. | If you've opted to include the access level, choose the data table column that contains that data.
From the Get Level From list, choose UserAccess and click OK to close the dialog.
| 15. | Save your page.
|
You won't be able to test your page until the all steps are completed. The User Authentication Server Behaviors that ship with Dreamweaver 8 for PHP have a bug that needs to be fixed. The problem is that in PHP you can create a new session variable only once, and the code that ships with Dreamweaver does not properly check to make sure the Session is not already created. Switch to Code view; then, place your cursor in front of the code session_start(); and enter if (!session_id()) followed by a space. The new code should look like this: if (!session_id()) session_start();
Step 3: Insert Error Message Our next action is to create a custom error message that displays if the login fails. By keeping the error message on the same page, we simplify the user experience. 1. | Place the cursor where you'd like the error message to appear.
Put the cursor in the row above the User Name label.
| 2. | Add the error message code:
From the Snippets panel, open the Recipes > UserLogin > Custom Code folder for your server model and insert the Login Failure - Display Text snippet.

| [View full width] <%if (cStr(Request("failed"))<>"") then Response  .Write("The Login information you provided is not valid. Please try again.")%> .Write("The Login information you provided is not valid. Please try again.")%>
|

| [View full width] <%=(String(Request("Failed"))!="undefined")?"The Login information you provided is not valid. Please try again.":""%>
|

| [View full width] <cfif IsDefined("URL.failed")><cfoutput>The Login information you provided is not valid. Please try again. </cfoutput></cfif>
|

| [View full width] <?php echo (isset($_GET['failed']))?"The Login information you provided is not valid. Please try again.":""; ?>
|
| 3. | If you entered the code by hand in Code view, be sure to remove the nonbreaking space character, . (Dragging a snippet into a table in Design view removes the nonbreaking space automatically.)
|
The ASP-JavaScript and PHP code use a conditional operator (also known as a trinary in PHP) instead of a standard if-then statement. With a conditional or trinary, should the opening statement (the segment before the question mark) be true, the first clause immediately following the question mark is executed. Otherwise, the second clause (found after the colon) is executed. Step 4: Add Session Objects Macromedia's Log In User server behavior creates a session variable named MM_Username. In this step, we'll be adding another session variable, UserID, which will be used to filter the recordset on other pages in the application. Our database schema includes UserID in another related table to keep a record of logins, which will be used later to display the login statistics. There are three parts to integrating the UserID session object into our code: adding it to the SQL, creating a session variable in the recordset code, and exposing the session variable to Dreamweaver. First we'll add UserID to the SQL statement inserted by the Log In User server behavior. 1. | Switch to Code view.
| 2. | Choose Edit > Find and Replace or use the keyboard shortcut Ctrl-F (Command-F) to open the Find and Replace dialog.
| 3. | In the current document, ASP and PHP users should look for the source code SELECT UserName, UserPassword; ColdFusion users should search for SELECT UserName, UserPasswordnote the lack of a space separating the two data fields.
When found, the entire line will be as follows:
| MM_rsUser.Source = "SELECT UserName, UserPassword"
|
| MM_rsUser.Source = "SELECT UserName, UserPassword"
|
| [View full width] SELECT UserName, UserPassword, UserAccess FROM Users WHERE UserName="#FORM.UserName#" AND UserPassword="#FORM.Password#"
|
| [View full width] LoginRS__query=sprintf("SELECT UserName, UserPassword, UserAccess FROM users WHERE UserName='%s' AND UserPassword='%s'",
|
| 4. | Add a comma after UserPassword (UserAccess in ColdFusion), followed by UserID so that the line now reads:
| [View full width] MM_rsUser.Source = "SELECT UserName, UserPassword, UserID"
|
| [View full width] MM_rsUser.Source = "SELECT UserName, UserPassword, UserID"
|
| [View full width] SELECT UserName, UserPassword, UserAccess, UserID FROM Users WHERE UserName='#FORM.UserName#' AND UserPassword='#FORM.Password#'
|
| [View full width] $LoginRS__query=sprintf("SELECT UserName, UserPassword, UserAccess, UserID FROM users WHERE UserName='%s' AND UserPassword='%s'",
|
| 5. | Save your page.
|
Now that UserID is part of the recordset, you can create a session object in the code. This new session object will make it easy to reference profile information based on the active user. Once the session variable is created at the login, UserID can then be accessed from any page in the application. Warning Because we have made a necessary modification within the Dreamweaver Log In User server behavior, you cannot reedit the server behavior through the dialog. If you open the Log In User dialog again, the modification just made will be lost and will have to be restored.
1. | As done previously, use the Find and Replace feature to search for the code MM_Username.
The entire line reads as follows:
| Session("MM_Username") = MM_valUsername
|
| Session("MM_Username") = MM_valUsername
|
| <cfset Session.MM_Username=FORM.UserName>
|
| ['MM_Username'] = $loginUsername;
|
| 2. | Add a paragraph return after the line of code.
| 3. | Insert the following code:
From the Snippets panel, open the Recipes > UserLogin > Custom Code folder for your server model and insert the Session - User ID snippet.
| [View full width] Session("MM_UserID") = cStr(MM_rsUser.Fields.Item ("UserID").Value)
|
| [View full width] Session("MM_UserID") = String(MM_rsUser.Fields .Item("UserID").Value);
|
| <cfset Session.MM_UserID=MM_rsUser.UserID> <cfif IsDefined("FORM.StoreProfile")> <cfset Session.UserStore=MM_rsUser.UserID> <cfelse> <cfset Session.UserStore=""> </cfif>
|
| [View full width] $SESSION['MM_UserID'] = mysql_result($LoginRS,0 ,'UserID');
|
|
The final element in our session object coding is, in all honesty, optional but is a good practice to follow. In this step, we'll create a site-level variable for the session object within Dreamweaver. While not necessary, it makes it possible to insert the MM_UserID session object by just dragging and dropping. Note Why is the ColdFusion code so much more elaborate than the ASP code here? ColdFusion 5 has a restriction that prevents cookies from being set in a page that is being redirected. In this workaround, the user name value is stored in a session variable that will be read in the Confirmation page and then stored in a cookie. This restriction has been removed in ColdFusion MX.
1. | From the Bindings panel, select Add (+) and choose Session Variable.
| 2. | Enter MM_UserID in the Name field of the Session Variable dialog and click OK.
| 3. | Expand the Session entry in the Bindings panel to see your new variable [r1-3].
r1-3. 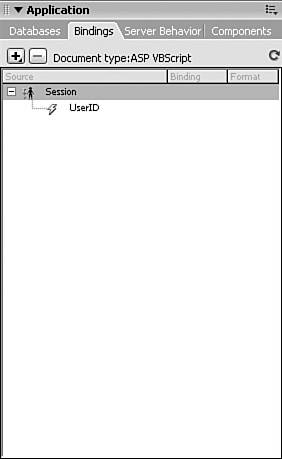
|
Step 5: Add Cookie Logic for the User Login Form The checkbox on the login form allows the application to remember the user name. This makes it far easier for the user to log in while keeping the feature optional for security reasons. The computer remembers each user by storing his information in a cookie on the client's computer. We now need to add the code to create and manage the cookies based on the user-entered values. There are several places to insert additional code: The first bit of code, which creates the cookies, is placed above the recordset, while all the other code is placed within the form elements themselves. 1. | In Code view, place your cursor at the top of the source code.
Because the cookie values are inserted into the form elements when the page loads, the code block needs to be at the top of the page above the recordset declaration.
For ASP and PHP server models, your cursor should be placed below the tag that includes the connection information.
| 2. | Insert the following code:
From the Snippets panel, open the Recipes > UserLogin > Custom Code folder for your server model and insert the Cookie - Object Code snippet.
| [View full width] % if (cStr(Request.Form("Login"))<>"") then if (cStr(Request.Form("StoreProfile"))<>"") then Response.Cookies("UserName") = cStr(Request ("UserName")) else Response.Cookies("UserName") = "" end if today = DateAdd("d",30, Date()) Response.Cookies("UserName").Expires = today end if %>
|
| [View full width] <cflock timeout="20" throwontimeout="No" type="EXCLUSIVE" scope="SESSION"> <cfif IsDefined("Session.MM_UserID")> <cfif Session.MM_UserID NEQ ""> <cfcookie name="UserName" value="#Session .MM_UserName#" expires="30"> <cfelse> <cfcookie name="UserName" value="" expires="0"> </cfif> </cfif> </cflock>
|
| [View full width] <?php if (isset($_POST['Login'])) { if (isset($_POST['StoreProfile'])) { setcookie ("UserNamePHP", $_POST['UserName'],time ()+43200); } else { setcookie ("UserNamePHP", "",time()-43200); } } ?>
|
|
For these code blocks, after verifying that the user form exists and that the StoreProfile checkbox is selected, the cookies are created and are set to expire in 30 days. The PHP code calculates the number of seconds in 30 days as required by the setcookie() function. When the login page loads, we want to show the StoreProfile checkbox selected if the user name has been previously storedin other words, if the cookie exists. To do this, we'll have to add some additional code within the <input> tag that describes the checkbox. Note You might find it easiest to work in the split Design and Code view for this operation.
1. | In Design view, select the StoreProfile checkbox.
| 2. | In Code view, place your cursor inside the <input> tag just before the closing bracket.
| 3. | Insert the following code:
From the Snippets panel, open the Recipes > UserLogin > Custom Code folder for your server model and insert the Cookie - StoreProfile Checkbox snippet.
| [View full width] <%if (cstr(Request.Cookies("UserName"))<>"")then Response.Write("checked")%>
|
| [View full width] <%=(String(Request.Cookies ("UserName"))!="")?"checked":""%
|
| [View full width] <cfif IsDefined("COOKIE.UserName") AND COOKIE .UserName NEQ ""> <cfoutput>checked</cfoutput></cfif>
|
| [View full width] <?php echo (isset($_COOKIE['UserNamePHP']) && $_COOKIE['UserNamePHP']!="")?"checked":""; ?>
|
|
Two more modifications, and the login page will be complete. Now we'll tie the UserName and Password text fields to their respective cookies. If a cookie value is defined, it will populate with that value; if the value is empty, the form elements will appear blank. 1. | In Design view, select the UserName text field.
| 2. | In Code view, move to the end of the input tag, press the spacebar, and then insert the following code:
From the Snippets panel, open the Recipes > UserLogin > Custom Code folder for your server model and insert the User Name Cookie - Display Text snippet.
| value="<%=Request.Cookies("UserName")"%>
|
| value="<%= Request.Cookies("UserName")"%>
|
| [View full width] value="<cfif isDefined("Cookie.UserName")> <cfoutput>#Cookie.UserName# </cfoutput></cfif>"
|
| value="<?php echo $_COOKIE['UserNamePHP"]; ?>"
|
| 3. | Save your page.
|
Note If the Code Hints pop-up displays when you press the spacebar, press Esc to dismiss it.
Test your page by entering user names and passwords into the appropriate fields. If the application finds a match, you'll be redirected to the protectedpage file. (If you haven't created a placeholder for this page, you'll get a Page Not Found error.) If no match is found, the error message should be shown [r1-4]. Whenever you return to this page, the user name should be filled in if the Save User Name option was selected. r1-4. 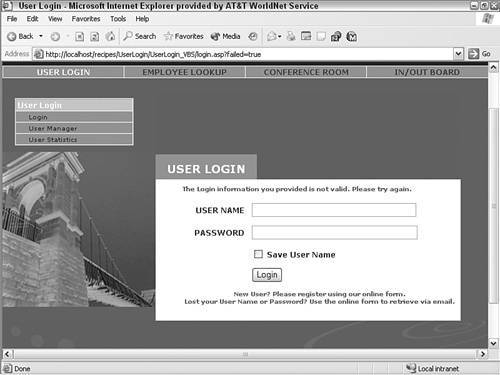
Step 6: Create Links to Other Application Pages It's important for the developer to cover every situation a user might encounter when interacting with an application page. So far, our page handles both a successful and an unsuccessful registration attempt; but what if the user is not registered at all or has forgotten his password? In this final step, we'll link to pages in the overall application to accommodate these situations. 1. | Select the text or image you want to use as a link to a new user registration page.
Select the word register in the text block at the bottom of the form.
| 2. | Link to the appropriate application page.
Click the folder icon next to the Property inspector's Link field. From the Select File dialog, choose the register_user page for your server model.
| 3. | Select the text or image to use as a link to the email password page.
Select the phrase online form in the text block at the bottom of the form.
| 4. | Create a link to the application page.
Open the Select File dialog again and choose the send_password file for your server model.
| 5. | Save your page when you are done.
|
In the next recipe, we'll complete the first of our two links: the new user registration page. |