Connecting to Data Sources
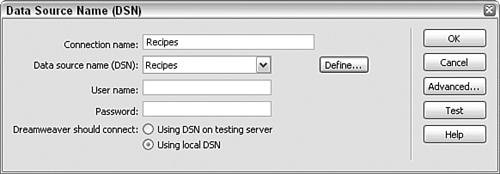
| With a well-designed data source at the ready, you're prepared to establish a connection to it from your Web application. You can achieve a connection in several ways, depending on the application server in use. Typically, application servers offer several alternative routes to establishing a connection. One method might be easier to set up but not quite as efficient, whereas another might be more difficult to create but more robust. It's good to know what the options are so that you can decide which type of connection is best in a given situation. Making ASP ConnectionsAlthough there are some variations, ASP connections occur in one of two ways: either through a Data Source Name (DSN) or through a connection string. Although the DSN connection is easier to set up, it does affect the performance of the application server somewhat. Connection strings are more robust in general but also require more detailed information, such as a precise path to the data source on the server. Note Because only ASP, PHP, and ColdFusion applications are used in the recipes, details on creating connections are covered for only those server models. See Dreamweaver Help for information on creating connections for other application technologies. When you create an ASP connection, whether through a DSN or a connection string, Dreamweaver stores the information in a file saved in the Connections folder of your site. Every time you create a recordset using that connection, the file is incorporated into your pages by using an <include> tag, like this: <!--#include file="../Connections/Recipes.asp" --> Dreamweaver regards this as a dependent file; when you upload your .asp files to the server via FTP, you'll see an option to include dependent files. Clicking OK will automatically transfer the connection file, and you'll be good to go. DSN ConnectionsA DSN is similar to a domain name in that it too is an alias that represents the file path of the data source. As with domains, the mapping from DSN to file location is handled on the server side. DSN connections contain other vital information, such as the type of data source driver required and any security information, such as username and password. On a remote testing server, DSNs are established by a system administrator. On a development system, a DSN is defined in a Windows program: the ODBC Data Source Administrator. ODBC stands for Open Database Connectivity; it is a system of drivers that allows the same language, SQL, to communicate with a variety of data sources. Note If you intend to follow along with the recipes, be sure to copy the recipes.mdb file from the CD-ROM to your system as instructed in the read-me file. Here's how a local DSN is established through the ODBC Data Source Administrator:
Although you can launch the ODBC Data Source Administrator independently of Dreamweaver, you can also open it from within Dreamweaver as you are defining the DSN connection. Here's how:
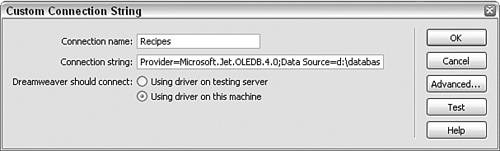
Your new connection is listed in the Databases panel. Connection StringsA connection string, unlike a DSN connection, does not use an alias; rather, it specifies an exact path locationas well as the ODBC driver or OLE DB provider and any other necessary information such as username and password. All this information is put into one rather lengthy text string. As noted, you can include the ODBC driver in a connection string to make what is referred to as a DSN-less connection, but it's not as robust as a direct OLE DB connection string. ODBC acts as a translator, facilitating communications from the data source to the underlying engineand that engine, or provider, is OLE DB. Each data source type has a particular OLE DB provider, which naturally affects the connection string. For example, if you were using an Access database called thebook.mdb as your data source, and the file was stored in the databases folder on your D: drive, the OLE DB connection string would look like this: Provider=Microsoft.Jet.OLEDB.4.0;Data Source=d:\databases\thebook.mdb; If, on the other hand, you were using a SQL Server database called BigBook found on a server called TheShelf, the OLE DB connection string would look like this: Provider=SQLOLEDB;Server=TheShelf;Database=BigBook;UID=jlowery;PWD=starfish Notice that this OLE DB connection string also contains username and password information. Dreamweaver's Custom Connection Strings feature makes it possible to connect directly to the OLE DB provider. Here's how:
Setting Up ColdFusion ConnectionsThe best, most flexible way to establish a data source connection in ColdFusion takes three steps:
Although there are other ways to establish a data source that do not require as many steps, the other methods are less modular and far more difficult to adapt if a data source changes. Declaring a Data SourceThe ColdFusion Administrator acts as a central clearinghouse for all data sources, among many other things. The process for setting up a new data source is similar in ColdFusion MX and ColdFusion 5, but slightly different. Here's how you set up a data source in ColdFusion MX and MX 7: Note If you intend to follow along with the recipes, be sure to copy the recipes.mdb file from the CD-ROM to your system as instructed in the read-me file.
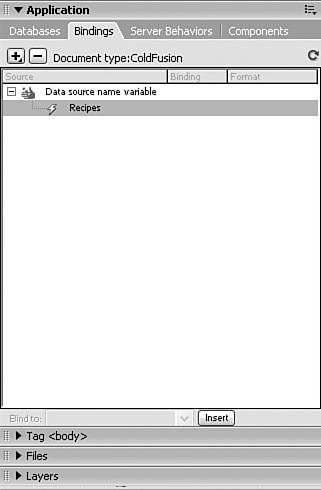
It is possible at this point to go into Dreamweaver and select this data source to build a recordset. If you do, however, the data source name will be encoded directly into the <cfquery> tag. The technique we are following applies a variable to the <cfquery> tag rather than a name, which makes the recordset far easier to update across an application. Setting Up the Application.cfm FileThe Application.cfm file is a marvelous time- and code-saving aspect of ColdFusion. The code found within an Application.cfm file, if placed at the site root, is automatically included into every ColdFusion page within the site, regardless of where it is located in the file structure. This facility allows us to define a variable pointing to the data source name set up in the ColdFusion Administrator, which will in turn allow us to declare a Data Source Name variable in Dreamweaver. A site can contain numerous Application.cfm files; additional files are stored in the root folders of one or more applications. The basic tag to create a variable is the <cfset> tag. If you wanted to assign a variable named theData to a data source you had created called CorporateData, you would use code like this: <cfset theData="CorporateData"> Let's build an Application.cfm file together.
Defining the Data Source Name VariableFor our final step in the process, we move into Dreamweaver and use a new feature introduced in Dreamweaver MX: the Data Source Name variable. After declaring a Data Source Name variable, Dreamweaver includes the variable as an option in the appropriate drop-down lists and dialogs. Choosing such a variable while creating a recordset creates code like this: Note For maximum cross-platform implementation, be sure to save your Application.cfm with an uppercase A. Although application.cfm is acceptable on a Windows platform, it would fail on any Unix system. <cfquery name="MyQuery" datasource="#DataSourceName#"> Note that the value for the datasource attribute is a ColdFusion variable rather than a direct reference to a data source. Here's how a Data Source Name variable is set up in Dreamweaver:
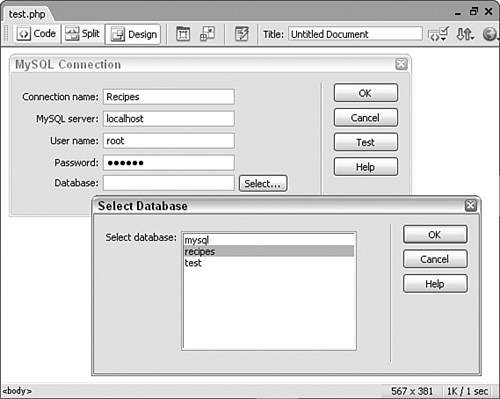
Connecting to a MySQL Data Source for PHPAs noted earlier, MySQL is a server-based data source. Dreamweaver provides a direct method for creating a connection to a MySQL data source. Once the connection is established, you'll be able to refer to the connection for all the relevant applications. Inserting a ConnectionConnections are created and displayed in Dreamweaver's Databases panel. Before you can create a connection, MySQL must be running, and you should have a username and password established. Note The following procedure assumes that you've already installed MySQL on your development system. To learn how to install MySQL, visit www.mysql.org.
To create a connection, follow these steps:
The newly created connection is displayed in the Databases panel. Expand the main connection node to reveal the available tables. The actual connection file is stored in the Connections folder and can be opened and examined in Dreamweaver. Dreamweaver writes a standard PHP file, like this one: <?php # FileName="Connection_php_mysql.htm" # Type="MYSQL" # HTTP="true" $hostname_Recipes = "localhost"; $database_Recipes = "recipes"; $username_Recipes = "root"; $password_Recipes = "mypassword"; $Recipes = mysql_pconnect($hostname_Recipes, $username_Recipes, $password_Recipes) or trigger_error(mysql_error(),E_USER_ERROR); ?> When you create a recordset in Dreamweaver, the connection file is included through the use of a require_once() function. This function is written into your PHP page at the top above the <html> tag, like the following code: <?php require_once('Connections/Recipes.php'); ?>The connection file is considered a dependent file by Dreamweaver. As such, it can be transferred automatically from the local to remote site with your application page when using Dreamweaver's built-in FTP feature to transfer files. Dreamweaver asks whether you'd like to transfer dependent files as well as the primary file. Answering yes ensures that the connection file is uploaded as well as additional system files necessary for the connection to be completed. |
EAN: 2147483647
Pages: 121
- Chapter II Information Search on the Internet: A Causal Model
- Chapter IV How Consumers Think About Interactive Aspects of Web Advertising
- Chapter V Consumer Complaint Behavior in the Online Environment
- Chapter VI Web Site Quality and Usability in E-Commerce
- Chapter XIII Shopping Agent Web Sites: A Comparative Shopping Environment