Configuring Client Computer Identification
Every client computer must identify itself to participate in the network. The computer identification consists of the computer's name, an optional description, and the name of either the workgroup or the domain to which the computer belongs.
The computer name must follow the rules for NetBIOS names; it may be 1 to 15 characters long and may contain letters, numbers, or hyphens but no spaces or periods. For small networks, it's common to make the computer name the same as the username. For larger networks, you may want to develop a naming scheme that identifies the computer's location. For example, a name such as C-305 - 1 may be assigned to the first computer in Room 305 of Building C. Or MKTG010 may be a computer in the Marketing department.
If the computer will join a domain, you need to have access to an Administrator account on the domain unless the administrator has already created a computer account on the domain. Note that only Windows 2000, Windows XP, and Windows Server (NT, 2000, and 2003) computers can join a domain. (Windows 98 or 95 users can access the domain's resources by logging on to the domain as users, but domain computer accounts for Windows 9 x clients aren't required.)
When you install Windows on the client system, the Setup program asks for the computer name and workstation or domain information. You can change this information later, if you want. The procedure varies depending on whether you're using Windows XP or Windows Vista.
Configuring Windows XP computer identification
To change the computer identification in Windows XP, follow these steps:
-
Open the Control Panel and double-click the System icon to open the System Properties dialog box.
-
Click the Computer Name tab.
The computer identification information is displayed.
-
Click the Change button.
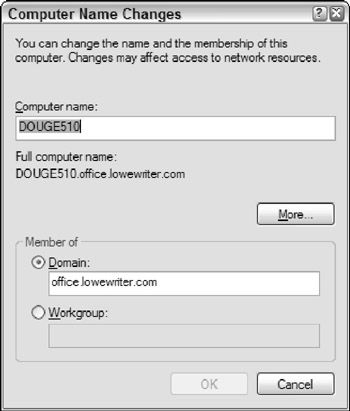
This step displays the Computer Name Changes dialog box, as shown in Figure 8-8.

Figure 8-8: The Computer Name Changes dialog box (Windows XP). -
Type the new computer name and then specify the workgroup or domain information.
Tip To join a domain, select the Domain radio button and type the domain name into the appropriate text box. To join a workgroup, select the Workgroup radio button and type the workgroup name in the corresponding text box.
-
Click OK.
-
If you're prompted, enter the username and password for an Administrator account.
You're asked to provide this information only if a computer account has not already been created for the client computer.
-
When a dialog box appears, informing you that you need to restart the computer, click OK. Then restart the computer.
You're done!
Configuring Windows Vista computer identification
To change the computer identification in Windows Vista, follow these steps:
-
Choose the Start button, and then right-click Computer and choose Properties.
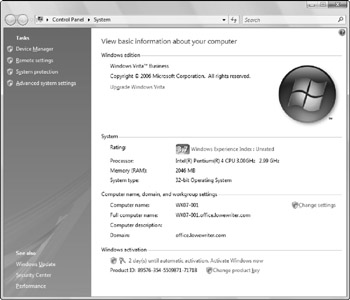
This step displays the System information window, as shown in Figure 8-9. Notice the section that lists computer name, domain, and workgroup settings.

Figure 8-9: The System Information window (Windows Vista). -
Click the Change Settings link.
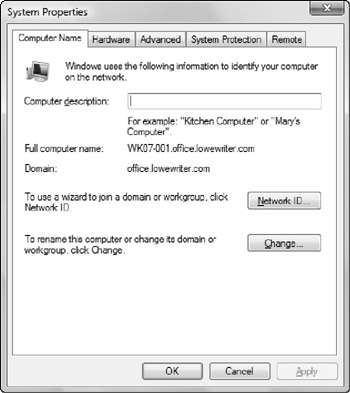
If a dialog box appears and asks for your permission to continue, click Continue. The System Properties dialog box then appears, as shown in Figure 8-10.

Figure 8-10: The System Properties dialog box (Windows Vista). -
Click the Change button.
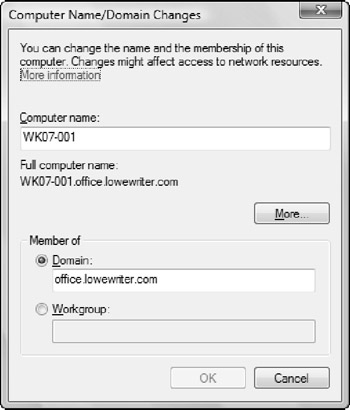
This step displays the Computer Name/Domain Changes dialog box, as shown in Figure 8-11.

Figure 8-11: The Computer Name/ Domain Changes dialog box (Windows Vista). -
Enter the computer name and the workgroup or domain name.
Tip If you want to join a domain, choose the Domain option button and type the domain name. To join a workgroup, choose the Workgroup option and type the workgroup name.
-
Click OK.
-
Enter the username and password for an Administrator account when prompted.
You're asked to provide this information only if a computer account has not already been created for the client computer.
-
When a dialog box appears, informing you that you need to restart the computer, click OK. Then restart the computer.
The computer is then added to the domain or workgroup.