Creating Themes
It would be quite boring if all web sites created with ASP.NET 2.0 used the same Themes. You have the choice, of course, to create your own Themes!
If you intend to use a newly created Theme globally for all the applications on your server, you can expand the list of global Themes. You just have to create a new subdirectory in the directory specified earlier. The name used later becomes the identifier of the Theme. Contrary to this approach, I recommend you create Themes exclusively for individual web sites and make copies available for other projects.
Creating a New Web Site Theme
You must create a new folder with the name "themes" in the root directory of your web site before you can apply a new Theme. Similar to the bin and code directories, this name is predefined. This fact can be visualized as well through a special icon in the VS .NET Solution Explorer. You must create another folder below the new directory if you want to create a new Theme. You can address the Theme across the chosen directory name later. For the purposes of this example, I've chosen HelloWorldTheme.
| Note | If you choose the same name for a local and a global Theme, the local one has priority, and you can't address the global one anymore. Using the same name will not cause an inheritance to occur. |
Now you create a text file named theme.skin within the newly created directory that later on carries the design templates for the controls. The name of the file is irrelevant, however. Only the ending, skin, is important. Microsoft even recommends creating a separate file for each type of control. Concerning the global templates, the developers didn't apply their own recommendations. I agree with this convention and think that a single file will do in general.
You can define the desired design templates within the file. To do so, you must write down an empty control definition including the runat attribute for each desired control type (for example Label, GridView, TextBox, and so on) and assign the properties you want to it. Please be aware that an ID should not be noted.
The content of the file may look like the example in Listing 9-2. Two controls (TreeView and GridView) are being formatted in this case. As you can see in Figure 9-3, the Theme applied to the previously used page is showing its effects.
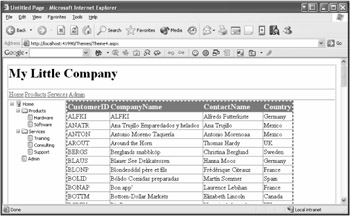
Figure 9-3: The same page shown earlier now uses a very special Theme.
Listing 9-2: Creating a Custom Theme
<ASP:TreeView runat="server" Font-Size="12" /> <ASP:GridView runat="server" BorderColor="Red" BorderWidth="3" BorderStyle="Dashed" > <HeaderStyle BackColor="Red" ForeColor="Yellow" Font-Size="15" /> <RowStyle ForeColor="Black" /> </ASP:GridView>
| Tip | Instead of creating the controls manually within the Skin file and adding the desired properties afterwards, I recommend using the Design view of VS .NET. After you've edited the control according to your needs, you can copy it out of the HTML source code and insert it into the Theme, deleting unnecessary properties such as the ID afterwards. |
Using Cascading Style Sheets
With the help of Themes, it's quite easy to replace CSS files. You can use their defined styles within the Skin file(s) as well as within ASPX pages to specify, for example, the view of headlines and text. If you want to integrate a new CSS file in your page, you only have to copy it to the corresponding Theme directory. The ASP.NET engine takes care of the rest.
I've created a file named styles.css for demonstration purposes and filled it with the following data:
body, td { font-family: Verdana; font-size: 11px; } h1 { font-size: 30px; color: blue; } The result is shown in Figure 9-4 as well as in the generated HTML source code of the page that automatically references the created file:
<html> <head > <title>Untitled Page</title> <style> ... </style> <link rel="stylesheet" href="Themes/HelloWorldTheme/styles.css" type="text/css" /> </head> <body>
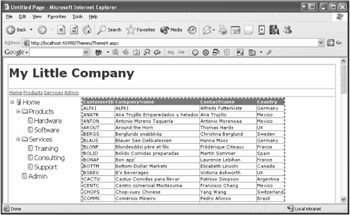
Figure 9-4: Using different stylesheet files with Themes is quite easy.
Creating Different Control Themes Called Skins
Up to now, I've shown only one Skin that has been defined for a control type in the examples. In reality, however, the controls of a type should often look a little different from each other. Therefore, you'll probably want to define additional Skins— apart from the so-called default Skins.
To differentiate between a default Skin and any number of additional Skins for a control type, you must assign them a unique identifier. For this purpose, you can use the SkinID property for the definition within the Skin file as well as later on when using the Skin within the page.
In Listing 9-3, I've enhanced the Theme of the preceding example as a test.
Listing 9-3: The Theme containing a Named Theme Called Skin
<ASP:GridView runat="server" Skin BorderColor="Black" BorderWidth="1" BorderStyle="Solid" > <HeaderStyle BackColor="Blue" ForeColor="White" /> <RowStyle ForeColor="Black" /> <AlternatingRowStyle BackColor="#BBBBFF" /> </ASP:GridView>
I've implemented another GridView on the test page next to the existing one. It's identical and uses the same source code. Only the SkinID property has been directed to the additional Skin. Figure 9-5 shows the differences caused by this action.
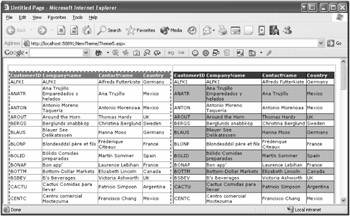
Figure 9-5: Two identical controls are now using different Skins.
<asp:gridview runat="server" autogeneratecolumns="False" datasource datakeynames="CustomerID" skin> ... </asp:gridview>
Disabling Themes
As an alternative to the implementation of an additional Skin, you have the option to switch off the use of Themes for controls. As a result, all controls offer a property named EnableTheming that is activated by default and can be deactivated if desired.
<asp:gridview runat="server" EnableTheming="false" ... </asp:gridview>
If you want to deactivate Themes for a complete page, you should apply the homonymous attribute of the @Page directive as follows:
<%@ page language="C#" EnableTheming="false" %>
EAN: 2147483647
Pages: 133