Creating a Personalized Web Site
Personalization is activated by default and is used for all authenticated users. Before using personalization, you must specify which data you would like to save individually for each user. The definition of such a profile takes place in the <personalization> section of the web.config configuration file. As shown in the following example, you may place individual properties here, such as a nickname. In principle, you can define as many profile properties as you want by simply using the corresponding <property> tags.
<?xml version="1.0"?> <configuration> <system.web> <personalization> <profile> <property name="Nickname" /> </profile> </personalization> </system.web> </configuration>
If you switch back to the source code of one of your pages after saving the configuration file, you can now call the IntelliSense window for this.Profile. You'll see that the property you defined a couple of seconds ago is already there. A corresponding typed class was generated dynamically from the defined profile, and then compiled and integrated into your web site's assembly. The local name of the class is HttpPersonalization. Its base class, called HttpPersonalizationBaseClass, is located in the framework.
You have two options to catch the current profile: either by using the object model of the current page or through the HttpContext class. In both cases, the personal data store is returned through a property called Profile (see Figure 7-1).

Figure 7-1: Any defined properties are available through a type-safe profile object.
Storing Data and Accessing the Profile
You may now access and start reading or writing to your defined properties without further ado. The data is saved and automatically made available with the user's next visit.
The example in Listing 7-1 is based on the user administration example of the last chapter. An input box appears in the protected area for the nickname of the authenticated user (see Figure 7-2). The name is saved to the profile with just a button click. With all subsequent calls of the page, the nickname will be read out of the profile again and assigned to the TextBox control as an initial value, even if the user closes the browser or logs on from a different computer.
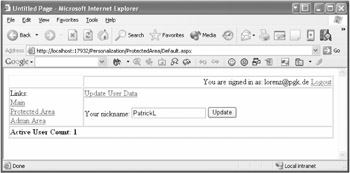
Figure 7-2: Profile data is automatically stored.
Listing 7-1: Accessing the Defined Profile Object
<%@ page language="C#" master="~/MasterPage.master" %> <script runat="server" language="c#"> void Page_Load(object sender, System.EventArgs e) { if (this.IsPostBack == false) { this.TB_Nickname.Text = this.Profile.Nickname; } } void BT_UpdateNickname_Click(object sender, System.EventArgs e) { this.Profile.Nickname = this.TB_Nickname.Text; } </script> <asp:content contentplaceholder runat="server"> <asp:hyperlink runat="server" navigateurl="UpdateUserData.aspx"> UpdateUser Data </asp:hyperlink> <br /> <br /> Your nickname: <asp:textbox runat="server"></asp:textbox> <asp:button runat="server" text="Update" onclick="BT_UpdateNickname_Click" /> </asp:content>
Gosh! But Where's the Profile Actually Stored?
Like many other infrastructure components of the latest version of ASP.NET, personalization is based on a provider model. ASP.NET ships with two providers, one for Microsoft Access and another for SQL Server. Although Microsoft Access is set as the default, I recommend using SQL Server, or at least it's MSDE version, for bigger projects.
In the last example, I worked with the default provider. The nickname is stored in the Microsoft Access database aspnetdb.mdb, which you already know from the previous chapter is as an instrument for saving specific data for users and roles. The profile-related information is saved in direct relation to the membership data. Figure 7-3 shows the corresponding tables in Microsoft Access. Here you can find the recently edited nickname as well.
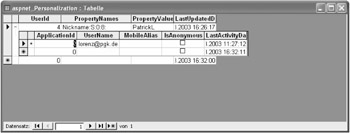
Figure 7-3: A Microsoft Access database is used to store profile data.
| Note | Instead of using the Membership Management system as shown in the present example, the personalization feature can automatically work together with any other authentication system—for example, Windows Authentication or .NET Passport. You may even use your own custom systems as long as they deliver a username via HttpContext.Current.User.Identity.Name. |
Accessing Somebody Else's Profile
Apart from access to the profile of the current user, you may also inquire about any other user. The HttpPersonalization class offers an instance method, called GetProfile(), to which the explicit user name is passed. With the help of the returned instance of HttpPersonalization, you can retrieve the data saved in the profile.
HttpPersonalization profile = this.Profile.GetProfile("Patrick"); string name = profile.Nickname; Even write access is possible. In this case, however, changes won't merely be transferred automatically but have to be saved explicitly by calling the CommitSettings() method against the underlying data source:
HttpPersonalization profile = this.Profile.GetProfile("Patrick"); profile.Nickname = "Mr. Ed"; profile.CommitSettings(); EAN: 2147483647
Pages: 133