Shooting HDR
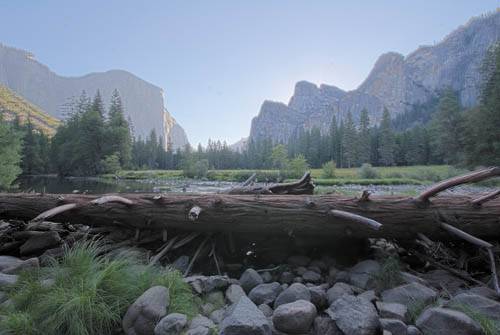
| At the end of Chapter 6, you were introduced to high-dynamic-range images, created using Photoshop CS2's Merge to HDR feature. Merge to HDR culls different tonal ranges from a selection of images that have all been shot with different exposures. These values are combined to create a single 32-bit image with a much wider dynamic range than you could ever shoot with a single exposure. As you saw, when the images are combined, the resulting picture pulls the highlight, shadow, and midtone details from the appropriate exposures. Obviously, if you don't have a good selection of source images to begin with, then your merge operations won't be as successful. Good HDR work, then, begins with good shooting. HDR shooting isn't difficult, but it can take some time. When should you shoot HDR?Any time you encounter a scene with a tremendous range from bright to dark, you've found a good candidate for an HDR image. You want to use HDR imaging for those scenes that go beyond the dynamic range that your camera can capture. You'll usually be able to determine this simply by looking at the scene, but shooting a test shot and then reviewing it on your camera and consulting your histogram is also a good HDR test. If you can't get a shot that gives you a good shadow exposure without blowing out your highlights, or that gives you a good highlight exposure without turning your shadows to complete black, then you probably have a good candidate for HDR. What you need to shoot HDRObviously, to shoot HDR you must have a camera that can shoot raw files. You're going to need to perform some precise exposure adjustments when shooting HDR. Though you can perform these adjustments with an exposure compensation control, you ideally want an aperture priority or manual mode on your camera. If you don't have these features, don't give upit's still worth trying HDR using your camera's exposure compensation feature. You'll need a camera that can display a histogram, and you'll need a fair amount of storage space. You'll be shooting anywhere from 3 to 10 exposures for a single HDR image, and getting it right can be complicated, so you'll probably want to make several attempts. This means that you may be taking up to 50 raw shots to capture a single scene! I have not found it possible to shoot usable HDR source images without a tripod. Though there are people who claim to be able to do it, I find that my images always suffer from artifacting (Figure 7.17). If you are going to try shooting HDR without a tripod, then you'll at least want to use lenses that feature some stabilization or vibration dampening. If you don't want to carry a full-size tripod, consider a small, micro-tripod. Though not as versatile as a regular tripod, they're easier to carry and provide at least some measure of stability. Figure 7.17. I tried to shoot this HDR scene handheld using exposure compensation and my camera's drive mode. Even with a lot of effort to get the source frames aligned, my image is still plagued by weird artifacts brought on by misregistration of the source images. In particular, note the weirdness around the tops of the cliffs and the trees.
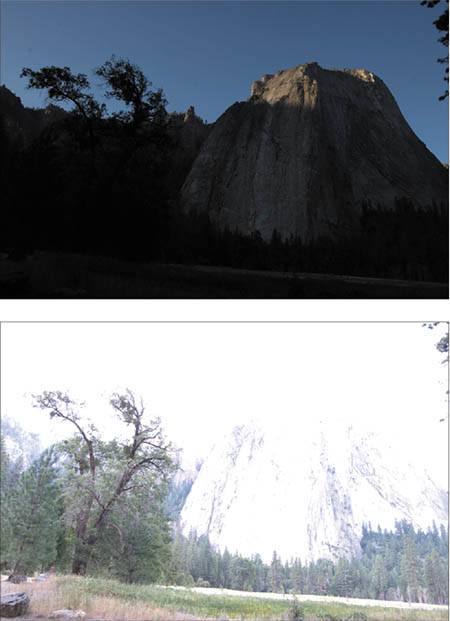
Because you don't want your camera to move at all between shots, it's best to handle it as little as possible while shooting. you'll find a remote control, either wired or wireless, to be a very important HDR accessory. If you don't have one, then you can use your camera's self-timer feature. Some of your exposures may be very long, so if you're using an SLR camera, a mirror lock-up feature can be handy. Framing your shot and preparing to shootFrame your HDR shot just as you would any other scene. Be aware that moving subjects such as running water or blowing trees can create problems when you perform your final merge, so you may want to frame these out or minimize them as much as possible. Moving people or vehicles are pretty much impossible to shoot with HDR, so you'll also need to frame these out or wait until they've left your scene. Your goal is to come away from your scene with a series of exposures, one stop apart, that span the darkest to lightest parts of your image. After framing your shot, your next step is to determine what that range of exposures should be. There are many ways of changing exposure on your camera. However, you ideally want to make your exposure changes in a fairly controlled fashion. You don't want your images to be shot with varying apertures lest the resulting pictures have varying depths of field. So it's best to make your exposure changes by varying the shutter speed. You can use exposure compensation to make these changes, but when over- or underexposing using exposure compensation, you have no control over how the camera achieves the change. For some changes, the camera may alter the aperture rather than the shutter speed. Point-and-shoot camerasIf you're using a small point-and-shoot camera that doesn't have any other manual controls, then exposure compensation will be your only exposure option. The good news is that your small camera probably can't register a significant change in depth of field anyway. However, your exposure compensation control probably allows you only a two-stop range above and below the normal metering. This makes your shooting task fairly simple, though it doesn't afford you a lot of flexibility. If this is your situation, you can skip ahead to the next step. Digital SLR camerasIf you're using a digital SLR camera with priority and manual modes, then you can shoot a much broader range than the four stops provided by exposure compensation. Your first goal is to determine the brightest and darkest exposures that you should shoot. First you need to pick an aperture. If you're shooting in daylight, then stick with an aperture somewhere in the middle of your camera's aperture range, as this will afford you good depth of field and usually offer the lens' greatest sharpness. In bright daylight, f/16 is usually a good choice. If you're shooting in low light, then you may want a slightly larger aperture to shorten your shutter speed. Switch your camera to manual mode and set your chosen aperture. On most cameras, your shutter speed will default to whatever your last manual operation was. Thus, your current shutter speed may be very wrong for your situation. When you meter your scene, your exposure compensation display should indicate whether your current settings are over- or underexposed. Change the shutter speed until the display says that you have the correct exposure for your chosen aperture. Now you want to determine the lowest exposure that you need for your scene. Adjust your shutter speed down by three stops. Three stops may not be your final choice, but it's a good starting point for experimenting. Shoot an image with a three-stop underexposure and then look at its histogram. Your goal is to find an exposure that underexposes the brightest elements in your scene. This way, as you work up the exposure scale, you will be getting good coverage of your scene's highlight areas. Usually three to four stops underexposed is all you'll need, but your histogram should give you a good indication of whether you need more or less. If the brightest areas in your scene are falling in the middle of your histogram or a little lower, then you've found a good bottom-end exposure. If they're coming in above this point, then try another test one stop lower. If the whole image is completely black, then this is more underexposure than you need, so you should dial the exposure back up and test again. Once you've found what seems to be a good point, note the shutter speed and then go through the same test with overexposing. This time, you're looking for an exposure that will leave the darkest parts of your scene somewhere in the middle of your histogram. This will probably also be around three to five stops over what your meter said was a correct exposure. When you find this point, note the shutter speed (Figure 7.18). Figure 7.18. When selecting an underexposure, you're trying to ensure that you capture the very brightest parts of your scene. Similarly, your selected overexposure will serve to capture detail from the darkest parts of your scene.
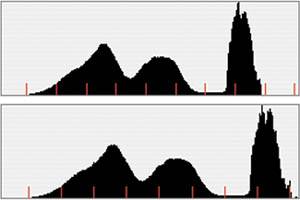
When you're finished, it's a good idea to delete the test images that you've taken, as they can confuse things when you get back home and begin sorting out which images go together. Shooting your sceneNow that you know the brightest and darkest exposures that you need, you're ready to shoot your full range of images. Set your camera on the dark exposure that you determined in the last step. Because you want all of your exposures to be perfectly registered, it's best to handle the camera as little as possible. If your camera has a self-timer, use it for your shots. Better yet is a remote control that lets you trip the shutter without touching the camera. As mentioned earlier, if you're using a digital SLR camera, activate its mirror lock-up feature if it has one, to reduce camera vibration. Obviously, if you're working in rapidly changing light conditions, you need to move as quickly as possible. Wherever you're shooting, though, keep a close eye on your scene. Make sure that no birds are flying through and no people are walking by, or that any other moving elements have entered the frame. You don't want anything in one frame that won't be in all of the others. Shoot your image and then move your shutter speed up one stop. Shoot your next image and then adjust your shutter speed again. Keep adjusting by one stop and then shooting until you've reached the upper exposure that you determined earlier. Shooting with aperture prioritySince your goal is to preserve the same aperture through all of your shots, you can use your camera's aperture priority mode instead of manual mode. Set it on the aperture that you want and then use your exposure compensation control to over- or underexpose. However, this approach will limit you to the four stops of range provided by your camera's exposure compensation control. Reviewing your shotsAfter you've worked through your entire intended exposure range, take a moment to double-check your images. Consult their histograms and see if your initial assessment of exposure range was correct. Obviously, if you've shot more than you need, that's okay, as you can simply work from the middle images. I usually shoot two or three batches of images, just in case there was a bird flying through that I didn't notice, and to protect against any accidental movements of the camera. In addition, I usually shoot an empty shotmy hand or the lens capbetween each batch, to help me sort the separate batches later. How many shots do you need?Unfortunately, there's no way to tell for sure whether you have the source files you need until you get back to your computer and run the images through the Merge to HDR function. However, with a little experience, you'll get a better sense of how many shots and how much range you need to cover your scene. If exposure compensation is your only exposure control, then you'll have a maximum of five source images (2, 1, 0, +1, and +2). This is often plenty, and for many scenes you can even make do with just three shots. Some scenes may need more underexposure than overexposure (or vice versa), depending on their content. Because different scenes require different amounts of source data, when you're first starting out with HDR, it's best to play it safe and overshoot. If you shoot more frames than you need, you can always deactivate them in the Merge to HDR window. Once you're home, how do you know if you have what you need? Obviously, just trying a merge operation is the easiest way, but you can also get a good idea of how good a shooting job you've done by looking at the histogram provided in the Merge to HDR window after Photoshop performs its initial merge (Figure 7.19). Figure 7.19. The upper Merge to HDR histogram shows a merge that has less highlight data than the image represented by the lower histogram. Though the upper merge will still provide a lot of latitude, the situation could have been better if I'd shot a few more exposures.
Obviously, the more data you have, the more latitude you'll have for editing. |
EAN: 2147483647
Pages: 76