Making Localized Corrections
| Sometimes, you need to create edits that apply to only specific areas of your image. While Camera Raw doesn't allow you to do this (although you can perform localized brightness changes using the Curve tab), here are some quick ways to make selective edits in Photoshop and Photoshop Elements. Adding a mask to an adjustment layerYou've already seen that you can apply Levels, Curves, and Hue/Saturation adjustments using Photoshop's adjustment layers (Elements users don't have access to Curves adjustment layers). Adjustment layers let you apply these types of edits without altering your original image data. They also allow you to go back later and tweak your adjustments. Adjustment layers provide another advantage over the regular Levels and Curves dialog boxes. Every adjustment layer includes a built-in layer mask, which lets you control which parts of the image the adjustment affects (Figure 6.40). Figure 6.40. In Photoshop, all adjustment layers include a layer mask, which you can use to constrain the effects of the adjustment to particular parts of your image.
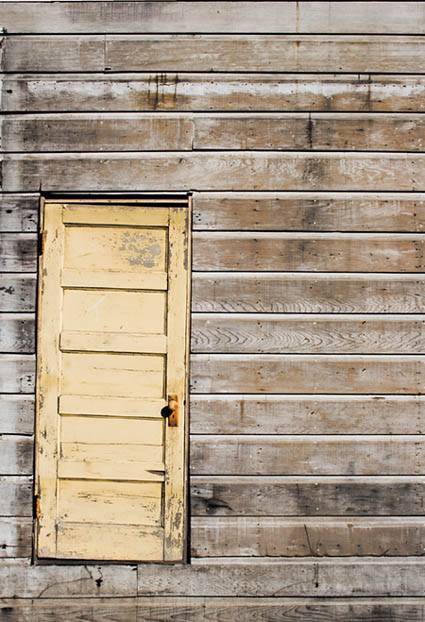
Add an adjustment layerFigure 6.41 shows an image that has already been processed by Camera Raw. Though the contrast is already fine, let's add some saturation to only the door, leaving the wall as it is. Figure 6.41. This image has already been processed by Camera Raw. Now we want to add saturation to only the door. In Camera Raw, the Saturation slider affects the whole image.
You begin by creating a Hue/Saturation adjustment layer and configuring it to increase the saturation (Figure 6.42). The adjustment layer applies its saturation increase to the entire door image, boosting the saturation in the door as well as the wall. Figure 6.42. We begin by creating a Hue/Saturation adjustment layer and dialing in the saturation boost that we want. Right now, the entire image is being saturated.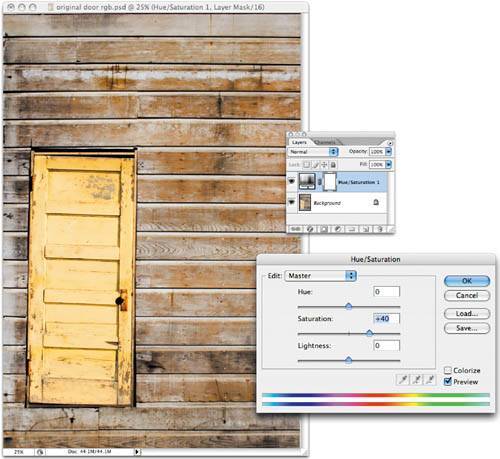 TIP If you're not sure how to create an adjustment layer, see Figure 3.29 in Chapter 3. On the Layers palette, note the small layer mask thumbnail in the Hue/Saturation layer. It is currently completely white, indicating that the layer mask is empty. Because there's no masking information, the effect of the layer mask is applied to the entire image. Click the layer mask thumbnail to select it. Now any painting operations that you make will affect the adjustment layer's layer mask rather than the image itself. Paint a layer maskSelect the Paint Brush tool and set the foreground color to black. Begin painting on the wall areas of the image, and you'll see the saturation effect disappear. In addition, on the Layers palette, the layer mask thumbnail will show the areas that you've painted (Figure 6.43). Figure 6.43. By painting in the adjustment layer's layer mask, we can control which parts of the image are affected by the adjustment layer. Here, you can see the incomplete mask on the Layers palette and the resulting partially saturated image.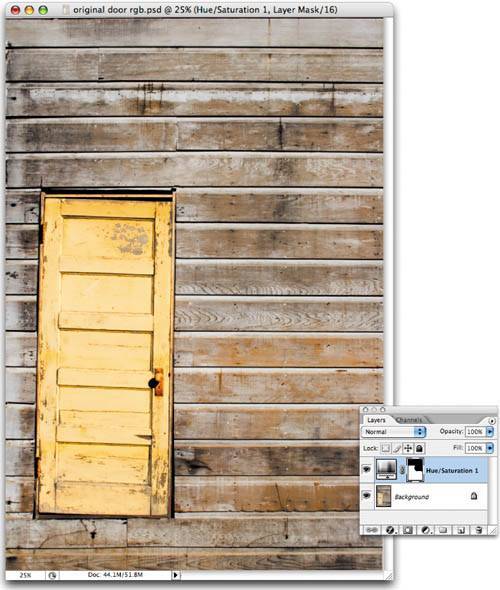 Layer masks work just like a stencil. Anywhere you paint with black will be protected from the effects of the associated adjustment layer. Anywhere you paint with white will allow the effects of the layer mask to fall through to your underlying layers. If you paint with shades of gray, then those parts of your layer mask will be semi-opaque, allowing varying degrees of your adjustment layer's effect to pass through. If you accidentally paint black into an area that you don't want to have masked, you can simply switch to white and paint areas back to normal. You can use any of Photoshop's painting tools to paint a layer mask. To fill large areas of the mask, try using Photoshop's selection tools along with the Paint Bucket tool or Fill command. For this image, you don't need to be too concerned about having a perfect masking border around the door. If a little bit of the saturation boost spills into the wall, that's okay. Use a brush with a very soft edge, and you'll automatically get a smooth masked-to-unmasked transition around the door. Refine the saturation settingsAfter painting the mask, I decided that my initial saturation boost settings weren't quite high enough, so I double-clicked the adjustment layer on the Layers palette and dialed the Saturation setting up to 50 (Figure 6.44). Figure 6.44. With the final mask, only the door receives a saturation boost.
Adding masks to image layersYou can add a layer mask to any type of image layer and get the same type of mask painting features that you have with adjustment layers. This means that you can easily create composites of different images by stacking images and then painting a mask on the upper image so that only certain parts of it are visible. For example, consider the picture in Figure 6.45. This scene had a dynamic range way beyond what my camera could capture. Trying to find an exposure that could capture both the dark shadows and the bright sky was impossible. In addition, some of the fog in the sky is clipping and has lost highlight detail. Figure 6.45. Because this scene had more dynamic range than the camera could capture, it was impossible to properly expose both the bright sky and the shadowy foreground. This problem can be fixed with a simple compositing operation.
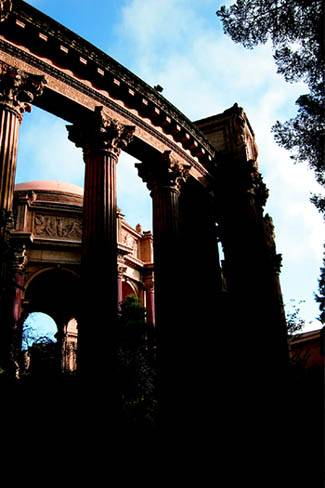
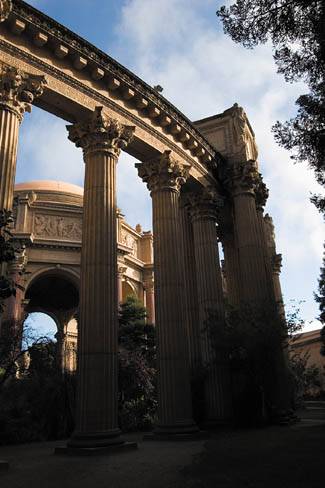
As you saw earlier in this chapter, we can use a negative Exposure adjustment in Camera Raw to recover the lost highlights in the fog and achieve a better rendering of the sky (Figure 6.46). Figure 6.46. We begin by processing the file in Camera Raw to recover the highlights in the fog and produce an image with a well-exposed sky.
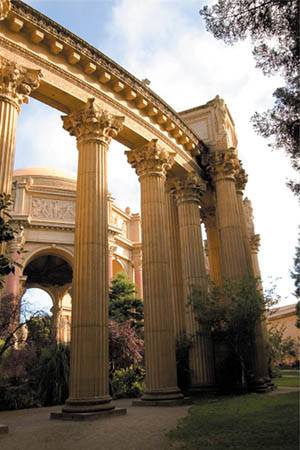
Obviously, doing this makes the rest of the image even darker than before. In Camera Raw, we could try to use the Brightness slider to brighten the shadow details, but the negative Exposure adjustment was so extreme that there's not much we can do to brighten the rest of the image at all, let alone to brighten it without introducing noise and posterization. For Figure 6.47, I went back to the original raw file and processed it again, but this time I concentrated on getting a good exposure for the midtones and shadows, without worrying about the sky at all. Because I didn't need to make a negative Exposure move to save the sky, I was able to make a slight positive move to brighten a lot of the midtone and shadow areas. Figure 6.47. Next, we use Camera Raw on the same raw file to produce a second image with a well-exposed foreground.
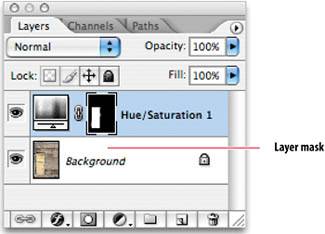
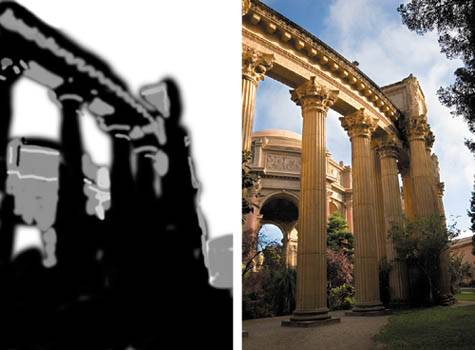
Sandwich the imagesUsing layer masks, it's a simple matter to composite one image on top of the other to arrive at a final image that contains the well-exposed sky from Figure 6.46 and the well-exposed shadows from Figure 6.47. We begin by opening both images in Photoshop or Photoshop Elements. We start with the image with the properly exposed sky and choose Select > All to select the entire image and then Edit > Copy to copy the image. Next, we go to the second image and choose Edit > Paste. We now have a document with two layers, with the dark, properly exposed sky layer on top (Figure 6.48). Figure 6.48. After copying and pasting the first image into the second, we end up with two layers: one containing the well-exposed sky, and a lower layer containing the well-exposed foreground.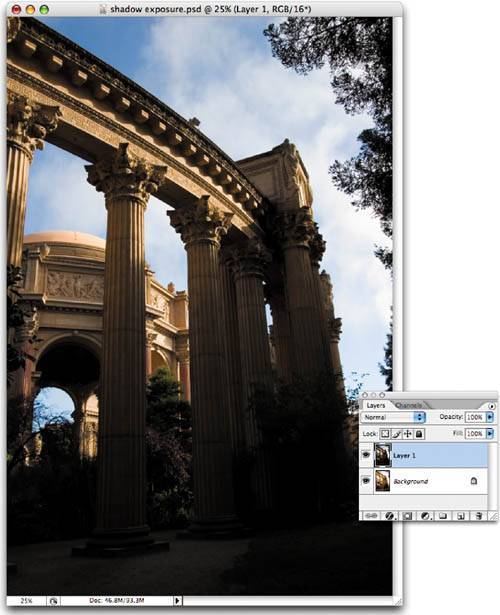 Now we'll add a layer mask to the upper layer so that we can mask out parts of it to reveal the better-exposed image that lies beneath. In Photoshop, with the upper layer selected on the Layers palette, we select Layer > Layer Mask > Reveal All. This adds an empty layer mask to the upper layerempty meaning that it is completely white, which leaves the entire upper layer visible. We click the Layer Mask icon to select the layer mask and begin painting with black. Wherever we paint, we're indicating that those pixels of the upper layer should not be visiblewe want them completely masked out (Figure 6.49). Figure 6.49. After adding a layer mask to the upper layer, we can paint out the areas of the upper image that we don't want to see, revealing the well-exposed lower layer. Here, you can see the mask partially completed. Some of the darker columns are still visible.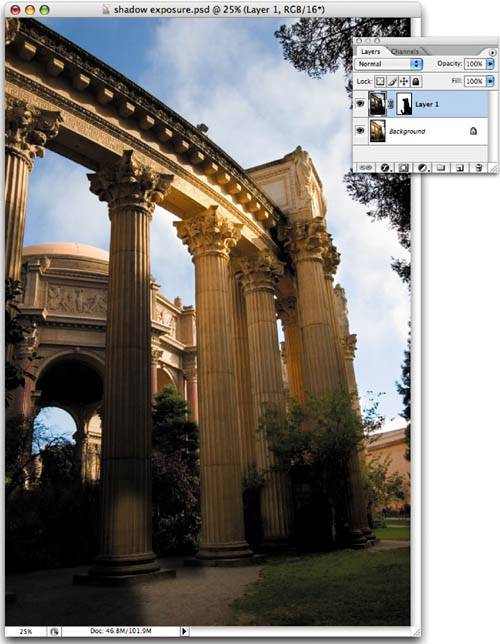 Painting the mask goes very quickly, because we can grab a big brush and cover most of the image with a few strokes. Obviously, painting around the tree would be extremely tedious, but here, we'll make it completely silhouetted, so we don't worry about masking it at all. We can use a soft-edged brush for painting around the edges of the building that butt up against the sky. These areas don't need to be perfectly masked, because any dark areas left on the top of the building simply look like shadows. With the mask completed, we have a good composite that presents an image with a lot of dynamic range (Figure 6.50). Figure 6.50. With the mask completed, we have an image with a lot of dynamic range. Both the sky and the darker shadows are well exposed and visible. On the Layers palette, you can see the final layer mask that makes the image possible.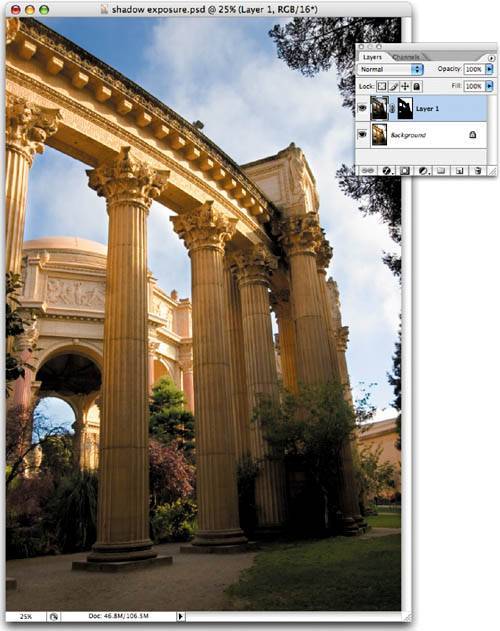 Improve the maskWhile this is a perfectly reasonable composite, we can make a more dramatic image by varying the layer mask to leave some areas darker than others. Painting with black or white reveals either one layer or the other. But by painting into the mask with shades of gray, we can cause a blending of the two layers. This allows us to leave some of the shadow areas a little darker, to create more contrast and contour. The final image is shown in Figure 6.51 along with the final layer mask. Figure 6.51. By painting into the mask with gray, we can combine parts of the two layers, rather than replacing one with the other. This allows us to paint in shadows to give the image a little more contour. Shown here is the final layer mask, along with the final image.
This image was fairly easy to composite because there were no tricky, fine details that had to be masked. Wisps of hair, semitransparent objects, foliageanything with complex detailscan be very difficult to mask, so using a composite for these difficult dynamic-range situations is not always possible. Fortunately, as you'll see in the next section, raw provides an alternative. |

EAN: 2147483647
Pages: 76