Getting Started
| Raw workflow begins with the transfer of files from your camera to your computer. This is really no different than when you work with JPEG files, and just as with JPEG files, you can use your camera's USB cable to move images directly out of your camera, or you can use a media card reader to transfer the contents of your camera's storage card to your computer. As you probably already know from shooting JPEG, your camera labels images with sequential numbers. Raw files follow this same scheme, but instead of a JPEG extension, they have some kind of raw format extension (.CRW or .CR2 for Canon, .NEF for Nikon, .ORF for Olympus, .RAF for Fuji, .SRF for Sony, .MRW for Minolta, .PEF for Pentax, and so on). Some cameras provide an option for simultaneously shooting raw and JPEG files. In this case, you'll find two files with the same file name but with different extensions. With JPEG files, you may be used to seeing image previews in various places throughout your systemthumbnail icons on files, previews in Open dialog boxes, and so forth. Unfortunately, with raw files, you're not going to see as many of those (or any, depending on your operating system). When your camera shoots raw, it generates a small preview thumbnail and embeds that in the file. This thumbnail is what you see when you look at the image on your camera's LCD monitor. Unfortunately, because there's no raw format standard, extracting those thumbnails can be complicated, so you probably won't see a lot of raw image previews throughout your system. Opening a raw fileOpening a JPEG file is pretty simple. Double-click the file, and your computer will open it using a JPEG-compatible application. Opening a raw file can be a bit more complicated. First, if you're looking at a directory full of raw files with camera-generated names and no thumbnails or previews, how do you know which file to open? If your camera can shoot raw and JPEG files simultaneously, then you can simply browse through the JPEG files to find the image you want and then open the corresponding raw file. The downside to this is that shooting two copies of every image will take up much more space on your camera's storage card and possibly slow down your camera's ability to shoot bursts of images. Fortunately, if you're using Photoshop Elements 3 or 4 or Photoshop 7, CS, or CS2, Adobe has provided a better solution. Using the File Browser and BridgeIn Photoshop 7, Adobe introduced the File Browser to provide an easier way to find and open images. The File Browser is almost like a separate application that lives inside Photoshop. In Elements 3, you access the File Browser by choosing File > Browse Folders. In Photoshop 7 and CS, you choose File > Browse. In Photoshop CS2, Adobe replaced the File Browser with a separate application called Adobe Bridge. Bridge provides all of the same functionality as the CS File Browser, but offers additional features to facilitate batch processing, working with stock photo agencies, and moving photos between Photoshop and other Adobe applications such as Illustrator and InDesign. You access Bridge from within Photoshop CS2 by choosing File > Browse, or because it's a stand-alone application, you can simply launch Bridge like you would any other program. For the basic browsing, sorting, viewing, and opening of files, Bridge and the File Browser are almost identical, and for the tasks you'll be performing in this book, either will work fine. We'll be using Adobe Bridge for our screenshots and examples. If you're using the Elements 3 or CS File Browser, you'll see some slight interface variations, but these shouldn't affect your ability to follow along. Bridge and the File Browser both display a single window divided into several panes (Figure 4.5). In the upper-left corner, you'll find the Folders pane, which provides a directory browser that lets you select the folder you want to view. The large pane to the right displays thumbnails of all of the images in the selected folder. Click an image, and you'll see a larger preview in the Preview pane. Finally, all of the image metadata is displayed directly below the Preview pane. Metadata is simply the additional information that's stored with each image. From the date and time the image was shot, to the exposure settings and white balance information, the Metadata pane shows just about everything you'd ever want to know about your image. Figure 4.5. Adobe Bridge, which is bundled with Photoshop CS2, serves as a file browser as well as a host application for Camera Raw. The File Browser included in Elements 3 or Photoshop CS provides nearly identical functionality.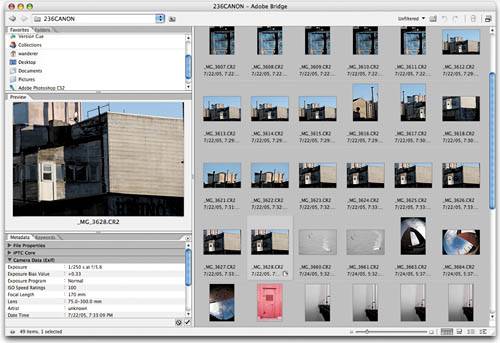 You can resize the panes by dragging their borders, so you can choose to view more thumbnails, see a bigger preview, or view a longer list of metadata. As you'll see in the next chapter, you can also edit the metadata of an image, allowing you to protect your images with copyright notices and add keywords and descriptions to facilitate searches. NOTE The Elements and Photoshop CS File Browser has its own separate menu bar that's contained within the File Browser menu. In the rest of this book, when we refer to selecting something from, for example, the View menu in the File Browser, this means the View menu located on the File Browser menu bar, not the View menu in Photoshop. Working with Adobe Photoshop Elements 4 and OrganizerFor Photoshop Elements 4, Adobe created a new application called Organizer (Figure 4.6). Organizer can automatically find all of the images on your computer, and it provides you with several ways to search and sort them. Organizer offers almost all of the same functionality as Bridge and the File Browser but packs a different interface. Figure 4.6. The Adobe Photoshop Elements 4 Organizer provides most of the same functionality as the Elements 3 Browser and Adobe Bridge.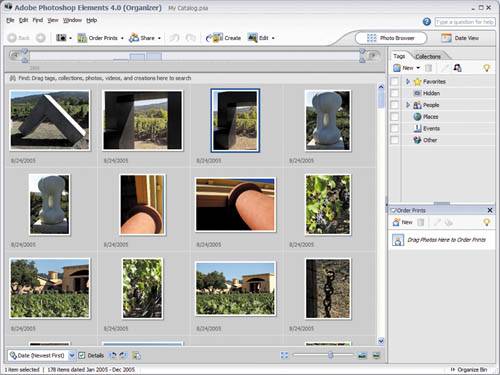 Organizer keeps your images in an internal catalog that you can browse in the main preview window. You can add new images by selecting from the File > Get Photos menu. From there, you can choose to import from your camera or card reader, or from a scanner or mobile phone, or from a directory of images that are already on your computer. You can control the size of the thumbnails in the thumbnail view by using the small slider at the bottom of the Thumbnails pane. You can also view images by date, by simply clicking the Date View icon on the Organizer toolbar. As with Bridge and the File Browser, you can edit the metadata of an image using Organizer. Simply right-click an image thumbnail and select Show Properties. This will bring up the Properties pane, which provides access to a number of metadata tags. We'll explore metadata in more detail later. Browsing for filesUsing the Folders pane at the upper left of the Bridge/File Browser window, you can easily navigate your entire system to find the folder that contains the raw files that you're looking for. The Folders pane provides you with a hierarchical view of all of the volumes and directories on your computer. If you single-click a folder, its contents will be displayed in the Thumbnails pane, as well as in list view in the Folders pane. To dig deeper into your directory structure, you can click subfolders in either the thumbnails view or the Folders pane. Finally, clicking an image will display a larger preview image in the Preview pane, as well as all of the image's metadata in the Metadata pane. To navigate back up your directory structure, you can either click directories in the directory tree in the Folders pane or use the pop-up menu above the Thumbnails pane (Figure 4.7). Figure 4.7. In Bridge, you can navigate up from the current directory by using the pop-up menu and Go Up button located above the Thumbnails pane.
If you're using Bridge, then you'll also have access to the Favorites pane, which sits right next to the Folders pane. From the Favorites pane, you can view the Bridge Center, a sort of centralized command post that lets you quickly navigate through recent folders and documents, as well as to RSS newsfeeds on the web (Figure 4.8). Figure 4.8. In addition to the Folders pane, Bridge provides a Favorites pane that gives you a place to store folders that you visit regularly. It also provides access to the Bridge Center, a one-stop repository of all of your recently opened documents, with a built-in RSS reader to keep track of your favorite photography sites.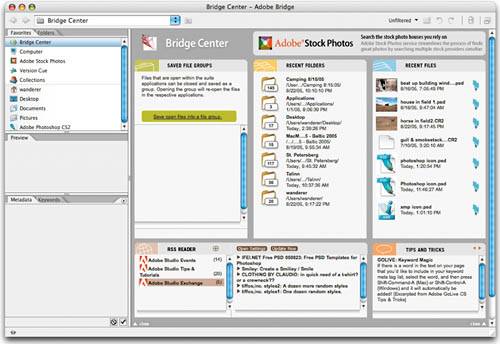 The Favorites pane also provides access to Adobe's stock photo service and to Version Cue, a tool for collaborative project management that we won't be covering in this book. One of the handiest features of the Favorites pane is the ability to drag a folder from the Thumbnails pane into the Favorites pane to create a shortcut. This allows you to quickly create single-click access to any number of folders on your system. Finally, the Favorites pane also provides access to any collections you have stored, something we'll talk about more in the next chapter. If you're using Organizer, then you don't have to concern yourself with directories, as Organizer simply displays a directory of all of the images that you've ever handed to it. Viewing raw thumbnailsThe Adobe browsers can read all of the same file formats that Photoshop can read. So in addition to Photoshop format documents, they can also show you thumbnails of TIFF files, PICT and BMP files, JPEG and GIF files, and files in many other formats. Most important for this discussion, though, is the fact that the browsers can display thumbnails of your raw images, making it simple to find the file you want to open. When you first view a folder full of images in the browsers, you'll see the camera-generated thumbnails that are embedded in each file. As soon as the browers display these, though, they will begin to generate new thumbnails. Camera-generated thumbnails are intended to be quick references that look good on your camera's LCD screen. Camera Raw slowly replaces those thumbnails with new thumbnails that it generates from the raw image data in the file. There's no single, "correct" interpretation of a raw file, and the thumbnails generated by the Adobe browsers are not meant to create great-looking images. Instead, Camera Raw simply applies some default parameters to the raw data to come up with a conversion that displays as much of the captured image as possible. Therefore, Camera Raw's thumbnails may not actually look that great. Don't panic if your raw files look lousy in the browser! As you'll soon see, they can be quickly and easily processed into something that looks much better (Figure 4.9). Figure 4.9. Adobe's browsers initially display the thumbnail that's embedded in your raw file. After these are displayed, the browsers build new thumbnails that present a more accurate view of the extent of the data contained in your file.
If you're looking at a folder that contains a lot of images, it may take a while for the browser to build all of its thumbnails (performance will vary depending on your computer's speed, of course). The Adobe browsers provide a status display at the bottom of the window that keeps you updated as to which image it's currently processing (Figure 4.10). If you click an image to view a preview, then the browser will immediately process an update preview for that image, if one isn't available. Figure 4.10. Both Bridge and the Elements 3/Photoshop CS File Browser provide a status display that indicates which thumbnails are being constructed.
TIP If you already know which image you want to open, you can skip the whole browser step and simply choose File > Open in Photoshop. This opens the image in Camera Raw just as if you'd selected the file from the browser. Opening an imageWhen you've found the image that you want to process, double-click it. If it's a "regular" file such as a Photoshop, TIFF, or JPEG file, it will open in Photoshop. If it's a raw file, though, it will open in Camera Raw. Now your serious work begins. If you're using Organizer, select the raw file you want to open and then choose Edit > Go to Standard Edit, or press Ctrl-I. |

EAN: 2147483647
Pages: 76