Understanding Web Part Pages
A Web Part Page is a special type of page on a SharePoint site that contains one or more Web Parts. A Web Part is an independent component that can be reused, shared, and personalized by all users who have permission to access it. Web Parts are the basic building blocks of a Web Part Page; each Web Part occupies its own rectangular area within the page.
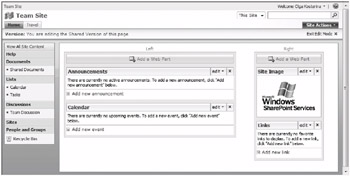
For example, the home page of a newly created team site contains four Web Parts. Three of them display the default lists: Announcements, Calendar, and Links. The fourth Web Part displays a Windows SharePoint Services logo.
Web Part Pages often contain several Web Parts that can be connected together if necessary. By using Web Parts, you can organize disparate information and consolidate data-such as lists and charts-and Web content-such as text, links, and images-into a single Web page.
For more information on Web Part Pages, refer to Chapter 15, “Working with Web Parts.”
The Links Web Part can prove to be particularly useful when you’re considering making the navigation of your site easier. For example, you can add links to the Links list that are displayed within the Links Web Part.
For more information on how to add items to a list, refer to Chapter 4.
In this exercise, you will modify the title of the Links Web Part on the home page of the team site.
OPEN the SharePoint site home page, such as http://wideworldimporters. If prompted, type your user name and password, and then click OK.
BE SURE TO verify that you have sufficient rights to modify the Web Parts. If in doubt, see the Appendix on page 435.
1. From the Site Actions menu, choose Edit Page.
The page is displayed in the Edit mode: the Web Parts on the page are shown in the two rectangular zones with the light blue background. In addition, an orange bar is displayed on top of each Web Part.

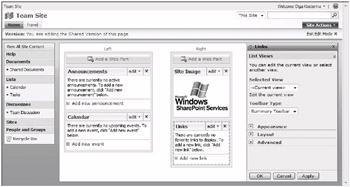
2. In the Links Web Part, open the Edit menu located at the top left of the Web Part and choose Modify Shared Web Part.

The Links Web Part is displayed with the orange dashed line surrounding it. In addition, a Web Part tool pane is displayed on the right of the browser window.
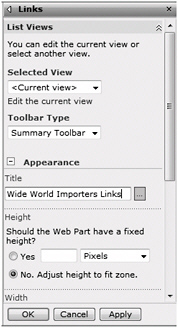
3. In the Web Part tool pane, open the Appearance area by clicking a plus sign (+) to the left of it.
4. In the Appearance area, in the Title box, delete the current Web Part title Links and type the new title Wide World Importers Links. Leave all other settings unchanged.

5. Click Apply. Verify that the new title is displayed in the Web Part title bar.
6. Click OK in the Web Part tool pane to confirm that you’ve finished editing this Web Part.
7. At the top right of the home page, below the Site Actions menu, click Exit Edit Mode.
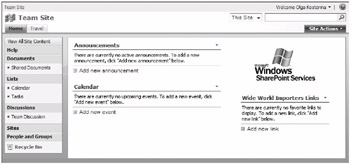
The modified Web Part is displayed on the home page.

CLOSE the browser.
EAN: N/A
Pages: 201