Understanding the Home Page of a Meeting Workspace
Once you have created a Meeting Workspace, you can familiarize yourself with the home page layout. The first obvious difference on a Meeting Workspace is the use of a second row of tabs, called Pages. These are included in addition to the top link bar found on all sites in Windows SharePoint Services. You can manipulate these Pages by using the Add Pages and Manage Pages options on the Site Actions menu. The exercise at the end of this section will focus on the Page tabs.
The second noticeable difference is that there isn’t a Quick Launch, which also means that the common functionality found on the Quick Launch must be found elsewhere. The Create option is also missing from the Site Actions menu. The following table should help you find links on a Meeting Workspace that are exposed by using the Quick Launch and Site Actions menu on the home page of a typical Team Site.
| Common Link | Meeting Workspace Location |
|---|---|
| View All Site Contents | Choose Site Libraries and Lists from the Site Administration group on the Site Settings page. |
| People and Groups | Choose People and groups from the Users and Permission group on the Site Settings page. |
| Recycle Bin | Unfortunately, the Meeting Workspace doesn’t have a user interface option on the home page to access the Recycle Bin (see the note following the table for another option). So, you must replace the default.aspx in the address bar with _layouts/re-cyclebin.aspx to undo an errant delete. |
| Create | Choose Site Libraries and Lists from the Site Administration group on the Site Settings page and then choose the Create new content link. |
| Tip | Clicking the name of any default Web Part (Objectives, Agenda, Attendees, or Document Library) takes you to that list’s default list view. From any list view, you can find the familiar View All Site Content and Recycle Bin links in the left nav. You can use these instead of the links in the above table. |
The home page of a basic Meeting Workspace also contains four Web Parts.
-
One that displays the details in the Objectives list,
-
One for the Attendees list
-
One for the Agenda list
-
One for a document library
These four items apply to every meeting. A meeting should typically have at least one objective as well as an agenda to inform people about the meeting. The Meeting Workspace is organized in a way that makes it easy for the organizer to communicate their reason for holding the meeting. Also, there should typically be a list of meeting attendees. The document library does not necessarily need to be used, but it is a convenient place to store documents such as information that attendees might need to read before the meeting, meeting minutes after the meeting concludes, or Microsoft Office PowerPoint presentations used during the meeting. At the top of the page, the date and time of the meeting as well as the location (if specified) is found, which can be useful information.
If you create a Meeting Workspace from a recurring event (as in the following exercise), additional information is provided on the Meeting Workspace page. On the left side of the page is located a list of dates that represents each instance of the recurring meeting. Each dates has its own virtual Meeting Workspace page associated with it, enabling you to establish different objectives, agendas, attendees, and documents for each specific instance of the meeting. For example, the Public Workshops meeting presents a different topic each month, so it is sensible to post different objectives, agendas, attendees, and documents for every monthly event.
In this exercise, you will add another Page to the Meeting Workspace for use later in this chapter.
OPEN the SharePoint Meeting Workspace created in the first exercise: http://wideworldimporters/PublicWorkshops site. If prompted, type your user name and password, and click OK.
BE SURE TO verify that you have sufficient rights to manage the site. If in doubt, see the Appendix on page 435.
1. On the Site Actions menu, choose Add Pages to open the Add Pages tool pane.
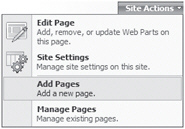
2. In the Page Name textbox, enter the word More.
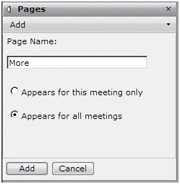
3. Leave the Appears for all meetings default option selected.
Choosing the Appears for this meeting only option generates the new Page for the current meeting only.
4. Click Add to create the new Page.
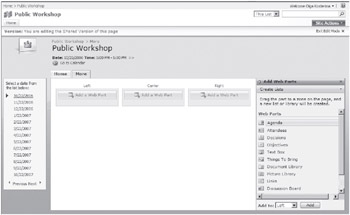
You can then toggle between the Home and More Page tabs. Each Page represents a place where you can put Web Parts.
| Tip | In addition to the Left and Right Web Part Zones that you typically find on a Team Site, you might notice that there is also a third Web Part Zone called Center. This Zone simply gives you another column in which to put Web Parts when using this site template. |
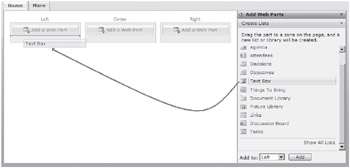
5. On the right side of the page is the Add Web Parts tool pane from the previous release. Drag the Text Box option to the Left Web Part Zone.
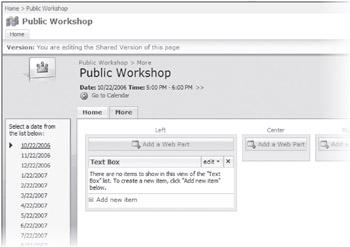
Not only does this action put a Web Part into the Web Part Zone, but it also creates the list that will hold the information presented by the Web Part. This response to a drag and drop is different than any other SharePoint site.
6. At the bottom of the Text Box Web Part, click Add new item to enter notes for this meeting.
| Important | The Text Box list is different than all other lists. It contains only one required field called Text. This list also allows the creation of only a single list item. Therefore, once the first text is entered, the Add New Item option is replaced with an Edit Item option. |
This Web Part is typically used to take notes during the meeting, so you can click Cancel to exit this screen without saving any changes.
The Add Web Parts – Create Lists tool pane is somewhat hidden in the user interface. If you close the tool pane, you must either create another Page to open it again or use the following steps.
7. On the Site Actions menu, choose Edit Page.
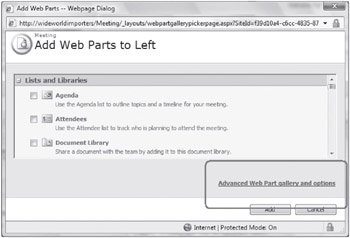
8. At the top of any Web Part Zone, click one of the Add a Web Part buttons. ![]()
9. In the bottom right corner of the Add Web Part dialog box, click Advanced Web Part gallery and options to dismiss the dialog box and open the tool pane.
10. From the drop-down smart menu to the right of the Browse setting near the top of the tool pane, choose Create Lists.
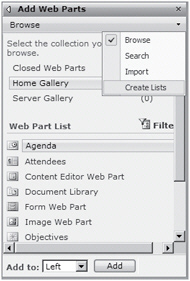
The page will post back and the tool pane will refresh with the elusive Create Lists tool pane that appears when a new Page tab is created.
CLOSE the browser.
EAN: N/A
Pages: 201