Finder Window Modification
You already know how to view a Finder window as icons, a list, or columns. You also know how to clean up an icon view and change the sorting of a list view. In addition, you know how to show and hide the toolbar at the top of any Finder window (which results in a rather different look!). We covered all these operations in Chapter 3. These are only some of the ways you can customize Finder windows. Other methods for tuning Finder windows include suppressing the sidebar and customizing the toolbar. These methods are covered in this section.
Customizing the toolbar
The default toolbar consists of a number of buttons with their names beneath them: Back, Forward, View Mode Selectors, and Action Buttons, and the Search field. Apple enables you to remove any of these buttons, add others, and arrange them any way you want. You can also set the toolbar to display the buttons as named icons (the default), icons without names, or names alone. To make these changes, with any Finder window active, choose View Customize Toolbar. The active Finder window changes to display the Customize Toolbar dialog box shown in Figure 4-13.
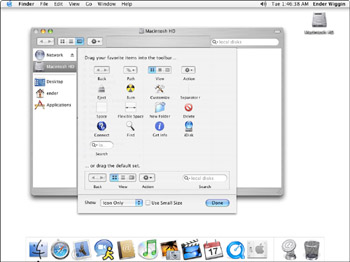
Figure 4-13: Add, remove, and rearrange buttons in a Finder window’s toolbar by using the Customize Toolbar dialog box.
With the Customize Toolbar dialog displayed, change the toolbar by doing the following:
-
Add buttons: Drag any of the optional buttons to the toolbar from the main part of the dialog. You don’t have to add buttons only at the right end of the toolbar. If you drag a button between two buttons in the toolbar, they move apart to make room for the button you’re dragging. If the toolbar is full of buttons and you drag another button to the toolbar, buttons that don’t fit on the toolbar appear in a pop-up menu. To see this menu, click the arrow that appears at the right end of the toolbar. Click the Done button to complete your toolbar customization. All of the additional tools are described in the section “Additional Toolbar buttons.”
-
Remove buttons: Drag buttons away from the toolbar.
-
Rearrange buttons: Drag buttons to different places on the toolbar.
-
Revert to default buttons: If you’ve customized the toolbar and want to get back to the default set of buttons, drag the boxed default set from the lower part of the dialog to the toolbar to replace whatever is currently there.
-
Change toolbar mode: Show items as icons with names, icons only, or names only by choosing from the Show pop-up menu at the bottom of the dialog. Figure 4-14 shows the three toolbar modes. The Use Small Size checkbox makes the toolbar icons smaller, conserving space.
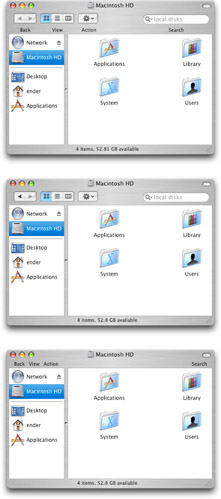
Figure 4-14: A Finder window’s toolbar displaying both icons and text (top), only icons without text (middle), and only text (bottom).Note Add icons as buttons. Even without the Customize Toolbar dialog open, if you drag folders, files, or disks from Finder windows to the toolbar, the items become buttons there. For example, if you create a folder for a particular project within your Documents folder, drag its icon to the toolbar to make it accessible with a single click. To remove items, use the Customize Toolbar dialog. Although, the easiest way to remove items is to hold down z and drag the item out of the toolbar. The item will disappear in a puff of smoke.
Tip Clicking a folder button in the toolbar opens the folder in the same window. If you z-click a folder button in the toolbar, the folder opens in a new Finder window.
Additional toolbar buttons
As shown in Figure 4-13, there are numerous additional tools available for the toolbar. Each has its uses:
-
Path: The Path tool when clicked displays a pop-up menu showing the file hierarchy path to the current folder. Selecting any of the folders in the path will open that folder within the active window. This can also be performed by z-clicking the title bar.
-
Eject: This tool will eject any selected disks or disconnect server volumes. The contextual menu for each disk or volume offers the same option.
-
Burn: If your computer is equipped with a CD or DVD burner, this tool will open the Burn disk dialog (as covered in Chapter 3).
-
Customize: This tool when clicked will bring up the Customize Toolbar window.
-
Separator: The Separator is a simply vertical line that serves as a visual dividing line between items.
-
Space/Flexible Space: The Space item is a simply a blank space, approximately the same width as other tools. The Flexible Space item will fill all space available in the toolbar. Placing a flexible space between items will push items on both sides to the far-left and far-right sides.
-
New Folder: Clicking this tool will create a new folder in the active window. This action can also be performed by pressing Shift-z-N.
-
Delete: This tool will move selected items to the Trash.
-
Connect: Clicking this tool will open the Connect dialog. This dialog can also be opened via the Go menu, or by pressing z-K. The connect dialog is discussed in Chapter 10.
-
Find: This tool brings up the Find dialog window.
-
Get Info: This tool will open the Get Info window for any selected item. This window can also be opened by pressing z-I.
-
iDisk: Click on this tool to open your iDisk (a feature of Apple’s .Mac service, covered in Chapter 18).
EAN: 2147483647
Pages: 290