Setting File and Folder Permissions
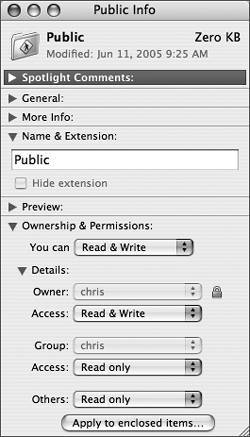
| In multiuser operating systems like Mac OS X, at the operating system level, permissions control user access to particular files and folders and protect core operating system files from inadvertent edits. At the user level, permissions determine whether other users are allowed to access the files and folders that you create. Each file and folder in the file system is automatically associated with an owner and a group when it is created. At any time, however, the owner or an administrator can choose File > Get Info (Command-I) in the Finder to set permissions. It is useful to remember that permissions limit access to the contents of the file or folder, which can lead to unexpected access issues. You will learn more about access limits later in this lesson. Files and folders have different permissions, because folders are containers for files. The access levels for files are Read & Write, Read Only, and No Access. If you have Read & Write access to a file, you can open the file and change its contents. If you have Read Only access to a file, you can open the file but cannot change its contents. No Access indicates that you cannot open the file. Folders have four assignable access levels. The access levels you can set for a folder are Read & Write, Read Only, Write Only (Drop Box), and No Access. If you have Read & Write access to a folder, you can change the contents of the folder by adding, removing, or renaming files within the folder. If you have Read Only access to a folder, you can open the folder and see what it contains but you cannot add, remove, or rename files in the folder. Write Only (Drop Box) access indicates that you can add files to the folder but cannot see the folder's contents. No Access, of course, means that you cannot add files to the folder nor can you see the contents of the folder. For example, the Public folder in your home folder has Read & Write permissions for Owner, and Read Only for Group and Others. The Drop Box folder within the Public folder has Read & Write permissions for Owner, and Write Only for Group and Others. To view and set the permissions on a file or folder, select the file or folder in the Finder and choose File > Get Info (Command-I). Click the Ownership & Permissions disclosure triangle, and then click the Details disclosure triangle to reveal the current permissions. Use the pop-up menus in this area to change the permissions for Owner; Group, non-owners who belong to a defined group; and Others, non-owners who do not belong to the group. (As a result, you can assign permissions so that Others have a higher access level than the Owner!) Once permissions have been set for a folder, the same permissions can be set on all items in the folder by clicking the "Apply to enclosed items" button.
Although not represented in the Info window, there is also an Execute permission. The Execute permission tells Mac OS X to run a set of instructions in a file or on a package's contents. The system opens applications by executing the application bundle when you double-click the application file's icon in the Finder. The Execute permission also makes a folder work properly as a container for files. When you view a folder in the Finder, the Finder must perform a file system operation to display the folder contents, with the Finder interpreting the result of your command. The Execute flag on a folder allows the Finder to perform this task. This is an important consideration, because if an application won't launch, you must remember that an application bundle is a special type of folder. If an application does not open, it could be due to a missing Execute permission on the application itself, or it could be due to an incorrect permission on a file inside the application bundle. In either case, the Repair Disk Permissions feature in Disk Utility might help. NOTE Permissions can be improperly changed, such as when creating files using Mac OS 9. To help you fix permissions problems on bootable Mac OS X volumes, Disk Utility includes a Repair Disk Permissions feature that uses permissions from application and operating system receipts in /Library/Receipts. Open Disk Utility, select the volume, then click the Repair Disk Permissions button in the First Aid pane to fix problems with items that have receipts. For more information, refer to Knowledge Base document 106712, "Troubleshooting permissions issues in Mac OS X." NOTE Sometimes you may find that a particular application doesn't seem to respect the file permissions. It may be able to modify a file, even though the file was marked Read Only. Some applications don't modify files directly. Instead, they duplicate the file and modify the copy. When you use the Save command, the application then deletes the original file and renames the duplicate to match the original file. GroupsIn Mac OS X, every user account is a member of at least one group, and every file and folder has group permissions assigned. Groups give permissions to sets of users who are able to perform similar functions. Mac OS X does not provide an application to easily create and manage groups. Instead, it uses some preset groups to give users permissions and functionality. If you need to create and manage groups, you will need to use Mac OS X Server.
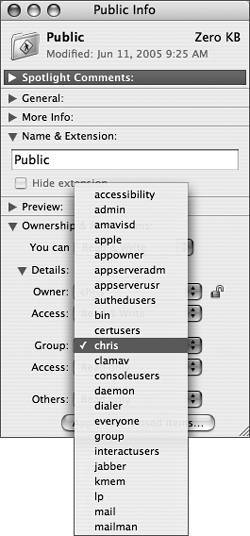
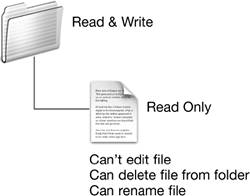
One preset group that you commonly see in Mac OS X is admin. All users with administrative privileges are automatically added to this group so that they can make system-wide changes. Users who do not belong to the admin group cannot change ownership or permissions on files other than their own, unless they first authenticate as an administrative user. In most cases, unless you are specifically trying to establish a very limited set of access permissions, you should use default group assignments. However, if you intend to grant access to any administrator user, you can change the group assignment to the admin group, and if you want to limit access to only a specific user, you can change the group assignment to the automatically-created group for that user, as shown here. Assessing Folder and Document Permissions in ContextFolder and document permissions can present complicated challenges. For example, consider the scenario in the following illustration. If you assign the indicated permissions to a folder and a file within it, can you safely assume that no harm can come to your file?
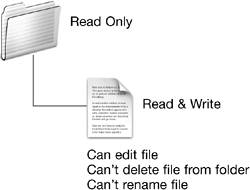
At first glance, the document appears safe, and it is certainly true that the contents of the file cannot be changed. However, the document can be deleted or renamed because the folder permissions are Read & Write. Consequently, a user could delete the file and replace it with a file of the same name but with different contents. Take a look at the set of permissions in the following illustration. What, if any, modifications can you make to the document?
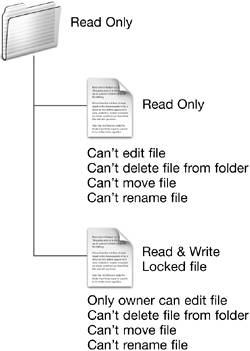
You can change the contents of the file using applications that rewrite document data in place, such as command-line tools. However, applications that attempt to make backup copies or require "Save As" when saving documents cannot edit the file in this location because the Read Only folder permissions prevent you from adding files to or removing files from the folder. You could save the edited file to another location, of course. Similarly, you cannot rename the file. This set of permissions on a containing folder is useful when you are sharing a set of templates or need to make a set of files available to your users but do not want them to be able to change your folder organization. The permissions in the following illustration are somewhat more complicated. The containing folder is still Read Only, meaning that you cannot rename, add, or delete enclosed files. However, as you saw in the preceding illustration, you could still edit those files in place.
To prevent editing in place, the first file has been set to Read Only. This limitation prevents editing in place, and retains the limitations of the containing folder. Also, because you cannot write to the file, you cannot use the Finder to move, rename, or delete it. To show a different limitation on editing in place, the second file has been set to Read & Write, but has been locked by the owner. In addition to permissions, files have a locked attribute that you can set in the Info window. Locking a file overrides some permissions for Group and Others, because locked files cannot be edited, deleted, or moved by anyone but the Owner. Folder and document permissions interact in potentially surprising ways. For example, you may have Read & Write access to a file but still not be able to open the file because the file resides in a folder to which you have no access. The combinations presented here are not always apparent to your end users, but you should know how to manage permissions so that you limit access in the manner that works most effectively for your organization. One effective method for limiting access is cascading permissions. By nesting less-protected folders inside more-protected folders, and by shrewdly placing files within your folder hierarchy, you can achieve almost any access design for your storage system. Setting Permissions on Files and FoldersPermissions can be set on both files and folders, thereby controlling who can access or modify these items. In this exercise, you will modify and compare permissions on three files and three folders on your computer, then see how those permissions interact. Change the Permissions on Three Folders
Change the Permissions on Three FilesYou will now create three text files and change their access permissions.
Test the Folder and File PermissionsThese steps will demonstrate the effect of different permissions on files and folders.
|
EAN: 2147483647
Pages: 233