Using Other Print Options
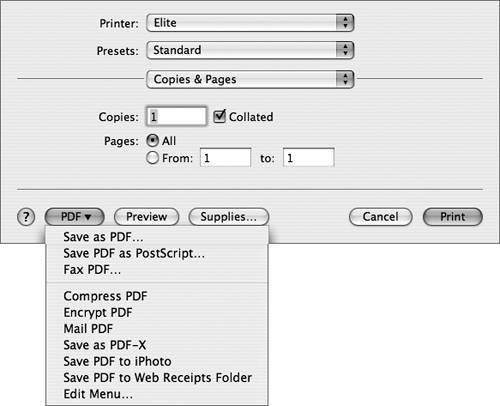
| Mac OS X has some unique options for outputting documents that don't involve printing, but they utilize the same interface because the process is virtually the same as printing. Saving Documents as PDF FilesIn Mac OS X, it is easy for you to save a document as a PDF file. All you need to do is choose File > Print (Command-P), and then in the Print dialog, click the PDF button. This reveals a menu from which you can choose Save as PDF. Enter a name and location for the PDF file, then click Save. You can open a PDF file with Preview (/Applications/Utilities) or any of Adobe's Acrobat applications on any platform, making PDF the perfect vehicle for sharing documents when retaining formatting is important.
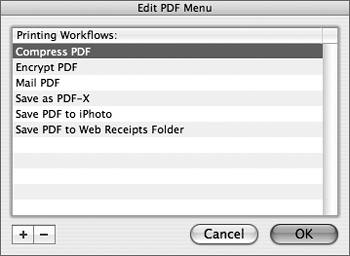
NOTE Mac OS X 10.4 adds the following PDF menu options: Compress PDF, Encrypt PDF, Mail PDF, Save as PDF-X, Save PDF to iPhoto, and Save PDF to Web Receipts Folder. The ability to save any document as a PDF file is very useful. It can be extended almost infinitely through the PDF Workflow feature, which enables you to specify how you will prepare the PDF and what to do with it after creation. A PDF workflow is any AppleScript script, Automator action, or application that can open a PDF file. For example, you can create a script that applies a Quartz filter to a PDF file, or you can specify that the PDF file be opened by Adobe Acrobat immediately after it's created. To use a PDF workflow you have set up, open a document and choose File > Print. Then choose your workflow from the PDF pop-up menu. Your document is converted to a PDF file, and then the PDF file is immediately opened by your workflow. To add or delete a PDF workflow, choose Edit Menu from the PDF pop-up menu in the Print dialog. Then you can add or delete scripts, applications, or actions in the Printing Workflows list. The Edit PDF Menu window adds a copy of the workflow to the ~/Library/PDF Services folder, which enables the workflow for the current user account. If you want to add a workflow for all user accounts on that computer, you need to create a PDF Services folder in /Library and manually add items to it. Workflows can also be located in /Network/Library/PDF Services.
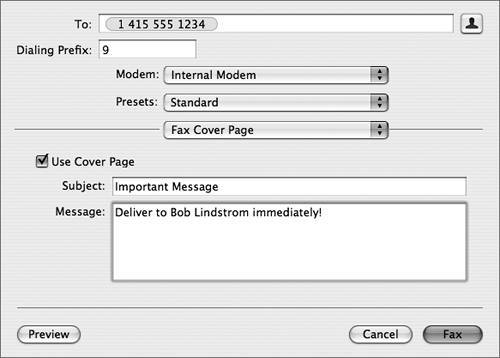
Working with Documents in PostScript FormatAlthough Quartz, the imaging model in Mac OS X, is based on PDF, it includes support for creating, viewing, and printing PostScript documents. Creating PostScript DocumentsSeveral Mac OS X applications, such as Adobe Illustrator and Adobe Photoshop, have the ability to create and edit PostScript documents. The Mac OS X printing system allows any Mac OS X application to create a PostScript file as well. In the Print dialog, choose "Save PDF as PostScript" from the PDF pop-up menu and the document will be "printed" to a PostScript file. Viewing PostScript DocumentsIn addition to creating PostScript documents, the Mac OS X imaging system also includes a PostScript interpreter to allow users to view PostScript documents. If you double-click a PostScript document in the Finder, it will be opened in Preview by default. You can also use the ColorSync utility to open a PostScript file and apply Quartz filters such as Sepia Tone or Lightness Decrease. Printing PostScript DocumentsOnce you have a PostScript file on your computer, you can print it on either a PostScript or a raster printer by dragging the file's icon to the desktop printer alias. You can also print a PostScript file from the command line. (You could open the PostScript file in Preview and print from there, but Preview would convert the file to PDF for printing, which might degrade the quality.) Faxing DocumentsWith Mac OS X 10.4, you can "print" a document to a fax machine using your computer's internal modem and any Mac OS X application that can print to a normal printer. Sending FaxesTo fax a document, open it with its default application, then choose File > Print. In the Print dialog, choose Fax PDF from the PDF pop-up menu and a configuration sheet appears.
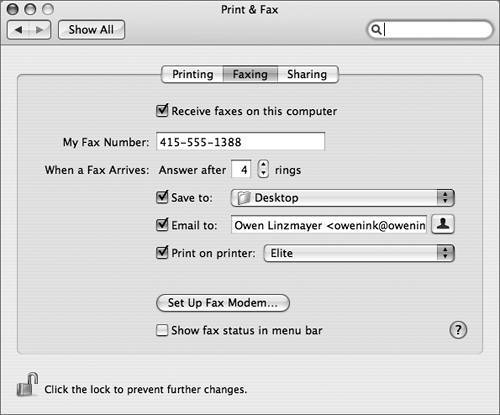
In the To field, enter the phone number of the receiving fax machine. Alternatively, click the icon to the right of the To field to choose a recipient from your Address Book. All other fields in the configuration sheet are optional. When you are ready to send your document, click Fax. Mac OS X transmits the document as a fax through the chosen modem, which must be connected to a working phone line. Like printing, the application creates a fax job and adds it to a fax queue. You can view a list of fax jobs to be sent and jobs that have been sent in Printer Setup Utility. Choose View > Show Fax List, select the fax modem, and click Show Info. Receiving FaxesYou can also set your system to receive faxes by selecting the appropriate checkbox in the Faxing pane of Print & Fax preferences. In addition to specifying how many times the phone should ring before the fax modem answers, you can specify how the received fax should be handled: save it as a PDF in a folder, email it, or print it on a specified printer. TIP If you don't want to leave your computer on all the time to receive an occasional fax, you can put it to sleep. But before doing so, in the Options pane of Energy Saver preferences, select the "Wake when the modem detects a ring" checkbox.
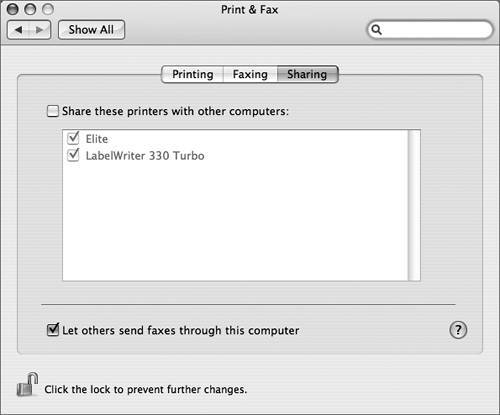
Fax SharingYou can also share your fax/modem with other computers so they can fax through your computer, the same way you can share a printer. Click Sharing in Print & Fax preferences, and select the "Let others send faxes through this computer" checkbox. Your fax/modem will show up under Shared Fax in the Modem pop-up menu in the Fax PDF sheet.
Note that when you are sharing your fax/modem, other computers on the network using your machine to send faxes will spool their print jobs to /var/spool/fax on your computer, at which point your computer will handle the faxing. It's important not to shut down your computer or put it to sleep, otherwise networked users will not be able to use your fax/modem. Faxing StatusWhen the "Show fax status in menu bar" checkbox is selected in the Faxing pane of Print & Fax preferences, a fax status menu extra is added to the menu bar. The icon displays status information when your computer sends or receives a fax. You can also control some fax functions through the menu extra. For example, you can answer an incoming call and treat it as a fax by choosing Answer Now from the fax status menu extra. If you need to hang up on an incoming fax, choose Hang Up Now. |
EAN: 2147483647
Pages: 233