B.2 C
B.2 C++
Progressing in the unit testing framework for C++, called cppUnit, is disproportionate to the widespread use of the language. There was only a prealpha version available at Sourceforge [URL:CppUnit] when this book went to press. One cause behind the slow progress of the testing framework for C++ is the lack of standardization for this language—in the area of user interfaces and library formats, for example. In particular, it seems obviously difficult to support different compilers by one common framework.
While cppUnit offers only rudimentary support for C++ compilers under UNIX and Borland C++, it concentrates heavily on the support of Visual C++, the de facto standard compiler for Windows. Installation and operation instructions, as well as a graphical test runner, are available for only this compiler. Accordingly, the following description is based on Visual C++ 6.0 and cppUnit Version 1.6.2.
Installation
Once you have downloaded and unpacked the tar file, there are two class libraries available:
-
The actual framework classes, including a text-based test runner, are in the cppUnit-1.6.2/src/cppUnit directory.
-
cppUnit-16.2/src/msvc6/testrunner contains a graphical test runner based on Microsoft Foundation Classes (MFC) [Kruglinski98].
The directories mentioned above include preconfigured Visual C++ project files and workspaces for both components, simplifying the translation and generation of corresponding libraries. Just load the workspace and use Rebuild All to start the compilation.
cppUnit-1.6.2/examples includes examples for using cppUnit. The projects CppUnitTestMain and CppUnitTestApp include regression tests for the cppUnit framework itself.
Setting Up a Test Project
The example projects show how a workspace for your own test projects should look like. When setting up such a test project, you can proceed as follows:
-
Create a new and empty workspace.
-
Add cppUnit by selecting Project→Insert Project into Workspace to add the file cppUnit.dsp to your workspace.
-
Create your new project by selecting File→New→Projects to add a Win32 Console Application to the workspace. You have to select the Add to current workspace option in the New Project Dialog.
-
Adapt your Project Settings. There are a few things to do here. The include path for cppUnit has to be typed in the well-hidden Settings tab, C/C++→Preprocessor→Additional include directories. In addition, you have to enable support for Run-Time Type Information (RTTI) [Schildt98]. To enable RTTI, select the appropriate checkbox in the tab, C/C++→C++ Language. Next, go to the tab, Link→General to add the unit test library to the Object/library modules list. This is cppunitd.lib for the default debugging configuration. And finally, a piece of information that's missing in the installation instructions: select the Debug Multithreaded DLL option in the tab, C/C++→Code Generation→Use run-time library.
Creating Test Cases
Now that you have overcome the wiles of installation, you can create your test cases. cppUnit defines analog classes similarly to JUnit. Note that all classes are defined in the name space, CppUnit; in other words, that the descriptors known from JUnit have to be preceded by the prefix, CppUnit::. This means that the class CppUnit::TestCase is the basis for creating test cases. The following listing shows the declaration of a test case, AppendTest, in a C++ header file, corresponding to the Java test case StringBufferTest from Chapter 2, Section 2.3:
class AppendTest : public CppUnit::TestCase { char *s; public: AppendTest(); virtual ~AppendTest(); void setUp(); void testAppendString(); void testEmptyBuffer(); } As in Chapter 2, Section 2.3, we are running two tests, where one (testEmptyBuffer) tests for correct determination of the length of an empty string and the other (testAppendString) tests for correct appending to an empty string. The corresponding methods look like this:
AppendTest::AppendTest() : TestCase() {} AppendTest::~AppendTest() {} void AppendTest::setUp() { s = new char[100]; *s = '\0'; } void AppendTest::testEmptyBuffer() { CPPUNIT_ASSERT(strlen(s) == 0); } void AppendTest::testAppendString() { strcat(s, "Ein String"); CPPUNIT_ASSERT(strcmp(s, "Ein String") == 0); CPPUNIT_ASSERT(strlen(s) == 10); }
Running Your Tests
To run your tests, you need a test runner and a test suite consisting of the test cases you want to run, as in JUnit. Unfortunately, C++ lacks a reflection mechanism, so that cppUnit cannot automatically collect all methods beginning with "test." Although cppUnit uses the C++ mechanism Runtime Type Information, this mechanism merely allows you to determine type IDs and type names, but doesn't let you find classes and methods by names. This means that the syntax used to build a test suite is somewhat more complex in cppUnit, compared to Java, because cppUnit requires a pointer to the method itself, in addition to the test method's name:
static CppUnit::Test *suite() { CppUnit::TestSuite *ts = new CppUnit::TestSuite; ts->addTest( new CppUnit::TestCaller<AppendTest>("testAppendString", &AppendTest::testAppendString)); ts->addTest( new CppUnit::TestCaller<AppendTest>("testEmptyBuffer", &AppendTest::testEmptyBuffer)); return ts; } The class TestCaller allows you to run each single test case. The template argument, AppendTest, is used to state the name of your test case class, allowing you to run the fixture. Subsequently, you run the test by means of the pointer to the test method (e.g., &AppendTest::testEmptyBuffer).
Finally, to run the test suite, you need a test runner. A text-based test runner is part of the cppUnit project:
int main(int argc, char* argv[]) { CppUnit::TextTestRunner runner; runner.addTest(AppendTest::suite()); runner.run(); return 0; } This returns the following output for the preceding test suite:
.. OK (2 tests)
An error is reported as follows:
.F. !!!FAILURES!!! Test Results: Run: 2 Failures: 1 Errors: 0 There was 1 failure: 1) test: testAppendString line: 34 C:\ cppunit-1.6.2\src\demo\demo\AppendTest.cpp "strlen(s) == 9"
All these things can be done in a much nicer way if you use the graphical test runner (Figure B.2). To use the graphical test runner, you have to add the test project as MFC-based Win32 application. As demonstrated in the cppUnitTestApp example, the test runner project should also be added to the workspace. In addition to the library, cppunitd.lib, you have to add the libraries, testrunnerd.lib and testrunnerd.dll.
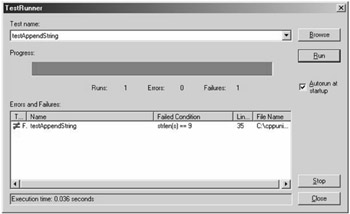
Figure B.2: A graphical test runner.
Overall Impression
The package does not appear to be fully mature yet. In addition, limitations of the language—such as lacking compatibility between the implementations, missing reflection, and the good old juggling with pointers and storage management—make testing much more laborious, compared to Java, let alone Smalltalk.
EAN: 2147483647
Pages: 144