Chapter 10: Applying CSS
|
| < Day Day Up > |
|
While the focus throughout Part One had been primarily markup examples, we had also explored how CSS can be applied to that markup for design and style details. To begin Part Two, in this chapter we'll talk about the different methods used to apply CSS to a particular document, site, or even single element. In addition, we'll discuss how we can hide CSS from older browsers, enabling us to use advanced techniques without harming the markup structure that all browsers and devices can read.
Later, in the "Extra credit" section at the end of the chapter, we'll introduce alternate style sheets that can produce multiple themes, font sizes, and colors without the need for server-side scripting.
How do I Apply CSS to a Document?
We're going to look at four different ways to apply CSS to a document, each having its own advantages and disadvantages. Depending on the situation, any one of these methods would be appropriate. Each method presented uses a valid and typical XHTML 1.0 Transitional framework for its document type, <html> tag, and <head> setup.
Let's begin with Method A.
Method A: The <style> Element
<!DOCTYPE html PUBLIC "-//W3C//DTD XHTML 1.0 Transitional//EN" "http://www.w3.org/TR/xhtml1/DTD/xhtml1-transitional.dtd "> <html xmlns="http://www.w3.org/1999/xhtml" xml:lang="en" lang="en"> <head> <meta http-equiv="content-type" content="text/html; charset=utf-8" /> <title>Applying CSS</title> <style type="text/css"> <![CDATA[ ... CSS declarations here ... ]]> </style> </head>
This method, also known as an embedded style sheet, allows you to write all of your CSS declarations right in the actual (X)HTML document. The <style> element sits inside the <head> section of a page and can contain any number of CSS rules you desire.
The type attribute with the text/css value ensures that the browser understands what type of style language we're presenting and is required. We're also using CDATA comment syntax that is recommended by the W3C to hide the style rules from older browsers that can't understand them (www.w3.org/TR/xhtml1/#h-4.8).
Partial Understanding
One important downside to using Method A is that some older browsers (particularly version 4.x of Internet Explorer and Netscape) will do their best to render CSS that is contained in <style> elements. This can be a bit of a problem if you have any advanced CSS rules that only modern browsers will understand for layout and positioning. If complicated CSS is kept within <style> elements, it's possible that users of older browsers may receive a jumbled, unusable mess.
Uncached
Another downside to embedded style sheets is that being on the page, they are required to be downloaded each time that page is loaded. Conversely, the method that follows requires the styles to be downloaded once, and then cached by the browser.
Multiple Changes
Along with the fact that embedded style sheets appear on the XHTML page, including an embedded style sheet also means duplicating these styles if they are desired to be applied to multiple pages within a site. If a change is needed to these styles, the change must be made over each page that includes the style sheet. Lots of changes. Lots of work.
Good for Development
On the upside, I find that when initially building and testing CSS, it's very convenient to write all of the rules on the page I'm testing using Method A. It allows me to work on a single document for both markup and style when making frequent changes. After testing is complete, I'll apply CSS to the public version using a different method. Let's take a look at a few more.
Method B: External Style Sheets
<!DOCTYPE html PUBLIC "-//W3C//DTD XHTML 1.0 Transitional//EN" "http://www.w3.org/TR/2000/REC-xhtml1-20000126/DTD/xhtml1-  transitional.dtd"> <html xmlns="http://www.w3.org/1999/xhtml" xml:lang="en" lang="en"> <head> <meta http-equiv="content-type" content="text/html; charset=utf-8" /> <title>Applying CSS</title> <link rel="stylesheet" type="text/css" href="styles.css" /> </head>
 Method B demonstrates how we can link to external style sheets—where all of the CSS declarations are kept in a separate file, and then referenced in the head section of the (X)HTML of the document with the <link> element.
The href attribute points to the location of the file. The value can be a relative path (as in the case of Method B), or an absolute path, using the full "http://" location of the document. Also note that <link> is a single tag, or empty element, and is required to have the self-closing / at the end.
Separate File = Easy Maintenance
Having all your CSS rules in a file separate from your markup has an obvious advantage— that any style changes for an entire site can be made on that one file, rather than repeating CSS declarations on every page, as you would need to do if using Method A.
This, of course, is especially critical for large-scale sites where hundreds or thousands of pages can all share the same style instructions from a single document.
Download Once
An additional advantage to linking styles in an external style sheet is that the file is often only downloaded once and cached by the browser, saving download time for repeat visits—or for other pages that reference the same style sheet.
Still Not Completely Hidden
Like Method A, Method B also has the possibility of being interpreted by older browsers that have limited support for CSS. Any styles that are targeted for modern browsers may wreak havoc in an unsupported browser.
Hmm, that's the second time I've mentioned that problem. The next method has to solve it, right?
Method C: @import
<!DOCTYPE html PUBLIC "-//W3C//DTD XHTML 1.0 Transitional//EN" "http://www.w3.org/TR/2000/REC-xhtml1-20000126/DTD/xhtml1-  transitional.dtd"> <html xmlns="http://www.w3.org/1999/xhtml" xml:lang="en" lang="en"> <head> <meta http-equiv="content-type" content="text/html; charset=utf-8" /> <title>Applying CSS</title> <style type="text/css"> <![CDATA[ @import "styles.css"; ]]> </style> </head>
 Similar to Method B, using the @import rule allows us to import CSS from an external document, either by a relative path (as in Method C) or an absolute path.
Method C shares the same benefits when using the <link> element. Because the styles are held in an external document, making changes and updates to single file can affect an entire site—and can be done so quickly and easily. External style sheets are cached by the browser, saving download times for pages that import the same file.
Hide and Seek
The major advantage for using Method C is that Netscape versions 4.x and below don't support the @import rule, essentially "hiding" the CSS that is being referenced. This is certainly a handy "hack," in that we can target advanced CSS for tasks such as layout and other design details to modern browsers that can handle them, while older browsers will ignore them.
The problem with Netscape 4.x is that it thinks it supports CSS as well as browsers that actually do. Therefore, with the exception of Netscape 4.x, we can send along any CSS that we wish, letting the browser decide if it can display it or not.
This is an important point for building sites with web standards—that we can separate our structured markup from the presentation as much as possible, and then hold design details and styles for browsers that support them. Older browsers will receive the structure that they can easily read, but the advanced CSS will be hidden from them.
What this does do is allow designers and developers to move forward now, rather than continue to use methods that cater to prehistoric browser versions that may choke on advanced CSS rules.
Styles on, Styles Off
As a comparison, take a look at Figures 10-1 and 10-2, which show my personal site with full CSS, and then without, as an older browser may render it. The structure without CSS is still evident and is readable and usable to all. If we hadn't hidden the CSS that's required to present the design, users of older browsers may have received quite an unreadable mess.
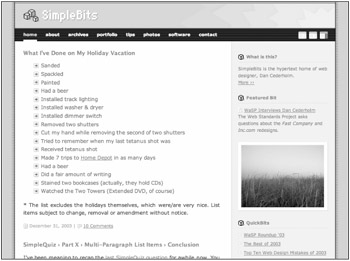
Figure 10-1: My personal site with CSS
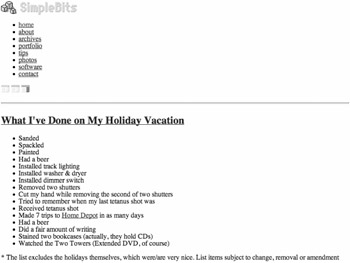
Figure 10-2: The same page, without CSS, as an older browser may render it
Combining B and C for Multiple Style Sheets
Sometimes, it can be beneficial to import more than one style sheet to a document. For instance, you could keep your entire layout in one style sheet and typography rules in another. For large, complex designs, this can make maintaining the high amount of rules much easier.
The Chameleon Effect
In the case of Fast Company magazine's website, I wished to make the colors of the website change each month to correspond to the magazine's monthly cover image. To make the routine change easier, I kept all CSS rules related to color in one file, while the rest of CSS that didn't change each month was held in another.
Each month I could make quick, easy updates to the colors file without hunting through the hundreds of rules that were needed to make up the rest of the design. Instantly the entire site's colors would change with the modification of that single file.
How it's Done
To combine Methods B and C for importing multiple style sheets, we would use the <link> element in the <head> of the document to reference a master CSS file—just like Method B illustrates, by linking to a styles.css file.
The contents of styles.css would simply contain @import rules to import any number of CSS files that we wish.
For instance, if we'd like to import three style sheets, one for layout, one for fonts, and one for colors, styles.css would contain the following:
/* hidden from old-school browsers */ @import url("layout.css"); @import url("fonts.css"); @import url("colors.css"); Now, our <link> element can stay the same throughout an entire site, referencing only the styles.css file. That one file can import multiple style sheets with the @import rule. New style sheets could be added to this one file that would in turn affect the entire site.
This makes updates and CSS file shuffling very easy. For instance, if down the road you would like to further separate your CSS into four files, you can easily change the import URLs in this single file, rather than being bothered with modifying the XHTML markup.
Lo-fi and hi-fi Styles
Another trick when using Method C's @import rule to hide CSS from old browsers is to use the cascade effect in CSS to serve lo-fi styles that old and modern browsers should be able to recognize, using either Method A or Method B, and then use @import to serve advanced styles to browsers that support them.
Older browsers get only what they can support, while more modern browsers receive all the styles intended.
Let's take a look at how this would appear in code:
<!DOCTYPE html PUBLIC "-//W3C//DTD XHTML 1.0 Transitional//EN" "http://www.w3.org/TR/2000/REC-xhtml1-20000126/DTD/xhtml1-  transitional.dtd"> <html xmlns="http://www.w3.org/1999/xhtml" xml:lang="en" lang="en"> <head> <meta http-equiv="content-type" content="text/html; charset=utf-8" /> <title>Applying CSS</title> <link rel="stylesheet" type="text/css" href="lofi.css" /> <style type="text/css"> @import "hifi.css"; </style> </head>
 where lofi.css would contain basic CSS rules like link colors and font sizes, and hifi.css may contain advanced rules like layout, positioning, and backgrounds.
We can achieve sending lo-fi and hi-fi versions of the design—without the need for scripting or server-side browser identification of any kind.
Order is Important
The order in which we've placed the <link> and <style> elements in the markup is important. The "cascade" of CSS refers to the priority that is placed on rules—depending on what order they appear.
For instance, since modern browsers support both methods, they will receive both style sheets and apply all the styles from each. Style rules in hifi.css will override styles that refer to the same elements in lofi.css. The reason? Because hifi.css comes after lofi.css in the markup.
Older browsers will ignore hifi.css because of the @import rule used, therefore they will only apply rules found in lofi.css.
Embrace the Cascade
You can use the cascade property of CSS to your advantage in a variety of ways. One example would be a scenario where you had an entire site sharing one external CSS file for all of its layout, positioning, fonts, colors, etc. You would use Method C on each page of the site to @import the file, hiding it from older browsers.
Let's say there was one page on the site that shared the layout and positioning, but needed custom colors or fonts. For this one page (which is different from the rest of the site), we can still import the main CSS file, but also just after that in the <style> tag, import a second CSS file containing customized styles for that particular page. Any styles in the second CSS file will take priority and override styles that reference the same elements found in the first CSS file.
Let's look at an example to illustrate this. master.css contains CSS that the entire site uses for structure, fonts, etc., while custom.css is imported only on a particular page with the overriding of a few elements.
<!DOCTYPE html PUBLIC "-//W3C//DTD XHTML 1.0 Transitional//EN" "http://www.w3.org/TR/2000/REC-xhtml1-20000126/DTD/xhtml1-  transitional.dtd"> <html xmlns="http://www.w3.org/1999/xhtml" xml:lang="en" lang="en"> <head> <meta http-equiv="content-type" content="text/html; charset=utf-8" /> <title>Applying CSS</title> <style type="text/css"> @import "master.css"; @import "custom.css"; </style> </head>
 Because custom.css comes second in the markup order, its declarations of the same elements will override those found in master.css.
For instance, let's say that in main.css we had all <h1> elements appear serif and red, while all <h2> appear serif and blue:
h1 { font-family: Georgia, serif; color: red; } h2 { font-family: Georgia, serif; color: blue; } On our customized page, we'd like to change only the styles for <h1> elements, while <h2> should stay the same. In custom.css, we need only declare the new styles for <h1>:
h1 { font-family: Verdana, sans-serif; color: orange; } This declaration will override the one found in master.css (because the custom.css is imported last). Pages that import custom.css after master.css will have <h1> elements that appear in Verdana and orange, while <h2> elements will still show in a serif font and blue—the declaration found in master.css wasn't overridden in custom.css.
Using the cascade property in CSS can be a handy way to share common styles, while overriding only those that need to be customized whenever desired.
Method D: Inline Styles
<h1 style="font-family: Georgia, serif; color: orange;">This is a  Title</h1>
 There is a fourth method of applying CSS that we need to talk about as well—inline styles. The style attribute can be added to almost any element, allowing CSS rules to be applied directly at the element level, as shown in Method D.
Since inline styles are at the lowest level possible in the cascade, they will override any styles that are declared in external style sheets, or rules held in the <style> element in the <head> of the document.
This can be a simple way of adding style here and there to documents, but it comes at a price.
Style Tied to Markup
If we rely on Method D too much for adding style to documents, we're not really separating our content from our presentation. Going back to make changes means going directly to the markup, when keeping CSS in a separate file makes for easier maintenance.
Abusing Method D is almost like littering your markup with <font> tags and other presentational gobbledygook. These design details always belong in a separate place.
Use with Caution
There are certainly real-world uses for inline styles—and they can be a savior in a pinch, where adding style to a document is necessary, but accessing an external file or the <head> of the document is impossible; or additionally, if they are merely temporary styles, not meant to be shared with other elements on the page.
For instance, if there is one page that will be announcing a bake sale on your website that will eventually be taken down afterwards, and you'd like this particular page to have unique styles, you may opt to embed these unique rules, rather than adding them to a permanent style sheet.
Just proceed with caution. Know that these styles can't be modified easily, across an entire page or site.
|
| < Day Day Up > |
|
EAN: 2147483647
Pages: 119
- Key #4: Base Decisions on Data and Facts
- Beyond the Basics: The Five Laws of Lean Six Sigma
- When Companies Start Using Lean Six Sigma
- Making Improvements That Last: An Illustrated Guide to DMAIC and the Lean Six Sigma Toolkit
- The Experience of Making Improvements: What Its Like to Work on Lean Six Sigma Projects