HTML Basics
| CSS was designed to work with HTML. To take advantage of CSS, you need to know some HTML. As stated in the Preface, we assume most readers have had some exposure to HTML. However, to ensure we all talk about the same thing, we now review the basics of HTML. ElementsHTML is simple to write. It is essentially a series of elements that define the structure of your document. An element normally has three parts:
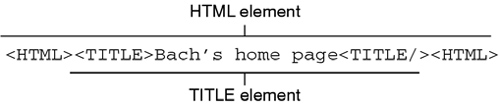
Figure 1.2 illustrates the three parts of an element. Figure 1.2. Anatomy of an element. All tags in HTML start with a "<" and end with a ">." Between these comes the name of the element. In Figure 1.2, the name of the element is SENTENCE. The content of the element is a string of characters (but we will soon see that the content of an element can be another element). After that comes the end tag. End tags look like the start tag, except they have a "/" (slash) before the element name. Building a Simple HTML DocumentHTML has approximately 30 commonly used elements. SENTENCE isn't one of them, in fact, SENTENCE isn't an HTML element at all. We used it as an example to show the basic structure of all elements. Let's look at a real HTML element: <HTML></HTML>
One of the elements in HTML is called HTML. The HTML start tag (<HTML>) marks the beginning of an HTML document, and the HTML end tag (</HTML>) marks the end. Everything between these two tags is the content of the HTML element. In the example, nothing is between the start and the end tag. In the next example, we add some content: <HTML><TITLE>Bach's home page</TITLE></HTML> What we added from the last example is marked in bold letters (this is a convention we will use throughout this chapter). Unlike the SENTENCE example, the content of the HTML element is not just a string of characters it's actually another element. The TITLE element contains the title of an HTML document. The title of the document we build in this chapter is "Bach's home page." Figure 1.3 maps out the two elements we have so far. Figure 1.3. Diagram of an element. When a browser displays an HTML document in a window onscreen, the content of the title element generally goes into the title bar of the window. The title bar is at the top of the window. Below that is often the browser's control panel. Further below that is the most interesting part of the browser window: the canvas. The canvas is the part of the window where documents are actually displayed. See Figure 1.4. Figure 1.4. The parts of a browser's window. The top line is the title bar, the large grey area is the canvas. CSS only deals with the content of the canvas.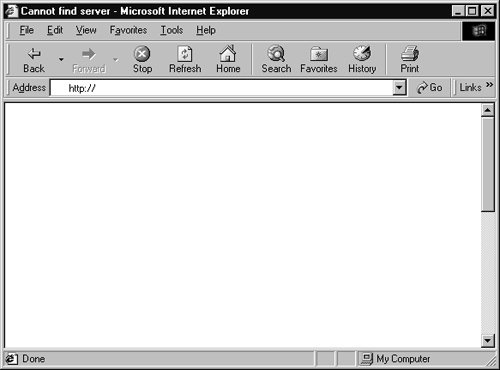 As you can see, we have yet to put anything in the document that will be displayed on the canvas. To have something actually show up on the canvas, you must place it in the BODY element. The BODY element is inside the HTML element: <HTML> <TITLE>Bach's home page</TITLE> <BODY> </BODY> </HTML>
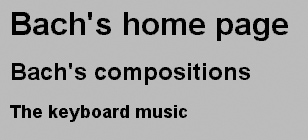
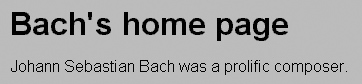
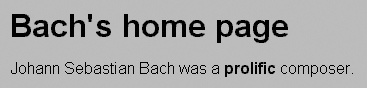
The content of the HTML element now consists of not one, but two other elements. By themselves, the BODY tags do not add anything to the canvas; we need to give the BODY element some content. Let's start by adding a first-level heading to the sample document. The standard HTML tag for a first-level heading is H1. Here's the HTML code: <HTML> <TITLE>Bach's home page</TITLE> <BODY> <H1>Bach's home page</H1> </BODY> </HTML> The title of the document is the same as the first-level heading. This will often be the case in HTML documents, but it doesn't have to be. HTML also has other headings you can use: H2, H3, H4, H5, and H6. The higher the number, the less important the heading is. If H1 corresponds to a chapter, H2 is a section, H3 a subsection, etc. Typically, also, the higher the number, the smaller the font size. Here's the document with a couple of extra headings added: <HTML> <TITLE>Bach's home page</TITLE> <BODY> <H1>Bach's home page</H1> <H2>Bach's compositions</H2> <H3>The keyboard music</H3> </BODY> </HTML> Figure 1.5 shows the heading levels as they might appear onscreen. Figure 1.5. Three heading levels. However, we don't need those two extra headings right now, so we delete them and add a paragraph of text instead. We do this using the paragraph element, P: <HTML> <TITLE>Bach's home page</TITLE> <BODY> <H1>Bach's home page</H1> <P>Johann Sebastian Bach was a prolific composer. </BODY> </HTML> Figure 1.6 shows the new paragraph. Figure 1.6. Adding a paragraph of text. Note that we left out the ending paragraph tag, </P>. Normally, an element begins with a start tag and ends with an end tag. However, for some HTML elements, the end tag may be omitted. The end tag notifies the browser when the element ends, but in some cases, the browser can figure this out for itself, so the tag is not needed. For example, the P element cannot exist outside of the BODY element. So, when the browser encounters the BODY end tag (</BODY>), it knows that the P element has also ended. Still, including the P end tag is perfectly legal. HTML specifies that leaving out the </P> has no effect on the way the document is displayed. You can also see that the browser ignored the spaces and line breaks in the source document. There is only one space between each pair of words and the line breaks are gone. Next, suppose we want to emphasize a word relative to the surrounding text. Several HTML elements can express this; among them, we find STRONG and EM (EM stands for emphasis). These elements do not say anything about how they are to be displayed, but there are some conventions: STRONG elements are normally displayed in bold, and EM elements are displayed in italic. The following code shows the use of the STRONG element: <HTML> <TITLE>Bach's home page</TITLE> <BODY> <H1>Bach's home page</H1> <P>Johann Sebastian Bach was a <STRONG>prolific</STRONG> composer. </BODY> </HTML> Figure 1.7 shows how this code is displayed. Figure 1.7. An example of using the STRONG element. Notice how the word "prolific" stands out relative to the surrounding text. Also note that although the H1 and P elements start on a new line, the STRONG element continues on the same line where the P element started. H1 and P are examples of block-level elements, while the STRONG element is an inline element. We discuss block-level and inline elements in the next section. Block-Level and Inline ElementsIn the previous section, the STRONG element was placed in the middle of an element, P, while the P and H1 elements both began and ended a line. You can't insert a P element in the middle of another P or H1 element or vice versa. But, you can insert an element like STRONG in the middle of most other elements. This is because the P and H1 elements are block-level elements, while the STRONG element is an inline element. Elements can be divided into three groups:
A block-level element is an element that begins and ends a line or, put another way, that has a line break before and after its content. Examples of block-level elements that you've seen so far in this chapter are H1 and P. Others are given in Table 1.1.
An inline element is an element that does not begin and end a line, although it may be placed at either end. Examples of inline elements are STRONG, which you saw in the earlier example, and EM. Others are given in Table 1.1. An invisible element is an element whose content isn't displayed on the canvas. We have seen only one invisible element so far: TITLE. It's not really an invisible element because it appears in the title bar of the window, but it is not displayed on the canvas. HTML only has a few invisible elements, and you will find them in Table 1.1. Element OverviewConfused about the different elements? Don't worry. Table 1.1 gives you an overview of the most common HTML elements. We've introduced you to several of these already and will discuss others shortly. We talk about others when appropriate throughout the rest of this book and use them in many examples. Also, we suggest that you refer to the table as needed as you work your way through this book. The last column of the table ("Empty? Replaced?") is explained later in this chapter. Among the elements that are not included in Table 1.1 are the elements that create forms and tables. Also, the non-standard elements have been left out. In the next several sections, we add to your repertoire of HTML tags by discussing elements that you can use to create lists, add a horizontal rule, force a line break, and link to text and images. CommentsMost of your documents will consist of elements. However, you can also insert HTML comments into the document. A comment is anything you want to say about what is going on with your document that you don't want to be displayed. The user won't see the comment on the canvas because browsers ignore comments; that is, they do not display a comment's contents. Comments can be a helpful way of communicating something about your document to other designers who will see your code. To ensure that the comment really is not viewable by the user, you enclose it between special strings that the browser will recognize as enclosing a comment. You begin the comment with the string <!-- and end it with the string -->. (That's two hyphens in both cases.) Here's a sample comment: <!-- CSS is the greatest thing to hit the Web since hyperlinks --> ListsLists are common in HTML documents. HTML has three elements that create lists:
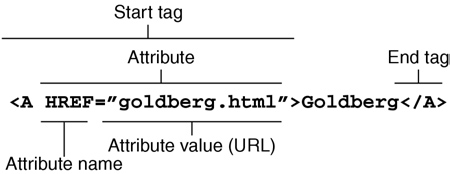
Bach's home page must surely include a list of some of his compositions. Let's add an ordered list: <HTML> <TITLE>Bach's home page</TITLE> <BODY> <H1>Bach's home page</H1> <P>Johann Sebastian Bach was a <STRONG>prolific</STRONG> composer. Here are his best works: <OL> <LI>the Goldberg Variations <LI>the Brandenburg Concertos <LI>the Christmas Oratorio </OL> </BODY> </HTML> Notice that an LI doesn't need an end tag, but an OL does. Figure 1.8 shows the result. Figure 1.8. An ordered list.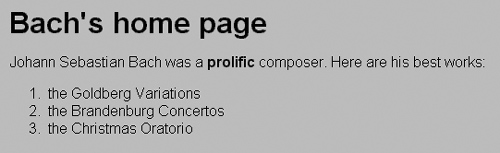 This ordered list is unfair to all the other great compositions by Bach. (What about the Mass in B-minor?) Let's change the ordered list into an unordered list. To do this, we simply change the OL to UL: <HTML> <TITLE>Bach's home page</TITLE> <BODY> <H1>Bach's home page</H1> <P>Johann Sebastian Bach was a <STRONG>prolific</STRONG>composer. Among his works are: <UL> <LI>the Goldberg Variations <LI>the Brandenburg Concertos <LI>the Christmas Oratorio </UL> </BODY> </HTML> Figure 1.9 shows the result. Figure 1.9. An unordered list.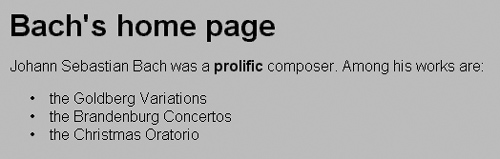 Notice that we do not have to change the LI elements to change the list from unordered to ordered: Both UL and OL use LI as the list item element. But, because the LI elements are now inside the UL element, they will look different. A DL, or definition list, is used for lists that have terms and their corresponding definitions. Each term is contained in a DT element, and each definition in a DD element. An example of a DL is a dictionary or glossary. In the next example, we change our OL to a DL. Notice how the LIs, change to DTs and that like the LIs, they do not require end tags. Figure 1.10 shows the result. Figure 1.10. A definition list.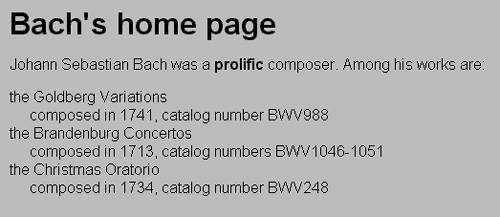 <HTML> <TITLE>Bach's home page</TITLE> <BODY> <H1>Bach's home page</H1> <P>Johann Sebastian Bach was a <STRONG>prolific</STRONG> composer. Among his works are: <DL> <DT>the Goldberg Variations <DD>composed in 1741, catalog number BWV988 <DT>the Brandenburg Concertos <DD>composed in 1713, catalog numbers BWV1046-1051 <DT>the Christmas Oratorio <DD>composed in 1734, catalog number BWV248 </DL> </BODY> </HTML> Empty Elements HR and BRAll the HTML elements that we have discussed so far have had content. HTML also has some elements that do not have content; they are called empty elements. One example is the HR element, which inserts a horizontal rule in the document. It doesn't need any content. Also, the BR element's sole purpose is to force a line break. Because empty elements do not have any content, they don't need any end tags. We can add a horizontal rule to a document by using the HR (horizontal rule) element. HR is an empty element, so you should omit its end tag. Here's the code for adding an HR element: <HTML> <TITLE>Bach's home page</TITLE> <BODY> <H1>Bach's home page</H1> <P>Johann Sebastian Bach was a <STRONG>prolific</STRONG> composer. Among his works are: <UL> <LI>the Goldberg Variations <LI>the Brandenburg Concertos <LI>the Christmas Oratorio </UL> <HR> </BODY> </HTML> Figure 1.11 shows the result. Figure 1.11. Adding a horizontal rule. We can force a line break in the middle of an element by using the BR (break) element. The browser normally ignores line breaks in the HTML document and automatically breaks a line when needed when it displays the document. However, if you want to force a line break at a certain spot in the document, BR enables you to do this. Because BR is an empty element, you can omit its end tag. Here is our example with a BR element added: <HTML> <TITLE>Bach's home page</TITLE> <BODY> <H1>Bach's <BR>home page</H1> <P>Johann Sebastian Bach was a <STRONG>prolific</STRONG> composer. Among his works are: <UL> <LI>the Goldberg Variations <LI>the Brandenburg Concertos <LI>the Christmas Oratorio </UL> </BODY> </HTML> Figure 1.12 shows the result. Figure 1.12. Adding a line break. It is usually better to let the browser determine the line breaks, because as an author, you cannot know how wide the user's window is or how large the fonts are. So, we'll take out the BR element as we move on. Maintaining Preformatted TextIn the previous example, we mentioned that a browser generally ignores line breaks, except for those that you enter using the BR element. The browser also ignores tabs and extra white space. Tabspaces are converted to single white-space characters, while extra white-space characters any more than one are collapsed into one white-space character. Generally, this is what we want. This feature enables us to space out our code so that it is more readable and reflects the structure of the document, secure in the knowledge that the browser ignores all the extra white spaces. Sometimes, however, you may want to insert white space and have the browser display your text exactly as you formatted it. The PRE (preformatted) element allows you do this. Simply enclose within <PRE> tags the information whose formatting you want to preserve. The PRE element is often used for simple tables where columns need to align vertically: <HTML> <TITLE>Bach's home page</TITLE> <BODY> <H1>Bach's <BR>home page</H1> <P>Johann Sebastian Bach was a <STRONG>prolific</STRONG> composer. Among his works are: <PRE> COMPOSITION YEAR CATALOG# Goldberg Variation 1741 BWV988 Brandenburg Concertos 1713 BWV1046-1051 Christmas Oratorio 1734 BWV248 </PRE> </BODY> </HTML> Notice that the content of the PRE element cannot be aligned with the other elements because the extra white space would appear on the canvas. Figure 1.13 shows the result. Figure 1.13. Preserving preformatted text. This is actually not a very good example because by using PRE, we hide the fact that the content is a table. This is a case where using a table is in fact the right thing to do because it enhances accessibility (see the section "Placing text in a table" earlier in this chapter). Adding HyperlinksWe can make our document more interesting by adding hyperlinks to it. When hyperlinks are in place, users can click on them to access related documents from somewhere else on the Web. Hyperlinks are integral to HTML and the Web. Without hyperlinks, there would be no Web. To make a hyperlink, you use the A (anchor) element. When the user clicks on the A element, the browser fetches the document at the other end of the hyperlink. The browser needs to be told where it can find the other document, and this information goes into an attribute on the A element. An attribute is a characteristic quality of the element, other than the type or content of an element. The A element uses an attribute called HREF (hypertext reference) to add a hyperlink: <HTML> <TITLE>Bach's home page</TITLE> <BODY> <H1>Bach's home page</H1> <P>Johann Sebastian Bach was a <STRONG>prolific</STRONG> composer. Among his works are: <UL> <LI>the <A HREF="goldberg.html">Goldberg</A> Variations <LI>the Brandenburg Concertos <LI>the Christmas Oratorio </UL> <HR> </BODY> </HTML> Let's take a closer look at the newly added A element. Figure 1.14 shows the different parts of the A element. Figure 1.14. The parts of an A element. The A start tag is a bit more complicated than the other start tags we have seen so far; in addition to the element name, it includes an attribute. Different element types have different attributes; among the most common ones is the HREF attribute on the A element. Attributes can only go into the start tag of the element, after the element name. Most attributes need a value: The HREF attributes always takes a URL as a value. A URL (Universal Resource Locator) is a Web address that the browser uses to locate the hyperlinked document. When URLs are used as values on the HREF attribute, they should always be quoted ("..."). URLs come in two flavors:
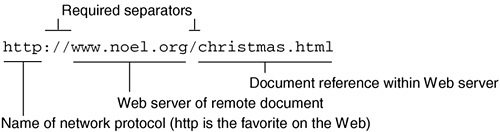
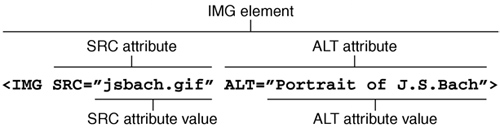
In the previous example, the HREF attribute had a relative URL (goldberg.html) as value. If the user clicks on the word "Goldberg," the browser fetches the document called goldberg.html from the same location as where our sample document is found. We can also put an absolute URL into our document: <HTML> <TITLE>Bach's home page</TITLE> <BODY> <H1>Bach's home page</H1> <P>Johann Sebastian Bach was a <STRONG>prolific</STRONG> composer. Among his works are: <UL> <LI>the <A HREF="goldberg.html">Goldberg</A> Variations <LI>the Brandenburg Concertos <LI>the <A HREF="http://example.org/christmas.html"> Christmas</A> Oratorio </UL> <HR> </BODY> </HTML> As you can see, absolute URLs are slightly more complicated than relative ones. In fact, when Tim Berners-Lee invented the URL scheme, they were only meant to be seen by machines. Figure 1.15 shows the various parts of this URL. Figure 1.15. Structure of a URL. The details of URLs are not the main topic for this book and as long as you are aware of the two types of URL, you may safely proceed. Adding ImagesImages proliferate on the Web. It wasn't until the Mosaic browser added support for images in 1993 that a critical mass of people realized the potential of the Web. You can add images to your documents with the IMG element IMG is short for image. IMG is a peculiar element. First, it's empty. That's not so strange, we've seen those before. (Quick reminder: an empty element is an element without content, e.g., HR, BR.) Second, it's a replaced element. A replaced element is a placeholder for some other content that is being pointed to from the element. In the case of IMG, it points to an image that is fetched by the browser when the IMG element is encountered. Unlike the A element, which gives the user the option of jumping to a link or not, the browser automatically fetches the image IMG points to. Also, unlike the A element, IMG uses an attribute called SRC to point to the image. Let's add an image to the sample document. Not many portraits of Bach are known, but those that exist are on the Web: <HTML> <TITLE>Bach's home page</TITLE> <BODY> <H1><IMG src="/books/2/664/1/html/2/jsbach.png" ALT="Portrait of J.S. Bach">Bach's home page</H1> <P>Johann Sebastian Bach was a <STRONG>prolific</STRONG> composer. Among his works are: <UL> <LI>the <A HREF="goldberg.html">Goldberg</A> Variations <LI>the Brandenburg Concertos <LI>the <A HREF="http://example.org/christmas.html"> Christmas</A> Oratorio </UL> <HR> </BODY> </HTML> Let's take a closer look at the attributes on the IMG element (see Figure 1.16). Figure 1.16. IMG element. The SRC attribute on IMG is similar to the HREF attribute on A: They both take a URL as a value. The ALT attribute is new. The purpose of ALT is to provide an alternative (from which it gets its name) textual description of the image. Sometimes, a browser cannot fetch the image (perhaps the Web server is broken?) or it may be configured to ignore images, for example, in the case of a text-only browser. In these cases, the browser will look for the alternative textual description and display that instead of the image. The ALT text is also essential for people who cannot see. Therefore, you should always try to include a textual alternative for the image so users can still get a sense of what is going on. Figure 1.17 shows how Microsoft Internet Explorer shows the page while the image is being fetched. Figure 1.17. Waiting for an element to be fetched. When the image is ready, the page looks like Figure 1.18. Figure 1.18. The image has been loaded.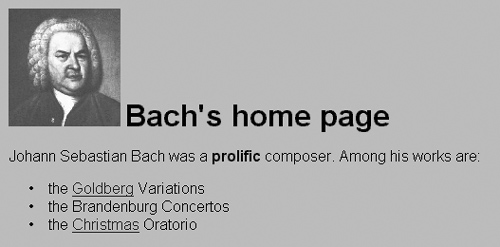 |

EAN: 2147483647
Pages: 215