Windows Forms Interface
| | ||
| | | |
| | ||
Windows Forms Interface
We'll create the UI application within the existing ProjectTracker solution. Open the solution (if you ever got around to closing it) and add a new project using File ![]() Add Project
Add Project ![]() New Project. Make it a C# Windows Application project, and name it PTWin .
New Project. Make it a C# Windows Application project, and name it PTWin .
We'll be using the ProjectTracker.Library assembly so we need to reference it. Because that assembly also requires the four CSLA .NET assemblies, we'll need to reference those as well. As shown in Figure 8-1, use the Add Reference dialog box to get the job done.
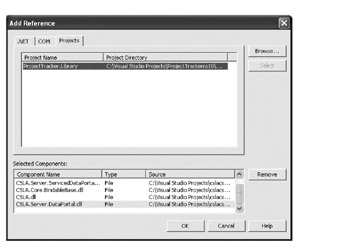
Figure 8-1: Referencing the ProjectTracker.Library and CSLA assemblies
We can use the Projects tab to add the reference to ProjectTracker.Library , but we need to click the Browse button and navigate to the ProjectTracker.Library\ bin\debug directory to reference the CSLA assemblies. (We could alternatively navigate to the CSLA bin\debug directory, but it's safer to get them from the ProjectTracker.Library 's directory, since we know that these are the actual files being used by the ProjectTracker.Library assembly.)
Remove Form1 from the projectwe'll add our own forms as we need them. Finally, right-click the project in Solution Explorer, and set it as the startup project. This way, we can easily use the debugger to test our work as we go along.
Application Configuration
Before we create any forms or interact with the business objects, we need to provide some basic configuration information to the application with the application's configuration file. (This is also done through the DataPortal server configuration file if we're running the DataPortal on a separate machine via remoting.)
Application Configuration File
In the client application configuration file, we can either provide connection strings so that the application can interact with the database directly, or we can provide URLs so that the application can interact with a remote DataPortal server via remoting. We discussed this in Chapter 5 when we set up our DataPortal host application in Internet Information Services (IIS).
In Chapter 1, we discussed the trade-offs between performance, scalability, fault tolerance, and security that come with various physical n- tier configurations. As we said then, the most scalable solution for an intelligent client UI is to use an application server to run our data-access tier. That's what we'll do here by configuring our client application to access the server-side DataPortal via remoting.
This is controlled by the application's configuration file. To add such a file, choose Project ![]() Add New Item, and then choose the Text File option as shown in Figure 8-2.
Add New Item, and then choose the Text File option as shown in Figure 8-2.
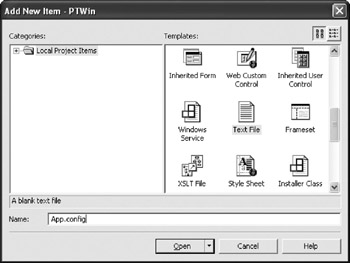
Figure 8-2: Adding the App.config file to the project
Name the new file App.config and click Open to add the file to our project.
| Note | Naming the file App.config is important. VS .NET will automatically copy the file into the appropriate bin directory, changing the name to match that of our program. In our case, it will change the name to PTWin.exe.config as it copies it into the bin directories. This occurs each time we build the project in VS .NET. |
The App.config file is an XML file that contains settings to configure our application. You use different XML depending on how we want our application configured.
If we wanted to have our client application interact directly with the database, we'd use the following (with " server " changed to the name of your database server):
<?xml version="1.0" encoding="utf-8" ?> <configuration> <appSettings> <add key="DB:PTracker" value="data source=server;initial catalog=PTracker; integrated security=SSPI" /> <add key="DB:Security" value="data source=server;initial catalog=Security; integrated security=SSPI" /> </appSettings> </configuration>
However, we want to demonstrate best practices, so we'll configure the application to use a remote DataPortal instead. Though this won't perform as well for small numbers of users, it provides better scalability in most cases:
<?xml version="1.0" encoding="utf-8" ?> <configuration> <appSettings> <add key="Authentication" value="CSLA" /> <add key="PortalServer" value="http://localhost/DataPortal/DataPortal.rem" /> <add key="ServicedPortalServer" value="http://localhost/DataPortal/ServicedDataPortal.rem" /> </appSettings> </configuration>
Here you need to change " localhost " to the name of your application server on which the DataPortal host is installed (unless it's actually on the local machine, of course).
| Tip | The App.config file won't be useful for no-touch deployment. In that case, we need to make a copy of this file and name it PTWin.exe.remoteconfig . This then needs to be placed in the same server directory as the application and its DLLs, so that it's available to clients running the program via the NetRun utility, as described in the Appendix. |
Notice that we're configuring the application to use our custom CSLA security model. If we wanted to use Windows' integrated security, we could do so by changing the Authentication key to Windows . In that case, we'd need to change the way the DataPortal host is configured as well. We'll discuss those changes when we configure the DataPortal server.
Configuring the DataPortal Server
Since we've configured the client application to use a remote DataPortal , we need to make sure that the DataPortal host has access to our ProjectTracker.Library business assembly. Remember that all our data-access code will run on the DataPortal server, so the DataPortal server needs our DLL.
Providing access to the DLL is simply a matter of copying the ProjectTracker.Library.dll file from the appropriate bin directory to the bin directory of the DataPortal host. By default, that would be a directory such as c:\inetpub\ wwwroot \DataPortal\bin. Once it's installed, our framework DataPortal code will automatically load and use the ProjectTracker.Library.dll as needed.
This bin directory may contain business DLLs for many applications. It will automatically invoke the appropriate DLL that corresponds to the business DLL that's being used by the client application.
| Tip | If this presents a security or application isolation issue in your environment, you can duplicate the DataPortal host by creating multiple virtual roots in IIS, each with its own copy of the DataPortal server, but you can only create the business DLLs for a specific application. The client-side application configuration file would have URLs that point to the specific virtual root, so the application would be isolated from other applications. |
Note that the business DLL on the client must be the same as the one on the server. If they get out of sync, the client will be unable to invoke the server, because the objects won't pass by value. This is a feature of the .NET Frameworkit performs version checking to ensure that the DLLs at both ends are the same when an object is passed by value across the network.
| Note | If we update ProjectTracker.Library.dll , we need to update both the DataPortal server directory and all client workstations at the same time. |
This is why no-touch deployment is so important and powerful. We can easily ensure that anytime a new business DLL is copied into the DataPortal server's bin directory, it's also copied into the appropriate server directory so that it's automatically deployed to all clients as well.
We also need to provide database-connection strings to our server-side code. This is done by editing the Web.config file in the DataPortal host project, and adding an <appSettings> child element of <configuration> (if one doesn't already exist).
<appSettings> <add key="Authentication" value="CSLA" /> <add key="DB:Security" value="data source=server;initial catalog=Security; integrated security=SSPI" /> <add key="DB:PTracker" value="data source=server;initial catalog=PTracker; integrated security=SSPI" /> </appSettings>
Once again, you should replace " server " with the name of your database server. Also, you'll need to change the security settings if you're using a specific user ID and password instead of relying on integrated security.
| Tip | I usually use a specific user ID for the application rather than integrated securitythe latter means that data access is handled by the ASP.NET account for all applications on the server, and that's typically unacceptable. Using an application-specific account provides more control over what an application can do or access in the database. |
Notice that we're configuring the server to use our custom CSLA security model. This matches what we did in the client configuration file.
| Note | The security authentication models on client and server must be the same. |
If we wanted to use Windows' integrated security, we could do so by changing the Authentication key to Windows on both client and server. In that case, we'd need to change the DataPortal host's virtual root settings through IIS to disallow anonymous users. We would also need to add an extra element to the <system.web> section of the DataPortal host's Web.config file, as follows :
<identity impersonate="true"/>
These steps ensure that IIS requires the client to authenticate with the server as it connects, and that the ASP.NET process in which our DataPortal code runs will properly impersonate the user who is logged in to the client workstation. We discussed the theory behind this in Chapter 3 when we covered .NET security, and in Chapter 5 when we implemented our own principal and identity classes.
Now that our client has been configured to use a remote DataPortal , and the DataPortal server has access to our business DLL, we can move on to create the UI itself.
Main Form
Because we'll be creating an MDI application, we need an MDI container form to start from. Add a new form to the project, and name it MainForm . Change the following properties, as listed in Table 8-1.
| Property | Value |
|---|---|
| IsMdiContainer | true |
| WindowState | Maximized |
| Text Project | Tracker |
This form's purpose is to contain all our other forms, and to provide a menu and status for the user.
Make sure to change the project's properties to make the new MainForm form the startup form for the application.
Menu
Drag and drop a MainMenu control from the toolbox onto the form. Add menu items to the control by clicking in the control on the form itself and adding the items shown in Figure 8-3.

Figure 8-3: Main menu layout
Once this is done, right-click the menu, and choose the Edit Names option. This changes the display so that we can see the names of the menu elements. Change the names of the elements to match those shown in Figure 8-4.
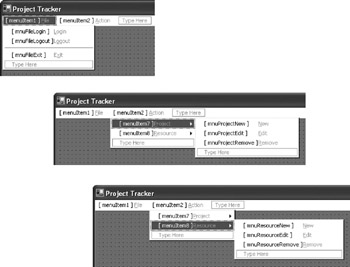
Figure 8-4: Setting the names of the menu items
Note that we're only assigning names to the menu options we'll be using via code. It wouldn't hurt to assign names to the File, Project, and Resource options, but there's little point since we won't be interacting with them.
We can now double-click menu items to bring up the code window that enables us to write code in order to respond when the user clicks the item. To start with, let's double-click the File ![]() Exit option and write the following:
Exit option and write the following:
private void mnuFileExit_Click(object sender, System.EventArgs e) { Close(); } Since we'll have a fair amount of code in the main form when we're done, let's put this into a region to keep it organized, as shown here:
#region Load and Exit private void mnuFileExit_Click(object sender, System.EventArgs e) { Close(); } #endregion Also, add empty regions for the security, project-related, and resource- related menu items as follows:
#region Login/Logout/Authorization #endregion #region Projects #endregion #region Resources #endregion
We'll add code for the remaining menu items as we create the forms that they'll invoke.
The final thing we need to do is to set the initial state of the menus . When the user first runs the application, he won't be validated as a user, so the Action menu should be unavailable. Set its Enabled property to false ; we'll set the value to true once the user has logged into the application.
Status
An MDI parent window typically also includes a status bar so that the user can see what's happening with the application. Drag and drop a StatusBar control onto the form, change its ShowPanels property to true so that its panels are displayed, and then click the " " button in the Panels entry of the Properties window to bring up a dialog box in which we can create panels for the control.
We'll create two panels: one to display status information, and the other to display the user ID of the user once she has logged into the application. Add the first of these as shown in Figure 8-5.
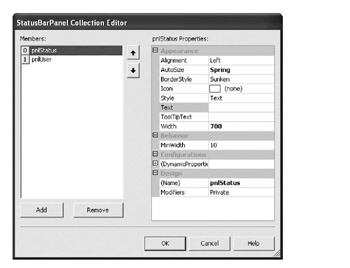
Figure 8-5: Setting up the Status panel
Setting the AutoSize property to Spring indicates that this panel should consume all the available space in the bar. This will give us as much space as possible to display our status text. Once that's done, you can add the second panel, as shown in Figure 8-6.
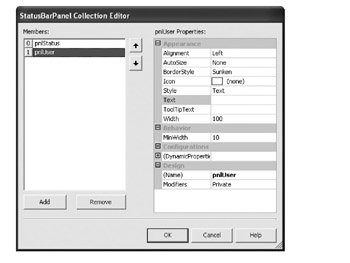
Figure 8-6: Setting up the User panel
Here the AutoSize property is left at the default value of None , indicating that the panel's size is fixed according to the Width property value.
We'll use these two panels on a number of occasions as we implement the remainder of the application. To simplify setting the status value from other forms in the UI, add the following code to the Main form as follows:
#region Status static MainForm _Main; public static void Status(string text) { _main.pnlStatus.Text = text; } #endregion Notice that this is a static method, so any code on any form in our UI project can update the status with code like this:
MainForm.Status("My status text") For this to work, we need a static variable that points to our form so we should add the following to the Load and Exit region:
private void MainForm_Load(object sender, System.EventArgs e) { _main = this; } As the form is loaded, it sets the static _main variable to point to the form, thus allowing our static method to update the status text.
Login Form
Before any of our business objects will function, we need to have the user log into the application. Until we've set the CurrentPrincipal for the client thread with either a WindowsPrincipal or a BusinessPrincipal object, our objects won't be able to verify the user's identity or roles. In our case, we've configured the client and DataPortal server configuration files to use CSLA table-based security, which means we're using the BusinessPrincipal object to manage security.
To use the BusinessPrincipal class, we need to call its Login() method, providing it with a username and password. BusinessPrincipal takes care of verifying the username and password, and loads the associated list of roles (if the user is valid).
To do this, we'll create a Login dialog box that retrieves the username and password from a user, and we'll call the dialog box from the main form as appropriate. The actual login process will be handled by the code in the main form. This keeps the Login dialog box very simple (and potentially reusable), since it merely prompts the user for a username and password combination.
The Login Dialog Box
We can create a simple form to get the username and password from the user. Add a new form to the project and name it Login . Set the following properties listed in Table 8-2 on the form.
| Property | Value |
|---|---|
| ControlBox | false |
| FormBorderStyle | FixedSingle |
| MaximizeBox | false |
| MinimizeBox | false |
| ShowInTaskbar | false |
| StartPosition | CenterParent |
| Text | Login |
Then add two Label s, two TextBox es, and two Button controls as shown in Figure 8-7. In this case, I added a picture as well, but obviously that's an optional extra.
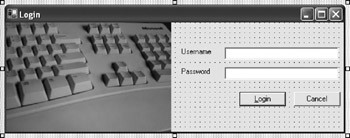
Figure 8-7: Layout of the Login form
Name the TextBox controls txtUsername and txtPassword , respectively. Name the Button controls btnLogin and btnCancel . Set the PasswordChar property of txtPassword to " * " so that it hides the contents of the field.
Set the form's CancelButton property to btnCancel , and the AcceptButton property to btnLogin . Set the DialogResult property of btnCancel to Cancel. Also, set btnLogin so its Enabled property is false and its DialogResult property is OK.
After all that, we can add some code. First, let's declare some variables to hold the results of the dialog box.
string _username = string.Empty; string _password = string.Empty;
Then add some properties so that our main form can retrieve the results after the dialog box has been displayed, as shown here:
public string Username { get { return _username; } } public string Password { get { return _password; } } Using these properties, our code in the main form can easily determine whether the user clicked the Login button. If so, we can retrieve the username and password values.
We'll also add code to enable the Login button only if the user has entered a username. Double-click txtUsername in the designer, and add the following code:
private void txtUsername_TextChanged(object sender, System.EventArgs e) { btnLogin.Enabled = (txtUsername.Text.Trim().Length > 0); } Though having a blank password isn't a good practice, it does happen, so we're supporting the concept by only checking to ensure that the user supplied a name. All that remains then is to handle the button-click events. If the user clicks the Login button, we can provide the values for retrieval as shown here:
private void btnLogin_Click(object sender, System.EventArgs e) { _username = txtUsername.Text; _password = txtPassword.Text; Close(); } On the other hand, if the user clicks the Cancel button, then we don't want to return the values:
private void btnCancel_Click(object sender, System.EventArgs e) { _username = string.Empty; _password = string.Empty; Close(); } Either way, it's up to the main form to decide what to do with these resultsthe dialog box we've created here is nicely generic and may be reused elsewhere with little or no change.
Doing the Login
Now that our Login dialog box is complete, we can add code to the main form to invoke the dialog box and do the actual login process. First, add this code to the main form's Login/Logout/Authorization region:
using CSLA.Security; using System.Threading; ... #region Login/Logout/Authorization void DoLogin() { Login dlg = new Login(); if(dlg.ShowDialog(this) == DialogResult.OK) { Cursor = Cursors.WaitCursor; Status("Verifying user..."); BusinessPrincipal.Login(dlg.Username, dlg.Password); Status(""); Cursor = Cursors.Default; if(Thread.CurrentPrincipal.Identity.IsAuthenticated) EnableMenus(); else { DoLogout(); MessageBox.Show("The username and password were not valid", "Failed login", MessageBoxButtons.OK, MessageBoxIcon.Exclamation); } } else DoLogout(); } #endregion This code displays the Login dialog box to retrieve the username and password from the user. If the user clicks the Login button, we call the Login() method on the BusinessPrincipal class to perform the actual login verification.
BusinessPrincipal.Login(dlg.Username, dlg.Password);
Once this call is complete, we can use our thread's CurrentPrincipal to determine whether the user was successfully authenticatedif so, we can retrieve the user's identity and check the user's roles using the principal and identity objects and standard .NET security coding techniques.
Note that we make a couple of calls to a DoLogout() method. Let's implement that method now.
void DoLogout() { // reset to an unauthorized principal Thread.CurrentPrincipal = new GenericPrincipal(new GenericIdentity(""), new string[] {}); pnlUser.Text = string.Empty; EnableMenus(); } This method ensures that we're no longer logged in by setting the current principal to an unauthenticated GenericPrincipal object.
In both DoLogin() and DoLogout() , we change the Enabled properties of our menusa procedure that's rather more complicated for enabling than for disabling because of the different actions that different users are allowed to perform. We need to implement the EnableMenus() method for this purpose, as shown here:
void EnableMenus() { IPrincipal user; user = Thread.CurrentPrincipal; pnlUser.Text = user.Identity.Name; mnuProjectNew.Enabled = user.IsInRole("ProjectManager"); mnuProjectRemove.Enabled = user.IsInRole("ProjectManager") user.IsInRole("Administrator"); mnuResourceNew.Enabled = user.IsInRole("ProjectManager") user.IsInRole("Supervisor"); mnuResourceRemove.Enabled = user.IsInRole("ProjectManager") user.IsInRole("Supervisor") user.IsInRole("Administrator"); } By enabling and disabling the various menu options based on whether the user is logged in and what the user's roles are, we provide immediate and obvious feedback to the user regarding what she can and cannot do within the application.
Updating the Menu
Now we're finally ready to make the login process occur based on the user's actions. First, when the user starts the application, we'll want to have the login take place immediately. Update the form's Load event handler as shown:
private void MainForm_Load(object sender, System.EventArgs e) { _main = this; DoLogin(); } We also want to allow the user to log in based on the Login menu item so add this to the Login/Logout/Authorization region:
private void mnuFileLogin_Click(object sender, System.EventArgs e) { DoLogin(); } At this point, the user is prompted to log in when the application starts, and he can log in or change their identity as needed by using the menu option.
Using Windows Integrated Security
If we wanted to use Windows' integrated security, we wouldn't need a login form, because the client workstation already knows the user's identity. Instead, we'd need to add a bit of code to our main menu form so that as it loads, the CurrentPrincipal is configured with a WindowsPrincipal object.
The following code shows how we can detect the authentication mode and adapt to use either Windows or CSLA security appropriately:
using CSLA.Security; using System.Configuration; using System.Security.Principal; using System.Threading; ... private void MainForm_Load(object sender, System.EventArgs e) { _main = this; if(ConfigurationSettings.AppSettings["Authentication"] == "Windows") { mnuFileLogin.Visible = false; AppDomain.CurrentDomain.SetPrincipalPolicy(PrincipalPolicy.WindowsPrincipal); EnableMenus(); } else DoLogin(); } Calling SetPrincipalPolicy like this triggers the .NET runtime to create and populate a WindowsPrincipal object and make it the current object for our client thread.
Of course, both the client and DataPortal server configuration files must be set to use Windows security. Also, the DataPortal server host in IIS must be set to disallow anonymous access, thereby forcing the client to provide IIS with the Windows identity from the client workstation via integrated security.
Project List
When the user wants to edit or remove a project from the system, she'll need to be presented with a list of projects. We implemented the ProjectList business object for this purpose, so the infrastructure already exists to retrieve the project data. All we need to do is provide a dialog box to display the information.
Because this dialog box needs to support both edit and removal operations, we'll make the dialog box itself genericit will simply display the list of projects and allow the user to select one. All the intelligence about what to do with the selected item will occur in the main form's code.
The biggest challenge we face is that the ListView control doesn't support data binding, which is a real shame. The ListView control is ideal for displaying a list of data because it's more lightweight than a grid control, and users are very familiar with it. Because I like the ListView control so much, I created a version that supports data binding. This is described in an article I wrote for MSDN. [1]
| Tip | The control and its code are included in the download for this book, but for full details about how it works, please refer to the MSDN article. Though the article and code are in VB .NET, thanks to .NET's language interoperability features we can use this control in a C# application with no problem. |
The new control is called a DataListView , and we'll be using it in several of our forms. You can download the code from MSDN, add the project to the current solution, and then reference the MSDN.DataListView project to gain access to the new control.
ProjectSelect Dialog Box
Add a new form to the project, and name it ProjectSelect . Add a DataListView control and two Button controls, as shown in Figure 8-8.
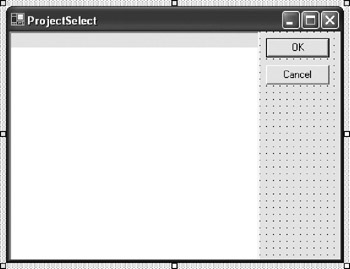
Figure 8-8: Layout of the ProjectSelect form
The DataListView control is an enhanced ListView that supports data binding. It also defaults to a "detail" view so it displays data in a gridlike format, and allows the user to select a single row at a time.
Name the DataListView control dvDisplay , the Button controls btnOK and btnCancel , and set the form's AcceptButton and CancelButton properties to point to the appropriate buttons .
Because our ProjectList business object does most of the work, and data binding in the form does most of what's left, we don't have to write very much code. First, declare a variable to hold the user's selection as follows:
string result = string.Empty;
Then create a property so that the main form can retrieve the value as shown here:
public string Result { get { return result; } } When the form is created, we need to get a ProjectList object and bind it to the DataListView control. We'll also take this opportunity to set the form's title text:
public ProjectSelect(string title) { InitializeComponent(); Text = title; ProjectTracker.Library.ProjectList list = ProjectTracker.Library.ProjectList.GetProjectList(); dvDisplay.AutoDiscover = false; dvDisplay.Columns.Add("ID", "ID", 0); dvDisplay.Columns.Add("Project name", "Name", dvDisplay.Width); dvDisplay.DataSource = list; dvDisplay.Focus(); } Retrieving the list of projects is trivial, because the business object does all the work:
ProjectList list = ProjectList.GetProjectList();
Once we have the list, we configure the columns to be displayed in the DataListView control. First, we tell the control not to discover all the properties on the object automatically, but rather to allow us to control the columns to be displayed. Then we add two columnsone for each data field.
The ID column is set to a width of zero. The value is in the control, but it's not displayed to the user. The project's name, however, is displayed. Finally, we set the DataSource of the control to our business collection:
dvDisplay.DataSource = list;
This binds the control to the collection so that the list of project data will be automatically displayed.
All we need to do now is add code behind our buttons. In the case of the OK button, we want to return the value chosen by the user; otherwise , we want to return an empty String :
private void btnOK_Click(object sender, System.EventArgs e) { if(dvDisplay.SelectedItems.Count > 0) result = dvDisplay.SelectedItems[0].Text; else result = string.Empty; Close(); } private void btnCancel_Click(object sender, System.EventArgs e) { result = string.Empty; Close(); } Either way, the dialog box doesn't care what's done with the valueits purpose is solely to allow the user to select a project.
Project Edit
To support both adding and editing a project, we'll create a form that allows the user to interact with a Project object. Our Project business object already implements our business functionality. Once again the form itself can be relatively straightforward, leaving the object to do all validation, manipulation, calculation, and other business operations.
The form is complicated a little because we need to display the list of resources assigned to the projectthe user needs to be able to add and remove resources too. To manage this display, we'll again use a DataListView control so that we can easily use data binding.
ProjectEdit Form
Add a new form to the project, named ProjectEdit . Add controls as shown in Figure 8-9 and the associated Table 8-3.
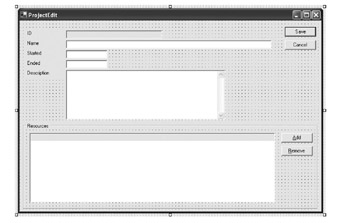
Figure 8-9: Layout of the ProjectEdit form
| Control | Properties |
|---|---|
| TextBox | Name=txtID ; Text="" ; ReadOnly=true |
| TextBox | Name=txtName |
| TextBox | Name=txtStarted |
| TextBox | Name=txtEnded |
| TextBox | Name=txtDescription ; Multiline=true ; Scrollbars=Vertical |
| ContextMenu | Name=mnuRoles |
| DataListView | Name=dvResources ; ContextMenu=mnuRoles |
| Button | Name=btnSave ; Text=Save |
| Button | Name=btnCancel ; Text=Cancel |
| Button | Name=btnAddResource ; Text=Add |
| Button | Name=btnRemoveResource ; Text=Remove |
Set the AcceptButton and CancelButton properties of the form to btnSave and btnCancel .
The chkIsDirty Control
There's one other control that we need to add, and its requirements are a bit odd. In fact, this is a bit of a hack we need to do until .NET 2.0 comes out and provides a better solution.
Back in Chapter 4, when we created our CSLA .NET Framework codein particular, the BindableBase classwe implemented an IsDirtyChanged event that could be used safely even though our business objects are [Serializable()] . We then designed our MarkDirty() method so that it raises this event anytime our object is marked as dirty.
At the time, we remarked that Windows Forms data binding requires that anytime a property on the object is changed, a propertyChanged event should be raised by the data source (our business object), where property corresponds to the property name. Data binding then receives this event, which triggers a refresh in the display of all data-bound controls.
Having to declare an event for every property on our object, and raise those properties anytime the appropriate data values change is a maintenance nightmare. We now know that .NET 2.0 will have an IPropertyChange interface that consolidates all this into a single event that we can raise from the business object.
In the meantime, it turns out that all we need to do is raise any single propertyChanged event any time that any property changes. We don't have to raise an event specifically related to the property that was changed. Because any property change on our object will result in MarkDirty() being called, we can use the IsDirtyChanged event to trigger Windows Forms data binding to refresh the changed data for any and all properties on our object.
For this to work, however, the IsDirty property on our object must be bound to a control on the form. There's no reason to display this control to the user, but at the same time, we can't just change its Visible property to false . Unless a control is visible, it won't be data bound. Luckily, there's a way to solve this problem. We can make a control invisible to the user by placing it physically outside the borders of the form. Then, technically it's still "visible," even though the user can't see it.
So: Add a CheckBox control to the form and name it chkIsDirty . Set its Enabled property to false . While this control is required on the form for data binding to work, we don't want the user interacting with it. We also don't want the user accidentally tabbing into the control. Disabling the control avoids these potential issues.
Now use the Properties window to set its Size property to 0,0 . This effectively makes the control invisible, without actually setting its Visible property.
| Tip | If you'd prefer, you can also position the control behind another control on your form, or set its location to ˆ 300 , ˆ 300 . The whole idea is to ensure that it isn't visible to the user, but yet its Visible property is still true . |
We'll data-bind this control to our object along with the other controls, with the end result being that our IsDirtyChanged event will be automatically caught by the data-binding mechanism, so all our controls will refresh their values when a property is changed on the business object.
Getting the Project Object
Now we can add code behind the form. First of all, we know that we'll be dealing with a Project object. This object will be provided to our form from the main form, which will create or retrieve the appropriate object on our behalf . We just need to include a variable and a property so that we can get access to the object, as shown here:
Project _project; public Project Project { get { return _project; } set { _project = value; } } The main form will pass us this value when creating the ProjectEdit form.
Loading the Form
As the form loads, we'll need to do some security checks, because there are some users who can bring up the form to look at its contents, but can't actually edit a Project object. In these cases, the Save button will need to be disabled.
To determine whether or not to disable the button, we'll use the IsInRole() method of our thread's Principal security object. To simplify access to the Principal object, we'll import the System.Threading namespace as shown here:
using System.Threading;
Then, as the form is created, we can set the security and fill the form based on the data in the Project object:
public ProjectEdit(Project project) { InitializeComponent(); _project = project; this.Text = "Project " + _project.Name; foreach(string role in Assignment.Roles) { MenuItem item = new MenuItem(Assignment.Roles[role]); mnuRoles.MenuItems.Add(item); item.Click += new System.EventHandler(this.mnuRoles_Click); } if(Thread.CurrentPrincipal.IsInRole("ProjectManager")) { // only project managers can save a project _project.BeginEdit(); btnAddResource.Enabled = true; btnRemoveResource.Enabled = true; } else { btnAddResource.Enabled = false; btnRemoveResource.Enabled = false; } DataBind(); } First, we store a reference to the Project object, and then we change our caption text to reflect the Project object:
_project = project; this.Text = "Project " + _project.Name;
Then we populate the mnuRoles control with the list of valid roles for a resource on a project. The Assignment business class provides this data, so our UI code doesn't need to worry about where it came fromit can just use the data as follows:
foreach(string role in Assignment.Roles) { MenuItem item = new MenuItem(Assignment.Roles[role]); mnuRoles.MenuItems.Add(item); item.Click += new System.EventHandler(this.mnuRoles_Click); } We'll be using mnuRules as a context menu in the DataListView control so that the user can change the role a resource is playing in our project.
We then check the role of the current user to see if they should have access to the buttons for adding and removing a resource from the project.
if(Thread.CurrentPrincipal.IsInRole("ProjectManager")) Notice also that we only call BeginEdit() in the case that we're allowing editing of the object. This call triggers the object to take a snapshot of its state so that if the user later cancels the form, we can call CancelEdit() to restore the object to its original values.
Finally, we call a DataBind() method (which we've yet to write) to bind the form to the Project object.
Simplifying Data Binding
The DataBind() method will itself make heavy use of a method named BindField() , which wraps a couple of standard Windows Forms data-binding methods in order to keep our code simpler.
Binding a property of a control to a data source is a single call, as follows:
control .DataBindings.Add( controlPropertyName , dataSource , dataSourcePropertyName )
The italicized items in this statement should be replaced with meaningful values. Table 8-4 describes the meaning of each.
| Item | Description |
|---|---|
| control | A reference to the control to bind |
| controlPropertyName | The text name of the property on the control to which we want to bind the value |
| dataSource | A reference to the data source (our business object) |
| dataSourcePropertyName | The text name of the property of the data source that's to be bound to the control's property |
The DataBindings collection exists on all Windows Forms controls, so we can use this technique to bind values from a data source to one or more properties on any control.
Unfortunately, we can get into trouble if we try to rebind the same property a second time, as this will result in a runtime error. This can happen if we reuse our form to bind against multiple data sources over time. Before we can bind a new data source to our controls, we need to make sure that any preexisting data bindings are removed.
The BindField() method takes care of these details, thus simplifying the code we write in our forms.
To make the BindField() method available to all forms in our project, we'll add it to a class as a static method. This will make the method available to all code in our project without forcing the need to create an instance of the class.
Add a new class to the project and name it Util . Then, add the BindField() method to it:
using System; using System.Windows.Forms; namespace PTWin { /// <summary> /// Utilities to assist with data binding. /// </summary> public class Util { /// <summary> /// Binds a control to a data source property, making sure /// that a previous binding doesn't already exist. /// </summary> public static void BindField(Control control, string propertyName, object dataSource, string dataMember) { Binding bd; for(int index = control.DataBindings.Count - 1; (index == 0); index--) { bd = control.DataBindings[index]; if(bd.PropertyName == propertyName) control.DataBindings.Remove(bd); } control.DataBindings.Add(propertyName, dataSource, dataMember); } } } The DataBind Method
Back in the ProjectEdit form, we can now add the DataBind() method:
void DataBind() { if(Thread.CurrentPrincipal.IsInRole("ProjectManager")) { // only project managers can save a project Util.BindField(btnSave, "Enabled", _project, "IsValid"); } else btnSave.Enabled = false; Util.BindField(chkIsDirty, "Checked", _project, "IsDirty"); Util.BindField(txtID, "Text", _project, "ID"); Util.BindField(txtName, "Text", _project, "Name"); Util.BindField(txtStarted, "Text", _project, "Started"); Util.BindField(txtEnded, "Text", _project, "Ended"); Util.BindField(txtDescription, "Text", _project, "Description"); dvResources.SuspendLayout(); dvResources.Clear(); dvResources.AutoDiscover = false; dvResources.Columns.Add("ID", "ResourceID", 0); dvResources.Columns.Add("Last name", "LastName", 100); dvResources.Columns.Add("First name", "FirstName", 100); dvResources.Columns.Add("Assigned", "Assigned", 100); dvResources.Columns.Add("Role", "Role", 150); dvResources.DataSource = _project.Resources; dvResources.ResumeLayout(); } First, we do a security check to see if the Save button should be available or not:
if(Thread.CurrentPrincipal.IsInRole("ProjectManager")) Even if the button should be available based on security, we still only want it to be available in the case that the Project object is in a valid state. This can be done easily, by binding its Enabled property to the IsValid property on the object, as shown here:
Util.BindField(btnSave, "Enabled", _project, "IsValid");
We then bind our other controls to the business object as follows:
Util.BindField(chkIsDirty, "Checked", _project, "IsDirty"); Util.BindField(txtID, "Text", _project, "ID"); Util.BindField(txtName, "Text", _project, "Name"); Util.BindField(txtStarted, "Text", _project, "Started"); Util.BindField(txtEnded, "Text", _project, "Ended"); Util.BindField(txtDescription, "Text", _project, "Description");
Note that we also bind chkIsDirty to the object's IsDirty property, even though this control has a size of 0,0 and isn't visible to the user. By doing this, we ensure that our IsDirtyChanged event is available to the data-binding infrastructure. When our business logic calls MarkDirty() that in turn calls OnIsDirtyChanged() . This raises the IsDirtyChanged event, which is automatically handled by the data-binding infrastructure because the IsDirty property is bound to a control. Data binding then automatically refreshes our controls anytime a property changes on our business object.
Finally, we bind the collection of child objects to the DataListView control, and manually specify which columns are to be displayed and what widths should be used for each.
Since Windows Forms data binding is read-write, we've now accomplished the vast majority of the coding that's necessary in our form, and you should notice that our form doesn't include any validation code. The business object takes care of those details, setting its IsValid property based on whether its data is valid or not. Since we've bound the Save button to IsValid , the user can only save the object in the case that it's indeed valid.
| Tip | Also remember that the Save() method itself checks the IsValid property, and throws an exception if it's called when the object is invalid. Even if the UI code was to allow the Save button to be clicked at any time, the object would still have the final say. |
Saving the Object
We need to write some code to handle the Save button. If the user clicks the Save button, we want to save the changes to the database as follows:
private void btnSave_Click(object sender, System.EventArgs e) { try { Cursor.Current = Cursors.WaitCursor; _project.ApplyEdit(); _project = (Project)_project.Save(); DataBind(); Cursor.Current = Cursors.Default; } catch(Exception ex) { Cursor.Current = Cursors.Default; MessageBox.Show(ex.ToString()); } Close(); } First, we call ApplyEdit() to commit any changes that the user has made to the object's state. This doesn't save the data to the database, but it does cause the object to resolve its "undo" stack. We then call the Save() method to trigger the actual save to the database. Of course, writing to a database comes with potential dangersperhaps there's a duplicate key, or some other relational rule gets violated? Because of this, we use a try catch block to catch the exception and display any problem to the user.
The bigger issue here is that the call to Save() returns a new instance of the Project object:
_project = (Project)_project.Save();
Notice that we update the form's _project variable with the new object. If we planned to continue to use the object in the form, we must rebind the data so that our controls are bound to the new object! In this example, we immediately close the form, so rebinding is unnecessary.
| Note | Were we to leave the form open and allow continued editing of the object, we'd need to call the DataBind() method to rebind the form to the new Project object we received as a result of the call to the Save() method. |
This fact is the reason why DataBind() calls BindField() . The latter simplifies the process of rebinding the controls to a new object, because it automatically removes the previous (now invalid) binding and replaces it with the new one. If we were to change the Save button not to close the form, we'd need to change the code as follows:
private void btnSave_Click(object sender, System.EventArgs e) { try { Cursor.Current = Cursors.WaitCursor; _project.ApplyEdit(); _project = (Project)_project.Save(); DataBind(); Cursor.Current = Cursors.Default; } catch(Exception ex) { Cursor.Current = Cursors.Default; MessageBox.Show(ex.ToString()); } DataBind(); } If we don't rebind the form to the new object, our application will not work properly, but it won't crash either. The form would remain bound to the old version of the object, even though we need to be using the new version. Any changes made by the user would be to the old version, but a subsequent click of the Save button would affect the new version. Things can obviously get messy very quickly, so it's critical that the form be rebound to the new object, or that the form be closed.
Canceling and Closing
We also need to write code to handle the Cancel button that's being clicked. Specifically, we need to tell the Project object to cancel any edits. (We need to do the same if the user clicks the close button on the form itself.)
private void btnCancel_Click(object sender, System.EventArgs e) { Close(); } private void ProjectEdit_Closing(object sender, System.ComponentModel.CancelEventArgs e) { _project.CancelEdit(); } The CancelEdit() call resets the object to its state when we called BeginEdit() .
| Tip | Since we're immediately closing the form, it might seem like a waste of time to reset the object. However, it's important to remember that other code in our application could have a reference to this object, so resetting it to its original values is important for overall consistency. Consider Microsoft Outlook, for instance. Within Outlook, it's quite possible to have several different windows open to view or interact with the same email at the same time. All those windows refer to the same underlying object, so it's important to keep that object consistent, even when one of the windows is done with it. |
Adding Child Objects
As with everything else in our user interface, we rely on the business objects to handle the details of working with child objects. Displaying the child objectsin this case, the list of resources assigned to this projectis handled by binding the child collection to the DataListView control. All we need to do is put a bit of code behind the Add and Remove buttons, and allow the user to right-click a resource to change its role in the project.
Behind the Add button, we can implement code so that the user can select a resource, and then assign it to the project. Though we haven't done so yet, we'll be creating a ResourceSelect dialog box that's just like the ProjectSelect dialog box we created earlier. The click event handler for the button looks like this:
private void btnAddResource_Click(object sender, System.EventArgs e) { ResourceSelect dlg = new ResourceSelect("Assign resource"); dlg.ShowDialog(this); string id = dlg.Result; if(id.Length > 0) { dvResources.SuspendLayout(); dvResources.DataSource = null; try { _project.Resources.Assign(id); } catch(Exception ex) { MessageBox.Show(ex.Message); } finally { dvResources.DataSource = _project.Resources; dvResources.ResumeLayout(); } } } First, we show the ResourceSelect dialog box to get the right resource from the user:
ResourceSelect dlg = new ResourceSelect("Assign resource"); dlg.ShowDialog(this); string id = dlg.Result; If the user selected a resource, then we assign it to the project as follows:
_project.Resources.Assign(id);
You may remember that we implemented several variations on the Assign() method. This one assigns the resource to the project with the default Role value.
Notice that there's some other code in the method. The calls to SuspendLayout() and ResumeLayout() are there for performance reasonsthey stop the DataListView control from refreshing its display as we update its underlying data. More importantly, we're unbinding and rebinding the control to the list of child objects to ensure that it reflects the new item we've added. If we don't do this, the list control won't reflect the changes, even though the underlying child collection will.
Removing Child Objects
Removing a child object is simpler than adding a new one, since we don't need to arrange for the user to select a new resource. They just select an item from our DataListView control, and then click the Remove button as follows:
private void btnRemoveResource_Click(object sender, System.EventArgs e) { string id = dvResources.SelectedItems[0].Text; if(MessageBox.Show("Remove resource " + id + " from project?", "Remove resource", MessageBoxButtons.YesNo, MessageBoxIcon.Question) == DialogResult.Yes) { dvResources.SuspendLayout(); dvResources.DataSource = null; _project.Resources.Remove(id); dvResources.DataSource = _project.Resources; dvResources.ResumeLayout(); } } We retrieve the selected resource ID from the control, and ask the user if he's sure about the operation he's about to perform. If he says yes, then we suspend the update of our control, unbind the control, remove the child, and rebind the control to the child collection.
Remember that when we both add and remove child objects, the database itself isn't changed until the user clicks the Save button and the Project object (along with its child objects) is updated to the database. Nothing we're doing here is permanent until the Save() method on the Project object is called.
Setting the Role
The final operation that we can perform on a child object is to change its role. Here, we're allowing the user to do that via a right-click context menu on the child item list.
In the form's Load event handler, we populated the context menu with the list of roles as follows:
foreach(string role in Assignment.Roles) { MenuItem item = new MenuItem(Assignment.Roles[role]); mnuRoles.MenuItems.Add(item); item.Click += new System.EventHandler(mnuRoles_Click); } Notice that we not only add the name of each role to the menu control, but also use the AddHandler() method to link each new menu item to a click event handler. This means that any time the user clicks an item in the menu, the click event will be routed to the mnuRoles_Click() method.
Setting the ContextMenu property of the dvDisplay control to mnuRoles actually attached the menu to the control, and .NET now automatically takes care of bringing up the context menu when the user right-clicks it. All we need to do is handle the selection by the user. As we noted earlier, we've linked the click events of all items in the menu to the mnuRoles_Click() method, so that's what we need to write here:
private void mnuRoles_Click(object sender, System.EventArgs e) { MenuItem item = (MenuItem)sender; if(dvResources.SelectedItems.Count > 0) { string id = dvResources.SelectedItems[0].Text; dvResources.SuspendLayout(); dvResources.DataSource = null; _project.Resources[id].Role = item.Text; dvResources.DataSource = _project.Resources; dvResources.ResumeLayout(); } } When the user clicks an option in the context menu, we determine which value she selected. We also determine which (if any) child object she selected. If the user did right-click a valid item in the list, we then change the child object's Role property to match the value selected by the user.
Again, notice that we unbind and rebind the control to the child collection to ensure that it reflects the changes we've made to the child objects.
Opening a Resource
Another behavior a user expects from a list is that if he double-clicks an item, something useful will happen. In our case, we can bring up the selected Resource object for editing if a user double-clicks a ProjectResource child object.
We haven't implemented the ResourceEdit form yet, but we'll invoke it from here nonetheless. When the user double-clicks an assigned resource, the details about that resource will be displayed as follows:
private void dvResources_DoubleClick(object sender, System.EventArgs e) { string id = dvResources.SelectedItems[0].Text; Cursor.Current = Cursors.WaitCursor; ResourceEdit frm = new ResourceEdit(Resource.GetResource(id)); frm.MdiParent = this.MdiParent; Cursor.Current = Cursors.Default; frm.Show(); } By implementing both ProjectEdit and ResourceEdit so that the calling code provides the business object, rather than making the forms retrieve the object themselves , the forms become highly reusable. We can invoke them from the main menu form, or from any other form, as long as we can provide a valid Project or Resource business object for them to display or edit.
Displaying BrokenRules
The last thing we should discuss here is how we can display the list of broken rules as the user interacts with the business object. (This is entirely optional, but many readers of my Visual Basic 6 Business Objects book contacted me to say that they got a lot of value out of displaying the list of broken rules to their users through the UI.)
We designed the BrokenRules object in the CSLA .NET Framework to support this concept, so implementing it in the UI by using data binding is quite easy. Add a ListBox control to the form, under the Cancel button and to the right of the Description control. Name it lstRules as shown in Figure 8-10.
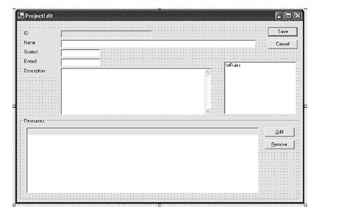
Figure 8-10: Adding a ListBox to display broken rules
To make this control display the list of broken rules, all we need to do is add a couple of lines to the DataBind() method:
void DataBind() { if(Thread.CurrentPrincipal.IsInRole("ProjectManager")) { // only project managers can save a project Util.BindField(btnSave, "Enabled", _project, "IsValid"); } else btnSave.Enabled = false; Util.BindField(chkIsDirty, "Checked", _project, "IsDirty"); Util.BindField(txtID, "Text", _project, "ID"); Util.BindField(txtName, "Text", _project, "Name"); Util.BindField(txtStarted, "Text", _project, "Started"); Util.BindField(txtEnded, "Text", _project, "Ended"); Util.BindField(txtDescription, "Text", _project, "Description"); lstRules.DataSource = _project.BrokenRulesCollection; lstRules.DisplayMember = "Description"; dvResources.SuspendLayout(); dvResources.Clear(); dvResources.AutoDiscover = false; dvResources.Columns.Add("ID", "ResourceID", 0); dvResources.Columns.Add("Last name", "LastName", 100); dvResources.Columns.Add("First name", "FirstName", 100); dvResources.Columns.Add("Assigned", "Assigned", 100); dvResources.Columns.Add("Role", "Role", 150); dvResources.DataSource = _project.Resources; dvResources.ResumeLayout(); } The BrokenRulesCollection property exists on all CSLA .NET business objects, and it returns a read-only collection that reflects the list of broken rules for that object. In this case, we're telling the ListBox control to display the Description property of each rule so that the user gets a human-readable description of all broken rules. This list is automatically updated by data binding, so as the user alters the data in the form and rules are broken and unbroken, her status will be updated in this control.
Updating the Menu
To make the ProjectEdit form available to the user, we need to enhance the main form a little. Specifically, we need to include code that invokes the ProjectEdit form to add a new Project and to edit an existing Project .
To add a new Project , write the following code in the Projects region of MainForm.cs as follows:
private void mnuProjectNew_Click(object sender, System.EventArgs e) { Cursor.Current = Cursors.WaitCursor; ProjectEdit frm = new ProjectEdit(Project.NewProject()); frm.MdiParent = this; Cursor.Current = Cursors.Default; frm.Show(); } The line of interest here is the one in which we call the NewProject() method on the Project class to get a brand-new Project object so we can pass it to the form's constructor:
ProjectEdit frm = new ProjectEdit(Project.NewProject());
This method initializes the new object with any default values, and gets it ready for use. All of the details surrounding loading and setting default values are handled by the business class, so our UI code doesn't need to worry about thatit simply gets the new object and provides it to the ProjectEdit form.
Editing an existing Project is handled in a similar fashion. We use the ProjectSelect dialog box so that the user can select the object to be edited; we retrieve an instance of that particular Project object; and then we open a ProjectEdit form so the user can interact with the object:
private void mnuProjectEdit_Click(object sender, System.EventArgs e) { ProjectSelect dlg = new ProjectSelect("Edit Project"); dlg.ShowDialog(this); string result = dlg.Result; if(result.Length > 0) try { Cursor.Current = Cursors.WaitCursor; Guid id = new Guid(result); Project obj = Project.GetProject(id); ProjectEdit frm = new ProjectEdit(obj); frm.MdiParent = this; Cursor.Current = Cursors.Default; frm.Show(); } catch(Exception ex) { Cursor.Current = Cursors.Default; MessageBox.Show("Error loading project\n" + ex.ToString(), "Edit Project", MessageBoxButtons.OK, MessageBoxIcon.Warning); } } First, we use our ProjectSelect dialog box to show the users a list of existing Project objects. Figure 8-11 shows an example display.
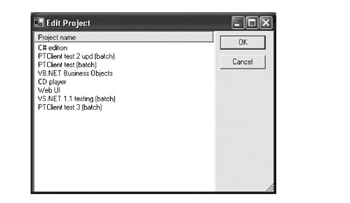
Figure 8-11: Example of the ProjectSelect form in use
If the user selects a project and clicks OK, we'll get the project's ID value as a result. The main processing then occurs when we ask the Project class to get the right Project object for us, based on the user's selection, as shown here:
Guid id = new Guid(result); Project obj = Project.GetProject(id);
This fully populated object is then provided to the ProjectEdit form, which displays it to the user as shown in Figure 8-12.
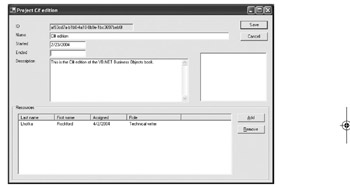
Figure 8-12: Example of the ProjectEdit form in use
Removing a Project
In our main form, we also have a menu option to remove a project from the system. When the user selects this menu option, we'll display the ProjectSelect dialog box. If the user then chooses a project, we'll remove it. This is relatively simple, because the Project class provides us with a DeleteProject() method to remove a project based on its ID value.
In the Projects region, add the event handler for the appropriate menu item with this code:
private void mnuProjectRemove_Click(object sender, System.EventArgs e) { ProjectSelect dlg = new ProjectSelect("Remove Project"); dlg.ShowDialog(this); string result = dlg.Result; if(result.Length > 0) if(MessageBox.Show("Remove project " + result, "Remove Project",MessageBoxButtons.YesNo, MessageBoxIcon.Question) == DialogResult.Yes) try { Cursor.Current = Cursors.WaitCursor; pnlStatus.Text = "Deleting project..."; Guid id = new Guid(result); Project.DeleteProject(id); Cursor.Current = Cursors.Default; MessageBox.Show("Project deleted", "Project Deleted", MessageBoxButtons.OK, MessageBoxIcon.Information); } catch(Exception ex) { Cursor.Current = Cursors.Default; MessageBox.Show("Error deleting project\n" + ex.ToString(), "Edit Project", MessageBoxButtons.OK, MessageBoxIcon.Warning); } finally { pnlStatus.Text = string.Empty; } } First, we display the dialog box to the user so that he can choose the project to remove.
ProjectSelect dlg = new ProjectSelect("Remove Project"); dlg.ShowDialog(this); If the user selects a project, we use the Project class to remove it.
Guid id = new Guid(result); Project.DeleteProject(id);
Since a project's ID is a GUID, we first need to convert the value from the ProjectSelect dialog box into a GUID, which we can then pass to the DeleteProject() method of the Project class. This method includes the appropriate code to contact the DataPortal and invoke the DataPortal_Delete() method of the business object to delete the project from the database.
Our method also includes error-handling code, and some other code that sets the cursor and status display so that the user has visual feedback that the application is busy while deletion is taking place.
Resource List
At this point, we're well over halfway done with the Windows Forms UI. The remaining two forms, ResourceSelect and ResourceEdit , are conceptually the same as the ProjectSelect and ProjectEdit forms that we've already built. We'll go through these new forms a little more quickly, since the design and concepts behind them should be familiar.
ResourceSelect Dialog Box
The ResourceSelect form is a dialog box that will be used to select resources. It will be used to edit and remove Resource objects, and it's also used from the ProjectEdit form when we want to add a new resource to a project.
Add a new form to the project and name it ResourceSelect . Add a DataListView and two Button controls, as shown in Figure 8-13.
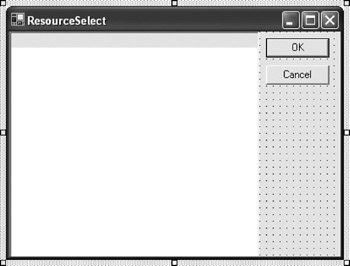
Figure 8-13: Layout of the ResourceSelect form
Name the Button controls btnOK and btnCancel , the DataListView dvDisplay , and set the form's AcceptButton and CancelButton properties accordingly . Then, as with the ProjectSelect dialog box, we'll declare a variable and a property method so that the dialog box can return its result to the calling code, as follows:
string _result = string.Empty; public string Result { get { return _result; } } As expected, we'll have the OK and Cancel buttons set and reset this value as shown here:
private void btnOK_Click(object sender, System.EventArgs e) { if(dvDisplay.SelectedItems.Count > 0) _result = dvDisplay.SelectedItems[0].Text; else _result = string.Empty; Close(); } private void btnCancel_Click(object sender, System.EventArgs e) { _result = string.Empty; Close(); } And as the form is loaded, we'll retrieve and display the list of resources, as follows:
public ResourceSelect(string title) { InitializeComponent(); Text = title; ResourceList list = ResourceList.GetResourceList(); dvDisplay.AutoDiscover = false; dvDisplay.Columns.Add("ID", 0); dvDisplay.Columns.Add("Name", dvDisplay.Width); dvDisplay.DataSource = list; dvDisplay.Focus(); } Again, since we can rely on the ResourceList business object to do the hard work, all we need to do here is bind the collection to our control so that it's displayed.
Removing a Resource
Back in the main form, we can now enable the menu option for removing a resource:
#region Resources private void mnuResourceRemove_Click(object sender, System.EventArgs e) { ResourceSelect dlg = new ResourceSelect("Remove Resource"); dlg.ShowDialog(this); string result = dlg.Result; if(result.Length > 0) { if(MessageBox.Show(this, "Remove resource " + result, "Remove resource", MessageBoxButtons.YesNo) == DialogResult.Yes) try { Cursor.Current = Cursors.WaitCursor; pnlStatus.Text = "Removing resource..."; Resource.DeleteResource(result); Cursor.Current = Cursors.Default; MessageBox.Show(this, "Resource deleted"); } catch(Exception ex) { Cursor.Current = Cursors.Default; string msg = string.Format("Error deleting resource\n{0}", ex.ToString()); MessageBox.Show(this, msg); } finally { pnlStatus.Text = string.Empty; } } } #endregion Since the Resource class implements a DeleteResource() method, our UI code doesn't need to do a whole lot.
Resource.DeleteResource(result);
Most of our coding effort is in updating the status display and the mouse cursor icon, and in handling any possible errors so that the user can be notified of them.
Resource Edit
The ResourceEdit form will be designed like the ProjectEdit form, in that it will have a property that enables the calling code to provide us with the Resource object we're to display or edit. This provides a high degree of flexibility, allowing our form to be called by the main menu to add a new Resource or edit an existing Resource . It also allows the ProjectEdit form to call the ResourceEdit form to display a Resource object, and vice versa.
The ResourceEdit Form
Add a new form named ResourceEdit to the project, and add controls as described in Figure 8-14 and Table 8-5.
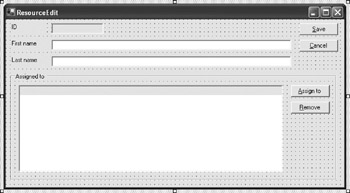
Figure 8-14: Layout of the ResourceEdit form
| Control | Properties |
|---|---|
| TextBox | Name=txtID ; T ext="" ; ReadOnly=true |
| TextBox | Name=txtFirstName |
| TextBox | Name=txtLastName |
| ContextMenu | Name=mnuRoles |
| DataListView | Name=dvProjects ; ContextMenu=mnuRoles |
| Button | Name=btnSave ; Text="Save" |
| Button | Name=btnCancel ; Text="Cancel" |
| Button | Name=btnAssignProject ; Text="Assign to" |
| Button | Name=btnRemoveProject ; Text="Remove" |
| CheckBox | Name=chkIsDirty ; Location= -368, 136 |
Set the form's AcceptButton and CancelButton properties to btnSave and btnCancel , respectively.
The Resource Object
Since we expect the calling code to provide us with a Resource object, we need to create a property and a variable for that object, which will be used by the rest of our code.
Resource _resource; public Resource Resource { get { return _resource; } set { _resource = value; } } Loading the Form
As the form is loaded, we'll do some initialization based on the Resource object and the user's roles. As in ProjectEdit , we'll use the current thread's principal object's IsInRole() method to do our authorization. To simplify access to the principal object, we'll use the System.Threading namespace as follows:
using System.Threading;
Then we can perform the initialization work as the form loads.
public ResourceEdit(Resource resource) { InitializeComponent(); _resource = resource; this.Text = "Resource " + _resource.LastName + ", " + _resource.FirstName; foreach(string role in Assignment.Roles) { MenuItem item = new MenuItem(Assignment.Roles[role]); mnuRoles.MenuItems.Add(item); item.Click += new System.EventHandler(mnuRoles_Click); } if(Thread.CurrentPrincipal.IsInRole("ProjectManager") Thread.CurrentPrincipal.IsInRole("Supervisor")) { // only project managers or supervisors can edit a resource _resource.BeginEdit(); btnAssignProject.Enabled = true; btnRemoveProject.Enabled = true; } else { btnAssignProject.Enabled = false; btnRemoveProject.Enabled = false; } DataBind(); } This is very similar to the Load event handler in ProjectEdit . We set the form's caption text, load the list of Role data into mnuRoles , enable or disable some buttons based on the user's security role, and call the DataBind() method, which binds the form to the business object.
void DataBind() { if(Thread.CurrentPrincipal.IsInRole("ProjectManager") Thread.CurrentPrincipal.IsInRole("Supervisor")) { // only project managers or supervisors can save a resource Util.BindField(btnSave, "Enabled", _resource, "IsValid"); } else btnSave.Enabled = false; Util.BindField(chkIsDirty, "Checked", _resource, "IsDirty"); Util.BindField(txtID, "Text", _resource, "ID"); Util.BindField(txtLastname, "Text", _resource, "LastName"); Util.BindField(txtFirstname, "Text", _resource, "FirstName"); dvProjects.SuspendLayout(); dvProjects.Clear(); dvProjects.AutoDiscover = false; dvProjects.Columns.Add("ID", "ProjectID", 0); dvProjects.Columns.Add("Project", "ProjectName", 200); dvProjects.Columns.Add("Assigned", "Assigned", 100); dvProjects.Columns.Add("Role", "Role", 150); dvProjects.DataSource = _resource.Assignments; dvProjects.ResumeLayout(); } The btnSave control is only bound if the user's role allows them to edit a resource. The other fields on the formincluding chkIsDirty are always bound to the Resource object so that the data binding reflects updates made to the object's data. The DataListView control is bound to the list of projects to which this resource is assigned, and we manually set the columns and their widths so that the display looks good.
Save, Cancel, and Close
When the user clicks the Save button, we need to tell the object to apply any changes, committing them inside the object itself. This mirrors the call to BeginEdit() that we made as the form was loaded. We then call the Save() method to save the object to the database.
private void btnSave_Click(object sender, System.EventArgs e) { try { Cursor.Current = Cursors.WaitCursor; _resource.ApplyEdit(); _resource = (Resource)_resource.Save(); Cursor.Current = Cursors.Default; } catch(Exception ex) { Cursor.Current = Cursors.Default; MessageBox.Show(this, ex.ToString()); } Close(); } Remember that if we don't close the form here, we need to call DataBind() to bind the form to the new instance of the Resource object that has returned from the Save() method.
| Note | Failure to either rebind to the new object or to close the form will result in hard-to-debug errors in the application. |
If the user clicks the Cancel button or closes the form by clicking the form's Close button, we need to tell the object to cancel any edit process like this:
private void btnCancel_Click(object sender, System.EventArgs e) { Close(); } private void ResourceEdit_Closing(object sender, System.ComponentModel.CancelEventArgs e) { _resource.CancelEdit(); } This resets the object to the state it was in when we called BeginEdit() .
Adding Child Objects
When we add a child object, we're adding a ResourceAssignment . To do this, however, we need to have the user select a project to which the resource will be assigned. Fortunately, we designed the ProjectSelect form as a reusable dialog box, so we can simply call it here to ask the user to select a project.
private void btnAssignProject_Click(object sender, System.EventArgs e) { ProjectSelect dlg = new ProjectSelect("Assign to project"); dlg.ShowDialog(this); string result = dlg.Result; if(result.Length > 0) { dvProjects.SuspendLayout(); dvProjects.DataSource = null; try { Guid id = new Guid(result); _resource.Assignments.AssignTo(id); } catch(Exception ex) { MessageBox.Show(this, ex.Message); } finally { dvProjects.DataSource = _resource.Assignments; dvProjects.ResumeLayout(); } } } Assuming that the user picks a project from the list, we call our AssignTo() method to assign this resource to that project.
Guid id = new Guid(result); _resource.Assignments.AssignTo(id);
This particular implementation of AssignTo() assigns the resource to the project using the default Role value.
Removing Child Objects
We can also remove a project from the list, which would mean that this resource is no longer assigned to the project we've removed.
private void btnRemoveProject_Click(object sender, System.EventArgs e) { Guid id = new Guid(dvProjects.SelectedItems[0].Text); string name = dvProjects.SelectedItems[0].SubItems[0].Text; if(MessageBox.Show(this, "Remove from project " + Name + "?", "Remove assignment", MessageBoxButtons.YesNo) == DialogResult.Yes) { dvProjects.SuspendLayout(); dvProjects.DataSource = null; _resource.Assignments.Remove(id); dvProjects.DataSource = _resource.Assignments; dvProjects.ResumeLayout(); } } First, we prompt the user to make sure she wants to do this. If she says yes, then we remove the project from the list like this:
_resource.Assignments.Remove(id);
Remember that neither this nor the addition of a child object actually updates the database. Our operation here is only affecting the Resource object in memory on the client. When the Save() method of the Resource object is called, both the Resource object and its child objects are updated to the database.
Changing Roles
Another option is to change the role of the resource on a project. As before, this is done through a context menu that appears when the user right-clicks the DataListView control and chooses a role from the pop-up menu. Most of the work is done by .NET or our business object, so all we need to do is catch the menu's click event as shown here:
private void mnuRoles_Click(object sender, System.EventArgs e) { MenuItem item = (MenuItem)sender; if(dvProjects.SelectedItems.Count > 0) { Guid id = new Guid(dvProjects.SelectedItems[0].Text); dvProjects.SuspendLayout(); dvProjects.DataSource = null; _resource.Assignments[id].Role = item.Text; dvProjects.DataSource = _resource.Assignments; dvProjects.ResumeLayout(); } } All we do is take the role value selected from the menu, and store it in the child object selected by the user.
_resource.Assignments[id].Role = item.Text;
The fact that the role value is stored as a numeric ID rather than as a human- readable text value is invisible to the UI code. This is nice because it means that the UI code deals with the same text values that the user sees. The business object completely encapsulates the code to translate between the cryptic numeric value and our text value. Perhaps more importantly, the business object validates the value, ensuring that only a valid role is specified.
Displaying a Project
Finally, we can support a double-click operation on a child item. If the user double- clicks on a ResourceAssignment in our DataListView , we can bring up the ProjectEdit form with the corresponding project so that the user can view or edit that project's details, as follows:
private void dvProjects_DoubleClick(object sender, System.EventArgs e) { Guid id = new Guid(dvProjects.SelectedItems[0].Text); Cursor.Current = Cursors.WaitCursor; ProjectEdit frm = new ProjectEdit(Project.GetProject(id)); frm.MdiParent = this.MdiParent; Cursor.Current = Cursors.Default; frm.Show(); } Again, this is possible and quite simple primarily because we designed the ProjectEdit form so that it doesn't load the Project object itself. Rather, it expects our code to load the Project object first, and then open the form. Because of this design, we can get a great deal of reuse out of the ProjectEdit form.
Updating the Menu
The ResourceEdit form is now complete, so we can return to the main menu form and enable the menu options to add and edit a resource.
To add a resource, we simply create a new Resource object and open a ResourceEdit form. Because the ID value for a resource isn't a GUID, we can't randomly generate it. In this case, we'll prompt the user to enter the new ID value, and then bring up the ResourceEdit form. Put the following code in the Resources region:
private void mnuResourceNew_Click(object sender, System.EventArgs e) { string id = InputBox.GetInput("Resource ID", "New resource"); if(id.Length > 0) { Cursor.Current = Cursors.WaitCursor; Resource obj = Resource.NewResource(id); ResourceEdit frm = new ResourceEdit(obj); frm.MdiParent = this; Cursor.Current = Cursors.Default; frm.Show(); } } | Tip | C# doesn't have a built-in input box concept, so I've added an InputBox form to the project. This form partially emulates the VB .NET InputBox concept by implementing a static method named GetInput() , which accepts the prompt and title value to be displayed to the user. The user's input is returned as a result of the method. The complete code for the form is available in the code download for the book. While it would have been faster and easier to simply call the Microsoft.VisualBasic.InputBox statement, many C# developers object to using the prebuilt and pretested functionality in the VB runtime library, and I've opted to follow their lead here. |
To allow the user to edit an existing Resource object, we use the ResourceSelect dialog box so that the user can select an existing item. We then use that item's ID to load a Resource object and open a ResourceEdit form, as shown here:
private void mnuResourceEdit_Click(object sender, System.EventArgs e) { ResourceSelect dlg = new ResourceSelect("Edit Resource"); dlg.ShowDialog(this); string result = dlg.Result; if(result.Length > 0) try { Cursor.Current = Cursors.WaitCursor; Resource obj = Resource.GetResource(result); ResourceEdit frm = new ResourceEdit(obj); frm.MdiParent = this; Cursor.Current = Cursors.Default; frm.Show(); } catch(Exception ex) { Cursor.Current = Cursors.Default; string msg = string.Format("Error loading resource\n{0}", ex.ToString()); MessageBox.Show(msg); } } First, as shown in Figure 8-15, we display the ResourceSelect dialog box so the user can select a resource from the list.
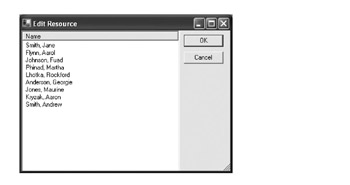
Figure 8-15: Example of the ResourceSelect form in use
If the user selects a resource and clicks OK, we'll get the resource's ID value as a result. We then use that ID value as a parameter to the GetResource() factory method on the Resource class to get back a fully populated Resource object that we can pass to the ResourceEdit form, as shown in Figure 8-16.
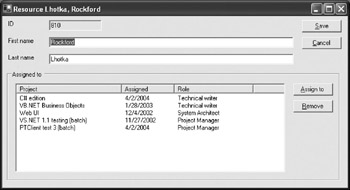
Figure 8-16: Example of the ResourceEdit form in use
At this point, our Windows Forms UI is complete. We can use it to add, edit, and remove projects and resources. It also allows us to assign resources to projects and set their roles.
Notice that nowhere in this UI did we deal with database concepts, SQL statements, or even ADO.NET. We allow the business objects to take care of all those details so that we can focus on the user experience.
[1] Rockford Lhotka, "Creating a Data Bound ListView Control," MSDN, August 8, 2002. See http://msdn.microsoft.com/library/default.asp?url=/library/en-us/dnadvnet/html/vbnet08262002.asp.
| | ||
| | | |
| | ||
| | ||
| | ||
EAN: 2147483647
Pages: 111
If you may any questions please contact us: flylib@qtcs.net