Database Design
| | ||
| | | |
| | ||
It's a rare thing to be able to design a database specifically for an application. More often than not, the databases already exist, and we must deal with their existing design. At best, we might be able to add some new tables or columns .
This is one reason why object-relational mapping is a key concept for object-oriented development. We have developed an object model that matches the business requirements without giving any consideration to the database design. It's up to us to create code that translates the data from our databases into our objects, and vice versa. We'll do that in Chapter 7 as we implement our business objects.
In this chapter, we'll create a database for use by our project-tracking application. One thing to note is that even though we're creating the database specifically for this application, our data model will not match the object model exactly. A good relational model and a good object model are almost never the same thing.
| Tip | Speaking of good relational models, I strongly recommend that database design be done by a professional DBA, not by software developers. While many of us are reasonably competent at database design, there are many optimizations and design choices that are better made by a DBA. The database design shown here is that of a software developer, and I'm sure a DBA would see numerous ways to improve or tweak the result to work better in a production setting. |
We'll create this database in SQL Server 2000, along with some stored procedures that we can use to interact with the database.
| Tip | If you're using an RDBMS other than SQL Server 2000, you should translate the table creation and stored procedures to fit with your environment. |
As in Chapter 5, when we created the Security database, we'll make use of the Server Explorer in Visual Studio .NET to create our database, tables, and stored procedures. We'll need to use SQL Server's Enterprise Manager to make some security changes once the database has been created. If you don't have access to these tools, the code download for this book also includes SQL scripts that you can run to create the database in SQL Server or MSDE.
Creating the Database
To create the database, open the Server Explorer in VS .NET and navigate to the SQL Server where the database is to be created. Right-click the SQL Server node and choose New Database. When prompted for the database name , enter PTracker, and provide the appropriate security information. The result is a new, empty database on the server as shown in Figure 6-15.
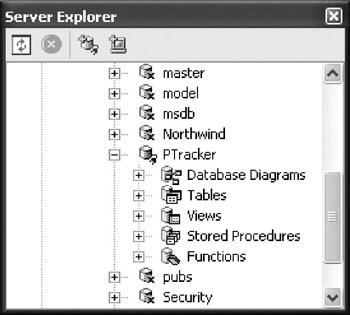
Figure 6-15: PTracker database in Server Explorer
Tables
Table creation can also be done within the Server Explorer: just right-click the Tables node under the database, and choose New Table. This will bring up a table designer in VS .NET where we can define the columns for the new table.
Once the columns, keys, and indexes have been set up, we need to save the changes by closing the designer or clicking the Save button in the toolbar. At this point, we'll be prompted to provide a name for the table, and it will be added to the database. Follow this process to add each of the following four tables to the database.
Roles
The Roles table will store the list of possible roles a resource can fill when assigned to a projectit simply contains an ID value and the name of the role. Figure 6-16 shows the VS .NET designer with these columns added, and the ID column configured as the primary key.

Figure 6-16: Design of the Roles table
Notice that neither column allows null values. With this data, we don't have any need to differentiate between an empty value and one that was never entered, so null values would make no sense.
Though a full-blown application would include maintenance screens for the list of roles, we won't create those screens, or any of the additional plumbing that would be necessary. Instead, we'll simply add some sample roles to the table using VS .NET.
Double-click the Roles node in the Server Explorer window to bring up a designer in VS .NET that allows us to edit the contents of the table. Add some sample roles, such as those shown in Figure 6-17.
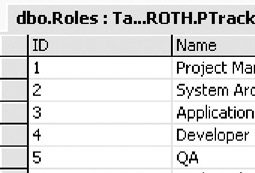
Figure 6-17: Example project roles in the Roles table
This is the data that will be used to populate our read-only RoleList business object.
| Tip | Remember that these roles are different from the security roles we added to our Security database in Chapter 5. The roles we're setting up here are the roles that a Resource can hold when assigned to a Project , and they have nothing to do with the security roles of users that are using our application. |
Projects
The Projects table will contain the data for each project in the system. The columns for this table are shown in Figure 6-18.
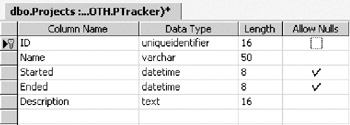
Figure 6-18: Design of the Projects table
The ID column is set up as the primary key, and it's of type uniqueidentifier , which is a GUID value.
There are many ways to create primary key columns in tables, including the use of autoincrementing numeric values, or user -assigned values. However, the use of a uniqueidentifier is particularly powerful when working with object-oriented designs. Other techniques don't assign the identifier until the data is added to the database, or they allow the user to provide the value, which means that we can't tell if it collides with an existing key value until the data is added to the database. With a uniqueidentifier , however, we can assign the primary key value to an object as the object is createdwe don't have to wait until it's updated into the database to get or confirm the value. If we don't assign it ahead of time, the database will supply the value.
What we get is the best of both worlds . If we want to assign the value in our object, we can do that and the database will honor our key value. If we don't assign the value in our object, the database will assign a key value as the row is added to the table.
Notice that the two datetime fields allow null values. We're intentionally "misusing" the null value here to indicate an empty value for a date. No other fields allow null values, since they have empty value representations, and we don't care to differentiate between an empty value and one that was never entered by the user.
The Description column is of type text , so that it can hold a blob of text data. We're using this to provide the user with the ability to enter a lengthy description of the project, if so desired. Even though the Length shows as 16, it's just the length of the internal data structureour data itself can be thousands of characters long.
Resources
The Resources table will hold the data for the various resources that can be assigned to a project. The columns for this table are shown in Figure 6-19.

Figure 6-19: Design for the Resources table
Once again, the ID column is the primary keyit's a varchar that will hold a user-entered value. Though we prefer to use uniqueidentifier primary key values, this isn't always possible. By giving this table a user-assigned primary key, we can explore how to support this concept within our business objects.
| Tip | Many, if not most, preexisting databases will not have a uniqueidentifier as a primary key. The uniqueidentifier concept is only a few years old, and most databases predate its introduction. Moreover, DBAs have different preferences as to what type of primary key is optimal, and we may not have a say in the matter (depending on our DBA's viewpoints, and how reasonable she is). |
None of the fields allows null valueswe don't need to differentiate between empty values and those that were never entered.
Assignments
Finally, we can create the Assignments table. There's a many-to-many relationship between projects and resourcesa project can have a number of resources assigned to it, and a resource can be assigned to a number of projects.
The way this is represented relationally is to create a link table that contains the primary keys of both tables. In our case, it will also include information about the relationship, including the date of the assignment, and the role that the resource plays in the project as shown in Figure 6-20.

Figure 6-20: Design for the Assignments table
The first two columns here are the primary keys from the Projects and Resources tables, and when combined they make up the primary key in our link table.
Though the Assigned column is a datetime type, we're not allowing null values. This is because this value can't be emptya valid date is always required.
The Role column is also a foreign key, linking back to the Roles table.
The data in this table will be used to populate the ProjectResource and ResourceAssignment objects, both of which inherit from the Assignment class that manages the data from this table.
This really drives home the fact that a relational model isn't the same as an object-oriented model. The many-to-many relational design doesn't match up to the object model that represents much of the same data. The objects are designed around behaviors and usage patterns, while the data model is designed around relational theory and the avoidance of redundant data.
Database Diagram
The Server Explorer in VS .NET supports the creation of database diagrams, which are stored in SQL Server. These diagrams not only illustrate the relationships between our tables, but also tell SQL Server how to enforce and work with those relationships.
Under our database in the Server Explorer, there's a node for Database Diagrams. Right-click this entry and choose New Diagram. VS .NET will prompt for the tables to be included in the diagram. Highlight all of them, and click Add and Close. The result is shown in Figure 6-21.
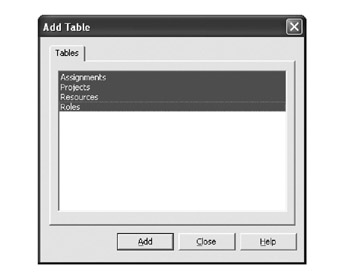
Figure 6-21: Adding the tables to the designer
We're then presented with a designer window in which our tables are shown as a diagram. We can drag and drop columns from our primary tables to other tables in order to indicate relationships. For example, drag and drop the ID field from Projects to the ProjectID field in the Assignments table. This will bring up a Create Relationship dialog box in which we can specify the nature of this relationship as shown in Figure 6-22. Click OK to create the relationship.
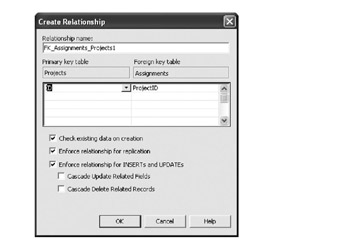
Figure 6-22: Creating a relationship between Assignments and Projects
| Tip | Lengthy debates can take place on the subject of whether or not to have the database automatically cascade updates and deletes. By default, these boxes are unchecked, and I personally like to handle the deletion process manually, in our stored procedures. You may opt to check these boxes, in which case you'll need to alter the stored procedures we'll create later in the chapter. |
Do the same to link the Resources table to Assignments . We can also link the Roles table's ID column to the Role column in Assignments , thereby allowing the database to ensure that only valid roles can be added to the table.
The resulting diagram should appear in a way that's similar to Figure 6-23.
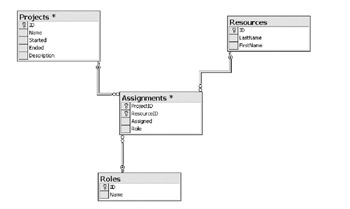
Figure 6-23: Database diagram in VS .NET
Save the diagram to the database, naming it PTrackerRelationships . VS .NET will then ask whether we're sure that we want to update our tables. Remember that these relationships are reflected as formal constraints within the database itself, so this diagram directly impacts our database design.
Stored Procedures
Wherever possible, database access should be performed through stored procedures. As we've discussed before, stored procedures offer powerful security control over the database and better performance than dynamic SQL statements. Rather than giving user accounts direct access to tables, we can provide access only to the stored procedures.
Our application will make use of stored procedures for most of its database interaction; the exception is when we're retrieving the list of roles. Our NameValueList class dynamically generates a SELECT statement based on the criteria provided, and we'll allow this read-only access to the Roles table.
| Tip | The NameValueList base class could be updated to include an overloaded SimpleFetch() method that invokes a stored procedure, but we won't make that optimization here. |
In our table design, we opted to handle deletion of related records (child records) manually. This means that we'll need to include code to handle these deletions in the following stored procedures:
-
deleteProject
-
deleteResource
We can use the Server Explorer to add the stored procedures to the database by right-clicking the Stored Procedures node under our database, and choosing New Stored Procedure. This will bring up a designer window in which we can write the stored procedure code. When we close the designer, the stored procedure will be added to the database.
getProjects
The getProjects procedure will return the project data to populate the ProjectList object as follows :
CREATE PROCEDURE getProjects AS SELECT ID, Name FROM Projects RETURN
It simply returns basic data about all of the projects in the system. Our use cases didn't specify details about the order in which the projects should be listed in a project list, so we haven't included an ORDER BY clause here. We may have to do so during the testing process, as users typically add such requirements during that phase.
getProject
The getProject procedure retrieves the information for a single project. This is a relatively complex proposition, since we need to retrieve not only the core project data, but also the list of resources assigned to the project.
This could be done by making two stored procedures and calling both of them to populate the business objects, but we can reduce this to a single database call by putting both SELECT statements in a single stored procedure. The stored procedure will then return two result sets, which we can read within our C# code:
CREATE PROCEDURE getProject ( @ID uniqueidentifier ) AS SELECT id,name,started,ended,description FROM Projects WHERE ID=@ID SELECT resourceid,lastname,firstname,assigned,role FROM Resources,Assignments WHERE ProjectID=@ID AND ResourceID=ID RETURN
Notice how the second SELECT statement merges data from both the Assignments table and the Resources table. Remember that our ProjectResource object will expose some resource data as read-only properties, so we need to return that data here.
To some degree, we're putting object-relational mapping (ORM) logic in our stored procedures by designing them to make it easy for our C# data-access code to populate the objects. This isn't essentialwe could write more complex code in C#but it is a good idea, when you can do it.
| Tip | In many cases, we must build applications for which we don't have the option of altering the structure of the database, or even its stored procedures. When that happens, all of the ORM logic must be written within our business objects. The end result is the same; it's merely a matter of where the ORM logic resides. |
addProject
The addProject procedure is called to add a record to the Projects table as follows:
CREATE PROCEDURE addProject ( @ID uniqueidentifier, @Name varchar(50), @Started datetime, @Ended datetime, @Description text ) AS INSERT INTO Projects (ID,Name,Started,Ended,Description) VALUES (@ID,@Name,@Started,@Ended,@Description) RETURN
Note that this only adds the record to the Projects table; a separate stored procedure adds records to the Assignments table.
updateProject
Not only do we need to add records to the Projects table, but also we need to allow them to be changed. The updateProject procedure provides this capability as shown here:
CREATE PROCEDURE updateProject ( @ID uniqueidentifier, @Name varchar(50), @Started datetime, @Ended datetime, @Description text ) AS UPDATE Projects SET Name=@Name, Started=@Started, Ended=@Ended, Description=@Description WHERE ID=@ID RETURN
Again, this procedure only updates the record in the Projects table; the related records in the Assignments table are updated separately.
deleteProject
The deleteProject procedure deletes the appropriate record from the Projects table, and also removes any related records in the Assignments table. (This requirement comes as a result of our choice not to have the database automatically cascade deletes to related tables.)
CREATE PROCEDURE deleteProject ( @ID uniqueidentifier ) AS DELETE Assignments WHERE ProjectID=@ID DELETE Projects WHERE ID=@ID RETURN
Though this procedure updates multiple tables, we are not including transactional code here. Although we could manage the transaction at this level, we gain flexibility by leaving it to our C# code.
Within our CSLA .NET Framework, we have the option of running our code within a COM+ transaction, or using ADO.NET to manage the transaction. If we opt to use Enterprise Services transactions, we don't want transactional statements in the stored procedures, since the work will be handled by COM+. If we opt instead to handle the transactions manually, we can choose to put the transactional statements here in the stored procedure, or use an ADO.NET Transaction object within our C# code.
addAssignment
When we add or edit a project or a resource, we may also add or change the associated data in the Assignments table. The addAssignment procedure allows us to add a new record as follows:
CREATE PROCEDURE addAssignment ( @ProjectID uniqueidentifier, @ResourceID varchar(10), @Assigned datetime, @Role int ) AS INSERT INTO Assignments (ProjectID,ResourceID,Assigned,Role) VALUES (@ProjectID,@ResourceID,@Assigned,@Role) RETURN
This procedure may be called during the adding or editing of either a Project or a Resource object in our application.
updateAssignment
Likewise, we need to be able to update records in the Assignments table:
CREATE PROCEDURE updateAssignment ( @ProjectID uniqueidentifier, @ResourceID varchar(10), @Assigned datetime, @Role int ) AS UPDATE Assignments SET Assigned=@Assigned, Role=@Role WHERE ProjectID=@ProjectID AND ResourceID=@ResourceID RETURN
As with addAssignment , this may be called when updating data from either a Project or a Resource object.
deleteAssignment
As part of the process of updating a project or resource, we'll also need to be able to delete a specific record from the Assignments table. An assignment is a child entity beneath a project or resource, and a user can remove a resource from a project, or a project from a resource. In either case, we'll need to be able to remove that specific assignment record from the database:
CREATE PROCEDURE deleteAssignment ( @ProjectID uniqueidentifier, @ResourceID varchar(10) ) AS DELETE Assignments WHERE ProjectID=@ProjectID AND ResourceID=@ResourceID RETURN
This completes the operations we can perform on the Assignments data, and we should note that there's no getAssignments procedure. This is because assignments are always children of a project and a resource. We'll never retrieve just a list of assignments, except as part of retrieving a project or a resource. The getProject procedure, for instance, also retrieves a list of assignments associated with the project that's how we retrieve assignment data.
getResources
Our ResourceList object needs to be able to retrieve a list of basic information about all the records in the Resources table as follows:
CREATE PROCEDURE getResources AS SELECT ID, LastName, FirstName FROM Resources RETURN
This information will be used to populate the read-only ResourceList business object.
getResource
We also need to be able to get detailed information about a specific record in the Resources table, along with its associated data from the Assignments table. This is very similar to what we did earlier with the getProject procedure. Here, too, we'll return two result sets from the stored procedure as shown here:
CREATE PROCEDURE getResource ( @ID varchar(10) ) AS SELECT ID,LastName,FirstName FROM Resources WHERE ID=@ID SELECT ProjectID,Name,Assigned,Role FROM Projects, Assignments WHERE ResourceID=@ID AND ProjectID=ID RETURN
The second SELECT returns data not only from the Assignments table, but also from the Projects table. This data will be provided as read-only properties in our ResourceAssignment object, which inherits from the Assignment class. By combining the two SELECT statements into a single stored procedure, we can make a single database call to retrieve all the data pertaining to a given Resource object.
Now, it might seem that we could combine these two SELECT statements into a single SELECT using a JOIN . That choice would allow us to retrieve the data we need, but at a high cost. First of all, every row of data would include the core Resource data, and we'd get a row of data for each assignment. This would result in the database returning a lot of redundant data over the network. Secondly, we'd have to write more complex code in our Resource business object, because we'd have to parse the Resource data out of a row in order to load our Resource object, and then parse the specific assignment data to populate our collection of ResourceAssignment objects. As we'll see in Chapter 7, the code in our business object is very simple and elegant when we return two separate result sets, as we do here.
addResource
When a new Resource object is created and saved, its data needs to be inserted into the Resources table:
CREATE PROCEDURE addResource ( @ID varchar(10), @LastName varchar(50), @FirstName varchar(50) ) AS INSERT INTO Resources (ID, LastName, FirstName) VALUES (@ID, @LastName, @FirstName) RETURN
We've already created the addAssignment procedure, which can be used to add related records to the Assignments table.
updateResource
Likewise, we need to be able to update data in the Resources table as shown here:
CREATE PROCEDURE updateResource ( @ID varchar(10), @LastName varchar(50), @FirstName varchar(50) ) AS UPDATE Resources SET LastName=@LastName, FirstName=@FirstName WHERE ID=@ID RETURN
This procedure will be called when an existing Resource object is edited and saved.
deleteResource
Finally, we need to be able to remove a Resource object from the system. This means removing not only the record from the Resources table, but also the associated records from the Assignments table as shown here:
CREATE PROCEDURE deleteResource ( @ID varchar(10) ) AS DELETE Assignments WHERE ResourceID=@ID DELETE Resources WHERE ID=@ID RETURN
At this point, we've created stored procedures to do every bit of data access, except for retrieving the data from the Roles table. In Chapter 7, we'll implement data-access code using ADO.NET that makes use of these stored procedures from our business objects.
| | ||
| | | |
| | ||
EAN: 2147483647
Pages: 111
If you may any questions please contact us: flylib@qtcs.net