| After you've created a stroke, you can use it in many ways. You can edit the stroke or copy a brush to or from the stroke. You can also modify existing Paint Effects parameters to, for example, make a brush have smaller flowers or more branching. Selecting Strokes To modify a stroke, you need to select it first, which can be challenging if you're currently in Shaded or Wireframe mode because the stroke is nearly always laying across an object. It's usually easier to select strokes in the Outliner. If you want to delete a stroke, you can press the Delete key after selecting it in the Outliner. Creating a Paint Effects Stroke with a NURBS Curve You can attach a brush to any NURBS curve you've created (by projection, direct creation, or any other method) to create a new Paint Effects stroke. With the curve selected, open the Visor, select a brush, and in the Paint Effects panel, choose Paint Effects | Curve Utilities | Attach Brush to Curves. Copying and Pasting Brush Settings You can select any stroke you've already created and use its brush settings to continue painting or to paint other objects by choosing Paint Effects | Get Settings from Selected Stroke. This action copies that stroke's brush settings into the template brush. You can then select other strokes and apply the same settings to their brushes. To do this, you select the strokes in the scene or in the Outliner, and then choose Paint Effects | Apply Settings to Selected Strokes. Simplifying Curves and Strokes To make a stroke's underlying curve easier to animate and deal with, you can remove CVs from the curve to simplify it by choosing Paint Effects | Curve Utilities | Simplify Stroke Path Curves. If the stroke has a complex brush attached, however, it can slow down Maya's responsiveness. The solution is to lower the stroke's display quality (this lowers the density by reducing the numbers of tubes and segments in the stroke). With the stroke selected, choose Display | Stroke Display Quality on Maya's main menu and select one of the following: 0%, 25%, 50%, 75%, 100%, or Custom. It's best to select the Custom option and set a value around 5% 20%. Usually, a percentage in this range is all you need to see where the stroke will appear and whether it's getting in the way of something else. Tutorial: Adjusting Paint Effects It's time to return to the office lobby scene you built in Chapter 5, "Modeling with Polygons." In this tutorial, you'll paint NURBS surfaces in the planters. Painting in plants for the planters is a snap, and it adds another level of realism to the scene. On the CD  Chapter_14\movies\ch14tut02.wmv |
Load the scene file, and maximize the Perspective view. Change the panel view to persp2 by clicking the Panels button at the top of the viewport and then choosing Perspectives | persp2. Next, enable Hardware Texturing in the Perspective view (Shading | Hardware Texturing). If this drags down your graphics performance too much, you can work with Hardware Texturing disabled simply toggle it off the same way you enabled it. On the CD  Chapter_14\ch14tut02begin.mb |
First, create a NURBS plane to place over the planter (Create | NURBS Primitives | NURBS Plane). In the Channel Box, enter Translate settings of 150.424, 20.986, 73.015; Rotate settings of 0, -45.063, 0; and Scale settings of 148.883, 65.865, 25.854. Under the INPUTS section, set Spans for U to 9 and Spans for V to 1. Switch to the Top view, and name this plane nurbsPlane1. Right-click on the plane, and choose Vertex. Position the vertices in the planter so that they're just inside the border. Next, make the nurbsPlane1 nonrendering by opening the Attribute Editor (hotkey: Ctrl+a), and under nurbsPlaneShape1, expand the Render Stats section and clear all the check boxes, from Cast Shadows to Opposite. This enables you to paint directly on an object in the scene, but the plane won't be visible at render time. You're ready to begin setting up Paint Effects. While nurbsPlane1 is selected, make it paintable (Hotbox | Paint Effects | Make Paintable). Next, open the Visor (hotkey: Alt+v) and the Brush Settings dialog box (Hotbox | Paint Effects | Template Brush Settings). In the Visor, open the Plants folder and select the Fernstextured brush. The Brush Settings dialog box should still be open; if it's not, open it with Hotbox | Paint Effects | Template Brush Settings. Set the brush's Global Scale to 2, and then expand the Brush Profile section. Set Brush Width to 2 and collapse the Brush Profile section. Next, expand the Shadow Effects section. In the Fake Shadow drop-down list, select 2D Shadow, and click the Cast Shadows check box. Collapse the Shadow Effects section, and expand the Tubes section and then the Creation section. Set Tubes Per Step to 1.2. You should now see a red circle around your brush as you place it over the NURBS surface. Begin painting on the NURBS surface around the edges, but do so sparingly until you see just how much it takes to cover the planter area. Leave the thin center section of the planter open to fill with ground cover. Don't try to fill the planter; rather, let the ferns drape over and cover some areas to make the planter look full (see Figure 14.8). This aspect requires some artistic judgment, and it might take some practice. Just keep in mind there's no right or wrong way. Figure 14.8. Hardware-textured and rendered view of the scene. 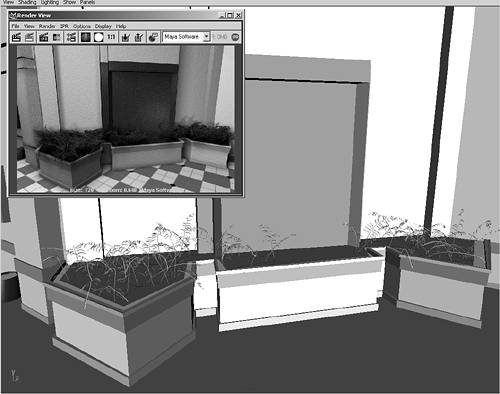
Now, you'll use some ground cover to fill in the center area and front edges of the planter. Begin by setting up a new brush. Open the plantsMesh folder in the Visor, and select the groundCoverLight brush. Open the Brush Settings dialog box (Hotbox | Paint Effects | Template Brush Settings), and set Global Scale to 3. Expand the Brush Profile section, and set Brush Width to 0.43. Expand the Shading section and pull the color slider from the light green default to the left for a darker green in Color1. Expand the Shadows Effects section in the Attribute Editor, and select 3D Cast from the Fake Shadow drop-down list. Select the Cast Shadows check box, and collapse the Shadow Effects section. Expand the Tubes section. Under the Creation section, set Tubes per Step to 72.045. To edit the groundCoverLight stroke, click the groundCoverLightShape tab in the Attribute Editor. Here, you can adjust the color, shadows, size, or any other attributes, much as you did in setting up the initial brush. Render the view to get an idea of what the plants look like (see Figure 14.9). Next, save the brushes you made changes to and reuse them in the planter on the opposite wall of the lobby. To do this, open the Outliner (hotkey: Alt+o). Select strokeFernsTextured1, and in the Hotbox, choose Paint Effects | Get Settings from Selected Stroke to copy the settings you created. Figure 14.9. The result of adding a shorter, lighter colored ground cover for contrast and depth in the planter. 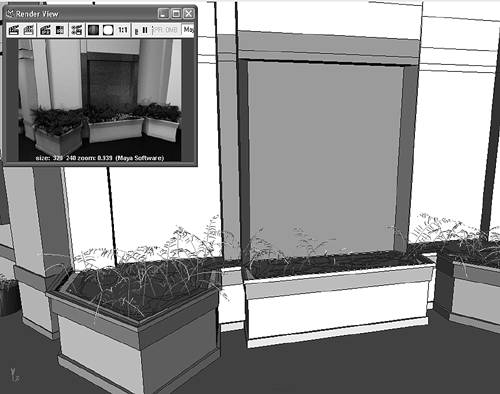
Choose Paint Effects | Save Brush Preset. In the Save Brush Preset dialog box (see Figure 14.10), enter M5FplanterFerns in the Label text box and Ferns in the Overlay Label text box. Select the To Visor radio button for the Save Preset setting, and this handy brush will open in the default directory where your brushes are currently saved. However, you might want to make sure it opens to the folder where the Visor is currently accessing brushes. In the Visor, look at the path displayed above the folders in the Paint Effects tab. Save the brush in the path you find, such as C:\Program Files\AliasWavefront\Maya5.0\brushes\plants. Before you save this brush, be sure you have a panel open in the Paint Effects view (hotkey: 8). After refreshing the view, click the Grab Icon button in the Save Brush Preset dialog box. Next, marquee-select a window over a portion of the ferns you'd like to have as an icon. Figure 14.10. Adding custom brush types to your Visor folders. 
Click the Save Brush Preset button, and then click Close. The new brush icon you created will be displayed in the Visor under the Plants folder. Now do the same for the ground cover brush you created, naming it M5FplantCover. Then name the overlay text groundcover. You'll be able to reuse these brushes now. Now, select nurbsPlane1 and copy it (hotkey: Ctrl+d). While it's selected, you'll freeze translations for the plane, or reset the attributes for its position, rotation, and scale (Hotbox | Modify | Freeze Transformation | option box). In the Freeze Transformations Options dialog box, make sure all check boxes are selected and click Freeze Transform. In the Channel Box, all Translate and Rotate values are set to 0. The Scale setting is currently 1. Change Scale X to 1 for nurbsPlane2. This setting flips the plane to fit the planter at the opposite side of the lobby. To move the plane into position, set Translate X to -300.688. After positioning the plane, freeze its transformations again (Hotbox | Modify | Freeze Transforms) to keep the Paint Effects on the upper face of the plane. In the Perspective panel, create a new perspective. Its name should be persp3. Move it into position in front of nurbsPlane2 to paint that surface. Then, make the plane paintable (Hotbox | Paint Effects | Make Paintable). In the Visor, select the Ferns brush you just created and paint in the planter, just as you did for the first one. Switch brushes to the M5FplantCover brush you made, and fill in the lower areas of the second planter. For this side of the room, you'll turn off shadows for the ground cover to speed things up. Then, render the Perspective view to see the results. tip Rendering should take no more than a minute. If your render times are extremely long, check the Render Global Settings window, and set the resolution to 320x240 and the antialiasing to Preview Quality for these tests. Now that you've painted the bulk of the plants in the lobby scene, you'll turn your attention to the smaller areas the plant stands. You can use the Fern brush for some of them, but for more variety, you'll create a new brush first. First, create a NURBS circle, and in the Channel Box, set Translate X, Y, and Z to 48.563, 9.938, -202.75. Convert the circle into a planar object (Hotbox | Surfaces | Planar | option box). In the Planar Options dialog box, set the Output Geometry to NURBS, and click Planar Trim. While the plane is selected, open the Attribute Editor (hotkey: Ctrl+a), and expand the Render Stats section. Clear all check boxes so that the plane isn't visible at render time. Make the planarTrimmedSurface1 paintable (Hotbox | Paint Effects | Make Paintable). Switch the view to Camera1, and check to make sure the Time Slider is set to 1 (because you animated this camera in Chapter 13, "Cameras and Rendering"). You should see planarTrimmedSurface1 at the bottom right of the view. Rename the NURBS surface as plantsurface_01 and center its pivot point (hotkey: Ctrl+c). In the Channel Box, set Rotate X to 180 so that the normals point up in the Y axis. Open the Visor (hotkey: Alt+v) and, in the Tree folder, select Shrub. Paint one stroke across plantsurface_01, and maximize the viewport. Now, you'll adjust the brush's settings. Open the Attribute Editor (hotkey: Ctrl+a). Change the Global Scale setting to 12, and expand the Shadow Effects section. Set Fake Shadow to 2D Offset (see Figure 14.11). Then, render the Camera1 view to see the size of the shrub and what it looks like in the scene. Figure 14.11. Adjusting the attributes of a Paint Effects stroke. 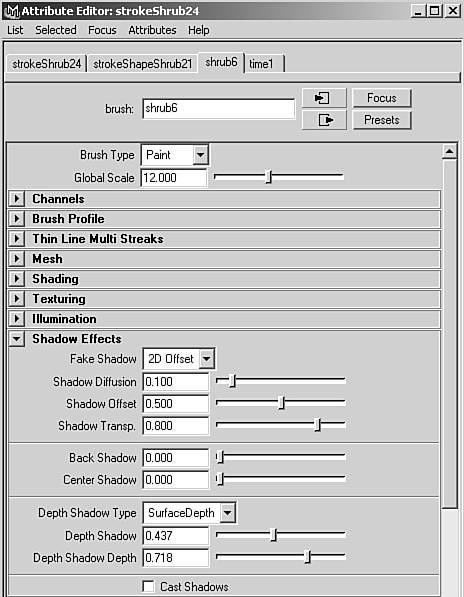
Expand the Tubes section, then the Creation section, and then the Width Scale section. Notice that the shrub currently leans to the side. To fix this, set Azimuth Min to 0.851 and Azimuth Max to 0.140. Also, set Elevation Min to 0.83 and Elevation Max to 0.65. Now, the shrub stands a bit straighter and is large enough to resemble a typical office plant. In the Attribute Editor, expand the Growth section and then the Branches section. Set Num Branches to 3. Notice that the shrub in the scene is now fuller, but the change hasn't noticeably increased render time. The remaining planters need to be filled, but you'll experiment with other brushes for variety. Select the shrub in the Outliner and center its pivot (hotkey: Ctrl+c) in preparation for moving it. Next, duplicate the Shrub (hotkey: Ctrl+d), and move the new shrub to the plant stand on the other side of the room. The Translate settings should be -87.727, 0, and -0.747. Now, copy the plant surface to each remaining plant stand and use the Visor to select new brushes to experiment with. As each plant stand is finished, notice that the scene gains a richer, more lifelike look (see Figure 14.12). Figure 14.12. The full scene with all Paint Effects added and rendered. 
Going Further Because the scene's plants are already applied, now is a good time to experiment with settings for Paint Effects strokes. You might want to see a change in color or perhaps the number of twigs and leaves. Explore the preset brushes, and figure out how some of the more esoteric styles, such as the teapot, have been created from the basic sets of variables that control a brush's look. Try creating some landscapes of different types, and use a variety of the brush tools. |
A few closing notes about Paint Effects: Everything associated with creating, rendering, and animating Paint Effects is housed within the stroke and brush. Paint Effects has its own internal shading procedures, so you can't assign your own shaders to them. If you're adventurous, however, you can locate the source images the strokes are based on and edit them with a paint program, such as Photoshop, to customize the existing brushes. If you do, be sure to make a copy of the originals so that you can always return the brushes to their defaults, if needed. Paint Effects also has its own Dynamics simulations, so the effects won't interact with Maya's Dynamic fields discussed in the next chapter (although the effects can be affected by external "control curves" to simulate dynamics, to a degree). Paint Effects are rendered separately as a post-procedure, and then are automatically composited into the rendered frame. You can see this during the preview rendering process, when Paint Effects strokes appear only after the rest of the scene is calculated. trap Now is also a good time to mention a limitation of Paint Effects that might cause you some setbacks. Because Paint Effects is a post process that's added at the end of a render, raytraced reflections or refractive effects, such as the distortions of a glass lens, can't be rendered in a single pass.
|