| When you're ready to render a finished animation, open Maya's Render Global Settings window to set up the render job. To render multiframe jobs, you use the Batch Render function, which uses the settings you've chosen in Render Global Settings. You can find the Render Globals button on the Status Line, just to the right of the IPR Render button. You can also activate it with Hotbox | Window | Rendering Editors | Render Globals. Render Global Settings The Render Global Settings window, shown in Figure 13.8, can look overwhelming at first, but you'll focus on a few keys to get your animation ready for the big render. Figure 13.8. Maya's Render Global Settings window controls how the renderer processes your scene. 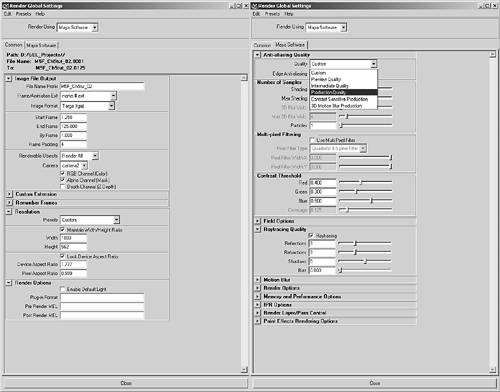
First, select which renderer you will use in the Render Using drop-down list at the top of the Render Global Settings window. You can select the Maya Software (or standard) renderer, the Maya Hardware renderer, Mental Ray, or the new Maya Vector renderer. Next, you need to set up specific options for the renderer you've chosen. In all renderers, however, the information in the Common tab remains nearly the same. You should make sure to configure the settings correctly in the top section, Image File Output, when you're rendering a job unattended. Generally, you want to keep your past renders, so it's always a good idea to name rendered output. Otherwise, it defaults to the name of the scene file. It's helpful to fill in the Frame/Animation Ext text box before rendering and animating because it sets filenaming conventions at the time of saving. Figure 13.8 shows one type of setup. The settings for Start Frame, End Frame, and By Frame are activated if you choose a movie file output format or a filename numbering extension for your saved files. A Frame Padding setting of 3 or 4 works for almost all situations. This setting determines how many digits are added to the end of the filename, so setting Frame Padding to 4, for example, results in files being numbered as filename.0001.TGA, filename.0002.TGA, and so forth. The default animation render length is set to frames 1 through 10 a short animation. Be sure to set it to the length of the animation you want to see. For the previous tutorial, you would set it to render frames 0 through 300. Select an image format and type in the Image Format list box; see Chapter 1 for a thorough explanation of these image formats. The Resolution section is where you set the image size; you can use the Presets list box to choose from a range of resolutions. Most of your tests will be at a lower resolution, typically 320x240 or 640x480. If your final image will be printed, you might render much higher for the final version, perhaps 2000 or more pixels wide. Your computer's RAM usually sets the ceiling for image size. Leave the Pixel Aspect Ratio set to 1. The second tab changes its name depending on what renderer you've selected. If the only renderer options you see are Maya's software and hardware renderers, use the Plug-in Manager to add more options (Hotbox | Window | Settings/Preferences | Plug-in Manager; hotkey Alt+p). The Anti-aliasing Quality setting has a big impact on rendering speed and image quality. Images that are poorly antialiased have a jagged appearance, particularly visible where different-colored objects overlap or in areas of high contrast. Generally, you keep this setting at a low quality level until your final render because higher settings take longer to render. For tests, you'd select the Preview Quality setting in the Presets list box; for final rendering, use the Production Quality setting, and select the Gaussian or Quadratic B Spline Filter in the Multi-pixel Filtering section for smoother-looking images. The Raytracing section is where you configure raytraced reflections, refractions, or shadows to appear in the rendering; it's disabled by default, so you need to expand that section to enable the options. Raytracing can also slow your rendering time dramatically. The numbers for the Reflections, Refractions, and Shadows attributes refer to the depth of raytracing the number of bounces allowed for a ray. As the ray strikes reflective or refractive objects, it ricochets through the scene. If the number of bounces reaches the limit set here, no further raytracing is done, and the pixel is colored based on the contribution of the previous bounces added to black. These limits can save you a lot of time when rendering scenes such as a "hall of mirrors" effect because without the limit, a ray could bounce forever. Rendering a Still When you want to render a test frame, you simply activate the panel of the view you want, and click Hotbox | Render | Render Current Frame. The settings in the Render Global Settings window determine the resolution, antialiasing, and raytracing, but only one frame renders, and it's saved as a temporary .iff (or whatever image format you've chosen as the default) file in the Images directory of your project. When the rendering is finished, you can save the rendered image to a permanent file by right-clicking on the Render View window and choosing File | Save Image in the Save dialog box that opens. For images you have rendered and saved, you can view them with Maya's FCheck utility. Figure 13.9 shows an image being viewed in FCheck. This handy tool can view most types of images and movies and can also save them in other formats. To start FCheck, click its icon in the Start menu (under the menu item for Maya). Figure 13.9. FCheck is a useful file viewer and multiformat image translator. 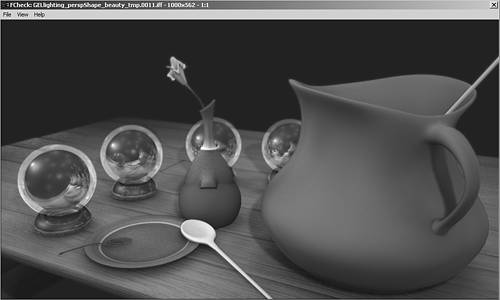
Setting Up a Render Job When you're ready to render a job, follow this checklist: Unhide any hidden objects you want to include. Make visible any layers you want to include. In Render Global Settings, make sure you have set the correct filename, frame range, and image format. Make sure the Frame Padding value accommodates the frame range; for example, use a value of at least 3 (for 3 digits) if the frame range is under 999 but over 100). In Render Global Settings, double-check the camera or view that you're rendering from. You can render from any camera in the scene that has rendering enabled. Set image resolution and antialiasing quality. Disable the alpha channel and depth channel if you aren't compositing. Check the top of the window to confirm the location where the files will be saved. Make sure it's a disk drive with enough space if you're rendering a large image or a long animation. If you want to change the save-to path, choose Edit | Change Project Image Directory from the Render Global Settings menu to open the Edit Project dialog box, where you can alter the Images setting to any path you like.
Now, close the Render Global Settings window and click Hotbox | Render | Batch Render, and your computer will begin processing frames. You can continue working in Maya, but often the renderer requires so much of your system resources that it's difficult to work on anything else while the renderer is running. If you want to minimize this effect and you're running a multiprocessor computer, you can click the option box for Batch Render, and set the number of processors that should work on the job just assigned. More information on batch-rendering multiple jobs and rendering on multiple machines is included in Chapter 16, "Your Next Steps: Efficiency and Artistry." tip Some people prefer to render to sequential still frames rather than movie formats, such as AVI, because if a movie render is interrupted, all rendering is lost and you must start the render job from the beginning. However, if you render to sequential frames, you can view the movie only by using FCheck or a compositing program, and you'll have a large collection of files on your drive. Also, you won't be able to show the movie on other computers or upload it anywhere unless you manually create a movie file. Rendering in sequential frames is much safer because you can restart a render if there's a problem, beginning with the frame where a problem or interruption occurred. This method is always used for production, because it allows many other post effects and compositing options after rendering the 3D elements.
Rendering Engines in Maya Maya 5 has added new rendering engines called Mental Ray and the Vector renderer. You can access these new renderers plus the Maya software and hardware renderers in the Render Global Settings window. With these new rendering options, Maya can quickly produce cartoon or web-like media with the Vector renderer and photorealistic renders using Global Illumination or HDRI in Mental Ray. These rendering options can be applied to any scene with some additional preparation. Maya Vector Renderer In the Render Global Settings window, you might notice very little change after you select the Vector renderer. The Common tab remains nearly the same; the main difference is the default animation extension and image format selections. The Vector renderer outputs .swf files for use with Flash or other web-creation programs. In fact, you can open the SWF format in your browser to play your animation. Opening the Maya Vector tab in the Render Global Settings window displays more drastic changes. The Frame Rate setting is lowered to 12fps, on average, to output a smaller file for viewing on the web. You can also select the version of Flash you want to use if you decide to add interactive elements to the SWF file. Another major difference in the Vector renderer is that you can use the Fill and Edge options to output cartoon-like animations. Tutorial: Setting Up a Cartoon-Like Render Maya's vector output capability offers even more stylistic rendering options for scenes created in Maya. After becoming familiar with its capabilities, you'll find it's a great jumping-off point for still illustrations, web animations, and complex composited effects. It's definitely one more reason for Maya's popularity in the graphics industry. On the DVD  Chapter_13\movies\ch13tut03.wmv |
On the DVD  Chapter_13\ch13tut02begin.mb |
Open the file noted next to the DVD icon, and you'll see a scene composed of an eye with tentacles to use for this tutorial. Begin by opening the Plug-in Manager (Hotbox | Window | Settings/Preferences | Plug-in Manager; hotkey: Alt+p). Scroll down and find the VectorRender.mll entry. Select the Loaded and Auto Loaded check boxes next to this entry (see Figure 13.10), and close the Plug-in Manager. Figure 13.10. Setting the Plug-in Manager to enable the Vector renderer. 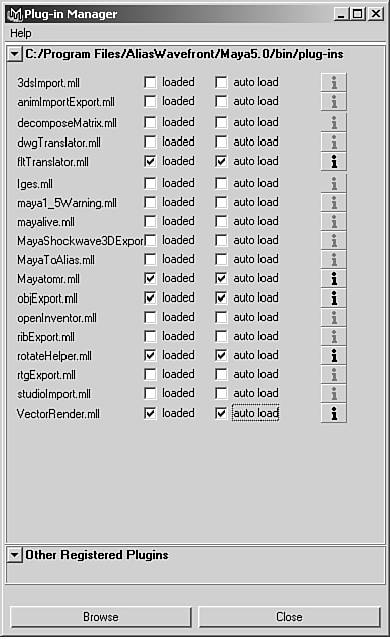
Open the Render Global Settings window (Hotbox | Window | Rendering Editors | Render Globals), or click the clapboard icon at the far right on the toolbar. In the Render Using drop-down list, select Maya Vector. In the Common tab, set the filename to Chapter13tut_02. Scroll down and expand the Resolution section. In the Presets drop-down list, choose the 640x480 option. Click the Maya Vector tab, and expand the Fill Options section. Select the Fill Objects check box. Then, select the Two Color radio button for the fill style to give the render a good solid cartoon-like fill (see Figure 13.11). Figure 13.11. Setting up the Vector renderer in the Render Global Settings window. 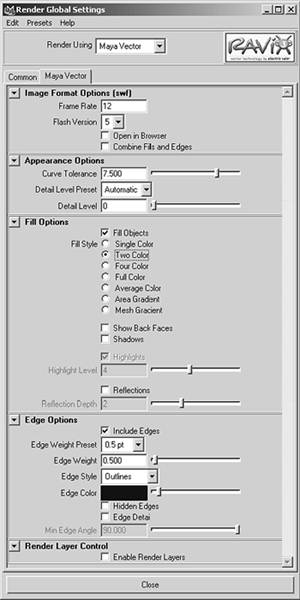
Expand the Edge Options section, and select the Include Edges check box. Then, set Edge Weight Preset to 0.5 pt and Edge Weight to 0.5. In the Edge Style drop-down list, select Outlines. It's time to render. Leave the Render Global Settings window open and click the white clapboard icon on the top toolbar to render. To render from the last viewport rendered, use the hotkey F9. Compare your results to Figure 13.12. Figure 13.12. A quick application of the Vector renderer on the Ferocious Tentaclops. 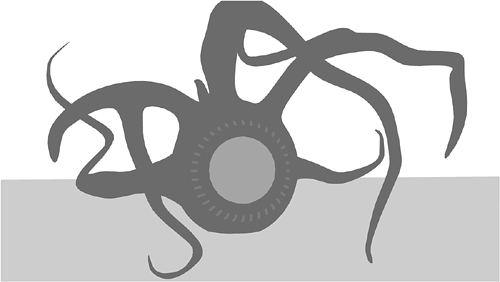
At this point, you can render entire animations and use them on the web very easily with this vector format. Try testing each radio button in Fill Options section to find the look you want. To get even thicker outlines for more of a comic book style, try increasing the Edge Weight setting in the Edge Options section. Whether it's for animation on the web or your own comic book style animation, you'll find the Vector render is easy to use and produces fairly quick results.
Mental Ray Mental Ray is one of the most widely used and powerful rendering engines today. It's included in Maya with a free single license and is the renderer of choice for many film and video production studios. Mental Ray might require some setup depending on your system, so some of the steps offered in the following tutorial might not apply in your particular case. It is, however, a good reference because you might not always be on the same system. To begin, you need to set up a path in Windows environments to enable the use of Mental Ray's custom shaders and utilities. On your desktop, right-click on the My Computer icon and choose Properties. In the System Properties dialog box, select the Advanced tab, and click the Environment Variables button (see Figure 13.13). In the Environment Variables dialog box, click the New button under the System Variables section. In the Edit System Variables dialog box that opens, enter MAYA_MRFM_SHOW_CUSTOM_SHADERS for the variable's name, and enter 1 in the Variable Value text box. Click OK, and then click OK in the Environment Variables and System Properties dialog boxes. Now, you're ready to open Maya and learn a method of Image based lighting from the next tutorial. This tutorial, however, is only an introduction to the power and functions of Mental Ray. Using Mental Ray is so vast a topic that the developers at Mental Images have listed two advanced books on their web site (www.mentalimages.com) specifically on the subjects of rendering and programming in Mental Ray. Tutorial: Using High Dynamic Range Imaging (HDRI) in a Studio Setup HDRI is an excellent way to achieve a sophisticated lighting style quickly. On the DVD Chapter_13\movies\ch13tut04.wmv |
Open the file noted next to the DVD icon; it's the eye with tentacles scene from the previous tutorial. The lights have been removed, however, and the default light is also off (you can turn the default light off in Render Global Settings, too). First, you'll need to enable the Mental Ray renderer in the Plug-in Manager. Open the Plug-in Manager (hotkey: Alt+p), and select both check boxes next to the Mayatomr.mll entry. The Auto Loaded check box ensures that Mental Ray is available in Render Global Settings each time you start Maya. On the DVD Chapter_13\ch13tut03begin.mb |
Open the Render Global Settings window (Hotbox | Window | Rendering Editors | Render Globals, or click the clapboard icon at the far right in the top toolbar). In the Render Using drop-down list, select Mental Ray. When you open Hypershade, you'll find three premade shaders. The blue shader is a shiny, reflective material and has been applied to the tentacles. If you examine the Eyeball shader, you'll find that quite a few nodes make up its shader network. It has been applied to the NURBS sphere. The floor shader is a flat white material and has been applied to the floorplane object. These shaders aren't the focus of this tutorial, so they have been added for you. They were created with the methods you learned in Chapter 9, "Materials." The scene includes a floor and the tentacle monster with an eyeball. Next, you'll need to create a shader using the HDR map supplied from Dosch (www.doschdesign.com). Open Hypershade (hotkey: Alt+h) and click on the Create Materials | Lambert material in the node bar at the left. It's then displayed in the Materials and Work Area sections. In the Work Area, double-click the Lambert material, and the Attribute Editor opens, displaying the options for this material. Click the checkered box to the right of Ambient Color to open the Create Render Node dialog box, and select the File option. To the right of Image Name, click on the folder icon to browse your drive for the material. The .HDR material is not visible in Maya, so in the Browse window, change the Files of Type to Best Guess (*.*). Under the Chapter_13 folder, open the source images folder, select the DH046LL.hdr file (see Figure 13.14), and click the Open button. Minimize the Attribute Editor, and return to Hypershade. Make sure the Work Area is large enough to work in, and select the Lambert shader. Rename the Lambert shader as LambertHDRI. Figure 13.14. The HDRI contains a broader range of color intensity than a normal image format, which uses RGB colors from 0 to 255. 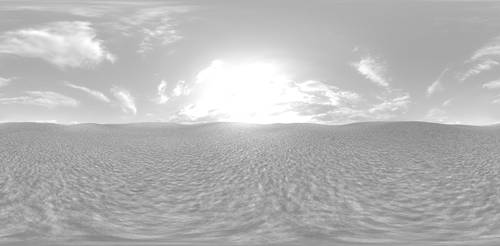
Right-click over the LambertHDRI shader, and choose Graph Network. In the Work Area, you should see this shader connected to the DH046LL.hdr file. The file does not appear in Maya because it's an unknown format, but when it's rendered in Mental Ray, the Mental Ray renderer will recognize and use the image. MMB-click over the blacked-out HDRI file, drag to the LambertHDRI material, and release the MMB. You'll be prompted for what you want to connect to; choose the Color option. Then, double-click the HDRI file to open it in the Attribute Editor. Expand the Color section and double-click on the white bar to open the Color Chooser. The intensity of the light emitted from the HDRI map can be controlled in the Color Gain section. For this tutorial, leave the value at 1.0 in the Color Chooser. You need a sphere to apply the HDRI image to, which will then act as the light source. Create a polygonal sphere (Hotbox | Create | Polygon Primitives | Sphere; hotkey: Shift+s). In the Channel Box, set Scale X, Y, and Z to 1.5. Name the sphere HDRI_Dome. Right-click and hold over the sphere's mesh, and choose Face. Switch to the Side view and maximize the view. Marquee-select the bottom third of the sphere, and delete those faces (see Figure 13.16). Figure 13.16. The HDRI_Dome before deleting faces (left) and after deleting faces on the bottom third (right). 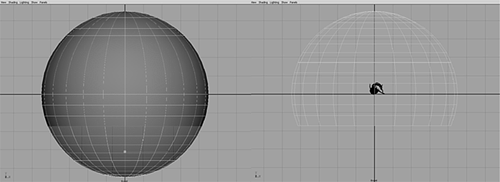
Press F8 twice to get out of Face selection mode. You should see the partial sphere return to its normal selected color. With the sphere still selected, open Hypershade (hotkey: Alt+h). Right-click over LambertHDRI and select Assign Material to Selection. To ensure that the map is applied correctly, you'll have to apply mapping coordinates. First, apply cylindrical mapping (Hotbox | Edit Polygons | Texture | Cylindrical Mapping). Then, use the Texture Editor (Hotbox | Window | UV Texture Editor; hotkey: Alt+t). In the Texture Editor, you can pan and zoom as in any Maya window, so zoom out to get the UV mesh in view. Then, right-click over the mesh and choose Vertex, and marquee-select a window over the entire mesh to select all UVs. Scale the UVs until they fit equally in one of the four square blocks in the UV Texture Editor (see Figure 13.16). Then, close the UV Texture Editor. Figure 13.16. Adjusting the placement of the cylindrical map on the sphere in the UV Texture Editor. 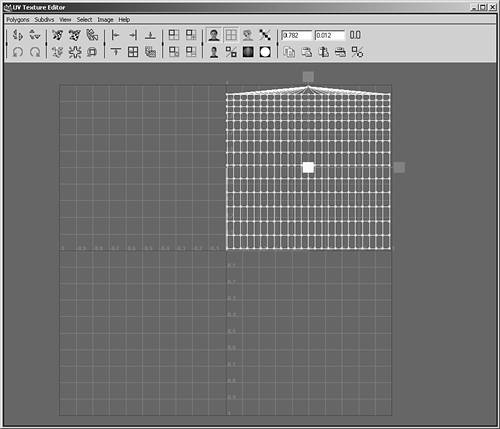
Open the Render Global Settings window and choose Mental Ray in the Render Using drop-down list. In the Common tab, enter tentaclops for the name of this file. In the Frame/Animation Ext drop-down list, select name.#.ext, and set the image format to Targa (tga). Change Frame Padding to 4 to add 4 digits after the name. This setting keeps the animation's still frames in sequential numbers. In the Resolution section, select HD 720 from the Preset drop-down list, which gives your render a letterbox effect. If you prefer to stay in the broadcast range, 640x480 is a better choice. Select the Maintain Width/Height Ratio check box. Then, type 720 in the Width text box and press Enter, and the value in the Height text box changes automatically. This size will give you the same look, but will render faster for testing. Click the Mental Ray tab. In the Quality section, select Production from the Presets drop-down list. Expand the General section to see the Raytrace settings. Set Max Reflection and Refraction to 6 and Max Ray Depth to 8. Switch to the Top view and zoom out until you see the entire HDRI_Dome. You need to measure the area so that you know how to set the Final Gather range. Create a measurement tool spanning the horizontal distance across the dome (Create | Measure Tool | Distance Tool). This value helps you determine the render settings for Mental Ray. You should get a value of 9. Back in the Render Global Settings window, expand the Final Gather section, and set Final Gather Rays to 500. Using the measurement you just took, a good rule of thumb is to set Min Radius to 10% of the value you set for Max Radius, so set Min Radius to 0.9 and Max Radius to 9. Minimize the Render Global Settings window and render to see the result. The image should have intense highlights and a good range in the shadow areas (see Figure 13.17). Figure 13.17. The rendered scene using no lights, but in Mental Ray an HDRI image illuminates the scene with the help of the Final Gather feature. 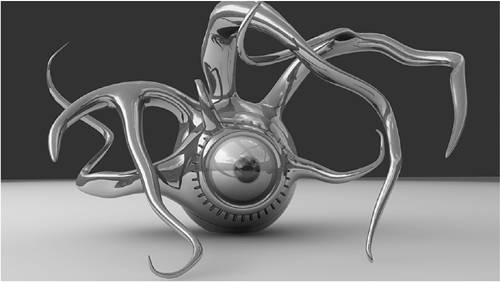
On the DVD Chapter_13\ch13tut03end.mb |
Figure 13.13. Creating the Windows environment variables for Mental Ray shaders. 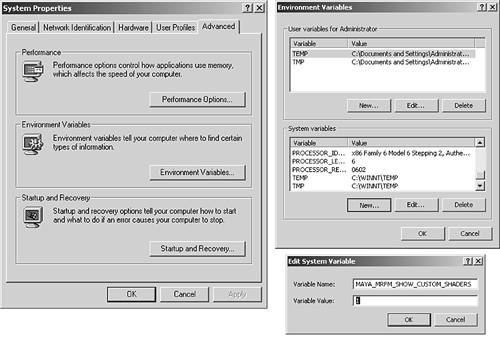
Going Further Use the methods for easing camera motion that you learned in the first tutorial to make the camera start and stop more smoothly in the lobby animation. Explore creating different moods by adjusting the camera's Angle of View setting in the Attribute Editor and using different path curves for the camera path: wide angle and low, if you want a huge, ominous world or closeup and high for a helicopter shot. Try animating the camera's aim independently of the camera to get different motion effects, or try to animate the camera in a handheld style to get a reality-TV look. Try parenting the camera to animated objects and rendering the resulting view. |
Summary Working through the tutorials in this chapter gave you a chance to try out some of the camera attributes and learn how to configure settings for rendering your animation. You learned the following concepts: The different camera types and attributes You learned the differences between the camera types and how each one gives you a different type of control, as well as the uses of the main attributes for cameras. Animating cameras Even if no objects are moving in your scene, adding a moving camera lends a sense of action to your animation. Easing camera motion You learned to adjust keys in the Graph Editor to give the camera a feeling of mass so that it doesn't start or stop moving too abruptly. This concept also works when you have objects that should seem heavy. Visualizing a camera path You learned how to create a curve showing your camera's motion over time. This is a good tool to avoid collisions and achieve smooth motion. Checking your animation Playing and scrubbing through your animation while looking through the Camera view can help you edit your animation. Render Global Settings You learned how to set up batch renders to get completed movies. Mental Ray Render Global Settings Setting up a small studio scene with HDRI, you can experiment with an advanced renderer and discover new methods to lead you into the next level of rendering.
The following chapter adds more exotic effects to your lobby scene by using Paint Effects to bring the scene closer to realism. You'll add plants and small shrubs with Paint Effects to enhance the look of your scene. If you render a movie at that stage, you'll have a complex and complete animation! |