Consuming a Web Service
Now that you have seen how to create two small Web services, it is time to figure out how to invoke and display the return value from an application. A Web service is, after all, designed to be called from any type of application that chooses to call it (or pays for the service). The first question that should come to mind is this: How do I figure out what Web services are out there? Good question.
Introducing the UDDI
Universal Description, Discovery, and Integration (UDDI) is the standard created by IBM, Microsoft, and Ariba. You can learn more about this standard by visiting the http://www.uddi.org Web site. Basically, the UDDI specification allows companies to publish information about their Web services, and it allows companies to manually, or programmatically, look through, or walk, the UDDI registry for specific types of businesses. Figure 11-7 shows the Microsoft UDDI Business Registry.
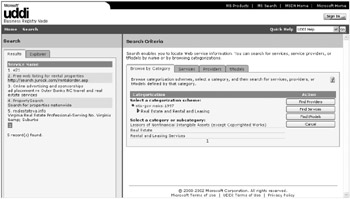
Figure 11-7: The Microsoft UDDI Business Registry
As you can see in the figure, I have browsed into the Real Estate and Rental and Leasing category. By selecting Find Services, I receive five services. The major Web service players would like to see this list in the thousands. This registry is available through Visual Studio .NET, as you will see shortly. Later on in this chapter you will set up the UDDI Server that comes with .NET Server 2003.
Building the Consumer Application
You are going to build a small Windows application to consume your two Web services. An ASP.NET application, which you will create in the next chapter, can also consume the Web services. To begin, create a new Windows application and call it NwindConsumer. For the purposes of this application, the interface will be simple.
Creating the List Form
Add a DataGrid control and three buttons to the Form1 form. Set the properties according to Table 11-1.
| Control | Name | Text |
|---|---|---|
| Form | frmMain | Employee Web Service Consumer |
| DataGrid | grdEmployees | -- |
| Button | btnLoad | Load Employees |
| Button | btnEdit | Edit Employee |
| Button | btnClose | Close |
When you are done, the form should like Figure 11-8.
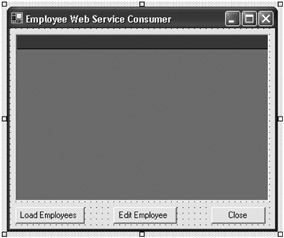
Figure 11-8: The Employee Web Service Consumer form
| Note | Before you do anything else, make sure to set the startup object in the project's Properties dialog box to frmMain. |
Next, you need to add a reference to your Web services. To do this, right-click the References node in the Solution Explorer and select Add Web Reference. The Add Web Reference dialog box displays, as shown in Figure 11-9.
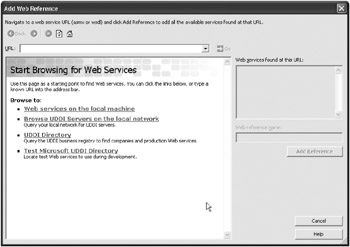
Figure 11-9: The Add Web Reference dialog box
| Note | Microsoft has changed the Web services dialog boxes between version 1.0 and 1.1 of Visual Studio .NET. Figure 11-9 shows version 1.1. However, because version 1.1 includes everything 1.0 did and more, I assume you are using version 1.0. Where there are significant differences, I explicitly note them. |
The UDDI Directory link and the Test Microsoft UDDI Directory link take you to the Microsoft UDDI Business Directory that you have already seen. You will come back to this later when adding a Web service to a UDDI. For right now, enter the Uniform Resource Locator (URL) of your local Web service into the URL drop-down box. If you have done everything by using the default location, the URL should be http://localhost/northwind/service1.asmx. Once you enter this URL and click Go, the dialog box changes to look like the dialog box shown in Figure 11-10.
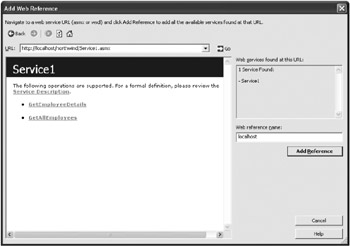
Figure 11-10: The Add Web Reference dialog box with your Web services
Notice that this is identical to the Web page you receive when you go directly to the URL in Internet Explorer.
| Note | If you are using Visual Studio .NET version 1.0, you will note that the Web service description displays below the Web services listed here. This information is not displayed in Visual Studio .NET version1.1. |
Click the Add Reference button to add your Web services. The Solution Explorer for your project will now have some additional nodes, as shown in Figure 11-11.
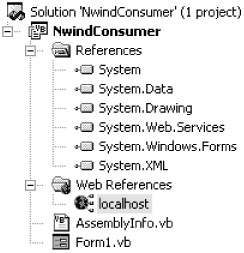
Figure 11-11: Solution Explorer for NwindConsumer
Localhost becomes another namespace in the application through which you can call the Web service. If this had been a different Web site, that Web site name would have become the namespace.
| Note | In Visual Studio .NET version 1.1, you can change the name of this Web service before you add a reference to it. |
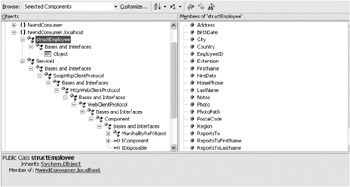
| Note | Visual Studio .NET version 1.0 listed several other files below the localhost node that contained the discovery map and Web service methods. In version 1.1, you need to double-click the localhost node to bring up the object browser. Viewing the Web service in the object browser, you will see the screen in Figure 11-12. |
Now, add some code to retrieve the data. Add a module-level variable to frmMain to hold the dataset:
Private mds As DataSet
Next, enter the code from Listing 11-10 in frmMain to retrieve the data.
Listing 11-10: The btnLoad Method
Private Sub btnLoad_Click(ByVal sender As System.Object, _ ByVal e As System.EventArgs) Handles btnLoad.Click Dim objWS As localhost.Service1 Try Cursor = Cursors.WaitCursor objWS = New localhost.Service1() mds = objWS.GetAllEmployees grdEmployees.DataSource = mds.tables(0) Catch exc As Exception MessageBox.Show(exc.Message) Finally objWS = Nothing Cursor = Cursors.Default End Try End Sub
That is all you need to call your Web service—but it will not work. If you try running the application, you will receive the error shown in Figure 11-13.
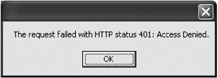
Figure 11-13: IIS "Access Denied" message
So why did you get the message? The reason is because your Web service is running under Windows Integrated Authentication only and you did not pass your client credentials. But how do you pass those credentials? It is not like a remoting application where you can control the channel—but you can specify that your credentials get passed to IIS. This is not the only way to solve your security problem. There are five or six different ways plus a number of ways currently being developed by third parties (see the sidebar "Web Service Security").
Although I do not fully discuss the available security options for a Web service, I'll present a brief overview here. When you accessed the Web service from Internet Explorer, the browser was passing your identity to IIS (as it always tries to do by default). Therefore, your identity was known to IIS and, because you have impersonation turned on, everything works fine. However, when you make a call to a Web service from an application, you are doing so through an HTTP channel, just as you do with your remoting calls. But, the major difference is that your network credentials are not passed unless you specifically request that they are passed. In an enterprise environment, you can pass your Windows Token, but what about users of your service that are external to your enterprise? This is the quandary you face: How do you authenticate and authorize a user of a Web service, and how can you access resources on behalf of that user calling that Web service?
Web services are the latest in distributed applications and easy to use, but security will likely be a stumbling block for a while. With this in mind, and the fact that the Windows .NET family of servers will incorporate a UDDI directory, internal Web services will probably be the norm for the first year or so. So, right now, this discussion is largely theoretical. There are some approved Web service security standards and many more in the works, but until they are approved and implemented companies will still shy away from Web services to a certain degree.
A standard Web application usually uses Forms security. There is a logon page that a user can go to, and once they have entered a user ID and password, they are allowed access to the site. There is no user interface with a Web service, so that option is not available to you either. But, with Forms security, to verify a user's security information, a connection must be made to a database to validate the information.
So how is that connection made when there is no real way to set up a SQL Server Logon for every user of a Web service? The answer is that the connection is made under a specific account to SQL Server using the appSettings section of the web.config file. Another solution is to add the IUSR account to the list of valid SQL Server logons. That way, you can still use integrated security. Still, that is hardly the best solution because anyone who gains control of the IIS session can access your database!
Another way to control security is to request that a user pass a logon and password just as they would for a regular Web application before they call the real Web service. This information can be encrypted and decrypted using custom methods or over a Secure Sockets Layer (SSL) connection. A Web service in IIS has the cool ability to maintain session state, just as in a regular Web application. Or, the logon information can be passed as part of every call.
All of these options have pros and cons, and as mentioned earlier, this is a topic for a book that specializes in Web services and Web service security. Because this is a book about enterprise application development, it demonstrates how to continue using Windows Integrated Authentication. To pass your Windows Token, add the following line of code immediately after the Service1 instantiation line:
objWS.Credentials = System.Net.CredentialCache.DefaultCredentials
That is all it takes to get you authenticated on the IIS server. This is identical to setting the defaultCredentials attribute of the HTTP channel.
| Note | Remember, you can do this only when both IIS and the client system run under the same network domain. |
If you run the application and click the Load Employees button, your form should look like Figure 11-14.

Figure 11-14: Consumer implementation of the GetAllEmployees Web service
Creating the Details Form
Just to keep things easy, you are going to create a form that displays the details of the employee but does nothing else. You have already seen how to handle everything involved with editing an employee's data, and none of that code would have to change here. All you will examine is how to get the data from your Web service and how to display it.
| Tip | This is why business logic should always be encapsulated in separate DLLs. Imagine if you had coded your initial application with all of the logic in the forms? You would have had to completely rewrite that logic for use in your Web service. This is a trap into which I have seen too many projects fall. |
What you need to do now is add another form to your project and call it frmDetails. Open your original NorthwindTraders project (in a separate instance of the development environment) and display the frmEmployeeEdit form in the designer. Then, select all of the controls on the form except for the inherited controls (the business rules, the OK and Cancel buttons, and FileOpenDialog and ErrorProvider) and copy those controls. Then go to the frmDetails form, resize it large enough to hold the copied controls, and paste those controls.
| Note | If you select the inherited controls, you will not be able to copy anything at all. |
This places all of the controls you need onto the frmDetails form. Next, add a private module-level variable to frmDetails as follows:
Private msEmployee As localhost.structEmployee
This holds your employee structure so it can be used in the form_load method. Next, create a second constructor in frmDetails, as shown in Listing 11-11.
Listing 11-11: Second frmDetails Constructor
Public Sub New(ByVal sEmployee As localhost.structEmployee) MyBase.New() 'This call is required by the Windows Form Designer. InitializeComponent() 'Add any initialization after the InitializeComponent() call msEmployee = sEmployee End Sub
Finally, add the Form_Load method as shown in Listing 11-12.
Listing 11-12: The frmDetails_Load Method
Private Sub frmDetails_Load(ByVal sender As Object, _ ByVal e As System.EventArgs) Handles MyBase.Load Dim i As Integer Dim strValue As String Try With msEmployee cboCourtesy.Text = .TitleOfCourtesy txtFirstName.Text = .FirstName txtLastName.Text = .LastName txtTitle.Text = .Title dtpBirthDate.Value = .BirthDate dtpHireDate.Value = .HireDate txtHomePhone.Text = .HomePhone txtExtension.Text = .Extension txtAddress.Text = .Address txtCity.Text = .City txtRegion.Text = .Region txtPostalCode.Text = .PostalCode txtCountry.Text = .Country rtbNotes.Text = .Notes If Not .Photo Is Nothing Then Dim mStream As New IO.MemoryStream(.Photo) mStream.Write(.Photo, 0, .Photo.Length - 1) picPhoto.Image = Image.FromStream(mStream) End If End With Catch exc As Exception MessageBox.Show(exc.Message) End Try End Sub
You will notice right off that this is a slightly abbreviated version of the load method in your NorthwindTraders application. That is because you no longer have your collections of objects to load the combo boxes and listboxes. But that is OK because now you have the ability to add the methods necessary to call those methods and return that data yourself.
The last thing you need to do for this step is to add the edit employee method in the frmMain form, as shown in Listing 11-13.
Listing 11-13: The btnEdit_Click Method
Private Sub btnEdit_Click(ByVal sender As System.Object, _ ByVal e As System.EventArgs) Handles btnEdit.Click Dim objWS As localhost.Service1 Dim frm As frmDetails Dim sEmployee As localhost.structEmployee Try Cursor = Cursors.WaitCursor objWS = New localhost.Service1() objWS.Credentials = System.Net.CredentialCache.DefaultCredentials With grdEmployees sEmployee = _ objWS.GetEmployeeDetails(Convert.ToInt32(.Item(.CurrentRowIndex, _ 0))) End With objWS = Nothing frm = New frmDetails(sEmployee) frm.ShowDialog() Catch exc As Exception MessageBox.Show(exc.Message) Finally Cursor = Cursors.Default End Try End Sub
As you can see, you are simply passing the ID of the employee to the GetEmployeeDetails method. You then pass the resulting structure to your form. Try the application out now to see how it works. You will notice that the response time is fairly fast considering the overhead of the call. You cannot actually edit the code at this point, but you should be able to create the Web service necessary to do this.
| Caution | You must take into account the resulting network load when implementing a Web service. In the original NorthwindTraders application, you will recall that you used a binary formatter to compress the data as much as possible. A Web service can only pass data in a SOAP format, which creates a much larger amount of network traffic. |
EAN: 2147483647
Pages: 148