Appendix A: Adding Support for Unicode Characters
Many companies these days are global. Business is global. This means an application must support Unicode characters. By default, all of the controls provided with .NET can display Unicode characters, but that is not what I am talking about. Try typing the following character in a word document: . You cannot do it. The only way to do it is to select Insert Symbol from the menu and select the special character you want to add. This letter is part of the extended Latin character set and is common in the French language. What if this character is in someone's name? What if, as a business, you send a letter asking that person to buy something from your company? Will that person look favorably if you cannot even spell their name right? Probably not.
This appendix is certainly not meant to be a complete discussion of Unicode characters or the namespace that contains the classes for Unicode encoding/ decoding in .NET (the System.Text namespace). It demonstrates how you can incorporate unicode characters in your applications in a manner similiar to that used in Microsoft Word. For more information on the Unicode standard, you can visit the official Unicode Web site at http://www.unicode.org. This site contains all of the different character sets and associated codes. The example presented in this appendix is a simple but flexible means of displaying those characters to the user so that they can select and use one of them.
Start a new Windows Application project and call it UnicodeSupport. Rename Form1.vb to frmUnicode.vb. Then, switch to the Code View tab and rename the class frmUnicode. Next, set the following properties on the form as shown in Table A-1.
| Property | Value |
|---|---|
| Text | Special Characters |
| Height | 215 |
| Width | 451 |
| FormBorderStyle | FixedDialogSingle |
| MaximizeBox | False |
After you have set these properties, add a button and name it btnCopy. Set the text property to read Special Characters and position it in the lower-left corner of the form. When you are finished, your form should look identical to Figure A-1.
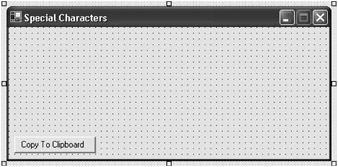
Figure A-1: Unicode support form
Now you can add some code. Add the standard Option Standard and Option Explicit statements at the top of the code module. Then, create the form load event by adding the code shown in Listing A-1.
Listing A-1: The frmUnicode_Load Method
Private Sub frmUnicode_Load(ByVal sender As Object, _ ByVal e As System.EventArgs) Handles MyBase.Load Dim i As Integer = &HFF Dim j, k As Integer Const BoxSize As Integer = 20 Const RowSize As Integer = 20 Dim CurrentX As Integer = 15 Dim CurrentY As Integer = 15 For j = 1 To 120 Dim lbl As New Label() lbl.Size = New Drawing.Size(BoxSize, BoxSize) lbl.Location = New Drawing.Point(CurrentX, CurrentY) lbl.TextAlign = ContentAlignment.BottomCenter CurrentX += BoxSize lbl.Text = Convert.ToChar(i + j) lbl.BorderStyle = BorderStyle.FixedSingle lbl.BackColor = Color.White lbl.Visible = True Me.Controls.Add(lbl) AddHandler lbl.Click, AddressOf Label_Click If j Mod RowSize = 0 Then CurrentY += BoxSize CurrentX = 15 End If Next End Sub
This code requires a bit of explanation. This code adds labels to the form and loads a single character in the label. It places 20 labels on a row for as many characters as you decide to load. The specific characters you are loading are the characters that make up the Latin Extended-A character set. In hexadecimal, the character set starts at 0100 and ends at 017F. This turns out to be 120 characters if you subtract 0100 from 017F. The value of i is &HFF, which is hexadecimal for 100. The loop loads a new label and sets the size, location, and text alignment. It then adds a character to the label with the following line:
lbl.Text = Convert.ToChar(i + j)
Because Unicode support is already built in to .NET, all you have to do is convert the character code to a character and assign it to the label. After that, you set a few more properties, add the control to the forms' controls collection, and hook up the click event to the Label_Click method (which you will code next). Finally, if you have added 20 labels to the current row, move down to the next row and reset horizontal position. When you have added this code, you should be able to comment out the AddHandler line and run it. You will see the form in Figure A-2.
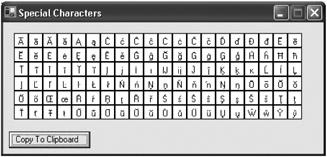
Figure A-2: The Latin Extended-A character set
After you have run the application and stopped it, you can uncomment the AddHandler line. Next you will add the Label_Click method. The Label_Click method highlights a character and enlarges it so that the user can see it better. It also clears this formatting for all of the other labels so that only one label at a time is highlighted and enlarged. Before you add this method, add the following module-level variable declaration:
Dim mstrValue As String
This variable stores the currently selected character so you can access the value more easily.
The code for the Label_Click method is as follows:
Private Sub Label_Click(ByVal sender As System.Object, _ ByVal e As System.EventArgs) Dim lbl As Label = CType(sender, Label) Dim sz As Size = lbl.Size Dim loc As Point = lbl.Location Dim ctl As Control Dim lblTemp As Label If lbl.Width <> 20 Then Exit Sub For Each ctl In Me.Controls If ctl.GetType Is GetType(Label) Then lblTemp = CType(ctl, Label) If lblTemp.Width <> 20 Then lblTemp.Size = sz lblTemp.BackColor = Color.White lblTemp.Font = New Font(lbl.Font.FontFamily, 10) End If End If Next lbl.BackColor = Color.Aquamarine lbl.Size = New Drawing.Size(lbl.Width + 10, lbl.Height + 10) lbl.Font = New Font(lbl.Font.FontFamily, 16) mstrValue = lbl.Text End Sub
After adding this method, run the code again and click a character. The result should look something like Figure A-3.

Figure A-3: Highlighted Unicode character
The last step is to enable the user to copy the value to the Clipboard. To do this, add the following code to handle the click event of the btnCopy button:
Private Sub btnCopy_Click(ByVal sender As Object, _ ByVal e As System.EventArgs) Handles btnCopy.Click Clipboard.SetDataObject(mstrValue) End Sub
Now you can run the code, select a character, and copy it to the Clipboard. Then the user can paste it into any control that will accept a character. Add another form with a textbox to give it a try.
This has been a fairly simple demonstration of how to add Unicode support. The following are some suggestions for improving this code if you need additional support:
-
Change the button to read Insert and insert a character directly into the active control.
-
Use a picture box on the form, add a scrollbar, and fill the picture box with all of the Unicode characters.
-
Add a drop-down box that lets the user select the Unicode character set that they want to choose from and load that character set dynamically.
These are just some suggestions. You will probably think of more. But always remember that in today's business world, international business is a way of life.
EAN: 2147483647
Pages: 148