Section 3.1. Using the Terminal
Each window in the Terminal represents a separate shell processa command-line interpreter ready to accept your instructions, as described in "Introduction to the Shell" in Chapter 4.
3.1.1. Terminal Preferences
The Terminal application's user settings control not just the application's look and feel, but the ways you interact with your shells . This section covers important application preferences to know about.
3.1.1.1. Setting a default shell
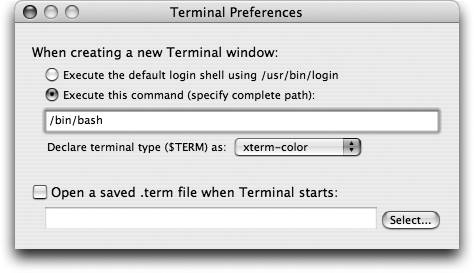
There are two ways to set a default shell when using your system, which are suggested by the "When creating a new Terminal window" radio buttons found in Terminal's Preferences window (Terminal  Preferences, or -,), seen in Figure 3-1.
The lazier way involves activating the "Execute this command" button and typing a shell's path into the neighboring text field. Henceforth, whenever you open a new Terminal window, that shell will launch in place of your default login shell. This is a nice solution if you use only Terminal as a command line and never log in remotely to your machine, or if you're not a member of the machine's admin group and hence can't set your login shell to something else.
Figure 3-1. The Terminal Preferences dialog
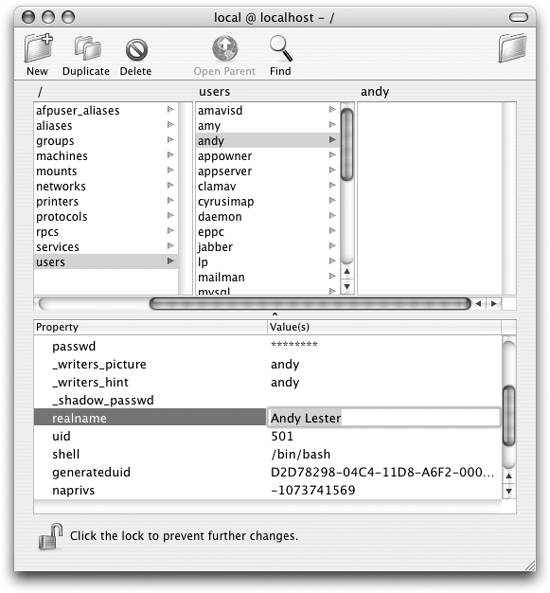
A more permanent, but less obvious, way involves changing your account's default shell. This affects not just the shell Terminal opens by default but the shell that appears when you use a different command-line access application or log in to your machine from some other location via ssh (described in "The Secure Shell" in Chapter 11). If you have admin privileges, you can do this through the NetInfo database by adjusting your user account's low-level preferences. Launch NetInfo Manager and navigate to its /users/ your-username directory. (For a complete review of NetInfo, see Chapter 10.) Locate the shell property, double-click its value, and type some other shell's path in its place, as shown in Figure 3-2.
Figure 3-2. Changing a user's default shell through NetInfo Manager
If you don't have admin access, you can ask someone who does to take these steps for you. Once your shell property under NetInfo has been reset one way or another, select the Terminal preferences' "Execute the default login shell using /usr/bin/login" radio button.
You can always change your shell on the fly by invoking it as a command. If you're running zsh and want to temporarily drop into tcsh (perhaps you're following some Unix program's arcane installation instructions, which are written only in tcsh -ese), you can just type tcsh (or the full path, /bin/tcsh ) at the command prompt.
A shell launched in this manner runs as a child to the Terminal window's main shell, so when you exit the second shell you'll pop safely back out to the first shell's command prompt.
|

3.1.1.2. The Terminal Inspector
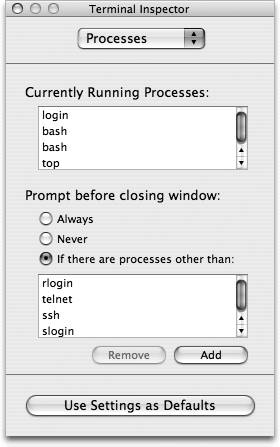
If you select File Show Info ( -I) or Terminal Window Settings, the Terminal Inspector window (shown in Figure 3-3) appears. This window lets you set a variety of visual and shell-interaction options affecting the front-most Terminal window.
Figure 3-3. The Terminal Inspector window
The pop-up menu at the top of the window lets you navigate between its many panes, summarized in the following list:
-
Shell
-
Lists the shell tied to this Terminal window, and lets you define the application's behavior when you exit a shell (through the logout or exit commands, or sending an EOF signal to the main shell through Control-D). See the earlier section "Setting a default shell" for information about changing shells.
-
Processes
-
Lists the processes currently running as children of this window's shell. Because closing a Terminal window kills its shell process and any non-backgrounded processes it may contain (see the section "Process Management" later in this chapter), this pane lets you specify the Terminal's behavior if some processes are still running when you close a window. As Figure 3-3 shows, you can have Terminal always prompt you to confirm a window's closure, never prompt you, or prompt you only when processes other than those in the given list exist among the shell's children (use the Remove and Add buttons to modify the list). This can be a lifesaver if you are one of those people who mistakenly hits
 -Q frequently (we know who we are). If a program other than the shell is running when you try to exit Terminal, you'll be asked for confirmation.
 -
Emulation
-
Terminal is a VT100 emulation program, meaning that it speaks a protocol originally conceived for a certain class of terminals made by (the now- defunct ) Digital Equipment Corporation in the late 1970s and early 1980s. Even though the protocol is ancient, it remains the standard. The Terminal's Emulation preferences pane gives you a list of checkboxes that control high-level mapping between your Mac's keyboard and the underlying terminal protocol, as follows :
-
Escape non-ASCII characters
-
If you use either the bash or tcsh shells, checking this box allows you to enter characters outside those in the standard ASCII set on the command line. Terminal translates the non-ASCII characters into octal ASCII character codes that the shell can interpret properly. (This works as long as character set encoding is set to Unicode in the Display section of the Terminal Inspector.)
-
Option click to position cursor
-
Though it may resemble an Aqua text view in some ways, a Terminal window is normally unresponsive to mouse clicks, making you use keyboard commands to move the cursor around. If you check this box, however, you can option-click a Terminal window to automatically reposition the cursor to that point. This can be a handy function when using Terminal-based text editors, such as Emacs or vi .
-
Paste newlines as carriage returns
-
When this checkbox is active, any newline characters within text that you paste into a Terminal window through the standard Edit
Paste ( -V) command are automatically converted to carriage return characters. -
Strict VT-100 keypad behavior
-
When checked, the number keypad functions according to the VT-100 protocol.
-
Reverse linewrap
-
In most cases when you move the cursor right to left to the beginning of a wrapped line, it will continue up through the wrap to the end of the previous line. When using some older applications or remote systems, however, you might find that the cursor won't wrap unless this feature is enabled.
-
Audible bell
-
Bell characters cause the Mac to sound its system beep.
-
Visual bell
-
Bell characters cause the Mac's screen to pulse.
-
-
Buffer
-
Lets you set how many lines of history the Terminal window remembers (and lets you scroll back to via the window's scrollbar), and how it handles line wrapping.
-
Display
-
Contains general display options for Terminal's windows , including:
-
Cursor Style
-
Sets the cursor's shape and blinking pattern.
-
Text
-
Sets the font as well as several font properties, including anti-aliasing and spacing. Also includes a setting that allows you to select and drag text from anywhere in a Terminal window and drop it into the command line or onto the desktop to create a clip file.
-
Character set encoding
-
Terminal uses Unicode UTF-8 as its default, but that can be changed here for compatibility with remote systems using other encodings.
-
-
Color
-
Lets you set the window's text, background, cursor and text- selection colors. You can either select from one of the pre-specified combinations or create your own. You can also use an image file instead of a color for window backgrounds. The Transparency slider sets the background's opacity level; setting it to something less than full opacity (by dragging the slider to the right) lets you work with a Terminal window while keeping things behind it visible. This can prove useful when following instructions contained in another window without having to resize either.
Activating the pane's "Disable ANSI color" checkbox prevents your color choices from being overridden by ANSI color-setting instructions the terminal might receive.
-
Window
-
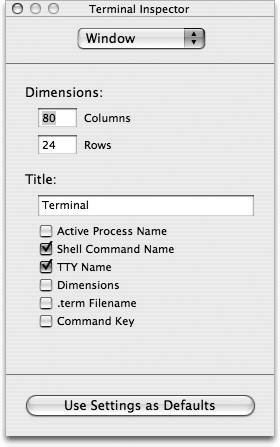
Lets you set the window's dimensions in terms of rows and columns of text, and assign it a title based on a number of checkbox-based criteria, as Figure 3-4 shows.
Figure 3-4. The terminal inspector's Window pane
-
Keyboard
-
The following options are available for configuring how the Terminal interacts with the keyboard:
-
Key Mappings
-
Some Terminal programs, run locally or from a remote machine, allow or even require you to use function keys to issue commands. Key Mappings allows you to add and edit custom key and command pairs using the function, arrow, Home, End and Page keys.
-
Delete key sends backspace
-
Some Terminal programs make a distinction between the delete character (which your Delete key normally sends) and a backspace character. Try checking this box if you find the Delete key is not doing what you expect.
-
Use option key as meta key
-
Some Terminal programs (such as the Emacs text editor) define a "Meta" key for certain keystrokes. Because your Mac keyboard lacks such a thing, checking this box will have your Option key stand in for it.
-
Clicking on the "Use Settings as Defaults" button at the bottom of the inspector window saves all the panes' settings as your Terminal application defaults. This means that all future Terminal windows you open, either by launching the Terminal or by selecting File New Shell ( -N) will use the settings you've just configured. See the next section.
3.1.2. Saving and Loading Terminals
After you set up a Terminal window and shell via the Terminal Inspector window (see "The Terminal Inspector" later in this chapter), you have two ways to save these settings for future Terminal sessions: either click the "Use Settings as Defaults" button to make them the Terminal applications' overall default settings, or save the front-most window's settings to a file through File Save ( -S). This creates a . term file that stores all the window's settings. (The .term file uses the standard XML property list format described in the section "Property Lists" in Chapter 13, so you can manually browse these files if you wish.) It's most convenient to save .term files in ~/Library/Application Support/Terminal , a directory you might need to create initially. You can then access any .term files placed in that directory by choosing one from the File Library menu. You can also open .term files using the File Open ( -O) menu command.
|
As Figure 3-5 shows, the dialog has an extra set of controls. If you select All Windows (rather than the default Main Window) from the "What to save" pop-up menu, then all the Terminal's open windows, including their onscreen positions , get stored to the resulting .term file. This is the option to choose if you like to arrange multiple Terminal windows, perhaps with different properties, in a "just-right" arrangement for a certain task.
Figure 3-5. The Terminal's Save dialog
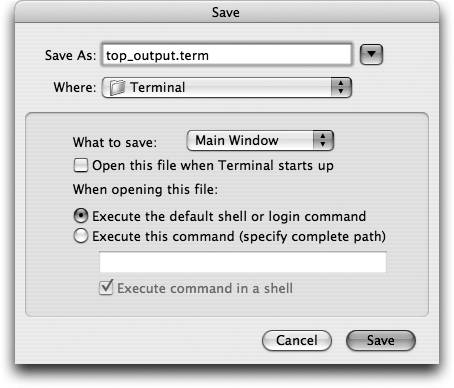
Activating the "Open this file when Terminal starts up" checkbox will do just what it says. Note that you can set several .term files with this function; if you wish to have a single such file as your default and later change your mind about which .term file to use, you have to re-save the original window settings with File Save As (Shift- [ -S) and deactivate that checkbox.
Using the final controls, you can choose to attach to the .term file a command that executes each time you open that file. Configure this by selecting the "Execute this command" checkbox and entering the command in the field below it. If you want Terminal to also execute the default shell or login command as specified in the Terminal Preferences dialog, check the "Execute command in a shell" checkbox. With the box unchecked, Terminal will execute only your specified command and close the window once the command is complete.
3.1.3. Connect to Server
Several of Tiger's network daemons advertise their services on the local network using Bonjour's discovery protocol. Terminal's Connect to Server window (File Connect to Server) allows you to browse and contact these remote ssh , sftp , telnet , and http servers without needing to provide a hostname or IP address (Figure 3-6).
Figure 3-6. The Connect to Server dialog box
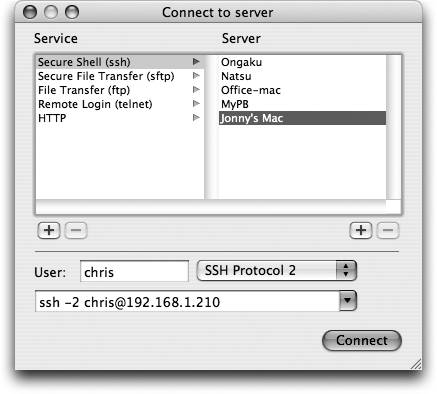
Clicking on an item in the Service column shows all remote Bonjour-enabled daemons of the selected type in the Server column. When you click on a server name , an appropriate connection command appears in the field at the bottom of the window. Above that field are optional settings specific to the chosen service. You can specify an alternate login name, for example, or choose to use SSH 1 instead of the default SSH 2 protocol for a secure shell connection, and the appropriate change is made to the command.
Clicking the HTTP service lists all user web sites found on each of the supported servers. When you select a site, an appropriate ping command appears in the command field (the command is the same for each server, ping hostname , regardless of the chosen site).
Each connection command that you use is permanently added to the command field's pop-up list, thereby building a list of connection bookmarks for you.
You can manually add other Bonjour-enabled services (as they become available) to the Services list using the Add button (+) below it. To contact a server without Bonjour-enabled services, you can manually add that server to the Server list using its add button. That way, even without using Bonjour, you can still keep bookmarks of commonly used connections.
A Connect to Server command also exists on the pop-up menu for Terminal's icon in the Dock. Selecting it opens the same Connect to Server browse window.
3.1.4. Secure Keyboard Entry
Enabling this feature ensures that all typed characters go directly to the active shell window without risk of another application intercepting them. In high-security environments, Secure Keyboard Entry provides important protection against keystroke recording software attempting to capture passwords and other sensitive data.
If you are using some third-party hot-key or macro-enabling software, however, you might find that it no longer works while Secure Keyboard Entry is enabled.
Focus Follows MouseUsers of other Unix-like operating systems are often accustomed to making their windows active just by passing the mouse pointer over them, without needing to click in the traditional Macintosh way. This behavior, called focus follows mouse , can be enabled for Terminal windows by executing the following defaults command: defaults write com.apple.Terminal FocusFollowsMouse -string YES After issuing that command, you'll need to exit any open Terminal windows for the focus follows mouse behavior to take effect. When you open a new Terminal window, the behavior is activated by the shell; open another window and move the mouse between windows to see the effect. Once activated, any Terminal window beneath the pointer, whether the Terminal is the front-most application or not, will accept text entry. The window won't, however, be raised to the front. To disable the focus follows mouse feature, run the following command and then exit any open Terminal windows: defaults write com.apple.Terminal FocusFollowsMouse -string NO |
3.1.5. Split-View Scrollback
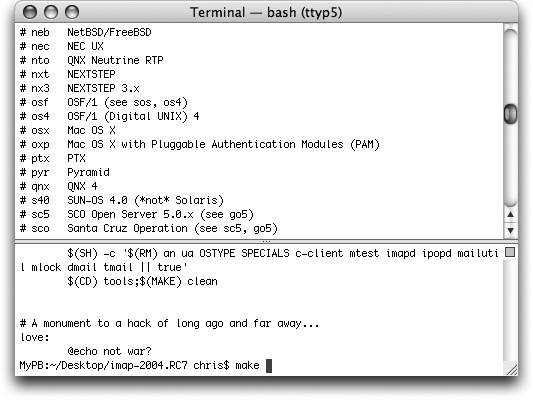
Split-view windows are nothing new to users of most word-processing software, and Terminal windows provide the same convenience. To split a Terminal window, click the small box just below the right end of the window's titlebar (Figure 3-7). A horizontal dividing bar will appear, which you can drag up and down to resize the height of the two panels. The top panel keeps the scroll bar, allowing you to scroll back up through your entire buffer, while keeping the prompt visible in the other panel. To return to a single pane, click the small box again.
Figure 3-7. A split-view Terminal window
EAN: 2147483647
Pages: 130